Set Up a ServiceNow Security Incident Webhook Connection
This page shows you how to set up a ServiceNow Security Incident Webhook connection and create scheduled searches for the connection.
If you want to create Events or ITSM Incidents see Set Up ServiceNow Connections for instructions.
About Webhooks and ServiceNow Incidents
A Webhook is an HTTP callback: an HTTP POST that occurs when something happens. Webhook connections allow you to send Sumo Logic alerts to third-party applications that accept incoming Webhooks.
A security incident is an unplanned security-related interruption that has occurred in your business and this is reported in ServiceNow via a security incident.
To create security incidents, the ServiceNow plugin Security Incidents Response is required.
Set up a ServiceNow connection
To configure a Webhook connection, you must have a Sumo Logic role that grants you the Manage connections capability.
To set up a ServiceNow Security Incident Webhook connection:
-
Classic UI. In the main Sumo Logic menu, select Manage Data > Monitoring > Connections.
New UI. In the top menu select Configuration, and then under Monitoring select Connections. You can also click the Go To... menu at the top of the screen and select Connections. -
On the Connections page click Add.
-
Click Webhook.
-
In the Create Connection dialog, enter the Name of the connection.
-
(Optional) Enter a Description for the connection.
-
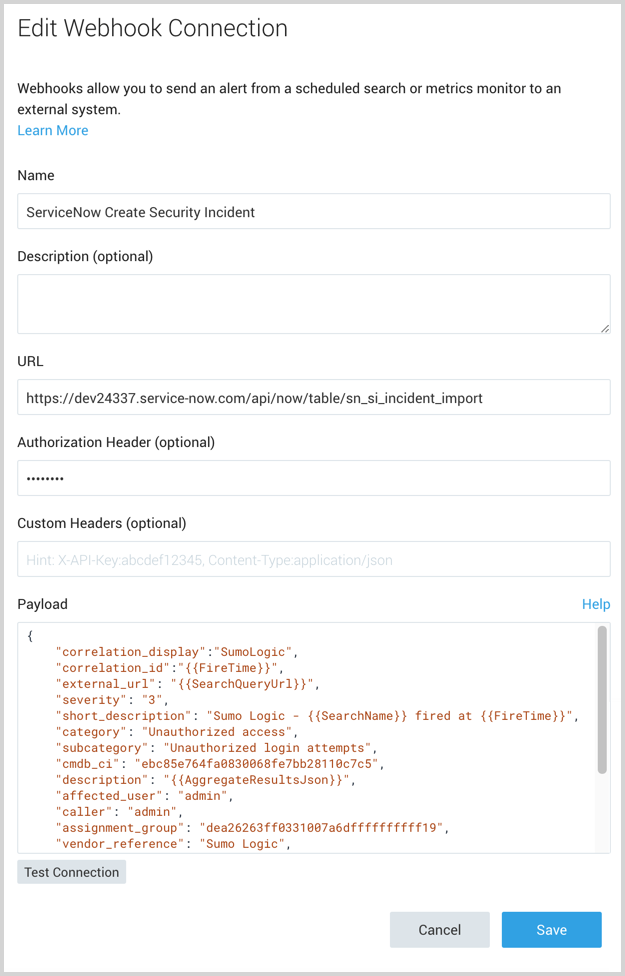
To create ServiceNow security incidents enter the URL for the ServiceNow Security Incident Import Table endpoint.
https://<your-instance>.service-now.com/api/now/table/sn_si_incident_importnoteOnly HTTPS (port 443) and HTTP (port 80) URLs are supported.
-
Provide an Authorization Header. For more information, see the help page for Webhook connections Example Authorization Header.
-
(Optional) Custom Headers, enter up to five comma separated key-value pairs.
-
For Payload, enter a security incident JSON object. For example,
{
    "short_description": "Sumo Logic - Search fired",
    "caller": "admin",
    "comments": "Total number of records returned: {{NumRawResults}}"
}
For a complete list of fields that can be sent in the payload, see the Webhook payload variables section that follows.
-
Click Save.
-
After configuring the connection, continue with Testing the connection, then create a scheduled search to send alerts to this connection.
Testing the connection
After configuring the connection, click Test Connection. If the connection is made, you will see a 201 OK response message.
If the connection is successful, you'll see a security incident being created in ServiceNow. There won't contain any information from the scheduled search, it will just have the text in the payload.
ServiceNow Security Table
To determine the available fields and generate a sample payload for ServiceNow Security Incidents see the ServiceNow documentation.
Once you are satisfied with the payload, copy the payload into the Sumo Logic payload field under the Webhook connection.
Webhook payload variables
If needed, you can customize Payloads for each scheduled search. If you’d like to use the default payload, leave this as-is.
See Webhook payload variables for more details.
Example payloads for ServiceNow incidents
Payload with short_description, comments and caller_id:
{
    "short_description": "Sumo Logic - Search fired",
    "caller": "admin",
    "comments": "The search Top Hosts has been Fired"
}
Payload for a scheduled search with a variable:
{
    "short_description": "Sumo Logic - Search fired",
    "caller": "admin",
    "comments": "Total number of records returned: {{NumRawResults}}",
    "severity": "3",
    "category": "Inquiry"
}
Payload with additional fields:
{
    "correlation_display":"SumoLogic",
    "correlation_id":"{{FireTime}}",
    "external_url": "{{SearchQueryUrl}}",
    "severity": "3",
    "short_description": "Sumo Logic - {{SearchName}} fired at {{FireTime}}",
    "category": "Unauthorized access",
    "subcategory": "Unauthorized login attempts",
    "cmdb_ci": "ebc85e764fa0830068fe7bb28110c7c5",
    "description": "{{AggregateResultsJson}}",
    "affected_user": "admin",
    "caller": "admin",
    "assignment_group": "dea26263ff0331007a6dffffffffff19",
    "vendor_reference": "Sumo Logic",
    "work_notes": "{{RawResultsJson}}",
    "assigned_vendor": "Okta",
    "business_service": "Single Sign-On",
    "contact_type": "SIEM",
    "comments": "{{TimeRange}} for {{SearchDescription}}",
    "source_ip": "1.1.1.10"
}
Incidents for Domain Separation
With domain separation in ServiceNow, you can separate data, processes, and administrative tasks into logically defined domains. To send security incidents to the right domain, as part of the Webhook payload, send “company” as part of the payload and set it to your customer’s company sysid (32-bit GUID) to ensure the incident is inserted in the proper ServiceNow domain. You will also need to ensure the following: