Sumo Docs Style Guide
This page describes how to author Sumo Docs, which are written in GitHub-flavored markdown.
The Sumo Logic Style Guide is a guide to language at Sumo Logic, so that we can speak as one company with a unified voice, and know what we mean when we talk about our product. The Style Guide began as a document used by the Documentation team to make decisions about tone, voice, and word usage. We thought it would be useful to share with everyone in our community.
This is a living document. If you're looking for a style rule or UI component usage that's not defined here, let us know. The Documentation team will look it up and add usage guidance.
Writing resources
If you need help with a convention, word to use, or format to follow, we will keep a cheatsheet of styles here. We also follow:
For terminology usage guidance, see our Word List.
If you're new to writing tech content or would like to learn more, check out these resources:
- Write the Docs. Association of tech writers, developers, trainers, and more that have collected ideas, created training and guidelines, and actively discuss documentation.
- Google Technical Writing Courses. Self-paced courses to refine your writing. The courses may use a style different from ours, but still an excellent way to get started.
- Every Page is Page One. A helpful method for considering what goes into a page is to think of every page as page one. With the extreme use of search engines or sharing a link to find content, users may land in the middle of a section or tutorial. These ideas help hone your content and focus on user needs.
Helpful blogs on tech writing:
- Writing for the Web. Guidance on writing for the web, including insights on technical writing and learning.
- Feathers. Blog for technical and fiction writing.
- I'd rather be writing. Guides and thoughts on tech writing process and content.
The Documentation team will review submissions, provide suggested edits, add new content into the navigation, and answer any questions you have.
To create a new doc quickly, use a template. You can copy and paste the file, add your content, and submit a PR.
Voice and tone
- Clarity and professionalism. We are clear, genuine, and trustworthy. We understand that our customers entrust us with their vital data and never make light about our commitment to data access and security.
- Engagement and assistance. The reader should feel confident and informed. We should strive to engage our customers and show them where to get additional assistance when needed.
- Professional description. Describe Sumo Logic in a professional and truthful manner. Avoid generic, unsubstantial adjectives like "very" or phrases like "we're the best". Instead, illustrate these points by letting our product speak for itself.
- Conversational tone. Avoid using a stiff, institutional voice. Instead, write with an instructive and conversational tone, using the sort of words that you would use in a face-to-face conversation. For example, when linking to the support site, use terms like "Need help? Let us know" instead of "Please email our support personnel" to give our company a friendly face.
- Reader address. Address the reader as "you", as you would in conversation. For example, instead of saying, "The user must provide his or her API key" or "One must provide their API key", say, "You'll need to provide your API key".
- Readability and SEO. Instructional content and blog posts should be written at approximately the 8th-grade reading level, particularly in introductory sections, for readability and SEO. You can test your content here.
- Brand guidelines. Our brand guideline is to always refer to “Sumo Logic”, rather than Sumo. To be more conversational, it is also fine to say “we”.
- Gentle Language. Use “need to” instead of “have to” or “must”. “Have to” and “must” can sound harsh and unfriendly.
- Judicious use of absolutes. Be judicious in use of “always” and “never”. Sometimes it’s appropriate to say “always” or “never”. Keep in mind though that “always” can imply a result that is not guaranteed, and “never” may very well not be the case — the exception makes the rule.
- Error messaging. When explaining a process or procedure, clarity is critical. Edit words that distract or confuse. Put yourself into the reader's shoes and think about what actions you recommend to them when an error message is displayed, rather than merely stating what went wrong. Example: "Could not create the user." vs "This email is already registered in the system. Please use a different email or contact Sumo Logic for assistance."
- Humor. We have a sense of humor! Conveying that we do serious work, but we do not take ourselves too seriously, makes Sumo Logic feel likable.
Active voice
When writing instructions, use the active voice whenever possible. This example below gives a call to action for the reader or user to effectively get something done. It also reduces word count and keeps instructions clear.
General statements
| ✅ Do | ❌ Don't |
|---|---|
| Sumo Logic ingests multiple streams of data. | Multiple streams of data are ingested by Sumo Logic. |
Task directives
We need them to complete a task. No need for please.
| ✅ Do | ❌ Don't |
|---|---|
| Build the query using the following... | Please build the query using the following... |
Instruction introduction (stem)
Introduce your instructions with the goal, then dive into the instructions. This is called a stem, and it helps focus the task and keeps you active:
| ✅ Do | ❌ Don't |
|---|---|
| To add a new collector: 1. Access Sumo Logic and find the... | When you need to add a new collector, access Sumo Logic and find the... |
Inclusive language
By writing inclusively and using culturally neutral language, our words resonate with global audiences and make everyone feel welcome, no matter their race, gender, socioeconomic status, and ability.
Avoid Regional Language
- Do not use idioms, slang, expressions, or terminology only understood by a specific region or group.
Simplify Language
- Avoid overly technical jargon.
- Don’t use words just because they sound better. Choose short, simple words over long and complicated ones.
Gender Neutrality
- Unless you're referring to a specific person, do not use gender pronouns (he/she).
Cultural Neutrality
- Use culturally neutral terms to replace terms with negative connotations. For example:
| ✅ Do | ❌ Don't |
|---|---|
| "allowlist" "denylist" "placeholder data" "primary" or "main" "press" or "click" | "whitelist" "blacklist" "dummy data" "master" "hit" |
Doc structure summary
- Frontmatter. Metadata formatted in YAML that goes at the top.
- Introduction. Tell the user in the doc introduction (first paragraph) what the page teaches, why they should read it, and who should read it.
- Contextual guidance. Let the user know what step/place they are in for a tutorial in the introduction/at top. The layout automatically provides a previous/next at the bottom of the page.
- Linking. Link out to important concepts and overviews for additional reading. This is helpful for instruction pages or tutorials.
- Conciseness. Keep instructions concise, easy to follow, and with not too many screenshots.
- Admonitions. Include any notes, warnings, tips, or other admonitions.
Abbreviations
Avoid the use of abbreviations like “e.g.”, “i.e.”, and “etc.”. Although they may be well understood, such abbreviations don’t support our goal of a conversational tone. In other words, don’t use language you wouldn’t use verbally.
| ✅ Do | ❌ Don't |
|---|---|
| for example | e.g. |
| ✅ Do | ❌ Don't |
|---|---|
| that is | i.e. |
Acronyms
An acronym uses the first initials of a word or phrase, for brevity. Our industry is full of them, and they can get confusing if their usage isn't clear. Acronyms should be capitalized, if not used directly in a query. Unless the usage is clear from the context, for the first usage, spell out the phrase, then present the acronym in parenthesis. For example: Secure Shell (SSH).
All companies have numerous acronyms for products, features, solutions, and more. Our documentation includes acronyms for Sumo Logic and third-party software. Always fully spell out the first instance of the acronym on the page, then you can use it throughout. Do not spell out in a heading, but in paragraphs or bullets.
For example, the first time you use AWS Application Load Balancer (ALB), you introduce or use it like that the first time on the page. Through the rest of the page, you can use ALB.
Admonitions
We refer to callout elements like Tip, Note, Warning, and Caution as admonitions.
Docusaurus has a special syntax to create admonitions and callouts, including note, tip, important, caution, warning, and sumo. You can use markdown content in the admonitions, code blocks, links, bullets, images, videos, and much more.
- Markdown
- Result
:::note
This is a note.
:::

:::tip
This is a tip about a cool feature option.
:::

:::important
This is some vital information.
:::

:::warning
This could note important and problematic information.
:::

:::danger
This action is dangerous and could result in data loss.
:::

:::sumo[Best Practice]
Highlight specific info, best practices, links, [training links](https://www.sumologic.com/learn/training/), and other information from Sumo specialists. You can change the title based on the content.
:::
This is a note.
This is a tip about a cool feature option.
This is some vital information.
This could note important and problematic information.
This action is dangerous and could result in data loss.
Highlight specific info, best practices, links, training links, and other information from Sumo specialists. You can change the title based on the content.
You can use code blocks in admonitions. Here's an example:
Here's a cool tip.
"overrides": [
    {
    "series": [],
    "queries": [
        "A"
        ],
    "userProvidedChartType": false,
    "properties": {
        "type": "column"
        },
    "unsafeCanvasJSProperties": {
        "bevelEnabled": true,
        "indexLabelPlacement": "inside",
        "indexLabel": "{y}",
        "indexLabelOrientation": "vertical"
        }
    }
]
Beta releases
Closed beta
Closed beta release features are exclusively available to participating customers. Documentation for these features is not publicly accessible; Sumo Logic representatives provide the documentation links only to the involved customers. These links are excluded from our table of contents.
To format a closed beta release:
- Underneath the frontmatter, add:
- The Robots meta tag, which prevents search crawlers from picking it up.
- The Sumo Logic Docs beta label.
---
id: xyz-source
title: XYZ Source (Beta)
description: The XYZ Source provides a secure endpoint to receive event data.
---

<head>
 <meta name="robots" content="noindex" />
</head>

<p><a href="/docs/beta"><span className="beta">Beta</span></a></p>

First paragraph goes here...
- Publish the document.
Open beta
When the feature moves to open beta, it becomes available to all customers. Help topics for an open beta feature have a beta label at the top, appear in the site table of contents, and are linked from the Beta Features section.
To format an open beta release:
- Underneath the frontmatter, add the beta label.
---
id: xyz-source
title: XYZ Source (Beta)
description: The XYZ Source provides a secure endpoint to receive  event data.
---

<p><a href="/docs/beta"><span className="beta">Beta</span></a></p>

First paragraph goes here... - Add the doc file path to
sidebars.tsunder its appropriate section, then add to the beta section with the same file path. For example, if your doc path isdocs/get-started/sumo-logic-ui.md, add it to theget-started/section, then add to thebeta/section with the same file path.sidebars.tsgetstarted: [
{
type: 'category',
label: 'Welcome to Sumo Logic',
items: [
'get-started/sumo-logic-ui',
...
beta: [
{
type: 'category',
label: 'Beta',
items: [
'get-started/sumo-logic-ui',
... - Publish the doc.
When the feature goes GA, remove the beta label and remove a description of the feature from the /docs/beta section.
Capitalization
- Title case (initial cap) all doc titles. Example:
Global Intelligence for Apache Tomcat App - Sentence case all other headers (H2, H3, H4). The only exception is proper nouns, which are always title case. Example:
Throughput signals and contributing factors
Code (inline)
Use single backticks (` `) to format inline code as monospace font. Example use cases include commands, operators, API method names, and error messages. For information on code blocks (scripts), see Code Blocks.
- Markdown
- Result
`_view = sumologic_slo_output`
_view = sumologic_slo_output
Code (blocks)
Use code blocks to format scripts, such as the JSON example below. This is important for scripts and CLI. Format blocks of code by placing triple backticks before and after the code.
Code blocks are intended only for code snippets that users can copy, paste, and run in their own terminal. Do not use code block formatting for error messages (see Code (Inline)), as this isn't something you'd run in a terminal.
If you know the code language, include that in the first set of backticks to activate syntax highlighting. See this list of supported languages. Use sql to format Sumo queries and json for Sumo logs.
- Markdown
- Result

{
  "employee": {
    "name": "Jane Smith",
    "team": "Operations",
    "manager": true
  }
}
Here's how to add a title to your code block.
- Markdown
- Result

function HelloDocusaurus() {
  return (
    <h1>Hello, Docusaurus!</h1>
  )
}
To highlight lines in the code, use {#} in the title line with lines numbers. This example highlights lines 2 through 6.
- Markdown
- Result
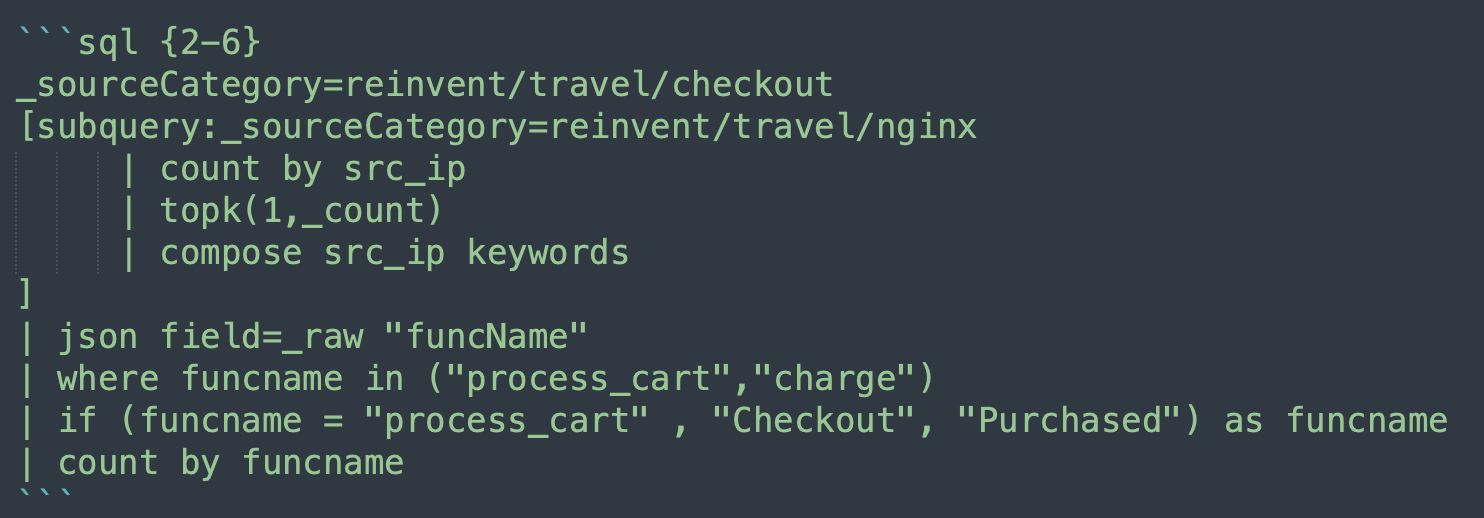
_sourceCategory=reinvent/travel/checkout
[subquery:_sourceCategory=reinvent/travel/nginx
     | count by src_ip
     | topk(1,_count)
     | compose src_ip keywords
]
| json field=_raw "funcName"
| where funcname in ("process_cart","charge")
| if (funcname = "process_cart" , "Checkout", "Purchased") as funcname
| count by funcname
For a full list of options, see Docusaurus Code Blocks.
Import GitHub repo file
To embed a code sample from a file in a GitHub repository, use reference in the code block with a link to the file. The code sample is embedded using the language with a link to the original file.
This code references a json script file:
- Markdown
- Result

loading...
Optionally, you can:
- Reference a specific range of code lines by appending
#Lwith the line number or numbers at the end of the URL. For example,https://github.com/SumoLogic/sumologic-documentation/blob/main/static/files/c2c/1password/example.json#L4-L5. - Add a title to the code block, such as
json reference title="Hello".
You'll see this used in our C2C source docs.
Collapsible text blocks
Use the Docusaurus Details feature to collapse long, additional content and long code samples. When collapsed, the content can be searched, but not displayed, when loading a page. Place long lists or lots of content in this section. The reader can expand/collapse as needed. Important content like required steps and instructions should not be placed in an expander.
You can include markdown content in expanders including code samples, embedded videos, bulleted lists, and more.
Add a title for the expander between the <summary> tags. Then, add all content after <summary> tags and before the closing <details> tags.
- Markdown
- Result
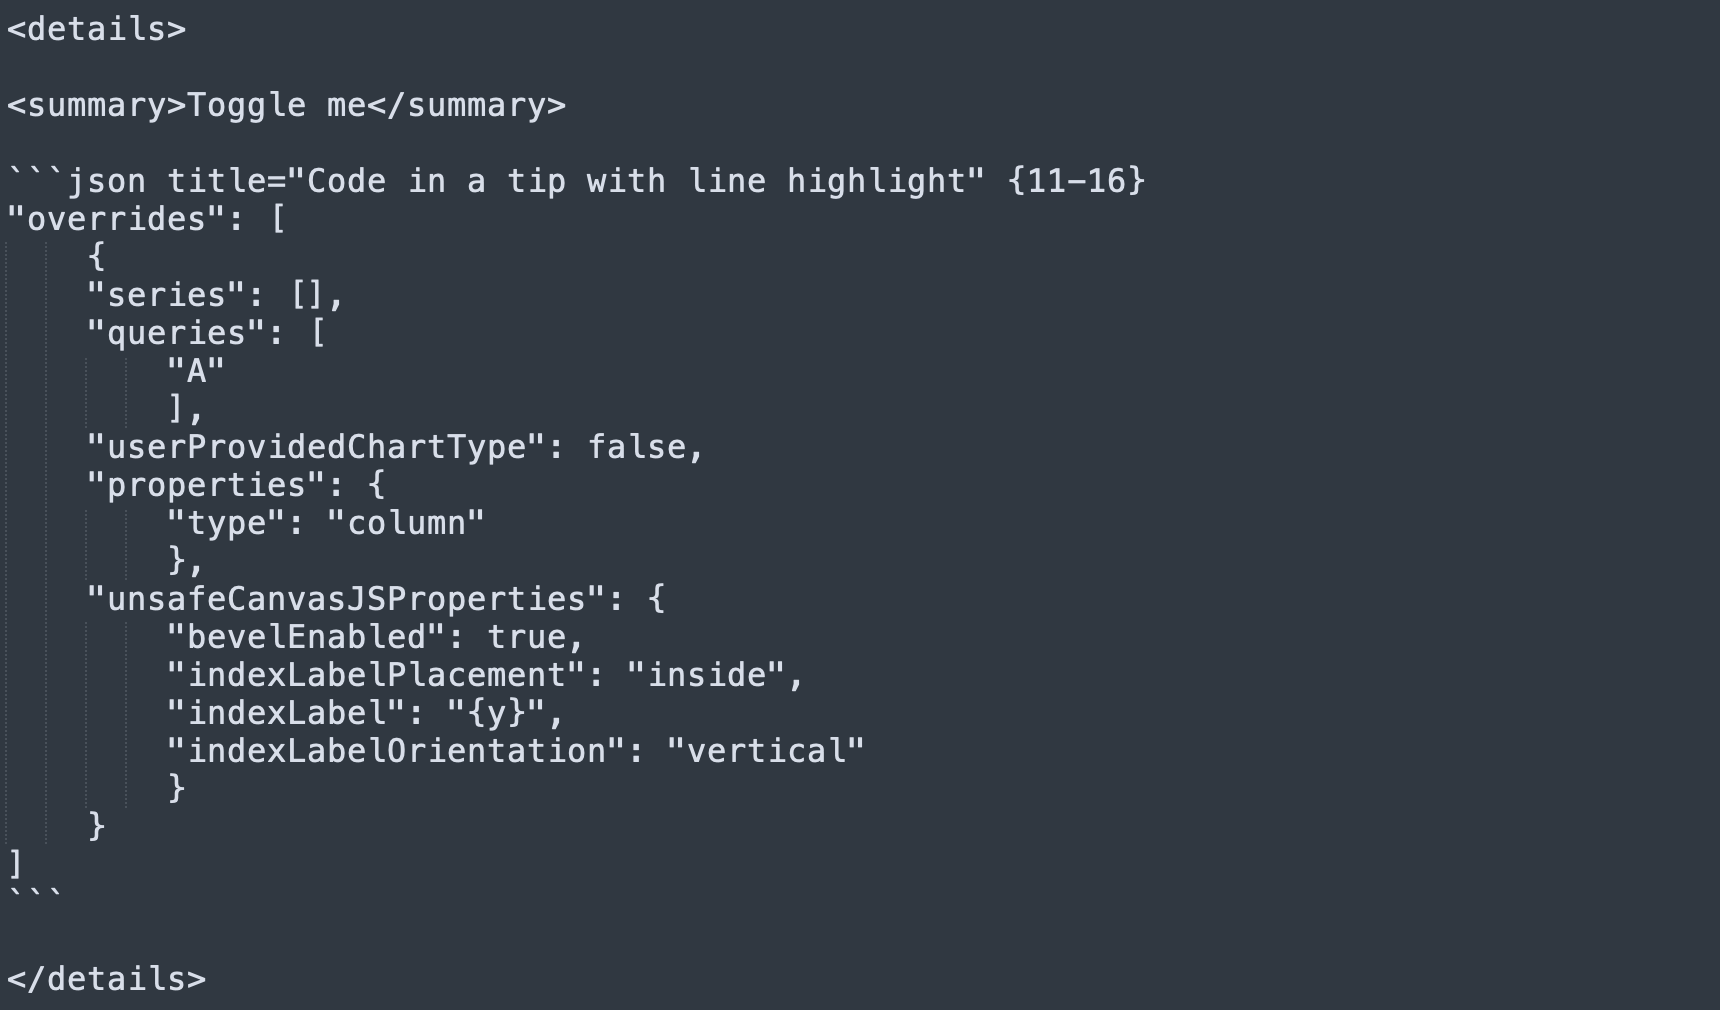
Toggle me
"overrides": [
    {
    "series": [],
    "queries": [
        "A"
        ],
    "userProvidedChartType": false,
    "properties": {
        "type": "column"
        },
    "unsafeCanvasJSProperties": {
        "bevelEnabled": true,
        "indexLabelPlacement": "inside",
        "indexLabel": "{y}",
        "indexLabelOrientation": "vertical"
        }
    }
]
Contractions
Using contractions contributes to our goals of striking a conversational, friendly tone.
It's okay to use common contractions like “I'm”, “they're”, and “you’ll”. Spell out all negative contractions (for example: use "cannot", not "cannot"), as they can be easily mistaken for the opposite meaning.
Avoid less common contractions, like “should’ve”, or “it’ll”.
Dates
- Use the month’s full name (September). If space is a concern, use 3-letter abbreviations (Sep).
- Avoid writing dates numerically (7-25-17) and ordinal indicators (1st, 2nd, 3rd, 4th). Use the 12-hour clock unless the user has specified otherwise, followed by am or pm in lowercase letters without a space.
- When including a time zone, append the time zone’s abbreviation after the “am” or “pm”, separated by a space.
- To show a time range, use an en dash and include the “am” or “pm” after both times.
The notation used in the UI time range editor is an exception to some of these rules.
Downloadable files
To link to a downloadable asset file, such as a .yaml, .json, or .xml:
- Drag and drop your file to the
static/filesfolder. In this example, we'll drop in a file calleddomainCollector.ps1.
- Go to your doc in progress and use the following syntax to link the file:
- Markdown
- Result
<a href="/files/domainCollector.ps1" target="_blank">domainCollector.ps1</a>
Nearly all file formats are supported. For more information, see Docusaurus Static Assets.
If your file is available in another public Sumo Logic repo, provide the standard URL link. Here's an example.
Emphasis
Bold
Use bold for UI elements you interact with, such as a button or tab.
Italics
Use italics for:
- Defining a term the first time. For example, when defining a collector the first time, you would italicize once with the definition.
- Providing content to enter into a field.
Underlines
Never underline text.
- Markdown
- Result
Emphasis, aka italics, with *asterisks* or _underscores_.

Strong emphasis, aka bold, with two **asterisks** or __underscores__.

Combined emphasis with **asterisks and _underscores_**.

Strikethrough uses two tildes. ~~Scratch this.~~
Emphasis, aka italics, with asterisks or underscores.
Strong emphasis, aka bold, with two asterisks or underscores.
Combined emphasis with asterisks and underscores.
Strikethrough uses two tildes. Scratch this.
Font
We use Lab Grotesque in our docs site and across all Sumo Logic media.
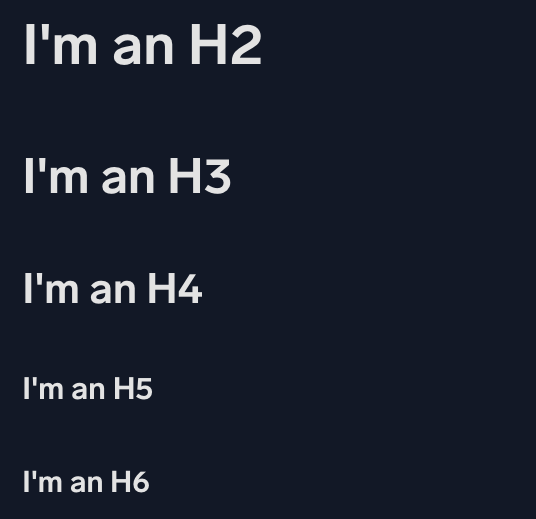
Headings
Use hashtags # to indicate the heading level and group content. Always start with H2 headers (##) in your doc body. Link anchors also generate automatically.
- We mark a heading using a number of # for the level. This section is using an H3 heading, which is
### Headings. - Never use H1 (
#) in your document. This is generated automatically by the page title (title:in frontmatter). - Headings should always be clean, plain text. Do not use bold, italics, or code ticks.
- Be careful of using special characters. Dashes are ok, but try to avoid other punctuation.
- Markdown
- Result
## I'm an H2

### I'm an H3

#### I'm an H4

##### I'm an H5

###### I'm an H6
Headings must be used in correct order. The subsection of an H2 header would be H3 - you wouldn't jump to an H4 or H5. Skipping over a header level affects search and SEO structures to search crawlers like Google. Docusaurus carefully formats generated pages to ensure strong search and SEO, and malformed structures can reduce that strength.
Documenting procedures
When a topic provides instructions for a significant multi-step process, organize the content in sections with headings that signpost the nature of the information. Include "Step" in the heading to make it clear that the section is part of a larger configuration process. For example:
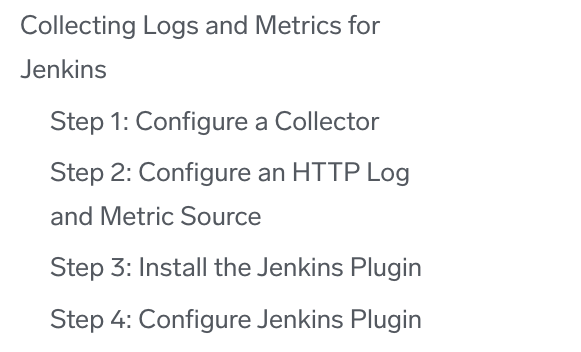
Hub pages
To generate a full list of docs within a folder, add this code to the file:
import DocCardList from '@theme/DocCardList';
import {useCurrentSidebarCategory} from '@docusaurus/theme-common';

## Guide contents

In this section, we'll introduce the following concepts:

<DocCardList items={useCurrentSidebarCategory().items}/>
This is best used in an index file. Include a list of all files and folders in that folder to the file. See any category file for a section in the site for how this looks.
Images
Add an image
- Save your image to the
/static/imgfolder. This folder structure mirrors the doc section folders.- When updating existing images (like if there's a Sumo UI change), do not add a new version; always replace existing images. Image files take up a lot of room and can slow build times.
- File format be .png or .gif.
- Add the import line to the top of your doc, underneath the front matter header, if it's not already there.
import useBaseUrl from '@docusaurus/useBaseUrl'; - Copy the below code snippet and paste it where you want your image to appear.
<img src={useBaseUrl('img/<your-image-file-path>.png')} alt="<your image description>" style={{border: '1px solid gray'}} width="<insert-pixel-number>" /> - Replace with file path above with your own image file path. The file path must start with
img(do not preface it with/static) because Docusaurus builds and saves these static assets and serves from thebaseUrl(or domain).infoFor web-hosted images, do not use the
useBaseUrlsyntax.- ✅ Do:
<img src='https://sumologic-app-data-v2.s3.amazonaws.com/dashboards/Jira-OpenTelemetry/Jira-Catalina.png' alt="Catalina" /> - ❌ Don't:
<img src={useBaseUrl('https://sumologic-app-data-v2.s3.amazonaws.com/dashboards/Jira-OpenTelemetry/Jira-Catalina.png')} alt="Catalina" />
- ✅ Do:
- Add alt text, which provides a brief description of an image, ensuring accessibility for users who rely on screen readers or have slow internet connections. It also complies with US Government GSA Section 508 regulations. Here are some best practices:
- Be concise and specific. Describe the core purpose of the image (e.g.,
alt="Screenshot showing the image properties dialog box"oralt="Sumo Logic logo"). - Focus on function. Convey the image's key message without unnecessary details.
- Skip decorative images. Use an empty alt attribute (
alt="") for images that are purely decorative. - Check for missing alt text. Always ensure that every image has appropriate alt text. If you encounter an image without it, add it.
- Be concise and specific. Describe the core purpose of the image (e.g.,
- Use the
widthto resize oversized and/or pixelated images, if needed.
- Markdown
- Result
<img src={useBaseUrl('img/reuse/sumo-square.png')} alt="Sumo Logic thumbnail logo" style={{border: '1px solid gray'}} width="150"/>

Logos
When sizing images, use your discretion. For square logos, set the width to about 45-55px.
| ✅ Do | ❌ Don't |
|---|---|
For wide logos (like in this doc), set the width to about 90-120px.
Screenshots
Use screenshots only when they clarify complex instructions. Our UI changes often, so minimizing screenshots reduces maintenance overhead.
- Prefer clear, concise text instructions over images when possible.
- Only include screenshots if they significantly aid user understanding.
- Avoid screenshots for simple UI interactions.
- When updating docs, evaluate whether screenshots are outdated or redundant.
- If you come across unnecessary screenshots, use your judgment to delete or replace them.
Make sure screenshots are large enough to be legible, but never wider than 800px. Avoid oversized images.
By default, images that you insert into a page are set to be responsive-resized for the type of device the reader is using.
Use the following syntax to add screenshots:
<img src={useBaseUrl('img/<your-image-file>.png')} alt="Descriptive alt text" style={{border: '1px solid gray'}} width="500" />
Add appropriate alt text for accessibility. See Add an image for more.
| ✅ Do | ❌ Don't |
|---|---|
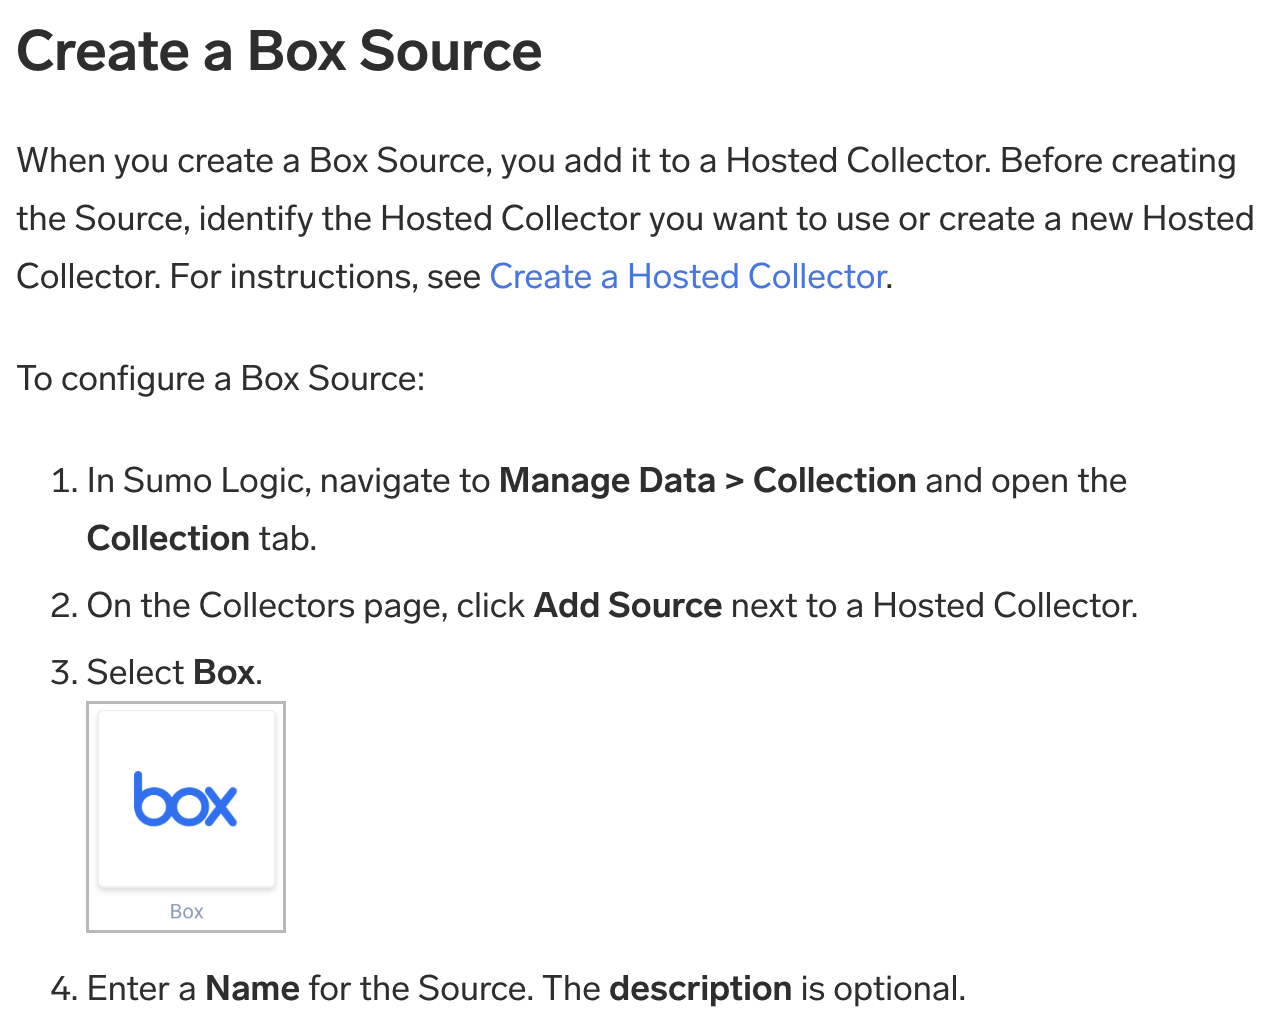 |  |
Images in lists
When adding an image to a bulleted or sequential list, include the image snippet in-line with the list item, with a <br/> element in between, like this:
- Markdown
- Result
1. Here is a dinosaur.<br/><img src={useBaseUrl('img/reuse/docusaurus.png')} alt="alt-text" width="100"/>
- Here is a dinosaur.

Masking sensitive information
We mask sensitive information like usernames, email addresses, and IP addresses. In Snagit or a similar program, use the shape tool to mask the text using solid gray, (RGB 212, 212, 212).
Callouts
Create callouts using the shape tool in SnagIt. Callouts should be red, 100% opacity, no drop shadow effect, 2 pts wide.
Lists
You can mix ordered (or numbered) and unordered (or bulleted) lists together. Use extra lines and tabs (or 2 spaces) to move content under these bullets, including other bullets, paragraphs, images, and more. Be careful of indenting too much; three tab indents will automatically render as code.
In a list item made up of an introductory word or phrase and an explanatory sentence or paragraph, separate the introductory text and the explanation with a period (.) rather than a dash (-). For example:
- Markdown
- Result
1. **Entity**. Select the Entity field in the Record that the resulting Signal should be associated with.
1. **Description (Optional)**. Define the description for the Signal.
- Entity. Select the Entity field in the Record that the resulting Signal should be associated with.
- Description (Optional). Define the description for the Signal.
Numbered lists
Use numbered lists when providing a set of instructions or steps.
Always start with 1.. Markdown automatically numbers sequentially when building the site. This can be helpful when you need to add or change the order of instructions (no need to edit every number).
- Markdown
- Result
1. First ordered list item.
1. Another item.
- Unordered sub-list.
1. Actual numbers do not matter, just that it is a number.
1. Ordered sub-list.
1. And another item.
More content for this entry. And a screenshot:<br/> 
- First ordered list item.
- Another item.
- Unordered sub-list.
- Actual numbers do not matter, just that it is a number.
- Ordered sub-list.
- And another item.
- More content for this entry. And a screenshot:

- More content for this entry. And a screenshot:
Bulleted lists
Use bulleted lists when the items do not need to be presented in sequential order. End each bullet in a terminal period. Use asterisks * for unordered, bulleted lists.
- Markdown
- Result
* Unordered list line 1.
* Line 2.
   <br/>Content to show under 2.
* Another set of bullets.
* Here we go, another!
- Unordered list line 1.
- Line 2.
Content to show under 2. - Another set of bullets.
- Here we go, another!
You can configure your editor to always use this format for lists. For Visual Studio Code, configure the following settings:
- Ordered List: Marker set to one.
- Unordered List: Marker set to *.
Ensure parallel grammatical structure - that is, start each bullet with the same part of speech.
Links
When linking to Sumo Logic docs, use relative file paths. For external links, use absolute URL paths.
Whenever possible, use link text that’s relevant - such as the page title - rather than just "click here". If the link title is too long, you can either edit the title or summarize the content in a few words.
When linking to other Sumo Logic documentation, use the phrase "Learn more" on its own or after the end of a sentence.
| ✅ Do | ❌ Don't |
|---|---|
| Add a processing rule to filter messages. Learn more. | Find out how to add a processing rule to filter messages. |
Linking to other headers in the same file
Here's how to make a [table](#tables).
Linking to files in the same folder
* Check out our [glossary](glossary.md); or
* Check out our [glossary](./glossary.md); or
* Check out our [glossary](/docs/contributing/glossary).
Linking to files in other parent folders
* Learn how to [sign up with Sumo](../get-started/sign-up.md); or
* Learn how to [sign up with Sumo](/docs/get-started/sign-up).
Linking to external URLs
For more information, see [Export Logs to Sumo Logic](https://auth0.com/docs/extensions/sumologic).
Markdown
Markdown is a simple, text-based format you can write using text editors, IDEs, or the GitHub website to write content. We use Docusaurus to manage, style, and build our site. We use GitHub-flavored Markdown, with some additional options. You can find more info at:
File naming convention
A Markdown file has a filename and extension of .md. We recommend keeping the filename short. It does not affect the canonical link.
MDX
MDX can make your documentation more interactive and allows using any React components inside Markdown:
export const Highlight = ({children, color}) => (
  <span
    style={{
      backgroundColor: color,
      borderRadius: '20px',
      color: '#fff',
      padding: '10px',
      cursor: 'pointer',
    }}
    onClick={() => {
      alert(`You clicked the color ${color} with label ${children}`)
    }}>
    {children}
  </span>
);

This is <Highlight color="#25c2a0">Docusaurus green</Highlight> !

This is <Highlight color="#1877F2">Facebook blue</Highlight> !
This is Docusaurus green !
This is Facebook blue !
Measurements
For storage and memory sizes (MB, GB), the unit of measurement should be uppercase. For dimensions and weights, the unit of measurement should be lowercase (cm, lb). Do not separate the number and the unit with a space.
Metadata (frontmatter)
Markdown documents contain a YAML block of metadata at the top called frontmatter. This block includes elements such as the title, description, and search keywords. Every page should have an id for sidebar navigation.
Here is an example of a frontmatter block with sample text:
---
id: page
title: Page title
sidebar_label: Sidebar navigation title
description: Description about this feature.
keywords:
    - metrics
    - traces
tags: [metrics, traces]
---
| Parameter | Description |
|---|---|
id: | (Required) Unique identifier for the page, used in the sidebar and as the canonical link. Keep it short and only use dashes. |
slug: | (Optional) Overrides the id: for the canonical link. Best used for index pages for sections. |
title: | (Required) For SEO purposes, include main keywords in your title and keep it under 60 characters. This title is used in navigation if a sidebar_label is not included. |
sidebar_label: | (Optional) Label for the sidebar navigation. Keep it title short. It does not affect the canonical link or page title. |
description: | (Optional) 1-2 sentences describing the content in the doc. It appears in search engine results. If omitted, search engines will pull the first couple of sentences from the page. |
keywords: | (Optional) List of keywords to enhance SEO. |
tags: | (Optional) A string or list of tags that adds labels and permalinks to help with sorting. |
For a full list of options, see Docusaurus Markdown front matter.
Navigation menus
Top-level navigation content is controlled in our docusaurus.config.js file.
Our sidebars.ts file controls the sidebar navigation for the entire site. It consists of multiple sidebars and sections based on the Guides top navigation, drilling down per guide. A list of sections and advice on content is at the top of the sidebars file, with comments throughout.
-
To add a specific page, you include the directory path and topic id from the frontmatter. For example, this page is
contributing/style-guide. -
To add a section within a section, use a category section with page links in it (see below example).
-
To add an index for a section, create an index.md page in the folder. Give it a
slug: namewhere the name is the folder for the entire section like contribution-guide. In the category, use a link line with the folder name and index for example:link: {type: 'doc', id: 'contributing/index'},. -
To add a new page, make note of the file path and id. For example, this document is located in the folder
contributingwith an id ofcreate-document. When adding this file to the sidebar, it would be added to thecontributing/create-edit-doc.Example: add
contribution/create-documentto sidebars.tssidebars.ts//Contribution guide for documentation
contributing: [
{
type: 'category',
label: 'Contribution Guide',
collapsible: true,
collapsed: false,
link: {type: 'doc', id: 'contributing/index'},
items: [
'contributing/create-edit-doc',
'contributing/build-deploy',
'contributing/translations',
{
type: 'category',
label: 'Templates',
collapsible: true,
collapsed: false,
items: [
'contributing/templates/partner-app-doc'
]
}
],
},
], -
To add a category, or dropdown list of documentation, use the following format:
Example: add sidebar category example with additional section
sidebars.ts{
type: 'category',
label: 'Name of Guide',
collapsible: true,
collapsed: false,
link: {type: 'doc', id: 'foldername/id-first-page'},
items: [
'foldername/doc-id1',
'foldername/doc-id2',
{
type: 'category',
label: 'Section in Guide',
collapsible: true,
collapsed: false,
link: {type: 'doc', id: 'foldername/id-section'},
items: [
'foldername/doc-id3',
'foldername/doc-id4',
]
}
],
}, -
To add a dedicated sidebar, use the following format:
Example: adding a dedicated sidebar for a guide
sidebars.tsmodule.exports = {
sectionName: [
    {
      type: 'category',
      label: 'Name of Guide',
      collapsible: true,
      collapsed: false,
      link: {type: 'doc', id: 'foldername/id-first-page'},
      items: [
        'foldername/doc-id1',
        'foldername/doc-id2',
        {
          type: 'category',
          label: 'Section in Guide',
          collapsible: true,
          collapsed: false,
          link: {type: 'doc', id: 'foldername/id-section'},
          items: [
            'foldername/doc-id3',
            'foldername/doc-id4',
          ]
        }
      ],
    },
{
type: 'category',
label: 'Name of Another Guide',
collapsible: true,
collapsed: false,
link: {type: 'doc', id: 'otherfoldername/id-first-page'},
items: [
'otherfoldername/doc-id1',
'otherfoldername/doc-id2',
{
type: 'category',
label: 'Section in Another Guide',
collapsible: true,
collapsed: false,
link: {type: 'doc', id: 'otherfoldername/id-section'},
items: [
'otherfoldername/doc-id3',
'otherfoldername/doc-id4',
]
}
],
},
]
Numbers
- Use numerals, rather than spelling the number out. For example, “2” instead of “two”.
- Use commas for numbers that are 4 or 5 digits in length, for example, 1,000 or 99,999.
- For numbers 100,000 and higher, use “K”, “M”, and “B” to indicate thousands, millions, or billions.
- Use an en-dash without a space on either side for number ranges.
Patents and trademarks
Protecting our patents and trademarks is important to do correctly. We do not want to expose the company to a loss of trademark or patent just because we didn't list it correctly.
This is a partial list of trademarked terms, which should be capitalized exactly as shown below.
- Sumo Logic
- Big Data for Real Time IT
- Log Reduce
- Elastic Log Processing
- Push Analytics
Never use Sumo Logic in the plural or possessive form.
Punctuation
Punctuation is placed outside of quotation marks, British English style. For everything else (dates, times, spelling), we use American English style.
Colons
Colons are used to introduce lists or to separate titles from subtitles. Only include the colon if the introduction isn’t a complete sentence.
Commas
We use the Oxford (serial) comma. For example, use "I had eggs, toast, and orange juice", not "I had eggs, toast and orange juice".
Exclamation points
Use exclamation points to express excitement or encourage the user. Don't use them for errors, warnings, or confirmation of basic actions as they are usually unnecessary and can distract from important details.
Ellipses and truncation
Use ellipses for truncation. Don’t use ellipses for placeholders or trailing off a sentence unless it is getting cut off. When truncating, think about which part of the string is most essential for the user. This may require truncating in the beginning, middle, or end of a string.
Periods
In the UI, avoid periods for single sentences on their own. Whenever there are two or more sentences, use periods at the end of each sentence. Separate sentences by one space, not two.
Release notes
Our release notes (also known as changelog) are posted to the both the docs site and corresponding RSS feed. Check out the categories here. Keep your them concise and add links to documentation. If there are updated UI elements, add an image or gif.
Text only
To add a text-only release note:
- In the appropriate blog folder (blog-collector, blog-cse, blog-csoar, blog-developer, blog-service), add a new file that follows the format of the other posts in that folder. For example, for blog-service release notes, the format is
YYYY-MM-DD-<product/feature>. For Cloud SIEM and SOAR, the format isYYYY-MM-DD-application-updateorYYYY-MM-DD-content-update.
- Add the following frontmatter, swapping out these example values with your own. Because there's no
image, we'll use the Sumo Logic logo in its place.---
title: New XYZ Feature
hide_table_of_contents: true
keywords:
- alerts
image: https://help.sumologic.com/img/reuse/rss-image.jpg
---title. Title for release note that includes product or feature name.noteFor service release notes only, append the title with the category name in parenthesis (example:
Automatic Log Level Detection (Search)). See previous service release notes for category names.keywords. Add a brief bulleted list of major keywords.hide-table-of-contents. Hide the TOC on the page, keeping the notes clean and wide on the page.
- Document the release notes. Add links, bullets, and images as needed.
Long release notes
For lengthy release notes, we recommend introducing the notes and adding a truncate line (<!--truncate-->), followed by the full set of release notes.
Text and images
To add release notes with images:
- In the blog folder, create a new folder with the following name format:
YYYY-MM-DD-product. - In the new folder, create a markdown file named
index.md. - Add your release notes with frontmatter:
---
title: New XYZ Feature
hide_table_of_contents: true
keywords:
  - alerts
image: https://help.sumologic.com/img/reuse/rss-image.jpg
--- - Save the image to this folder and add them to the markdown file:
.
Reusing content
For repeatable content - an identical section that appears in one or more docs - you can save a lot of time by creating one instance of that content in the /docs/reuse folder and then importing that snippet to other docs.
- Create a new markdown file and save it to the
/docs/reusefolder. - Import that content to another doc by adding this snippet (substitute the file path and object name with your own).
import RestartC2C from '../reuse/restart-c2c-source.md';

<RestartC2C/>
Headings in the reuse folder will not appear in the right-side nav in docs where they're imported. For this reason, unless the headers are H4 or below, reuse the content only but retain headings in the other docs.
Example: the content under the Cloud-to-Cloud source docs > Restarting Your Source section (example) lives in the reuse folder. The H3 headers live in the actual docs, and H4 headers live in the reuse file:
- Markdown
- Result
### Restarting your source

import RestartC2C from '../reuse/restart-c2c-source.md';

<RestartC2C/>
Restarting your source
If your Source encounters VendorConfig errors, you can restart it from either the Sumo Logic UI or Sumo Logic API.
UI
To restart your source in the Sumo Logic platform, follow the steps below:
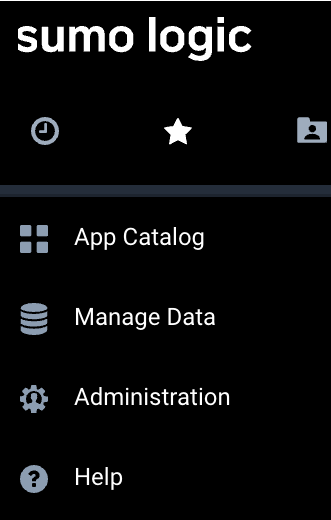
- Classic UI. In the main Sumo Logic menu, select Manage Data > Collection > Collection.
New UI. In the Sumo Logic top menu select Configuration, and then under Data Collection select Collection. You can also click the Go To... menu at the top of the screen and select Collection. - Select the source and click the information icon on the right side of the row.
- The API usage information popup is displayed. Click the Restart Source button on the bottom left.
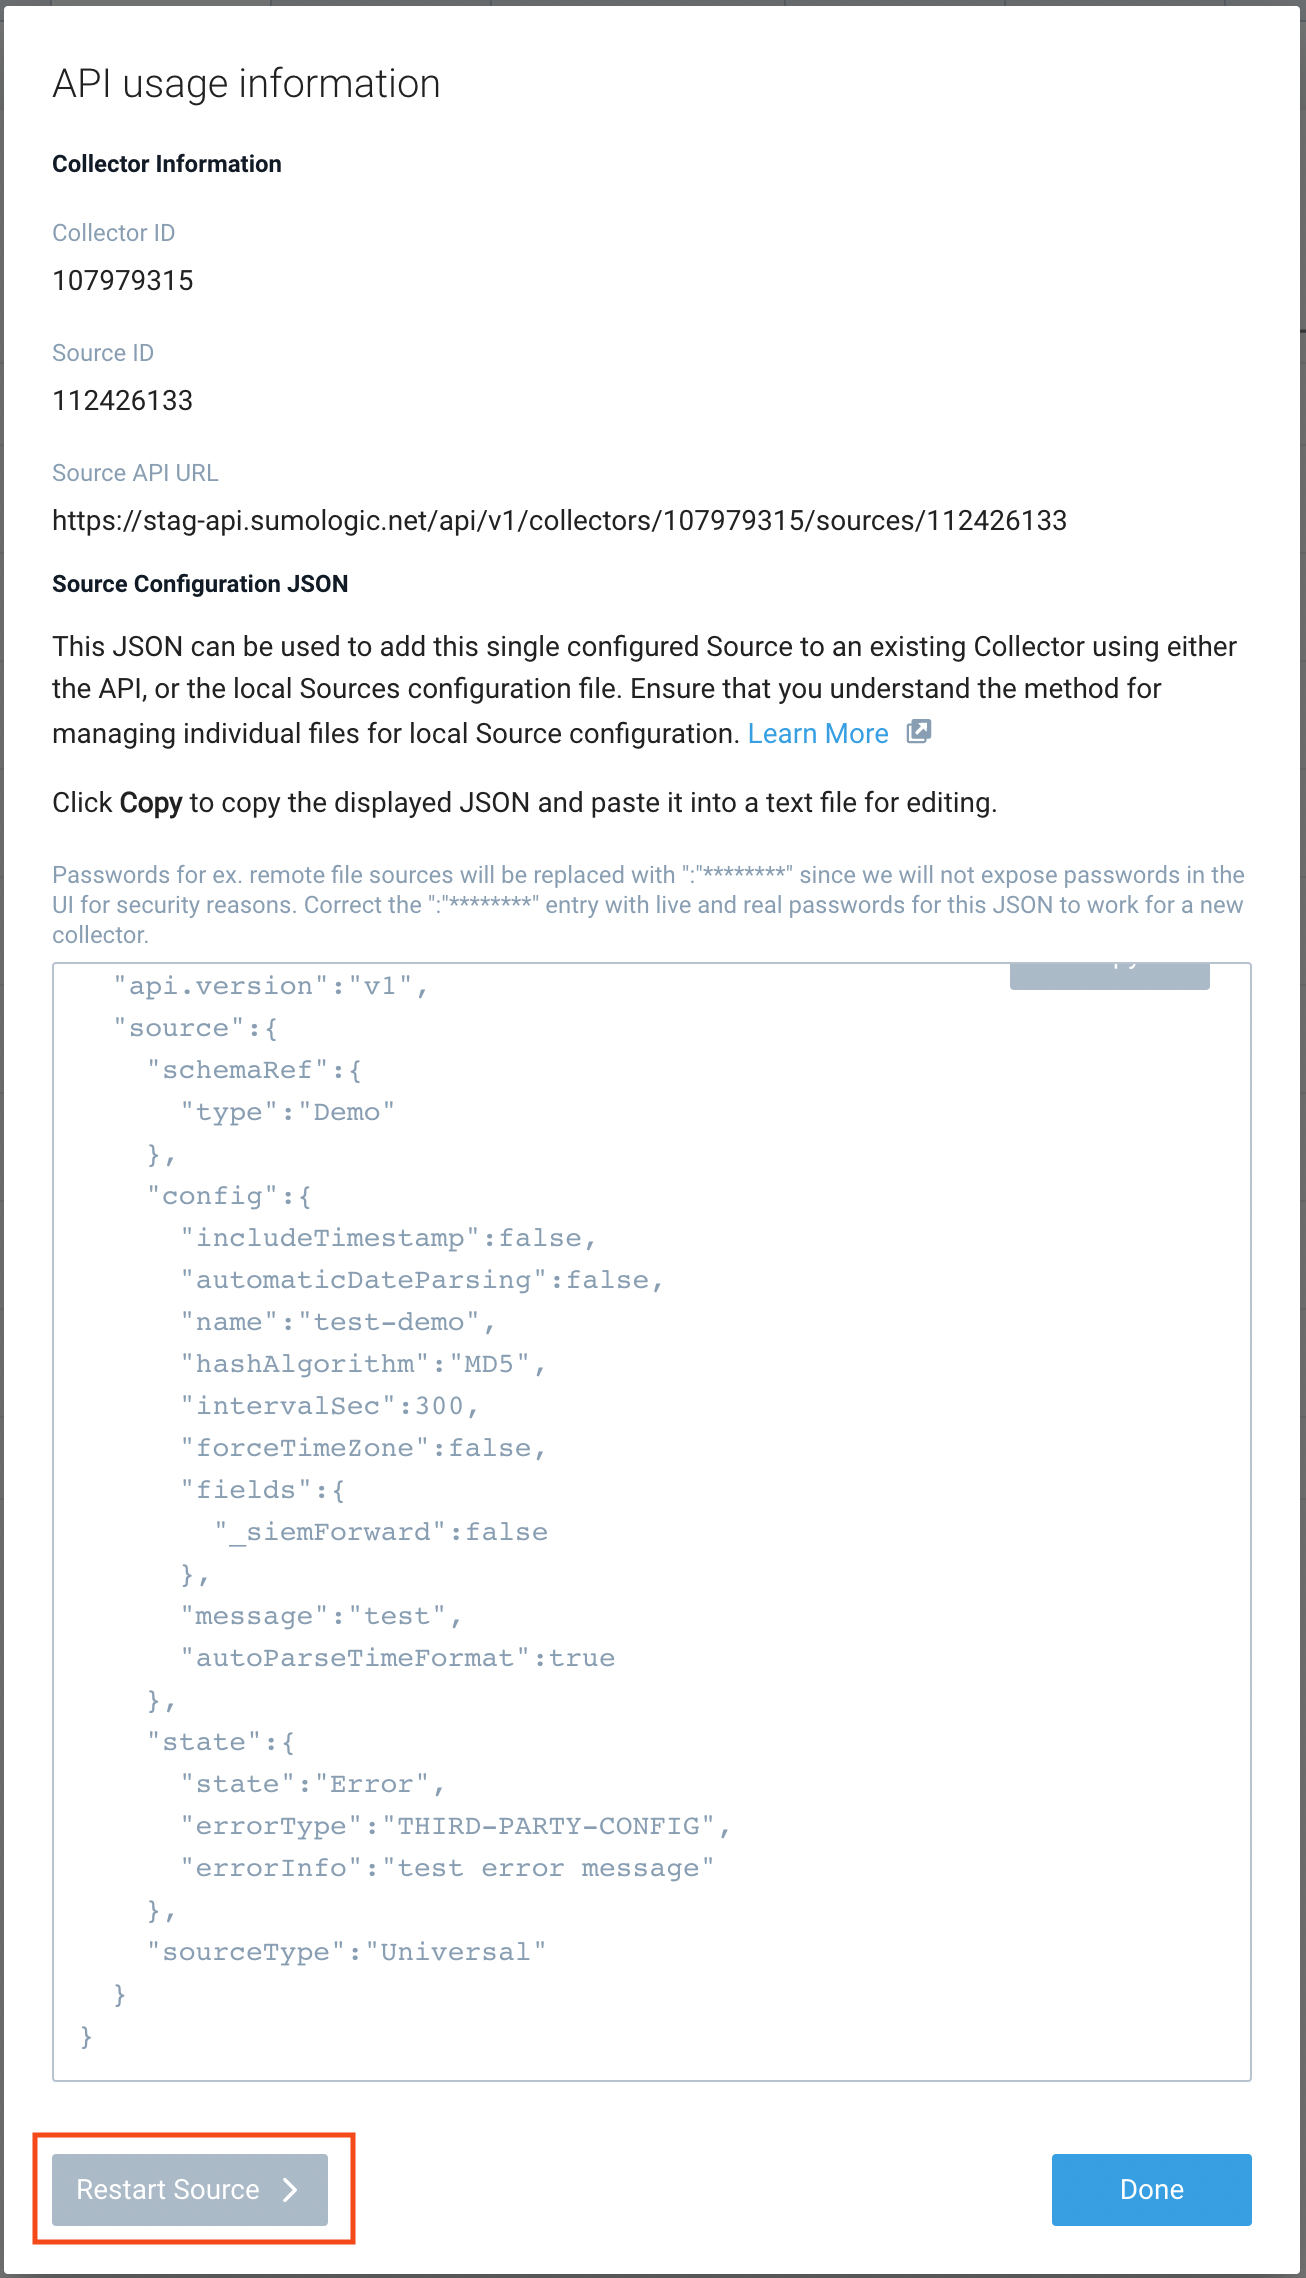
- Click Confirm to send the restart request.
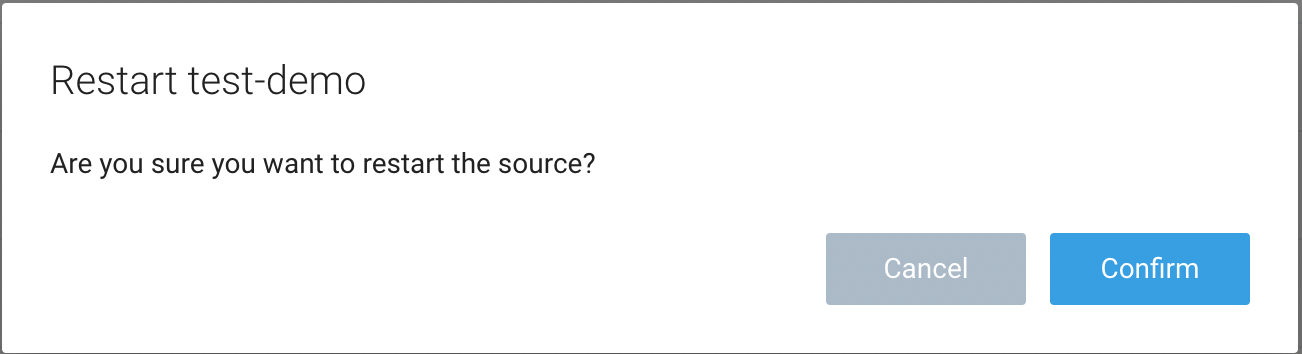
- The bottom left of the platform will provide a notification informing you the request was successful.

API
To restart your source using the Sumo Management API, follow the instructions below:
- Method:
POST - Example endpoint:
https://api.sumologic.com/api/v1/collectors/{collector_id}/sources/{source_id}/action/restart
Sumo Logic endpoints like api.sumologic.com are different in deployments outside us1. For example, an API endpoint in Europe would begin api.eu.sumologic.com. A service endpoint in us2 (Western U.S.) would begin service.us2.sumologic.com. For more information, see Sumo Logic Endpoints.
Tables
Simple tables can help format content. For example, lists of attributes with descriptions. Adding the style below the table helps with formatting.
Tables use plain markdown with one header, default left-aligned columns, and multi-colored rows. You can use Markdown for links and images. To break up content, you can use <br/> for line breaks.
- Markdown
- Result
| Column Name | Example Value | Description |
| :-- | :-- | :-- |
| Trace ID | ffaf2f69ee8ad0c1 | The unique identifier of the trace. |
| Root Service | api | The service that started the trace. |
| Started At | 07/27/2020 09:01:04.533 | When the trace started. |
| Duration | 12.582 ms | The amount of time the trace spans. |
| Number of spans | 35 | A trace consists of spans. This number tells you how many spans are in the trace. |
| Duration Breakdown |  | Each color indicates a service. The colors assigned to services are always the same on your account. You can change the color in the span summary tab after clicking on the individual span in trace view.<br/>Hover over to view a percentage breakdown of how long each span covers in the trace.<br/> |
| Number of errors | 0 | The number of errors in the trace. |
| Status | 200 | The HTTP status code of the trace. |
Colons can be used to align columns.

| Tables        | Are           | Cool  |
| :------------- |:-------------:| -----:|
| col 3 is      | right-aligned | $1600 |
| col 2 is      | centered      |   $12 |
| zebra stripes | are neat      |    $1 |

There must be at least 3 dashes separating each header cell.
The outer pipes (|) are optional, and you do not need to make the
raw Markdown line up prettily. You can also use inline Markdown.

Markdown | Less | Pretty
--- | :--- | :---
*Still* | `renders` | **nicely**
1 | 2 | 3
| Column Name | Example Value | Description |
|---|---|---|
| Trace ID | ffaf2f69ee8ad0c1 | The unique identifier of the trace. |
| Root Service | api | The service that started the trace. |
| Started At | 07/27/2020 09:01:04.533 | When the trace started. |
| Duration | 12.582 ms | The amount of time the trace spans. |
| Number of spans | 35 | A trace consists of spans. This number tells you how many spans are in the trace. |
| Duration Breakdown | Each color indicates a service. The colors assigned to services are always the same on your account. You can change the color in the span summary tab after clicking on the individual span in trace view. Hover over to view a percentage breakdown of how long each span covers in the trace. | |
| Number of errors | 0 | The number of errors in the trace. |
| Status | 200 | The HTTP status code of the trace. |
Colons can be used to align columns.
| Tables | Are | Cool |
|---|---|---|
| col 3 is | right-aligned | $1600 |
| col 2 is | centered | $12 |
| zebra stripes | are neat | $1 |
There must be at least 3 dashes separating each header cell. The outer pipes (|) are optional, and you do not need to make the raw Markdown line up prettily. You can also use inline Markdown.
| Markdown | Less | Pretty |
|---|---|---|
| Still | renders | nicely |
| 1 | 2 | 3 |
Docusaurus also supports HTML tables.
Tabs
Use the following code to create tabbed content. You can use Markdown in these tabs, including text, code content, images, and more.
At the bottom of the Markdown file, add the following code:
import Tabs from '@theme/Tabs';
import TabItem from '@theme/TabItem';
For each set of tabs, use the following code:
<Tabs
  className="unique-tabs"
  defaultValue="tab1"
  values={[
    {label: 'Tab 1', value: 'tab1'},
    {label: 'Tab 2', value: 'tab2'},
  ]}>

<TabItem value="tab1">

Add content here for first tab.

</TabItem>
<TabItem value="tab2">

Add content here for second tab.

</TabItem>
</Tabs>
See the following tabbed code examples:
- Kinsesis Firehose
- Lambda
Set up a Source in Sumo Logic:
- Navigate to Collection management.
- Use an existing Hosted Collector, or create a new one.
- Next to the collector, select Add Source.
- Select AWS Kinesis Firehose for Logs.
- Enter a Name to identify the source.
- Enter a Source Category following the best practices found in “Good Source Category, Bad Source Category”.
Deploy the Cloudformation Template to Create a Kinesis Firehose Delivery Stream:
- Download the Cloudformation template.
- Open CloudFormation in AWS.
- Create a new stack using the CloudFormation template you downloaded.
- Provide the URL you created from your Sumo source.
- Select an S3 bucket to deliver failed logs, or create a new one.
- Click Next.
Accept the IAM permissions, and create the stack.
Info for the second tab would go here! Content can include markdown, code blocks, notes, and more.
SEO
For clarity and search engine discoverability:
- Doc titles are very important for SEO. Use primary target keywords, try to mention "Sumo Logic", and keep length under 60 characters.
- Example:
Monitoring with the Observability Solution→ Monitoring with Sumo Logic Observability
- Example:
- Use H2 sections to break up content and try to use primary keywords here as well.
- Example: AWS Observability Solution.
- H3 and H4 headers do not impact SEO as much. Use short, meaningful titles for readability and search.
- Example: System architecture and monitoring.
- If you change a URL, set up a redirect so that users don’t get a 404 page.
- Use Google Analytics to make data-driven decisions.
UI elements
Not all UI elements have an intuitive name. It's the very nature of working with a constantly evolving product. Here are some examples:
| Icon | Tab Name | Definition |
|---|---|---|
| Recent | Access content you’ve recently accessed and recently shared with you. | |
| Favorites | Content you’ve marked as favorite. | |
| Library | List of all accessible content, including your creations and the content shared with you. | |
| More Actions / Three-Dot Kebab | Click to reveal a menu with additional options. | |
 | Left Nav | Access all Sumo Logic features, such as Log Search, Metrics, Infrastructure Monitoring, Application Monitoring, and Cloud SIEM, as well as your dashboards library. |
| Icon | Tab Name | Definition |
|---|---|---|
| Recents | Access content you’ve recently accessed and recently shared with you. | |
| Favorites | Content you’ve marked as favorite. | |
| Personal | Content you manage. | |
| Library | List of all accessible content, including your creations and the content shared with you. | |
| More Actions / Three-Dot Kebab | Click to reveal a menu with additional options. | |
 | Navigation Menu | Main Sumo Logic menu containing your collectors, sources, library, help, and more. |
Cascading instructions
When providing instructions that involve multiple UI elements, list them sequentially and in cascading order. For example: Click More Actions > Delete.
Referring to locations in the UI
Avoid "below", "above", "next to", and so on, when referring to UI elements on a page, as locations may change or appear differently for different users.
Mouse actions
Try to avoid these if possible. Instead, use "Select".
If you need to use mouse actions to be specific, use:
- "Click" (not "Click on" or "Left-click")
- "Right-click"
- "Hover" (not "Mouse over")
- "Drag"
When to use “select”, “choose”, and “enter”
- Select. Use to tell users to pick something from a limited number of options, such as from a list or a dropdown menu, or when you are referring to checking or toggling a UI element.
- Choose. Use to encourage the user to make a decision that is more subjective or open-ended.
- Enter. Use enter when the user is explicitly inputting something from scratch, rather than from a pre-built set of options.
Videos
YouTube
To embed a YouTube video on a doc:
- Copy and paste the following code into your page (including the
import Iframeline).<Iframe url="https://www.youtube.com/embed/abcde12345?rel=0"
width="854px"
height="480px"
id="myId"
className="video-container"
display="initial"
position="relative"
allow="accelerometer; clipboard-write; encrypted-media; gyroscope; picture-in-picture"
allowfullscreen
/>
import Iframe from 'react-iframe'; - Remove the URL ID from the snippet (
abcde12345) and replace it with your own video ID, which you can find in the YouTube link URL. - Ensure that
?rel=0is appended to the end of the URL. This ensures that only videos from the current YouTube channel will be suggested to the viewer after they've finished viewing the embedded video.
- Markdown
- Result
<Iframe url="https://www.youtube.com/embed/ZcbHoC1jZz4?rel=0"
        width="854px"
        height="480px"
        id="myId"
        className="video-container"
        display="initial"
        position="relative"
        allow="accelerometer; clipboard-write; encrypted-media; gyroscope; picture-in-picture"
        allowfullscreen
        />

import Iframe from 'react-iframe';
Other video types
You can use similar coding to embed videos from other vendors than YouTube. Following is example coding to embed videos from Wistia.
- Markdown
- Result
<Iframe url="https://fast.wistia.net/embed/iframe/yebz0v90tx?web_component=true&seo=true&videoFoam=false"
  width="854px"
  height="480px"
  id="wistiaVideo"
  className="video-container"
  display="initial"
  position="relative"
  allow="autoplay; fullscreen"
  allowfullscreen
/>
Typically you must include import Iframe from 'react-iframe'; with the markdown. It is not included in the example above because it was already called in the previous markdown for YouTube.