Cloud SIEM Automation Examples
Following are examples that show you how to create Cloud SIEM automations using the Automation Service. The examples, which are listed in order from simple (performing a basic automation using an out-of-the-box integration) to advanced (creating a custom integration), illustrate many of the tasks you’ll perform on a regular basis when you create your own automations.
The number of actions that can be run per hour is limited to prevent abuse of system resources or runaway processes. For more information, see Actions limit.
Simple example: Configure an enrichment
The following example shows how to add an enrichment to an insight using the “IP Reputation V3” action from VirusTotal.
- Edit the VirusTotal OIF resource:
- Classic UI. In the main Sumo Logic menu, select Automation and then select Integrations in the left nav bar.
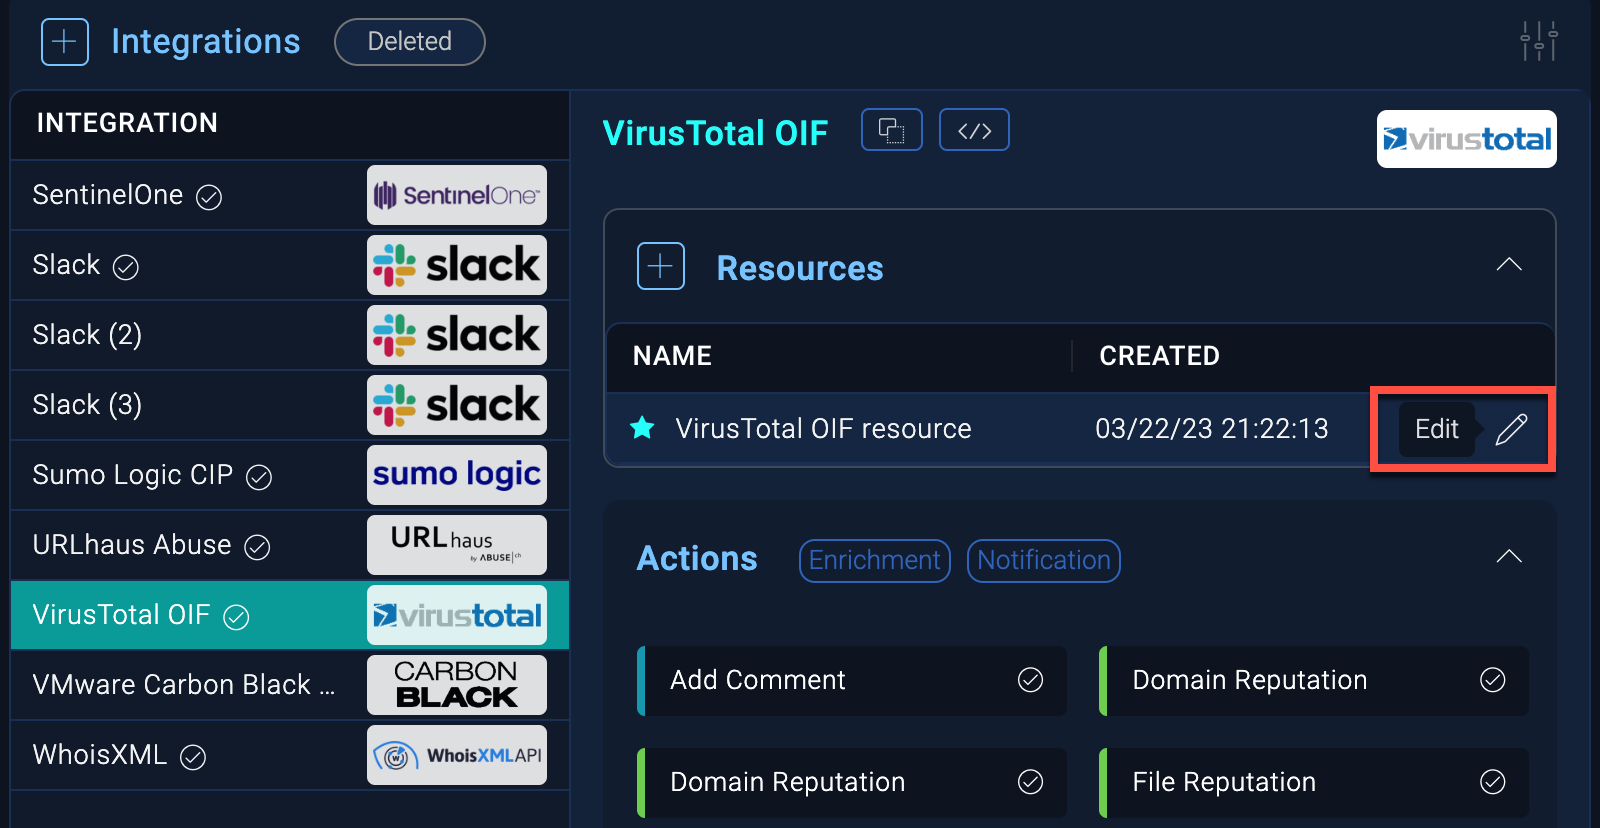
New UI. In the main Sumo Logic menu, select Automation > Integrations. You can also click the Go To... menu at the top of the screen and select Integrations. - Select VirusTotal OIF.
- Hover your mouse over the resource name and click the Edit button that appears.
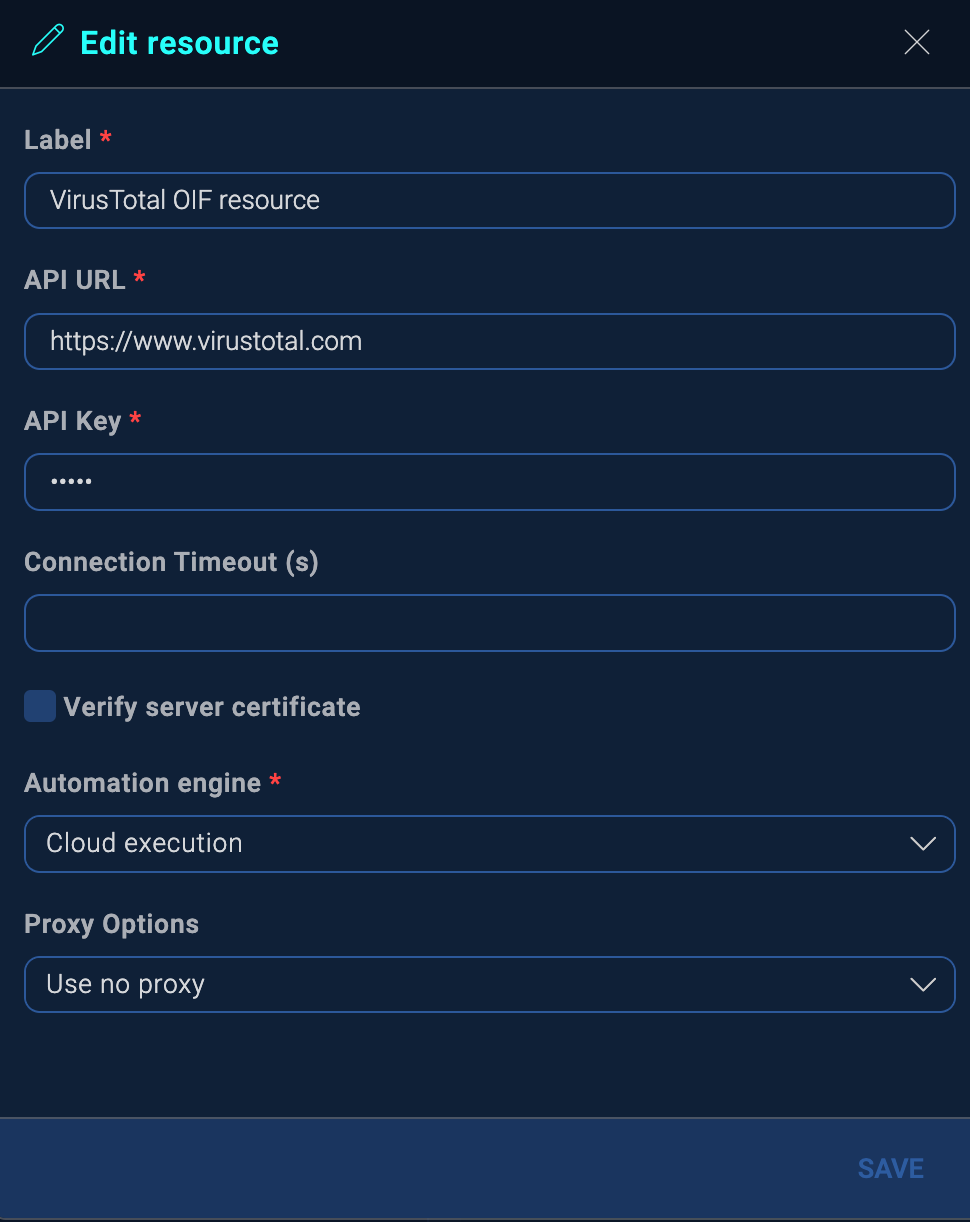
- In the Edit resource dialog, enter the API URL:
https://www.virustotal.com. - Enter the API Key. See the VirusTotal documentation to learn how to obtain the API key. If you do not already have a VirusTotal account, you need to create one to get an API key.
- Click Save.
- Classic UI. In the main Sumo Logic menu, select Automation and then select Integrations in the left nav bar.
- Create the playbook:
- Classic UI. In the main Sumo Logic menu, select Automation > Playbooks.
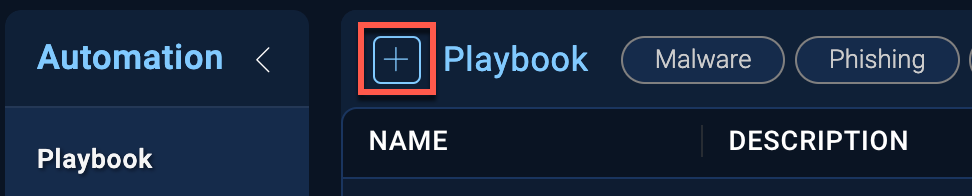
New UI. In the main Sumo Logic menu, select Automation > Playbooks. You can also click the Go To... menu at the top of the screen and select Playbooks. - Click the + button to the left of Playbook.
- In the New playbook dialog, give your playbook a Name.
- For Type, enter CSE.
- Enter a Description.
- Click Create.
- Classic UI. In the main Sumo Logic menu, select Automation > Playbooks.
- Add the “IP Reputation V3” action to the playbook:
- Click the Edit button (pencil icon) at the bottom of the playbook view.
- Click the Edit button (pencil icon) on the START node.
- In the Edit node dialog, select Insight from the dropdown menu and click UPDATE.
- Click the Add Node button (+ icon) on the START node.
- Select Action.
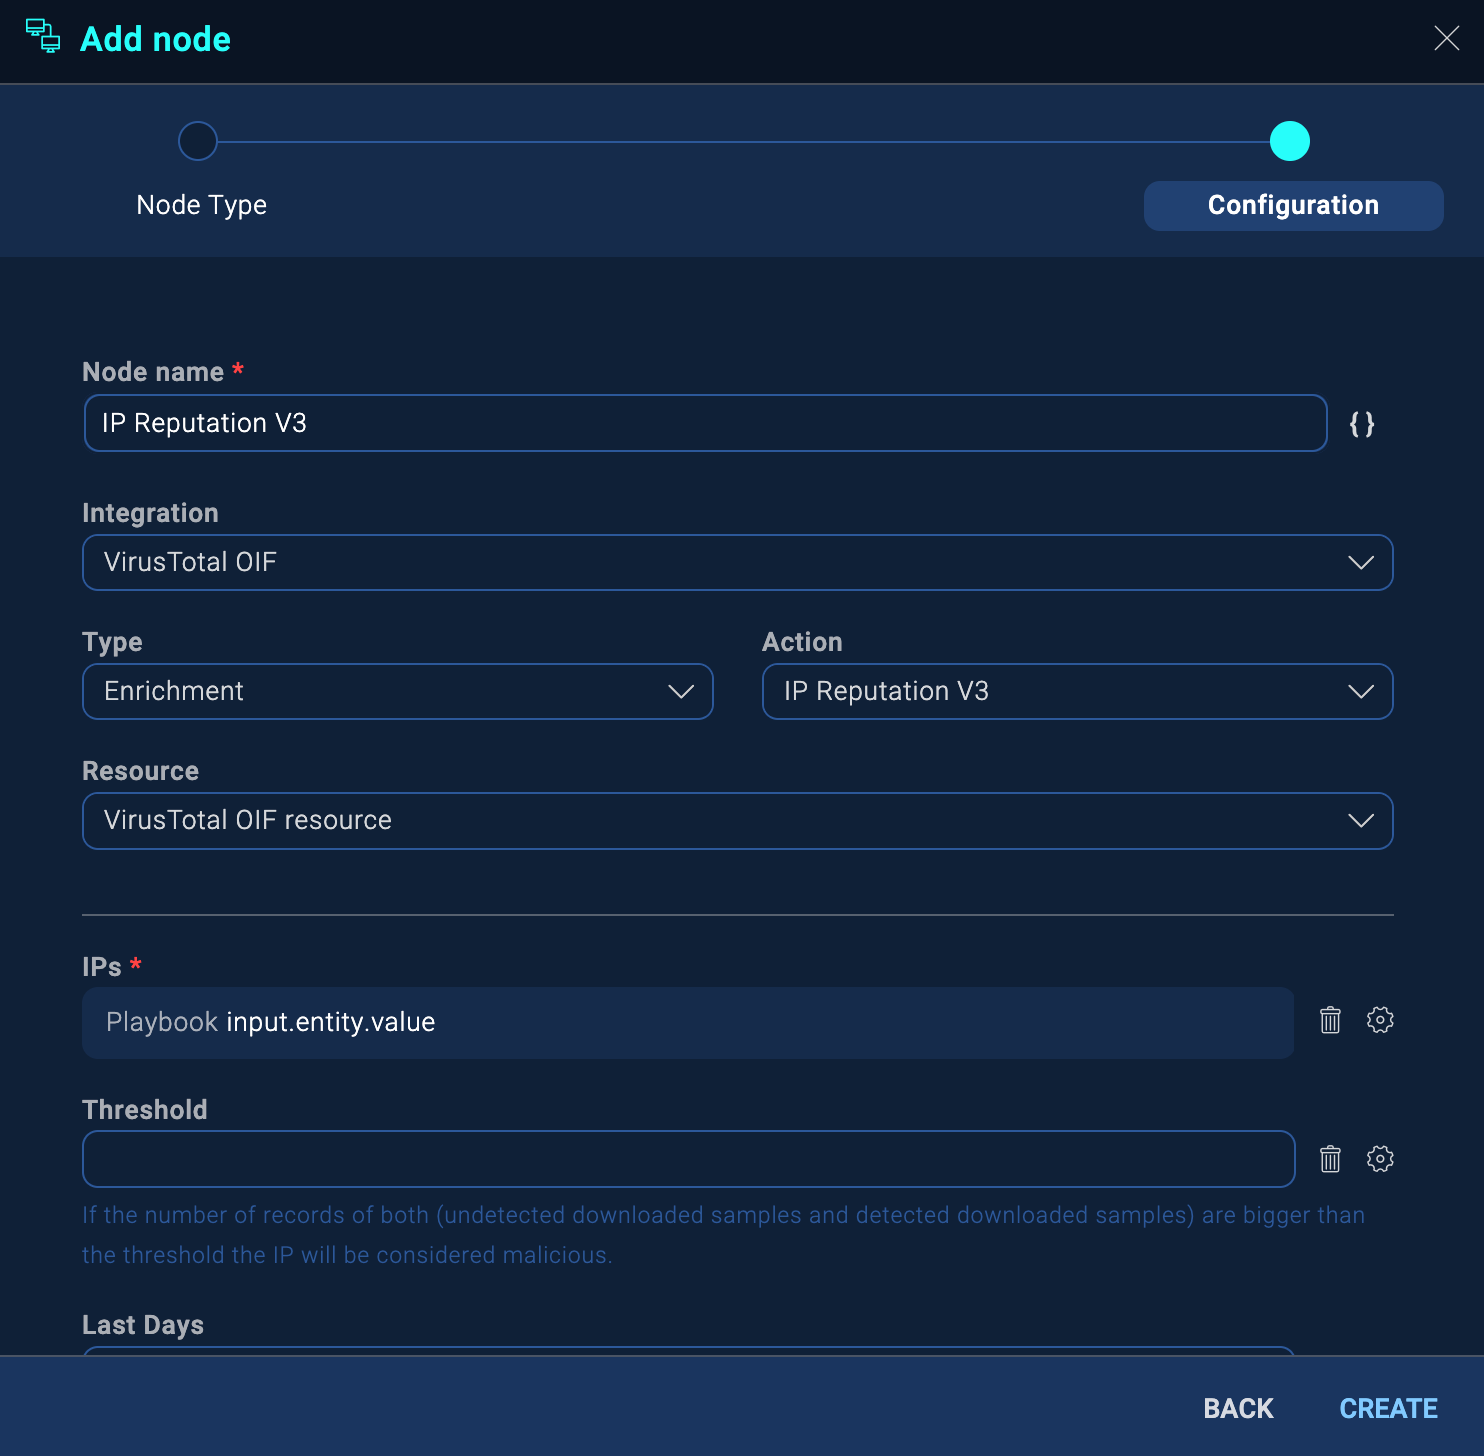
- In the Add node dialog, for Integration select VirusTotal OIF.
- Ensure that Type is Enrichment.
- For Action, select IP reputation V3.
- To the right of the IPs field, click the gear icon.
- Click Playbook inputs and select input.entity.value.
- Click Create.
- Add an enrichment action to the playbook:
- Hover your mouse over the IP reputation V3 node and click the Add Node button (+ icon).
- Select Action.
- In the Add node dialog, for Integration, select Sumo Logic Cloud SIEM Internal.
- For Type, select Notification.
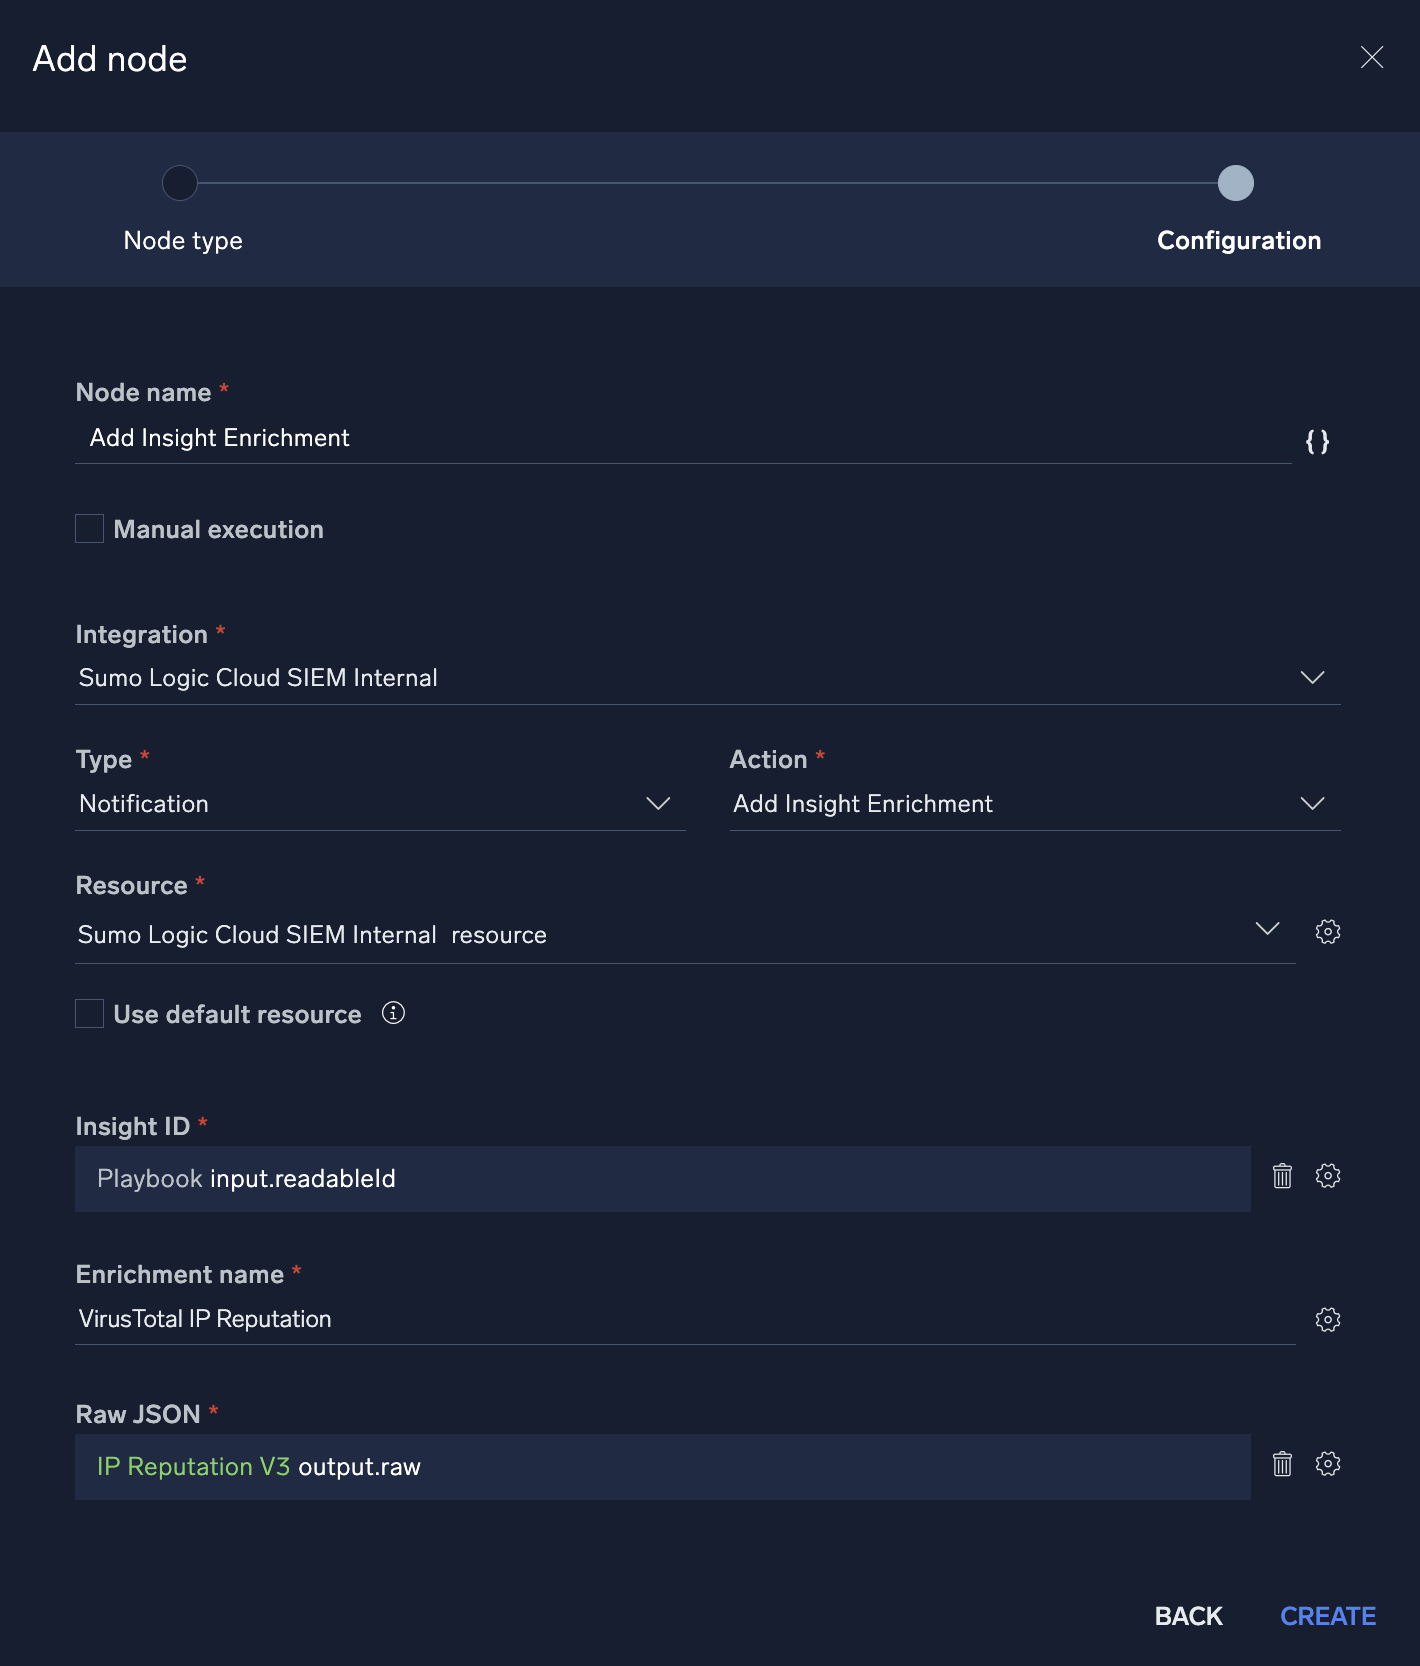
- For Action, select Add Insight Enrichment.
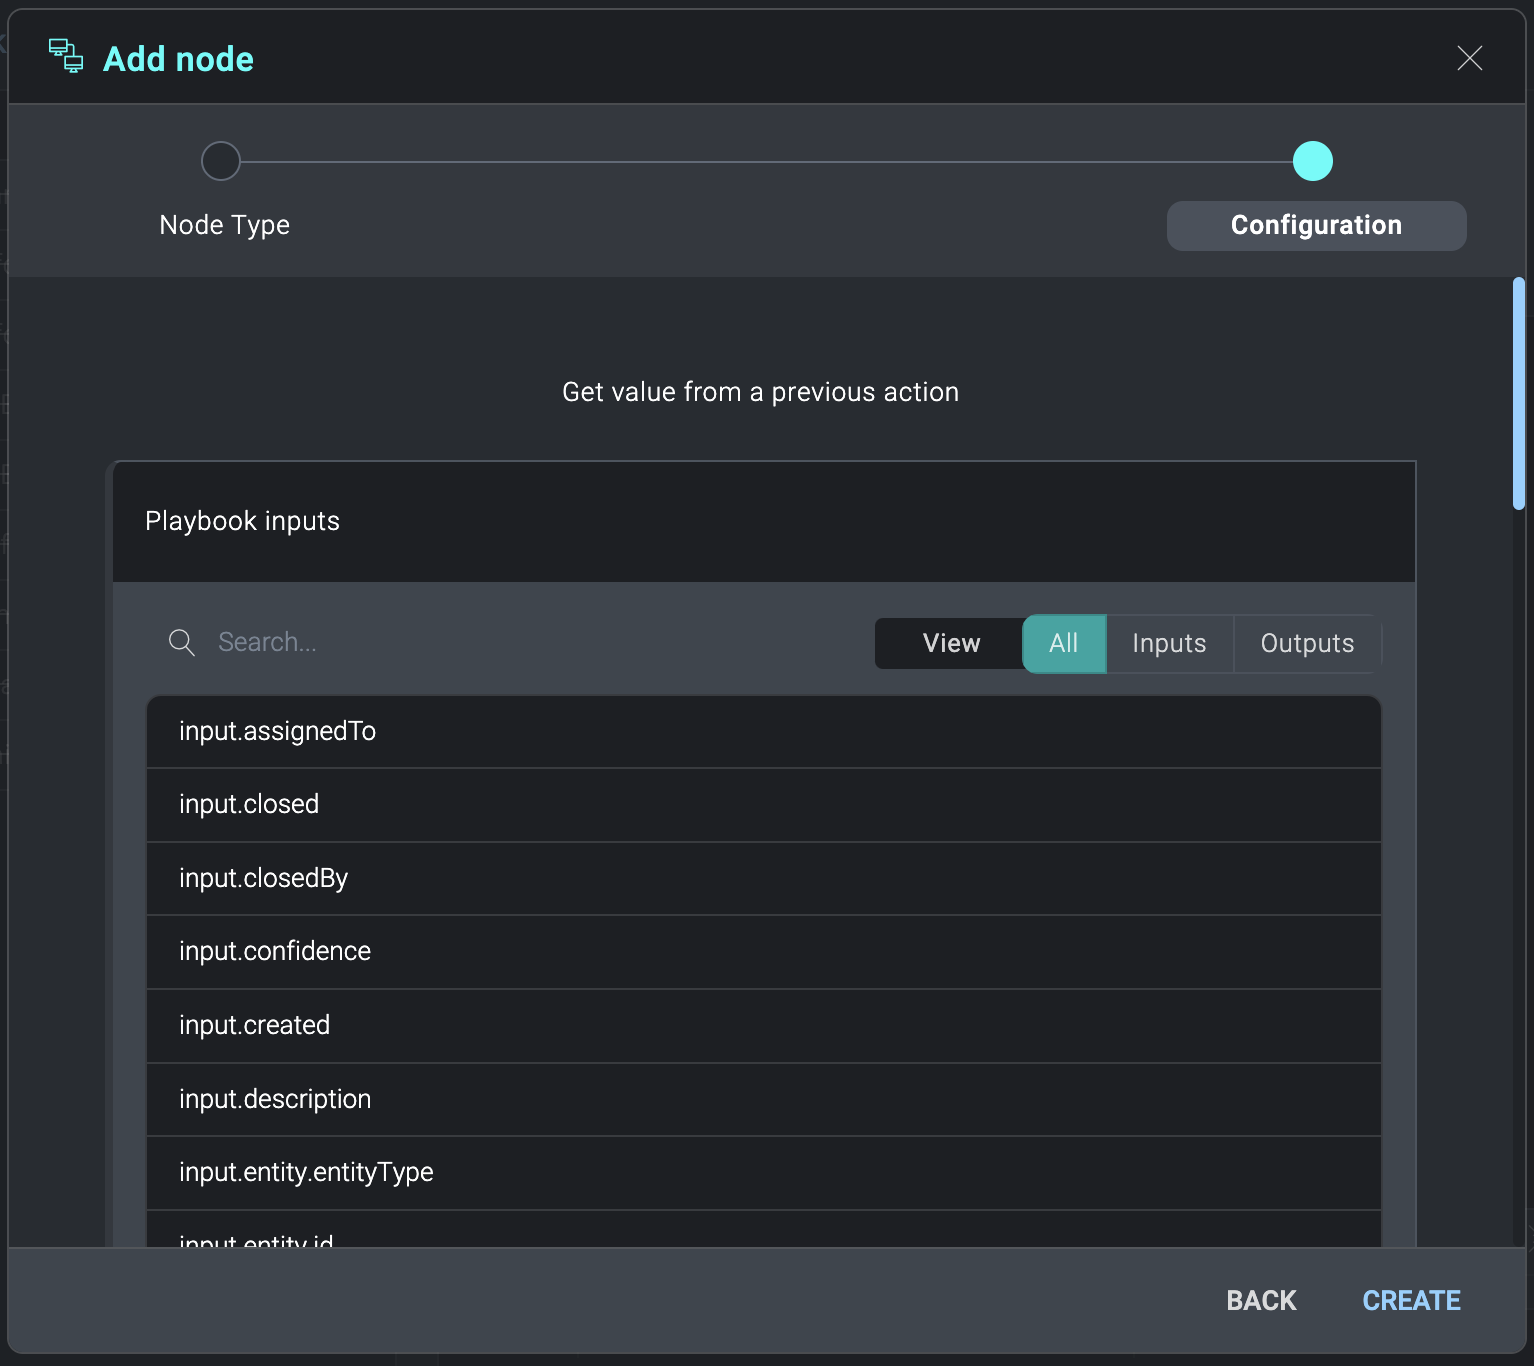
- To the right of the Insight ID field, click the gear icon.
- Click Playbook inputs and select input.readableId.
- In the Enrichment name field, type VirusTotal IP reputation.
- To the right of the Raw JSON field, click the gear icon.
- Click IP reputation V3 and select output.raw.
- Click Create.
- Click and hold on the right semicircle of the new Add Insight Enrichment node and drag to the semicircle of the END node and release. The playbook is complete.
- Save the playbook:
- Click the Save button (floppy disk icon) at the bottom of the playbook view.
- To test the playbook, click the kebab button in the upper-right of the UI and select Run Test.
- Click the Publish button (clipboard icon) at the bottom of the playbook view. The playbook should look like this:

- Create an automation in Cloud SIEM to run the playbook:
- Classic UI. In the main Sumo Logic menu select Cloud SIEM. In the top menu select Configuration, and then under Integrations select Automation.
New UI. In the top menu select Configuration, and then under Cloud SIEM Integrations select Automation. You can also click the Go To... menu at the top of the screen and select Automation. - At the top of the Automation tab, click + Add Automation.
- For Playbook, select the playbook you created in the previous steps.
- For Object (expects attributes for), select Insight.
- For Execution, select Manually Done.
- Click Save.
- Classic UI. In the main Sumo Logic menu select Cloud SIEM. In the top menu select Configuration, and then under Integrations select Automation.
- Run the automation:
- Select Insights from the main Cloud SIEM screen.
- Select an insight.
- Click the Actions button.
- Under Insight Automation, select the automation you created in the previous step (it will have the same name as the playbook). The playbook runs.
- To see the results of the run, click the Automations tab at the top of the insight.
- View the Status field to find out if the playbook has a status of Success or another status such as Completed with errors.
- Click View Playbook to see details of the playbook run. Each node in the playbook will show either Success or Failed.
- Click a node to download results of that node’s run.
Playbook inputs
Depending on the action, you may need to select a playbook input. The playbook inputs define the kind of input data needed for the action. For descriptions of the playbook inputs, see the responses on the Get an Insight API.
Intermediate example: Configure a notification
The following example shows how to configure a notification that sends an email upon completion of an action to perform a log search in Sumo Logic core platform.
- Edit the Sumo Logic resource:
- Classic UI. In the main Sumo Logic menu, select Automation and then select Integrations in the left nav bar.
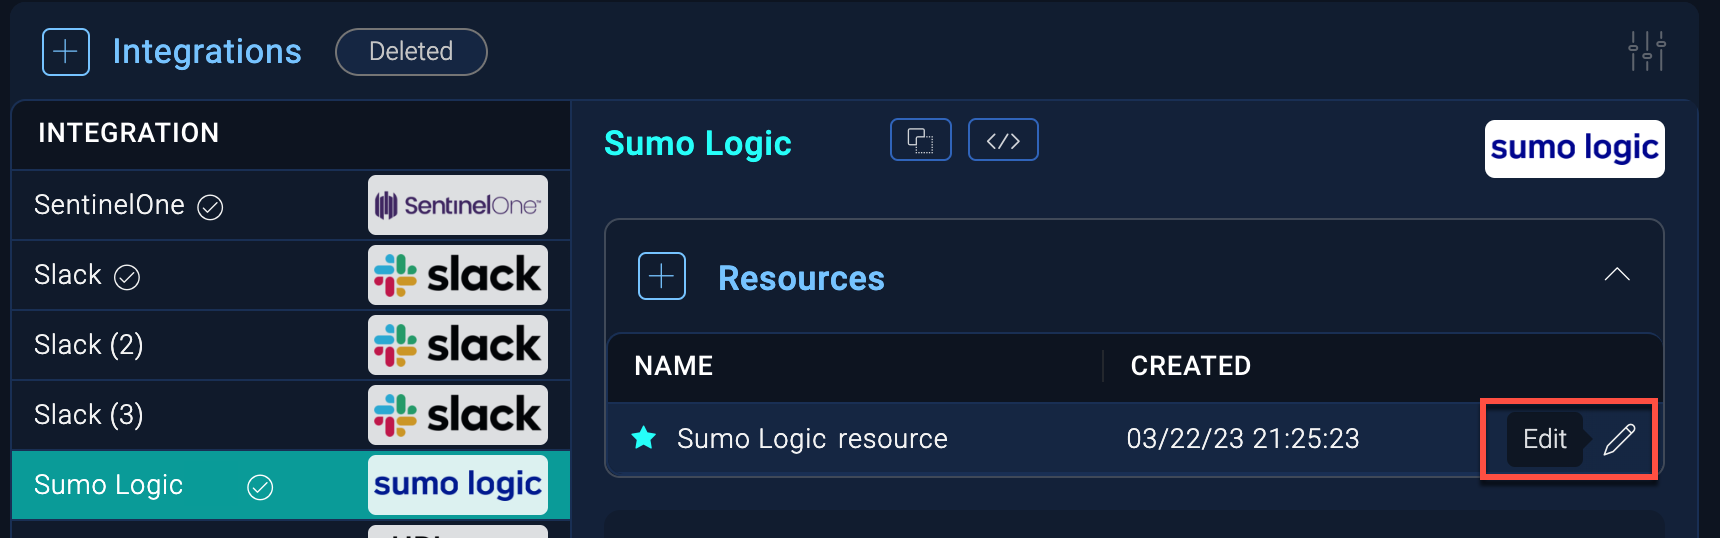
New UI. In the main Sumo Logic menu, select Automation > Integrations. You can also click the Go To... menu at the top of the screen and select Integrations. - Select Sumo Logic.
- Hover your mouse over the resource name and click the Edit button that appears.
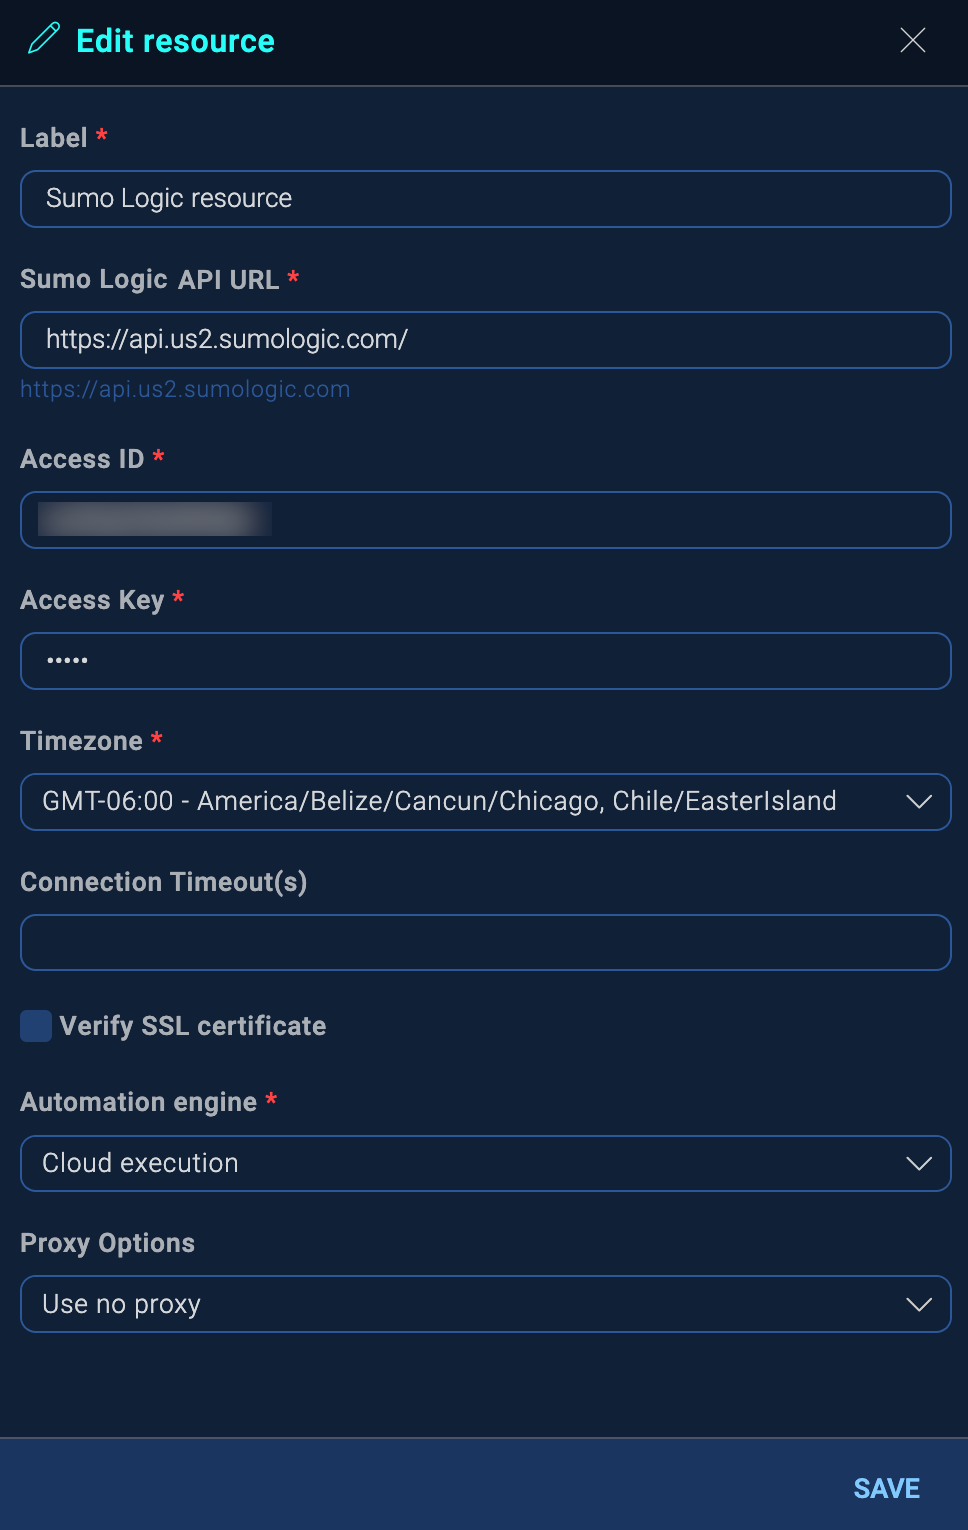
- In the Edit resource dialog, enter the API URL for your Sumo Logic core platform instance (for example,
https://api.us2.sumologic.com). For the URL to use for your Sumo Logic instance, see Sumo Logic Endpoints by Deployment and Firewall Security. - Create an access key and copy the resulting access ID and access key.
- Enter the Access ID and the Access Key.
- Select your Time Zone.
- Click Save.
- Classic UI. In the main Sumo Logic menu, select Automation and then select Integrations in the left nav bar.
- Create the playbook:
- Classic UI. In the main Sumo Logic menu, select Automation > Playbooks.
New UI. In the main Sumo Logic menu, select Automation > Playbooks. You can also click the Go To... menu at the top of the screen and select Playbooks. - Click the + button to the left of Playbook.
- In the New playbook dialog, give your playbook a Name, such as Notification for a log search.
- For Type, enter CSE.
- Enter a Description.
- Click Create.
- Classic UI. In the main Sumo Logic menu, select Automation > Playbooks.
- Add the "Search Sumo Logic" action to the playbook:
- Click the Edit button (pencil icon) at the bottom of the playbook view.
- Click the Edit button (pencil icon) on the START node.
- In the Edit node dialog, select Insight from the dropdown menu and click UPDATE.
- Click the Add Node button (+ icon) on START.
- In the Add node dialog, select Action.
- For Integration, select Sumo Logic.
- Ensure that Type is Enrichment.
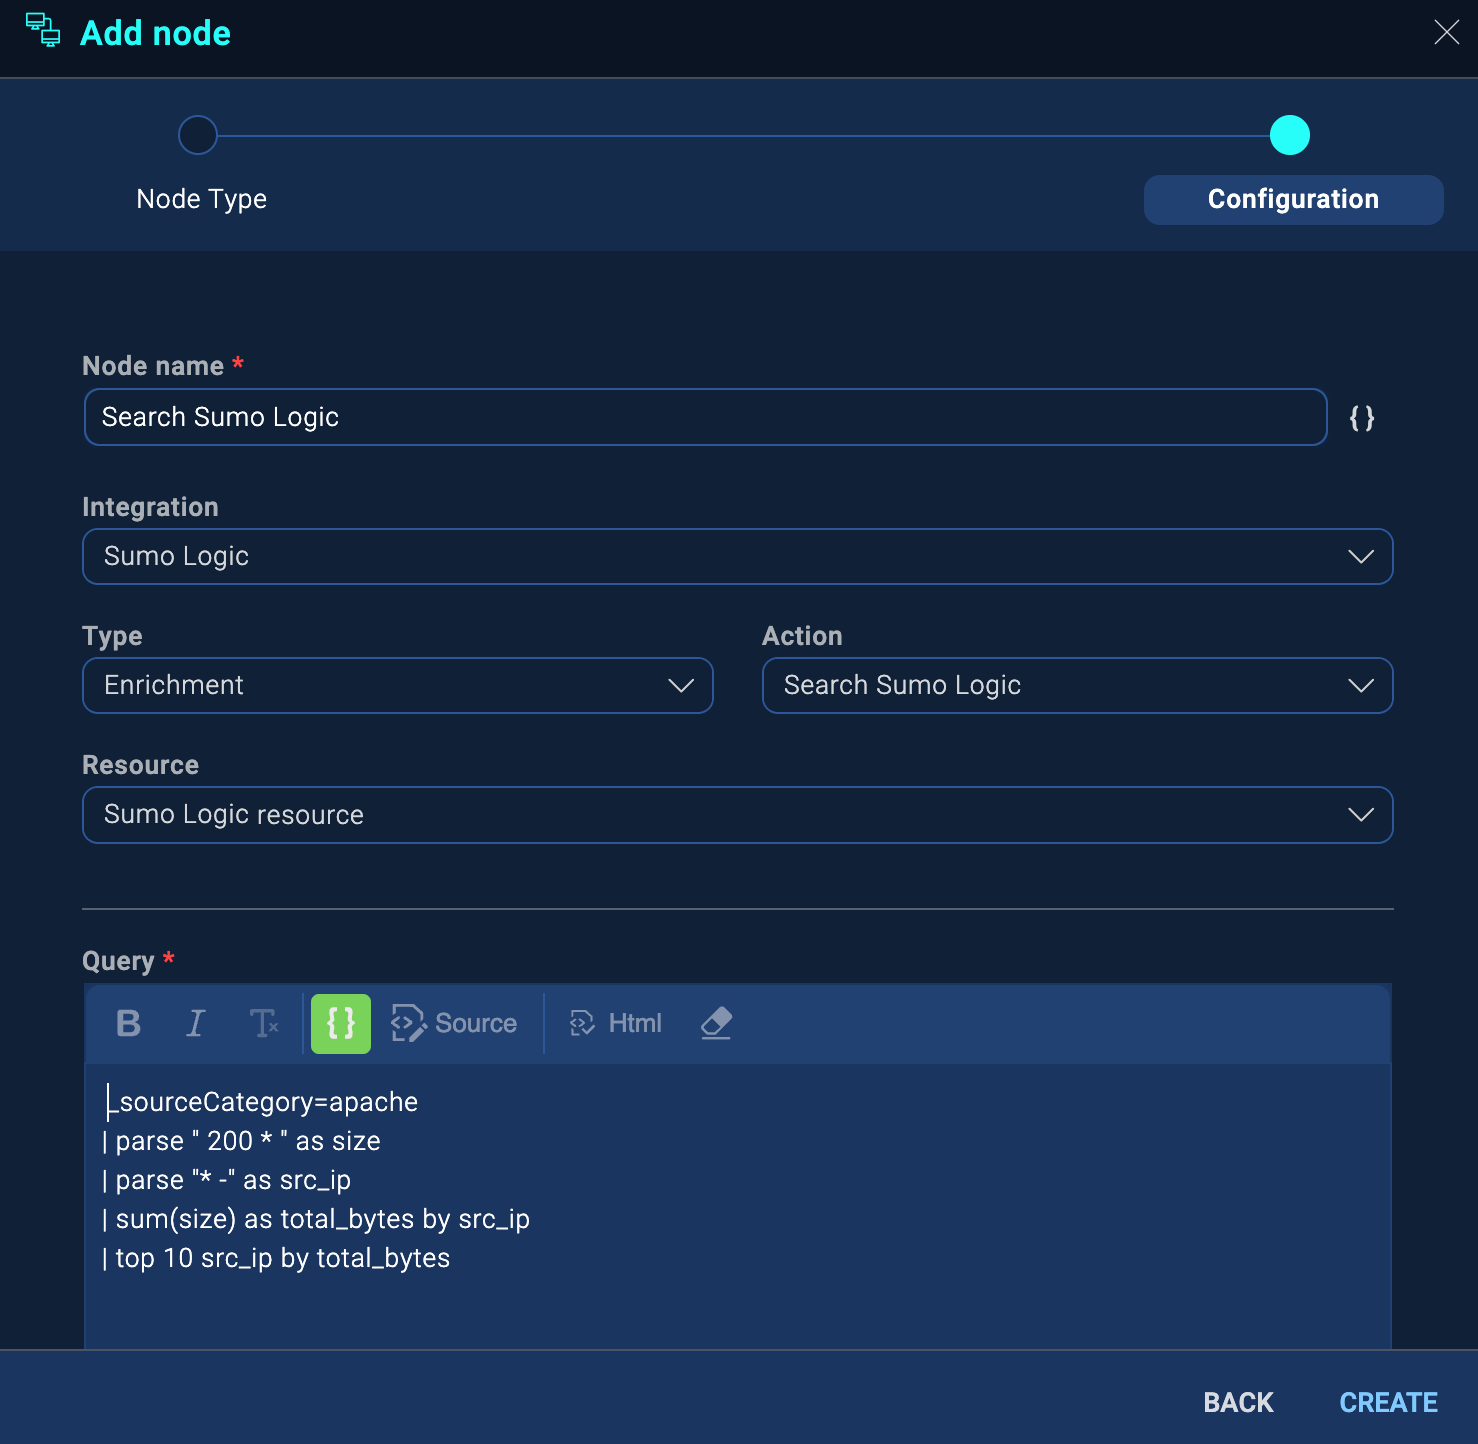
- For Action, select Search Sumo Logic.
- In the Query box enter the search query you want to make in the Sumo Logic core platform. For help with queries, see General Search Examples Cheat Sheet.
- For Last Period select 1 Hour.
- Click Create.
- Add the "Send Email" action to the playbook:
- Hover your mouse over the new Search Sumo Logic node.
- Click the Add Node button (+ icon) at the bottom of the Search Sumo Logic node.
- Select Action.
- In the Add node dialog, for Integration select Basic Tools.
- Ensure that Type is Notification.
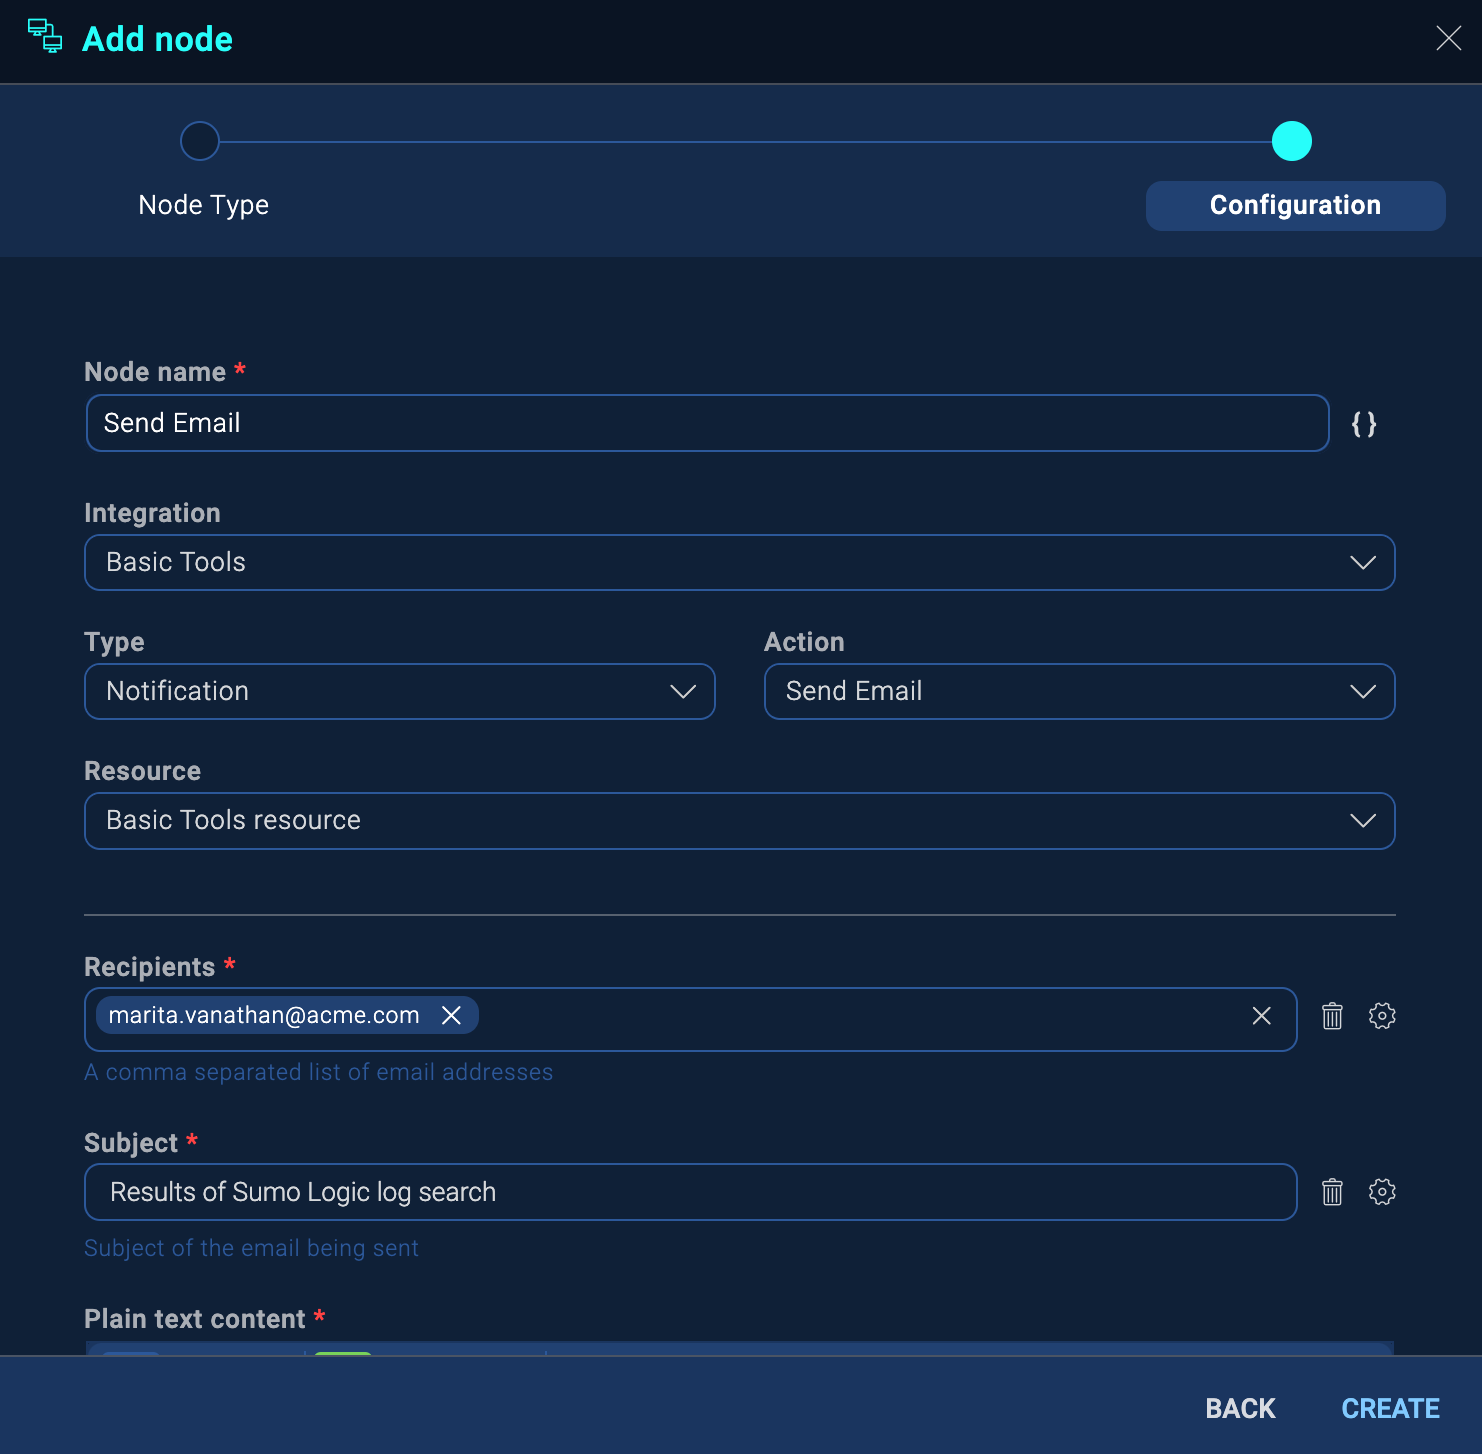
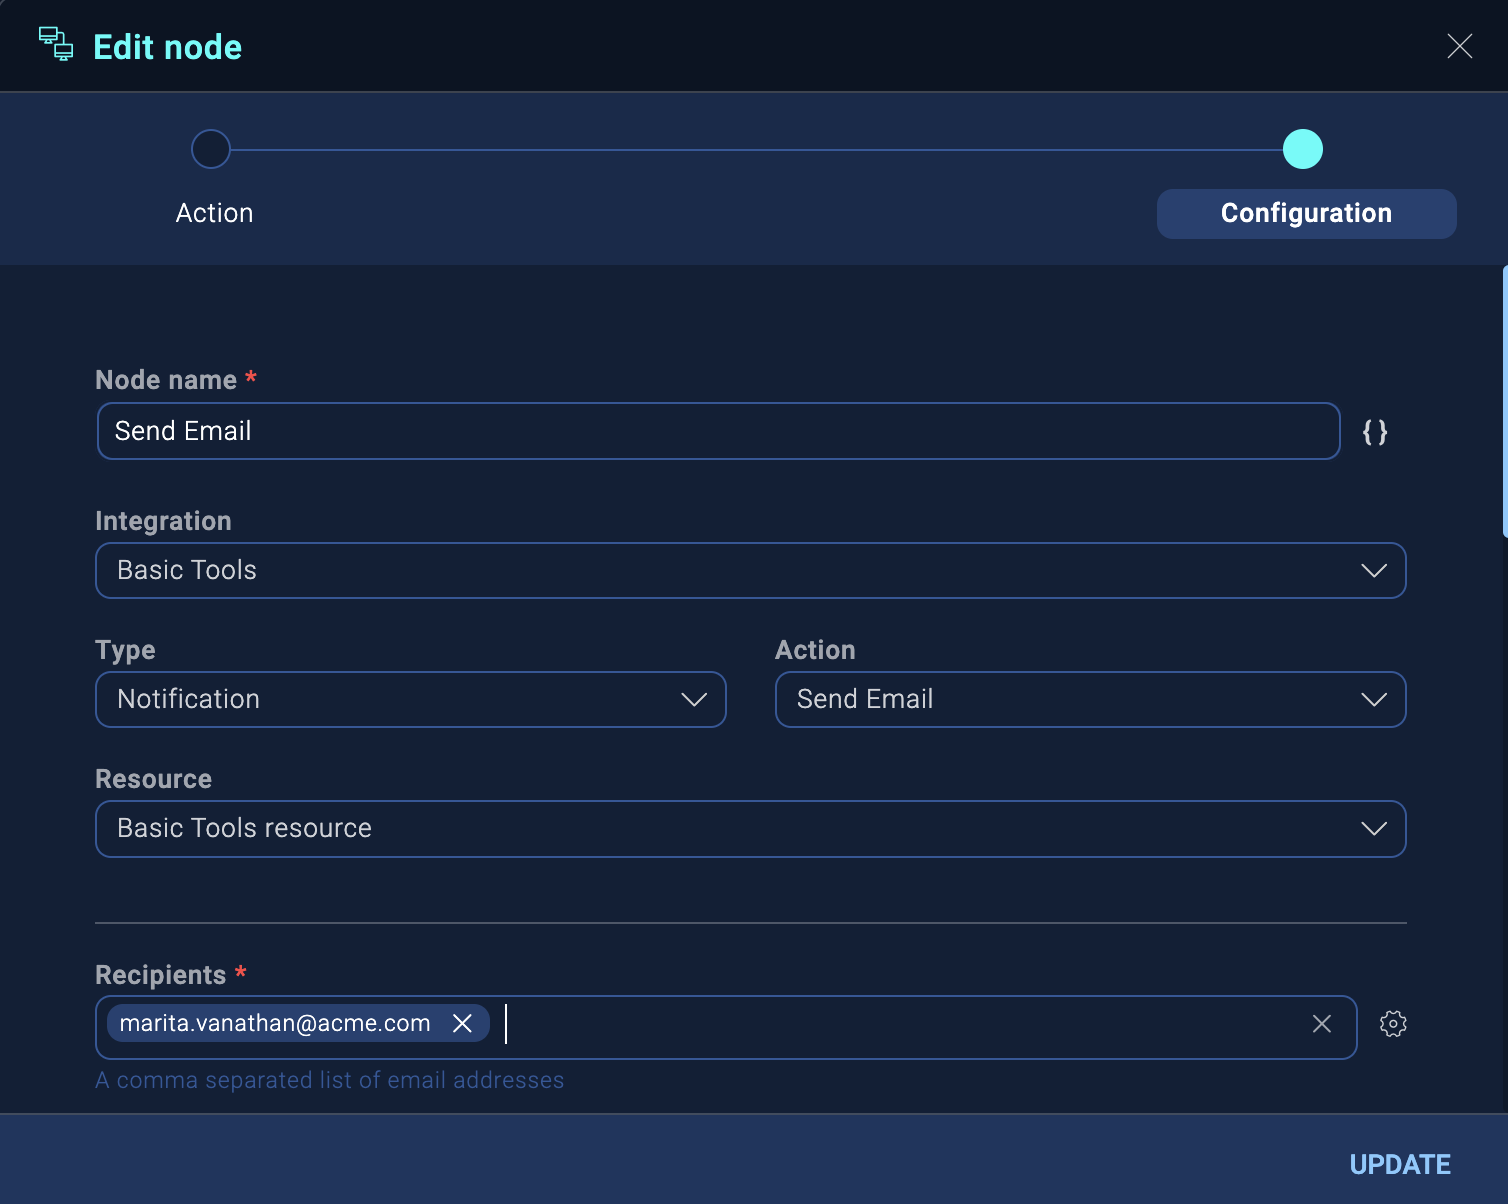
- For Action select Send Email.
- In Recipients enter your email address and press Enter.
- For Subject type a subject line for the email (for example, "Results of Sumo Logic log search").
- In Plain text content enter the text you want to appear in the body of the email. For example, enter "Search in Sumo Logic was executed. Click the Automations tab at the top of the insight for which the 'Notification for a log search' automation was run. Click 'View Playbook' to see the results."
- Copy the plain text content into HTML content and add formatting if desired.
- Click Create.
- Click and hold on the right semicircle of the new Send Email node and drag to the semicircle of the END node and release. The playbook is complete.
- Save the playbook:
- Click the Save button (floppy disk icon) at the bottom of the playbook view.
- To test the playbook, click the kebab button in the upper-right of the UI and select Run Test.
- Click the Publish button (clipboard icon) at the bottom of the playbook view. The playbook should look like this:

- Create an automation in Cloud SIEM to run the playbook:
- Classic UI. In the main Sumo Logic menu select Cloud SIEM. In the top menu of Cloud SIEM select Configuration, and then under Integrations select Automation.
New UI. In the top menu select Configuration, and then under Cloud SIEM Integrations select Automation. - At the top of the Automation tab, click + Add Automation.
- For Playbook, select the playbook you created in the previous steps.
- For Object (expects attributes for), select Insight.
- For Execution, select Manually Done.
- Click Save.
- Classic UI. In the main Sumo Logic menu select Cloud SIEM. In the top menu of Cloud SIEM select Configuration, and then under Integrations select Automation.
- Run the automation:
- Select Insights from the main Cloud SIEM screen.
- Select an insight.
- Click the Actions button.
- Under Insight Automation, select the automation you created in the previous step (it will have the same name as the playbook). The playbook runs.
- To see the results of the run, click the Automations tab at the top of the insight.
- View the Status field to find out if the playbook has a status of Success or another status such as Completed with errors.
- Click View Playbook to see details of the playbook run. Each node in the playbook will show either Success or Failed.
- Click a node to download results of that node’s run.
Advanced example: Configure a custom integration
The following example shows how to create a custom integration with an action that runs a script you provide. The custom integration and action are defined by YAML files. To learn how to build your own YAML files, see Integration framework file formats.
The action uses IP Quality Score to gather IP reputation information for enrichment. (This example shows how to add enrichment to an insight. To use the same action to add enrichment to entities, see Add entity enrichment below.)
- Install the Automation Service Bridge. Because this example uses a custom integration, you must first install the Bridge before you proceed.
- Obtain an API key from IP Quality Score:
- Create a free account on IP Quality Score.
- Log in.
- Go to your account settings and copy the API Key. You will use this key later.
- Create a new IP Quality Score integration:
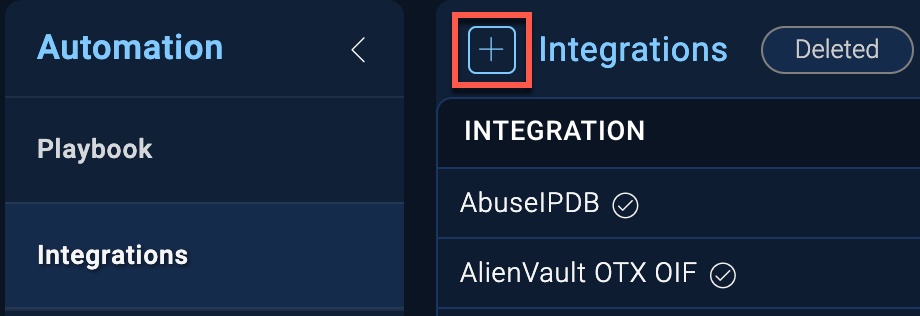
- Classic UI. In the main Sumo Logic menu, select Automation and then select Integrations in the left nav bar.
New UI. In the main Sumo Logic menu, select Automation > Integrations. You can also click the Go To... menu at the top of the screen and select Integrations. - Click the + icon at the top of the screen to the left of Integrations.
- Download this file: IP-Quality-Score-Test.yaml.
- In the New Integration dialog, click Upload File.
- Drag the file into the Select File box.
- Click Upload. An IP Quality Score integration is created.
- Open the new IP Quality Score integration.
- Hover your mouse over the IP Quality Score name and click the Upload button that appears.

- In the Upload dialog, select Action in the Type field and click Next.
- Download this file: IP-Reputation.yaml.
- In the Upload dialog, click Upload File.
- Drag the file into the Select File box.
- Click Upload. The IP Reputation action appears in the IP Quality Score integration.
- Classic UI. In the main Sumo Logic menu, select Automation and then select Integrations in the left nav bar.
- Add the IP Quality Score integration resource:
- Click the + button to the left of Resources.
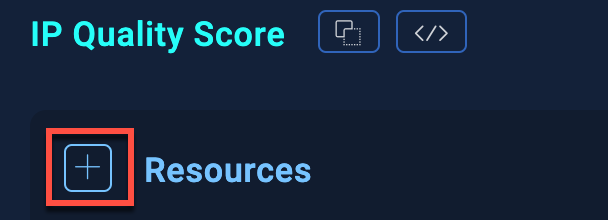
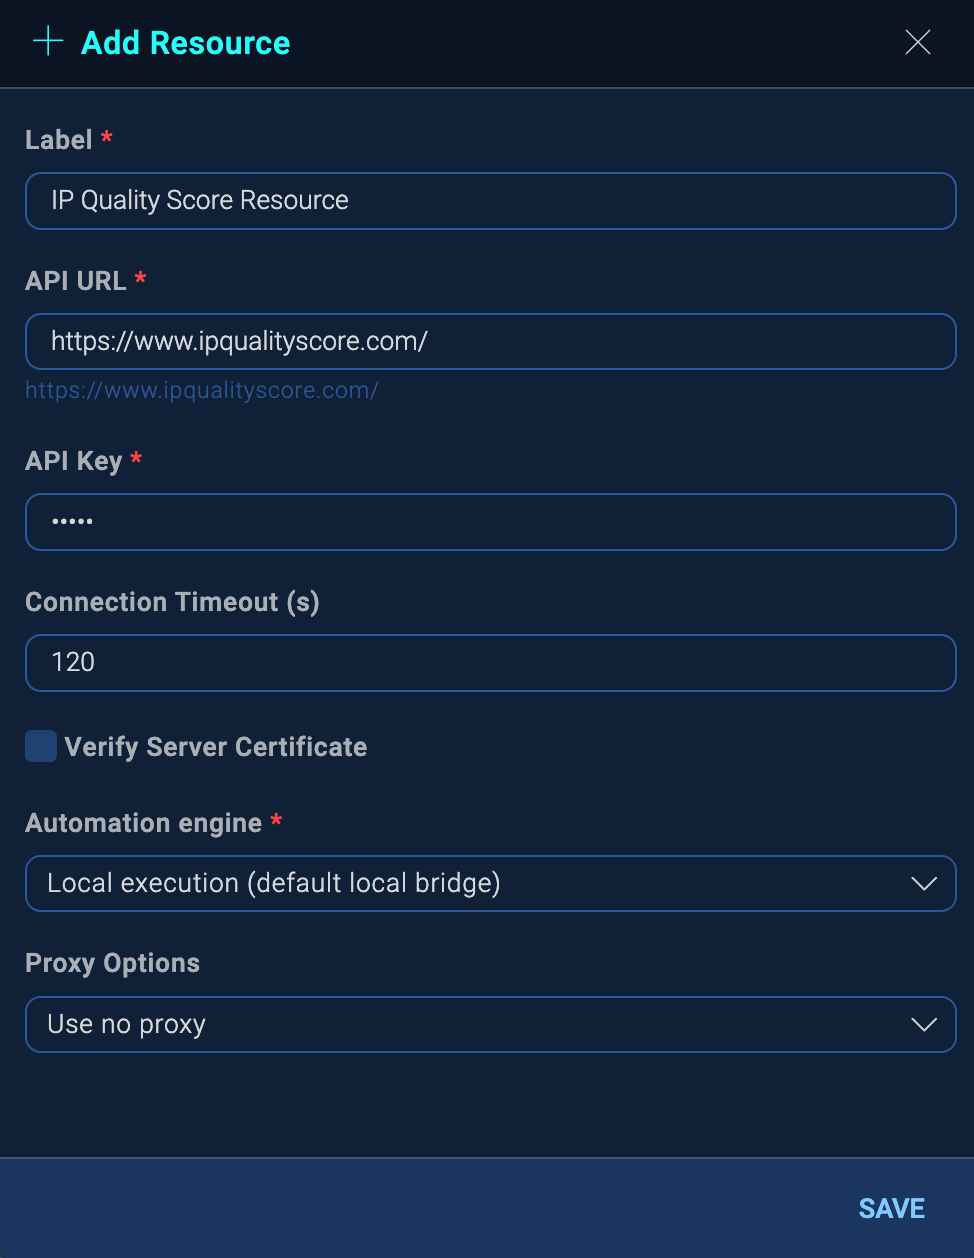
- Fill out the Add Resource dialog:
- Label: Enter IP Quality Score Resource.
- API URL: Enter
https://www.ipqualityscore.com/. - API Key: Enter the API key you previously obtained from IP Quality Score.
- Connection Timeout (s): Leave the default value at 120.
- Automation engine: Select the Automation Bridge you installed locally as described in the first step of this example.
- Proxy options: Select Use no proxy.
- Click Save.
- Click the + button to the left of Resources.
- Create the playbook:
- Classic UI. In the main Sumo Logic menu, select Automation > Playbooks.
New UI. In the main Sumo Logic menu, select Automation > Playbooks. You can also click the Go To... menu at the top of the screen and select Playbooks. - Click the + button to the left of Playbook.
- Give your playbook a Name, such as Custom Enrichment with IP Quality Score.
- For Type, select CSE.
- Enter a Description.
- Click Create.
- Classic UI. In the main Sumo Logic menu, select Automation > Playbooks.
- Select the input parameters for the playbook:
- Click the Edit button (pencil icon) at the bottom of the playbook view.
- On the Start node, click the Edit button (pencil icon).
- In the Edit node dialog, select Insight in the Add one or more params as a playbook input field. (If you want to create a playbook to add entity enrichment instead, see Add entity enrichment below.)
- Click Update.
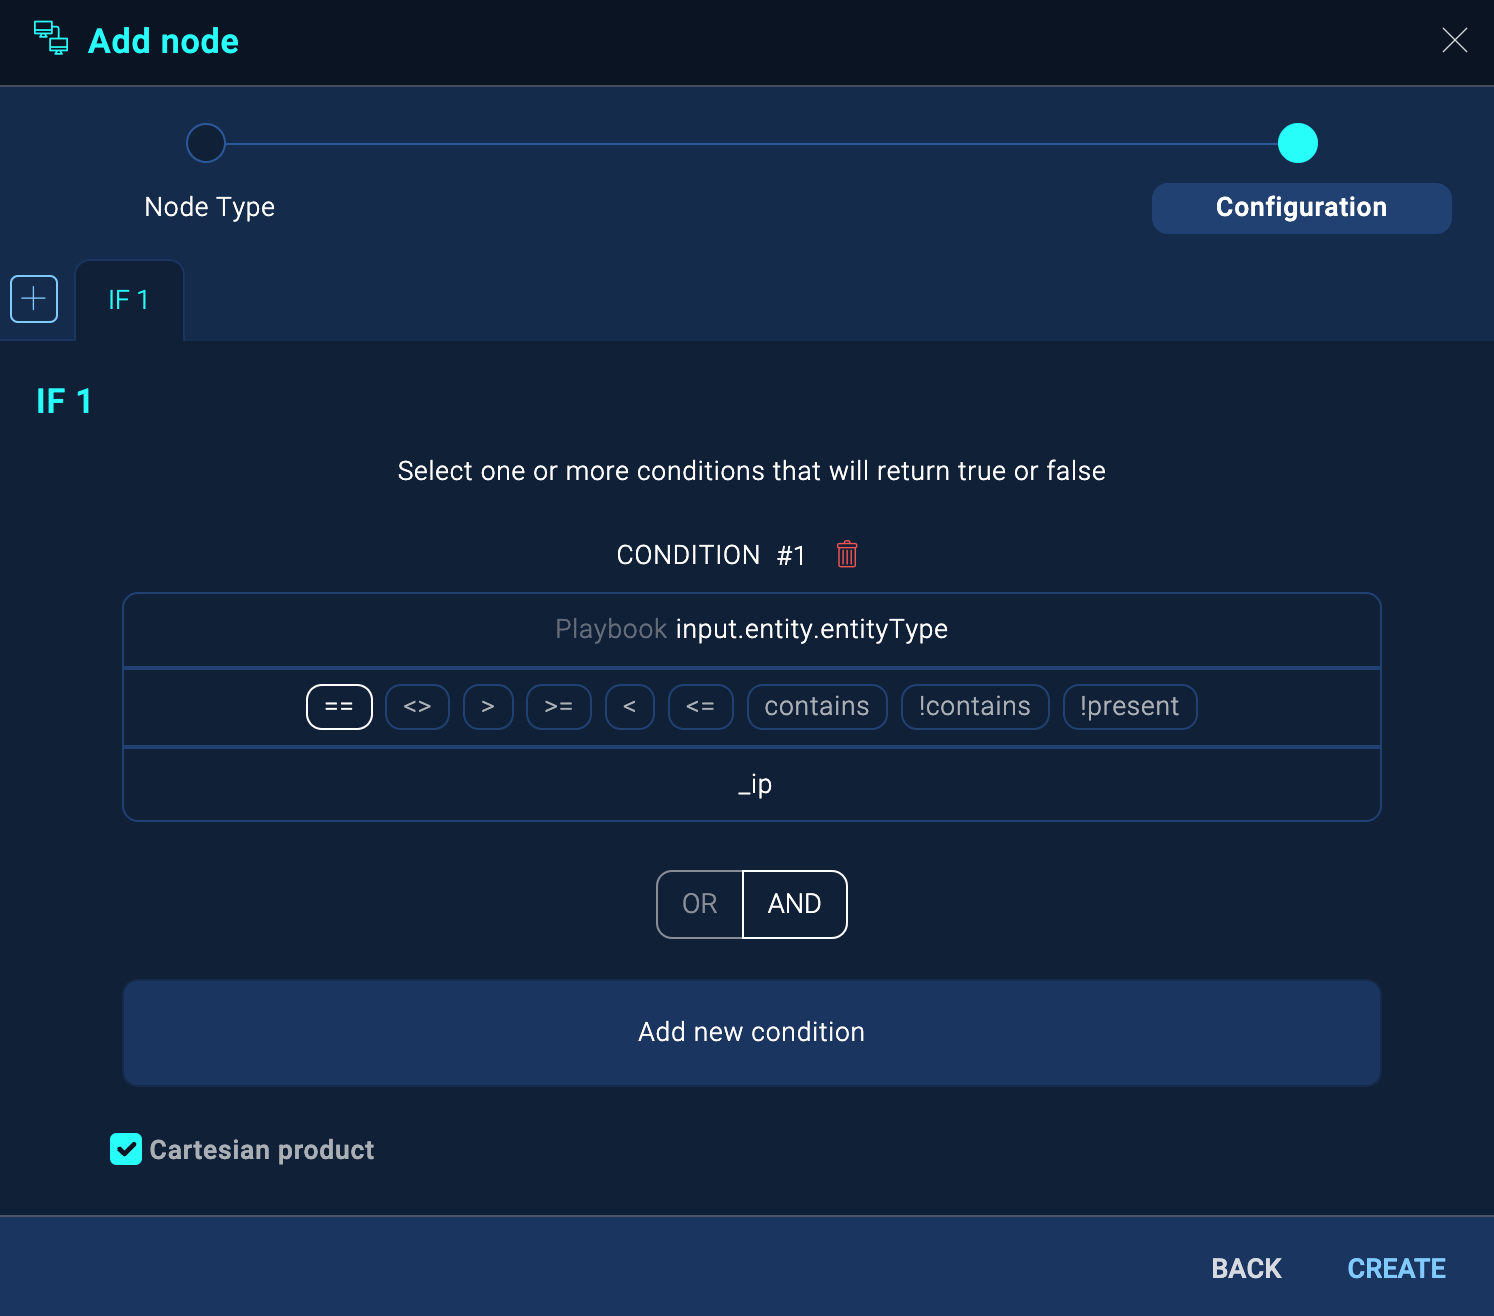
- Add a condition to validate IP addresses:
- Click the Add Node button (+ icon) on the START node.
- In the Add node dialog, click Condition.
- Just below Condition #1, click the top Select a value in the dialog.
- Click Playbook inputs.
- Select input.entity.entityType.
- Click the bottom Select a value in the dialog.
- In Get value, type _ip and press Enter.
- Click Create.
- Click and hold on the FAILURE (red) semicircle of the new condition node, and drag to the semicircle of the END node and release. This tells the playbook that if there are no valid IP addresses on entities, the playbook should end.
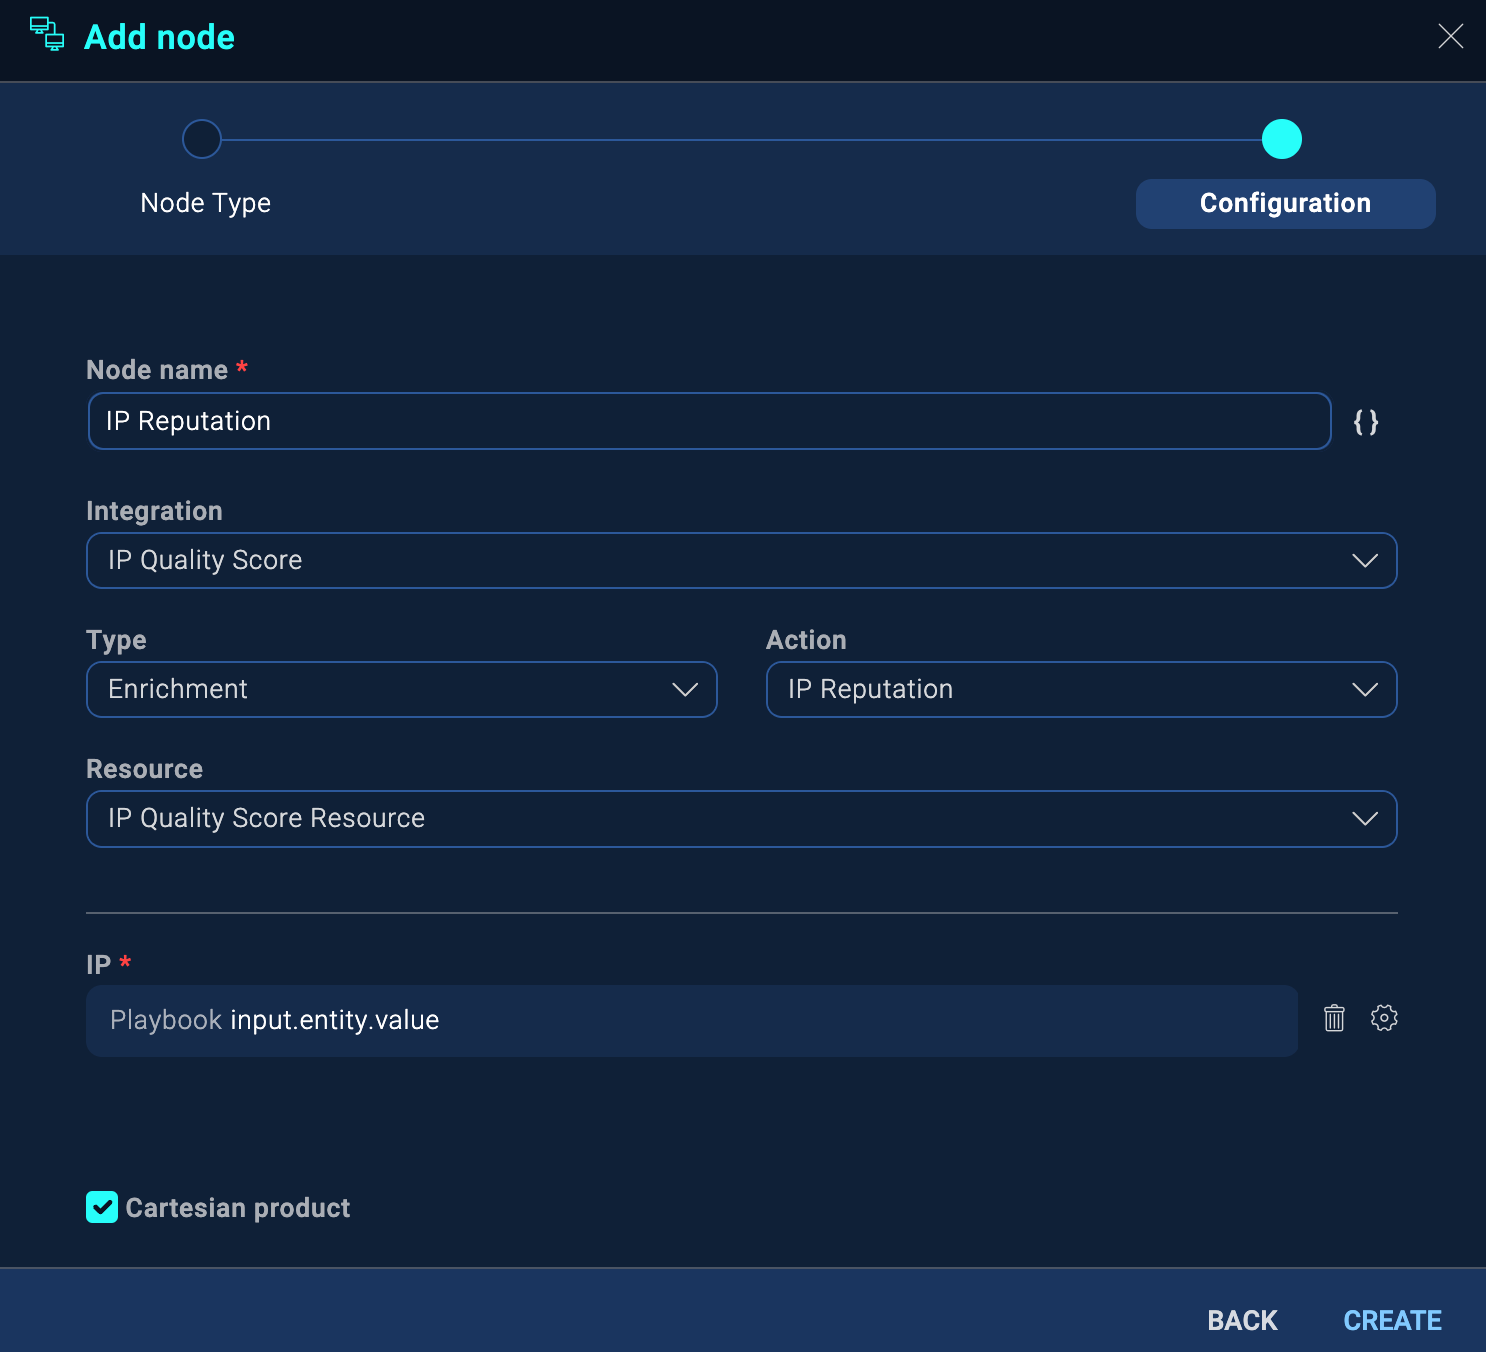
- Add the “IP Reputation” action to the playbook:
- Click the Add Node button (+ icon) on the CONDITION node.
- In the Add node dialog, click Action.
- In the Integration field, select IP Quality Score.
- In the Action field, select IP Reputation.
- To the right of the IP field, click the gear icon.
- Click Playbook inputs.
- Select input.entity.value.
- Click Create.
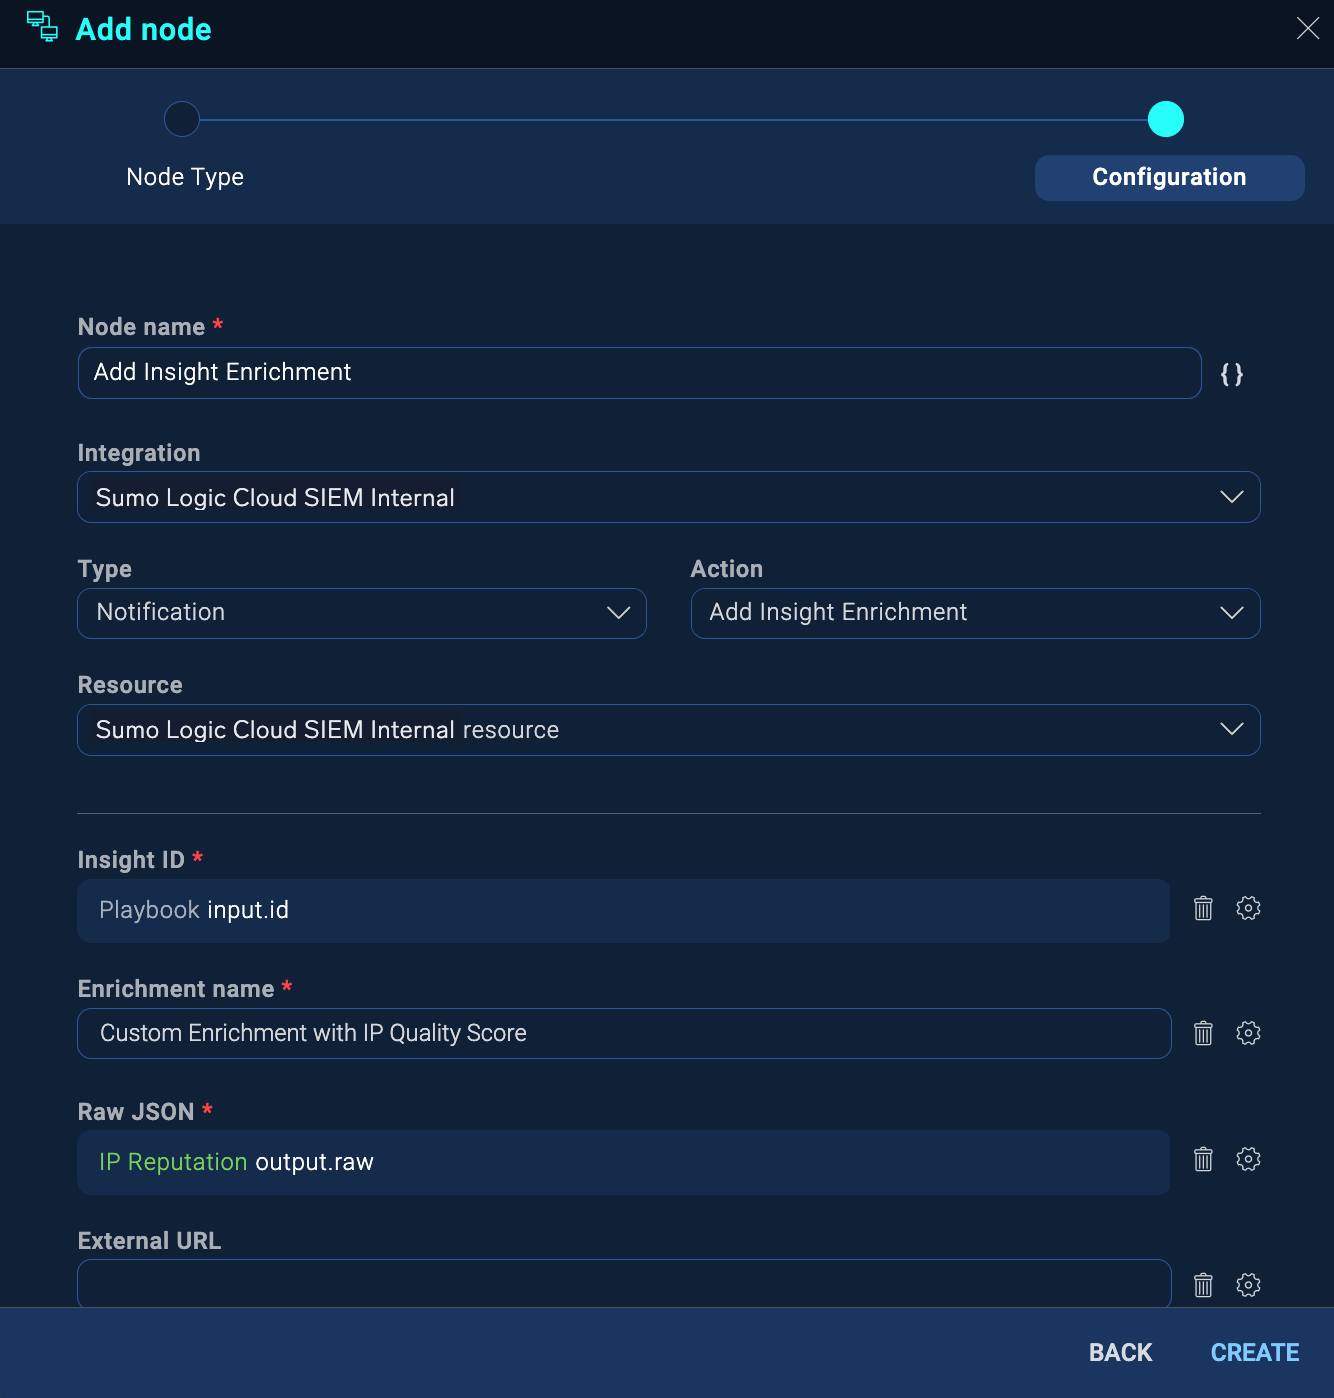
- Add the “Add Insight Enrichment” action to the playbook:
- Hover your mouse over the new IP Reputation node.
- Click the Add Node button (+ icon) at the bottom of the IP Reputation node.
- In the Add node dialog, click Action.
- In the Integration field, select Sumo Logic Cloud SIEM Internal.
- In the Type field, select Notification.
- In the Action field, select Add Insight Enrichment.
- To the right of the Insight ID field, click the gear icon.
- Click Playbook inputs.
- Select input.id.
- In the Enrichment name field, enter the name of your playbook, for example, Custom Enrichment with IP Quality Score.
- To the right of the Raw JSON field, click the gear icon.
- Click IP Reputation.
- Select output.raw.
- Click Create.
- Click and hold on the right semicircle of the new Add Insight Enrichment node and drag to the semicircle of the END node and release. The playbook is complete.
- Save the playbook:
- Click the Save button (floppy disk icon) at the bottom of the playbook view.
- To test the playbook, click the kebab button in the upper-right of the UI and select Run Test.
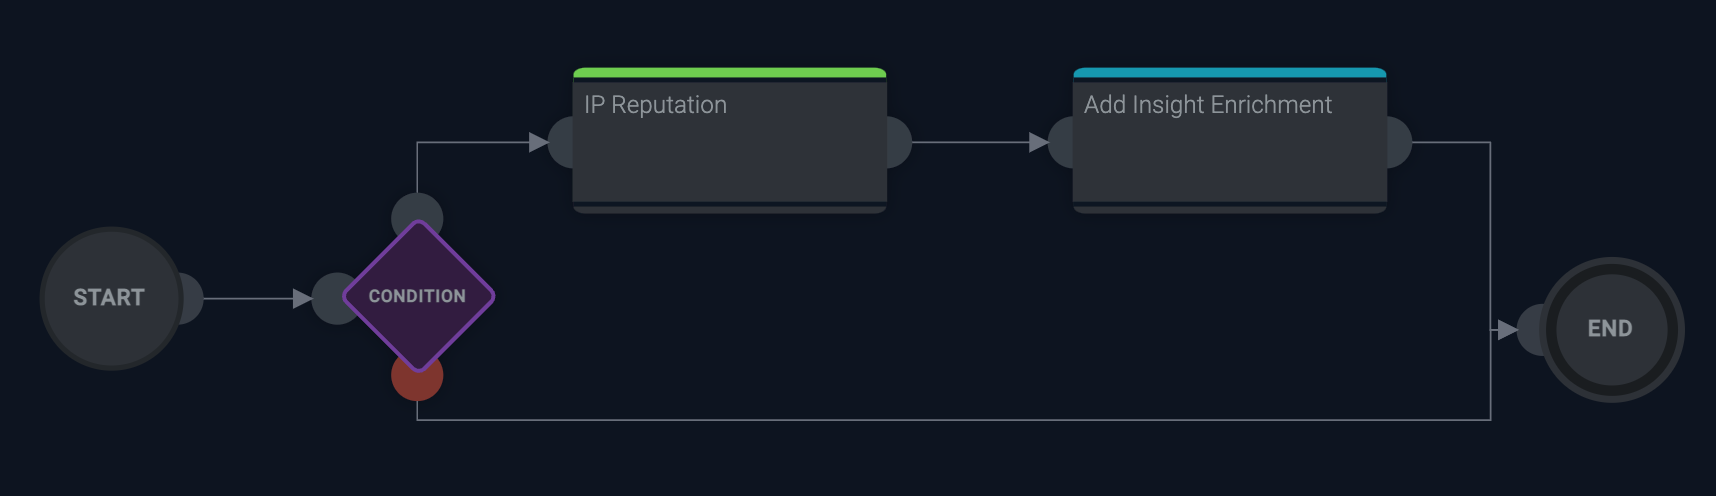
- Click the Publish button (clipboard icon) at the bottom of the playbook view. The playbook should look like this:
- Create an automation in Cloud SIEM to run the playbook:
- Classic UI. In the main Sumo Logic menu select Cloud SIEM. In the top menu select Configuration, and then under Integrations select Automation.
New UI. In the top menu select Configuration, and then under Cloud SIEM Integrations select Automation. - At the top of the Automation tab, click + Add Automation.
- For Playbook, select the playbook you created in the previous steps.
- For Object (expects attributes for), select Insight.
- For Execution, select Manually Done.
- Click Save.
- Classic UI. In the main Sumo Logic menu select Cloud SIEM. In the top menu select Configuration, and then under Integrations select Automation.
- Run the automation:
- Select Insights from the main Cloud SIEM screen.
- Select an Insight.
- Click the Actions button.
- Under Insight Automation, select the automation you created in the previous step (it will have the same name as the playbook). The playbook runs.
- To see the results of the run, click the Automations tab at the top of the insight.
- View the Status field to find out if the playbook has a status of Success or another status such as Completed with errors.
- Click View Playbook to see details of the playbook run. Each node in the playbook will show either Success or Failed.
- Click a node to download results of that node’s run.
- Go back to the insight and click the Enrichments tab to view the enrichments added by the automation.
Add entity enrichment
The preceding example shows how to use a custom integration to add enrichment to an insight. To add enrichment to entities instead, use the same steps but with the following changes:
- When you select the input parameters for the playbook, in the Edit node dialog, select Entity instead of Insight in the Add one or more params as a playbook input field.
- When you add a condition to validate IP addresses, for Playbook inputs select input.entityType instead of input.entity.entityType.
- When you add the “IP Reputation” action to the playbook, for Playbook inputs select input.value instead of input.entity.value.
- Instead of adding the “Add Insight Enrichment” action to the playbook, add the “Add Entity Enrichment” action.
The resulting playbook should look like this: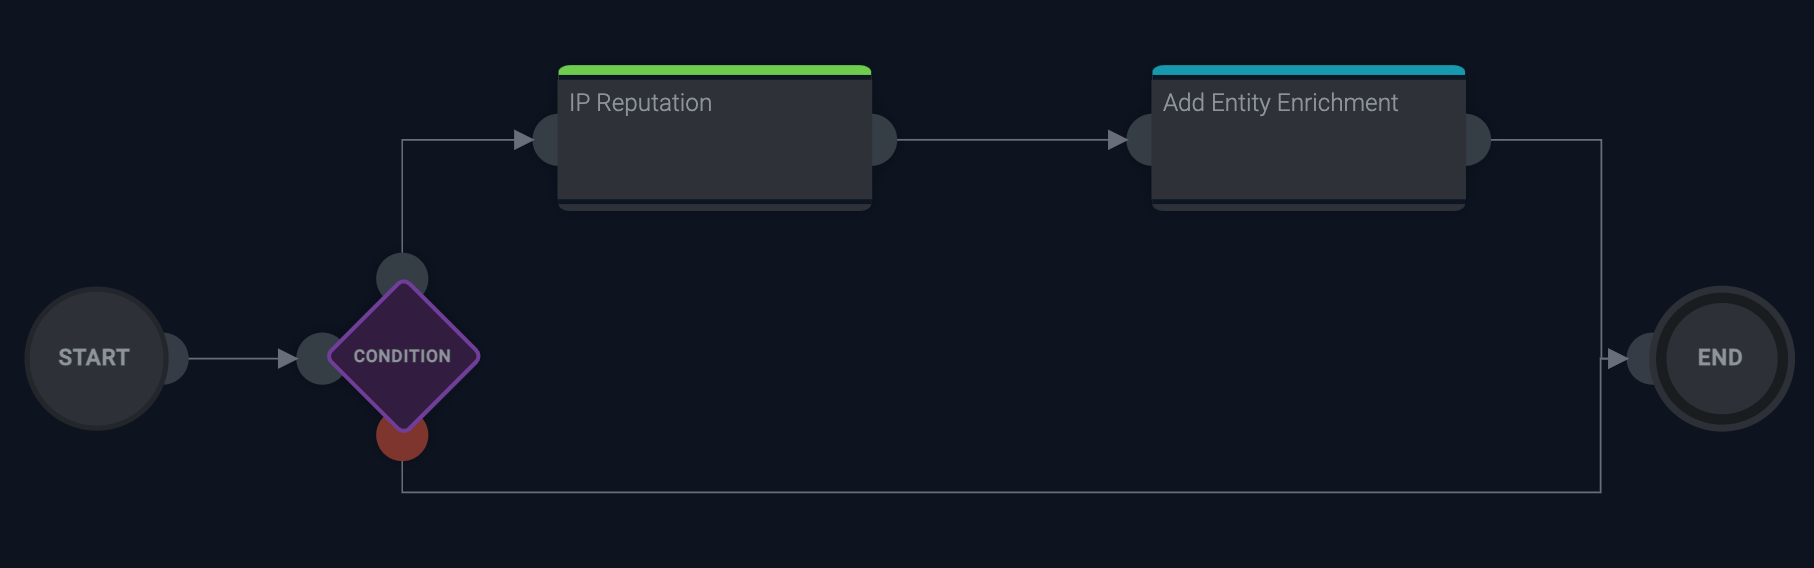
Advanced example: Build a complex playbook
The following example pulls together elements of the Simple example and Intermediate example above. The resulting playbook runs an enrichment using VirusTotal, performs a Sumo Logic search, and sends an email notification.
- Edit the VirusTotal OIF resource:
- Classic UI. In the main Sumo Logic menu, select Automation and then select Integrations in the left nav bar.
New UI. In the main Sumo Logic menu, select Automation > Integrations. You can also click the Go To... menu at the top of the screen and select Integrations. - Select VirusTotal OIF.
- Hover your mouse over the resource name and click the Edit button that appears.
- In the Edit resource dialog, enter the API URL:
https://www.virustotal.com. - Enter the API Key. See the VirusTotal documentation to learn how to obtain the API key. If you do not already have a VirusTotal account, you need to create one to get an API key.
- Click Save.
- Classic UI. In the main Sumo Logic menu, select Automation and then select Integrations in the left nav bar.
- Edit the Sumo Logic resource:
- Classic UI. In the top menu select Configuration, and then under Integrations select Automation.
New UI. In the top menu select Configuration, and then under Cloud SIEM Integrations select Automation. - From the Automation screen, click Manage Playbooks. This opens the Automation Service UI.
- Click Integrations in the navigation menu.
- Select Sumo Logic.
- Hover your mouse over the resource name and click the Edit button that appears.
- In the Edit resource dialog, enter the API URL for your Sumo Logic core platform instance (for example,
https://api.us2.sumologic.com). For the URL to use for your Sumo Logic instance, see Sumo Logic Endpoints by Deployment and Firewall Security. - Create an access key and copy the resulting access ID and access key.
- Enter the Access ID and the Access Key.
- Select your Time Zone.
- Click Save.
- Classic UI. In the top menu select Configuration, and then under Integrations select Automation.
- Create the playbook:
- Classic UI. In the main Sumo Logic menu, select Automation > Playbooks.
New UI. In the main Sumo Logic menu, select Automation > Playbooks. You can also click the Go To... menu at the top of the screen and select Playbooks. - Click the + button to the left of Playbook.
- In the New playbook dialog, give your playbook a Name.
- For Type, enter CSE.
- Enter a Description.
- Click Create.
- Classic UI. In the main Sumo Logic menu, select Automation > Playbooks.
- Add the “IP Reputation V3” action to the playbook:
- Click the Edit button (pencil icon) at the bottom of the playbook view.
- Click the Edit button (pencil icon) on the START node.
- In the Edit node dialog, select Insight from the dropdown menu and click UPDATE.
- Click the Add Node button (+ icon) on the START node.
- Select Action.
- In the Add node dialog, for Integration select VirusTotal OIF.
- Ensure that Type is Enrichment.
- For Action, select IP reputation V3.
- To the right of the IPs field, click the gear icon.
- Click Playbook inputs and select input.entity.value.
- Click Create.
- Add an enrichment action to the playbook:
- Hover your mouse over the IP reputation V3 node and click the Add Node button (+ icon).
- Select Action.
- In the Add node dialog, for Integration, select Sumo Logic Cloud SIEM Internal.
- For Type, select Notification.
- For Action, select Add Insight Enrichment.
- To the right of the Insight ID field click the gear icon.
- Click Playbook inputs and select input.readableId.
- In the Enrichment name field type VirusTotal IP reputation.
- To the right of the Raw JSON field click the gear icon.
- Click IP reputation V3 and select output.raw.
- Click Create.
- Click and hold on the right semicircle of the new Add Insight Enrichment node and drag to the semicircle of the END node and release.
- Add a condition to validate IP addresses:
- Click the Add Node button (+ icon) on the Add Insight Enrichment node.
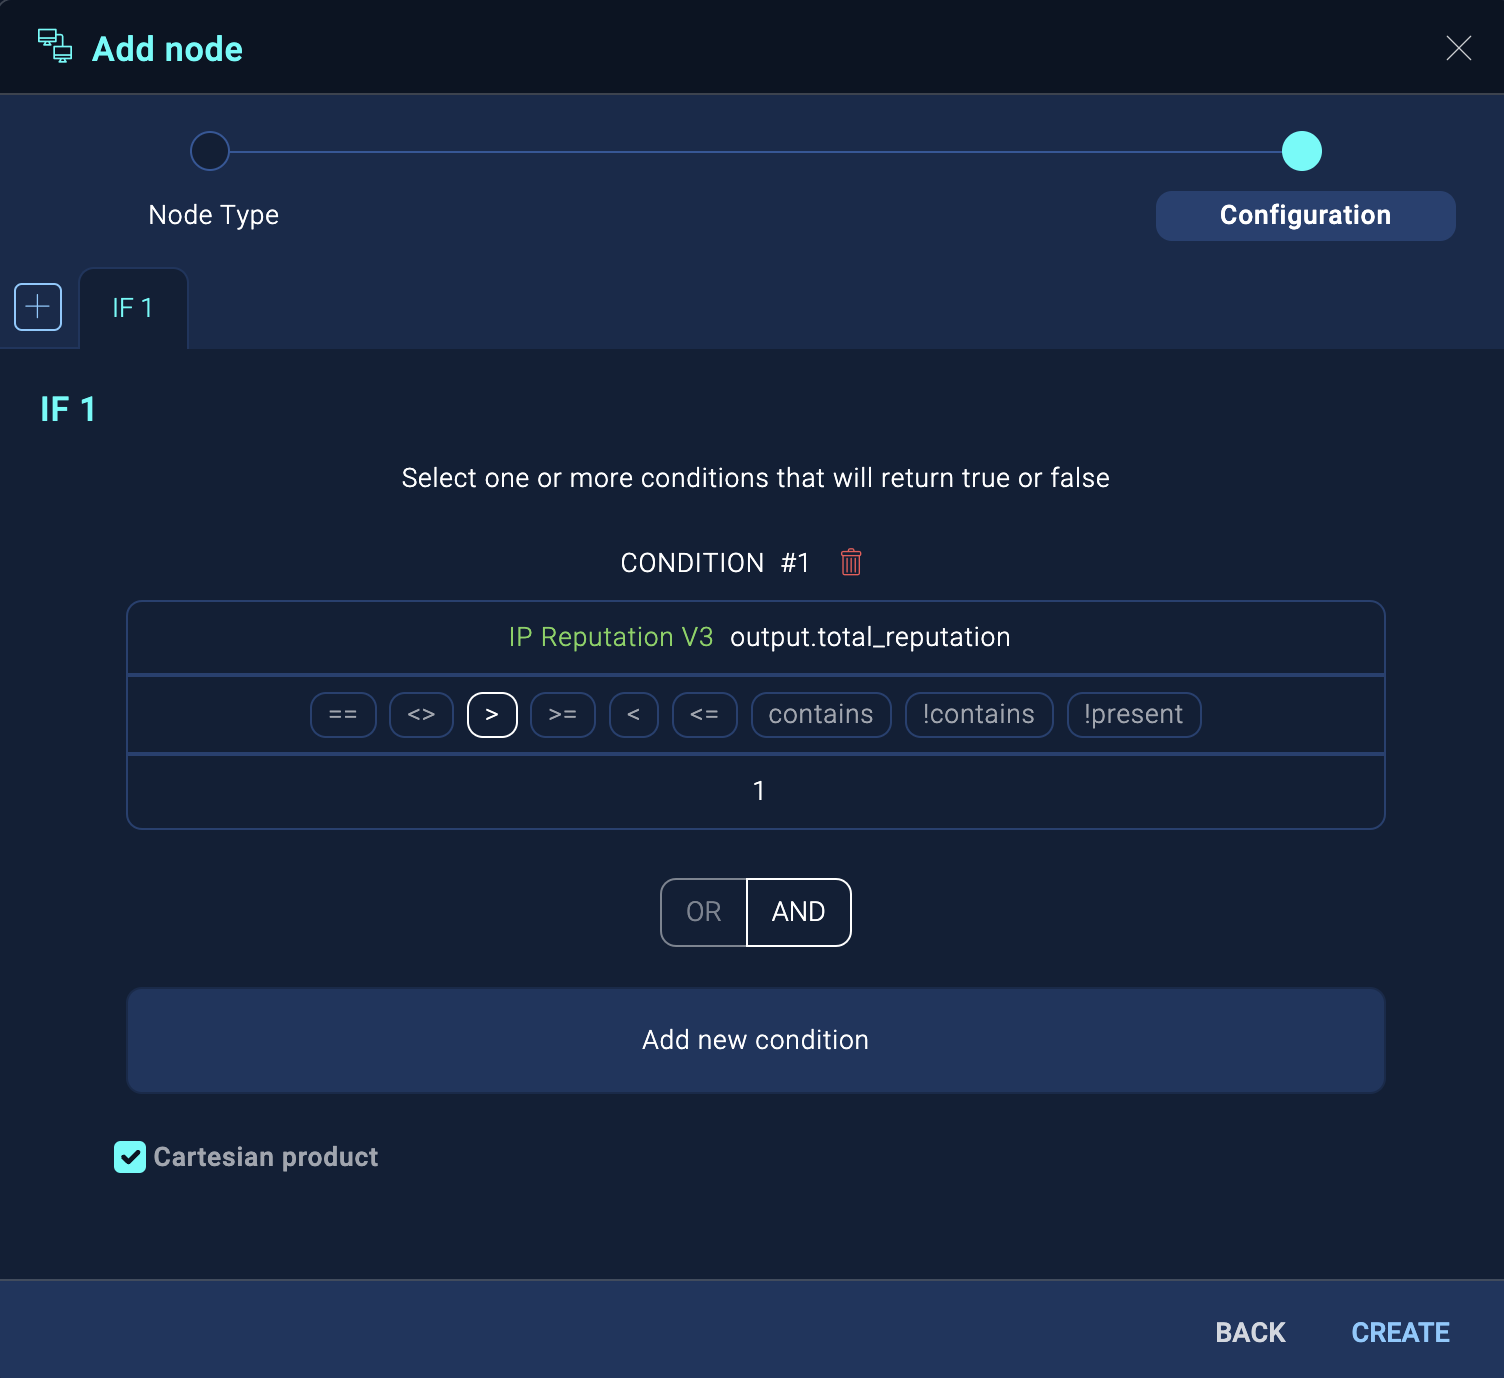
- In the Add node dialog, click Condition.
- Just below Condition #1, click the top Select a value in the dialog.
- Under Get value from a previous action, select IP Reputation V3.
- Select output.total_reputation.
- Click the > (is greater than) operator.
- Click Select a value.
- In the Get value field, type 1 and press Enter.
- Click Create.
- Add the "Search Sumo Logic" action to the playbook:
- Click the Edit button (pencil icon) at the bottom of the playbook view.
- Click the Edit button (pencil icon) on the START node.
- In the Edit node dialog, select Insight from the dropdown menu and click UPDATE.
- Click the Add Node button (+ icon) on START.
- In the Add node dialog, select Action.
- For Integration, select Sumo Logic.
- Ensure that Type is Enrichment.
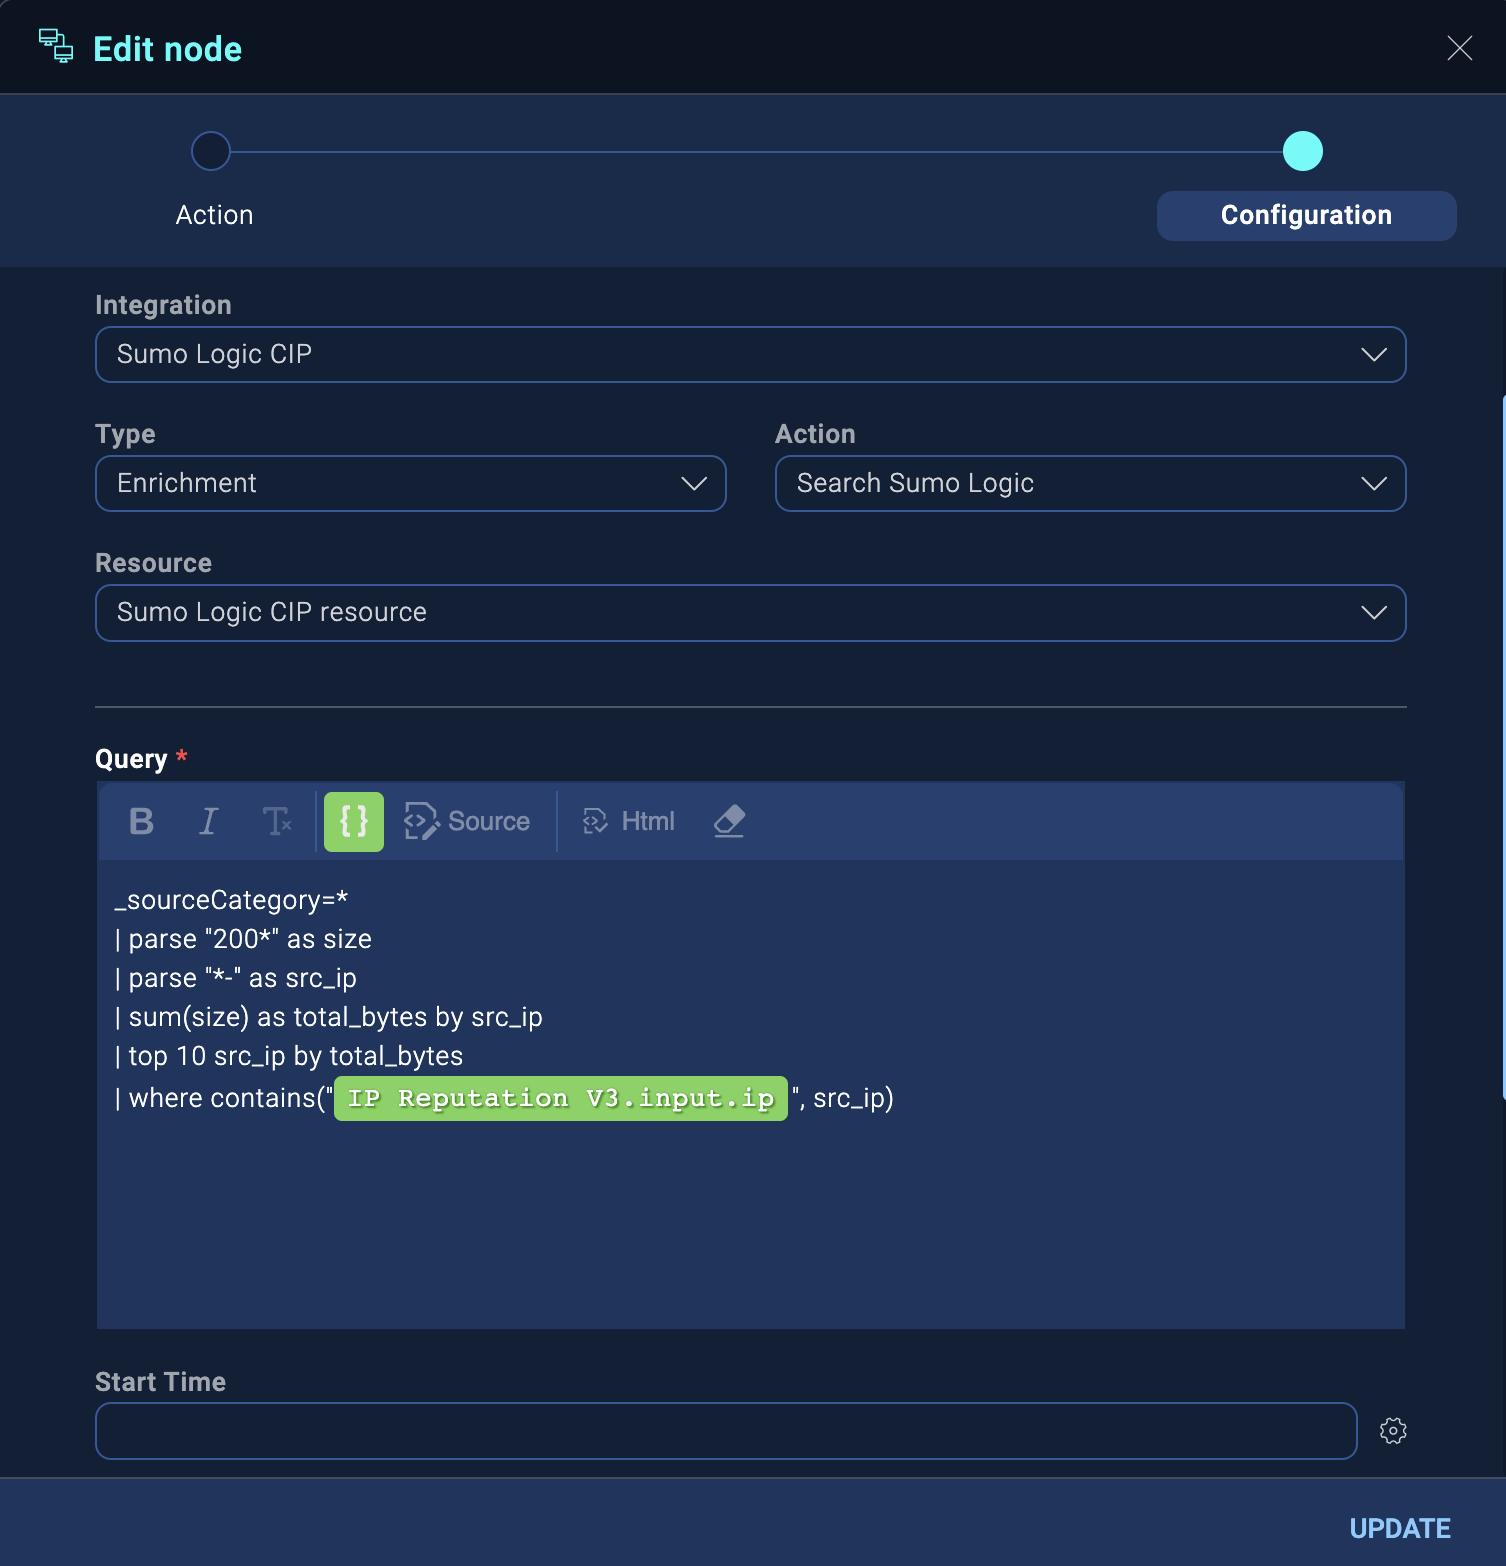
- For Action, select Search Sumo Logic.
- In the Query box enter the search query you want to make in the Sumo Logic core platform. In the example below, a placeholder queries for a value obtained from the IP Reputation V3 node. For help with queries, see General Search Examples Cheat Sheet.
- For Last Period select 15 Minutes (or any time period you want).
- Click Create.
- Click and hold on the right semicircle of the new Search Sumo Logic node and drag to the semicircle of the END node and release.
- Add the “Send Email” action to the playbook, which will run if no value is returned from the IP Reputation V3 node:
- Click the Add Node button (+ icon) on the new Condition.
- In the Add node dialog, ensure Failure is selected under Select an exit port.
- Select Action.
- In the Add node dialog, for Integration select Basic Tools.
- Ensure that Type is Notification.
- For Action select Send Email.
- In Recipients enter your email address and press Enter.
- For Subject type a subject line for the email (for example, “Playbook completed”).
- In Plain text content enter the text you want to appear in the body of the email (for example, “Playbook completed. Click ‘View Playbook’ to see details”).
- Copy the plain text content into HTML content and add formatting if desired.
- Click Create.
- Click and hold on the right semicircle of the new Send Email node and drag to the semicircle of the END node and release. The playbook is complete.
- Save the playbook:
- Click the Save button (floppy disk icon) at the bottom of the playbook view.
- To test the playbook, click the kebab button in the upper-right of the UI and select Run Test.
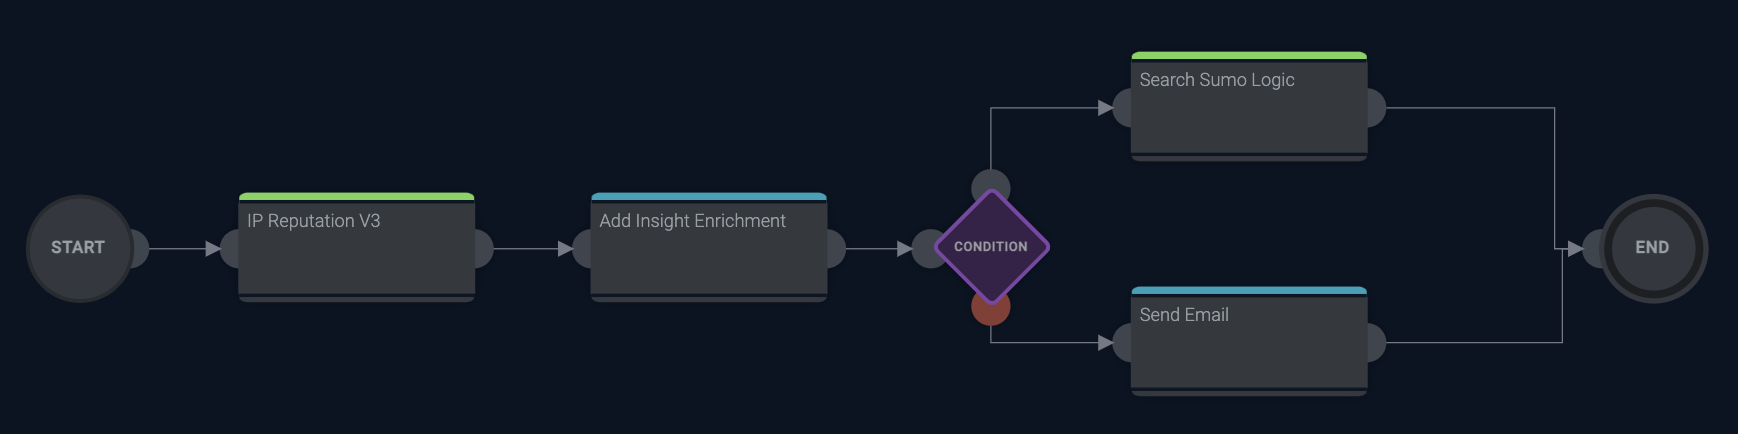
- Click the Publish button (clipboard icon) at the bottom of the playbook view. The playbook should look like this:
- Create an automation in Cloud SIEM to run the playbook:
- Classic UI. In the main Sumo Logic menu select Cloud SIEM. In the top menu select Configuration, and then under Integrations select Automation.
New UI. In the top menu select Configuration, and then under Cloud SIEM Integrations select Automation. - For Playbook, select the playbook you created in the previous steps.
- For Object (expects attributes for), select Insight.
- For Execution, select Manually Done.
- Click Save.
- Classic UI. In the main Sumo Logic menu select Cloud SIEM. In the top menu select Configuration, and then under Integrations select Automation.
- Run the automation:
- Select Insights from the main Cloud SIEM screen.
- Select an insight.
- Click the Actions button.
- Under Insight Automation, select the automation you created in the previous step (it will have the same name as the playbook). The playbook runs.
- To see the results of the run, click the Automations tab at the top of the insight.
- View the Status field to find out if the playbook has a status of Success or another status such as Completed with errors.
- Click View Playbook to see details of the playbook run. Each node in the playbook will show either Success or Failed.
- Click a node to download results of that node’s run.