View and Manage Entities
This topic has information about the Entities page in Cloud SIEM UI, which lists all of the entities in Cloud SIEM and their activity scores, and the Entities > Details page, which presents information about a particular entity, including signals and insights associated with the entity.
The Entities page is useful for monitoring entities that are close to having an insight created. On the Entities > Details page, you can view signals and insights for an entity, and, as desired, manually create an insight from signals associated with the entity.
You can also update the tags, suppression state, and criticality assigned to entities, as described below in the Update multiple entities section below.
Watch this micro lesson to learn more about entities.
About entities
In Cloud SIEM, an entity is a unique actor that a signal fired upon. Cloud SIEM has a number of built-in entity types:
- Command
- Domain
- File
- Hash
- Hostname
- IP Address
- MAC Address
- Process
- URL
- User Agent
- Username
You can create custom entity types as well. For more information, see Create a Custom Entity Type.
When a signal is fired, if an entity doesn’t already exist in Cloud SIEM for the item that the signal fired on, Cloud SIEM creates an entity for it. For more information about entities and signal and insight generation, see Insight Generation Process.
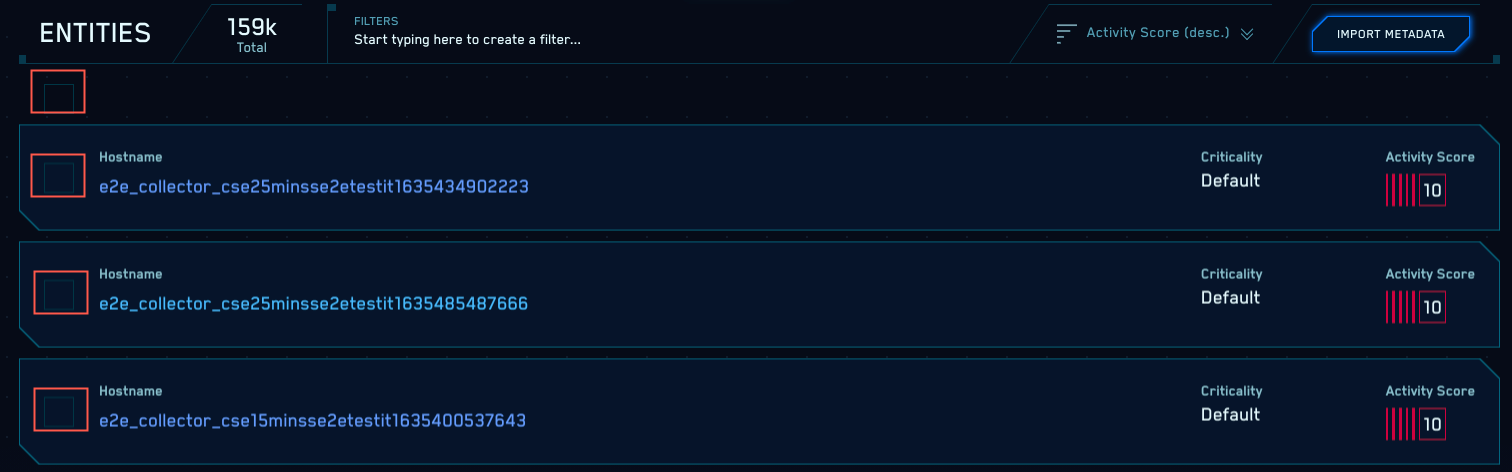
About the Entities list page
Classic UI. To view entities, click Entities at the top of the screen.
New UI. To view entities, in the main Sumo Logic menu select Cloud SIEM > Entities. You can also click the Go To... menu at the top of the screen and select Entities.
| Letter | Description |
|---|---|
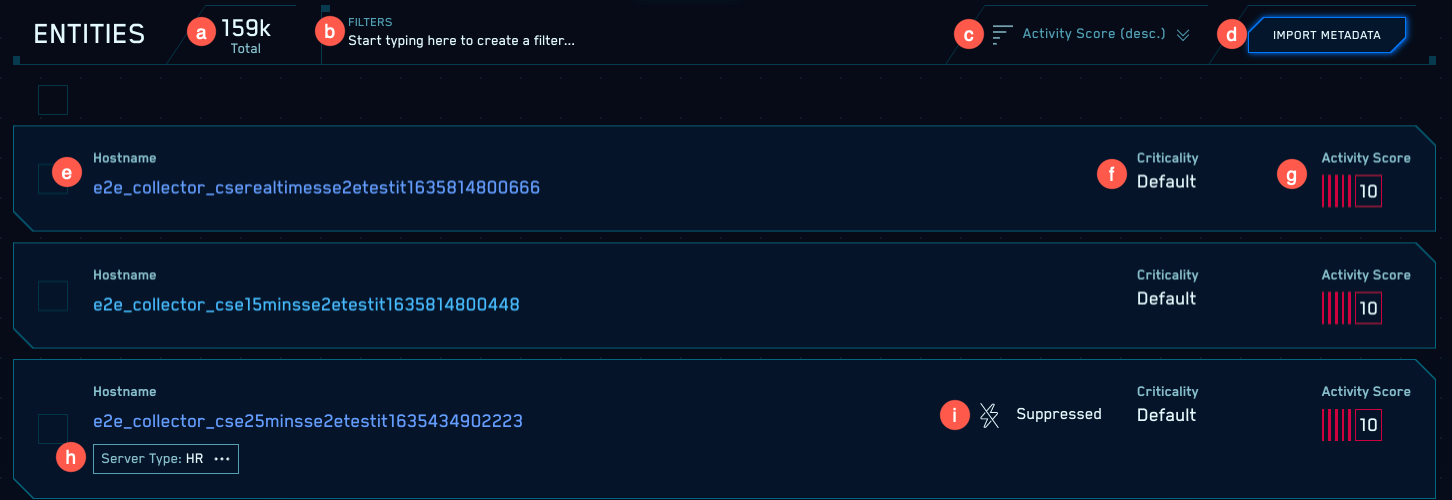
| a | This area shows the total number of unique entities in Cloud SIEM. |
| b | In the Filters area, you can filter the list of entities by activity score, hostname, IP address, username, tags, type, and suppressed. |
| c | In this area you can sort entities by activity score, name, or type. |
| d | The Import Metadata option allows you to upload a .csv file of updates to entity tags, suppression state, and criticality, as described in Update multiple entities. |
| e | Shows the entity type and its value. |
| f | If an entity has the Suppressed indicator, that means that signals will not be fired on the entity. |
| g | The Criticality column shows whether a criticality has been assigned to the entity. A criticality adjusts the severity of signals for specific entities based on some risk factor or other consideration. If a criticality hasn't been assigned to an entity, the column contains "default". |
| h | The current activity score for the entity, which by default is the sum of the severities of the signals that have fired on the entity over the previous two weeks. For more information, see Understanding entity activity scores, in the Insight Generation Process topic. |
| i | The total amount of signal severity for the entity. |
If you see a link below the entity value, it’s a tag. You can click it to filter entities by that tag.
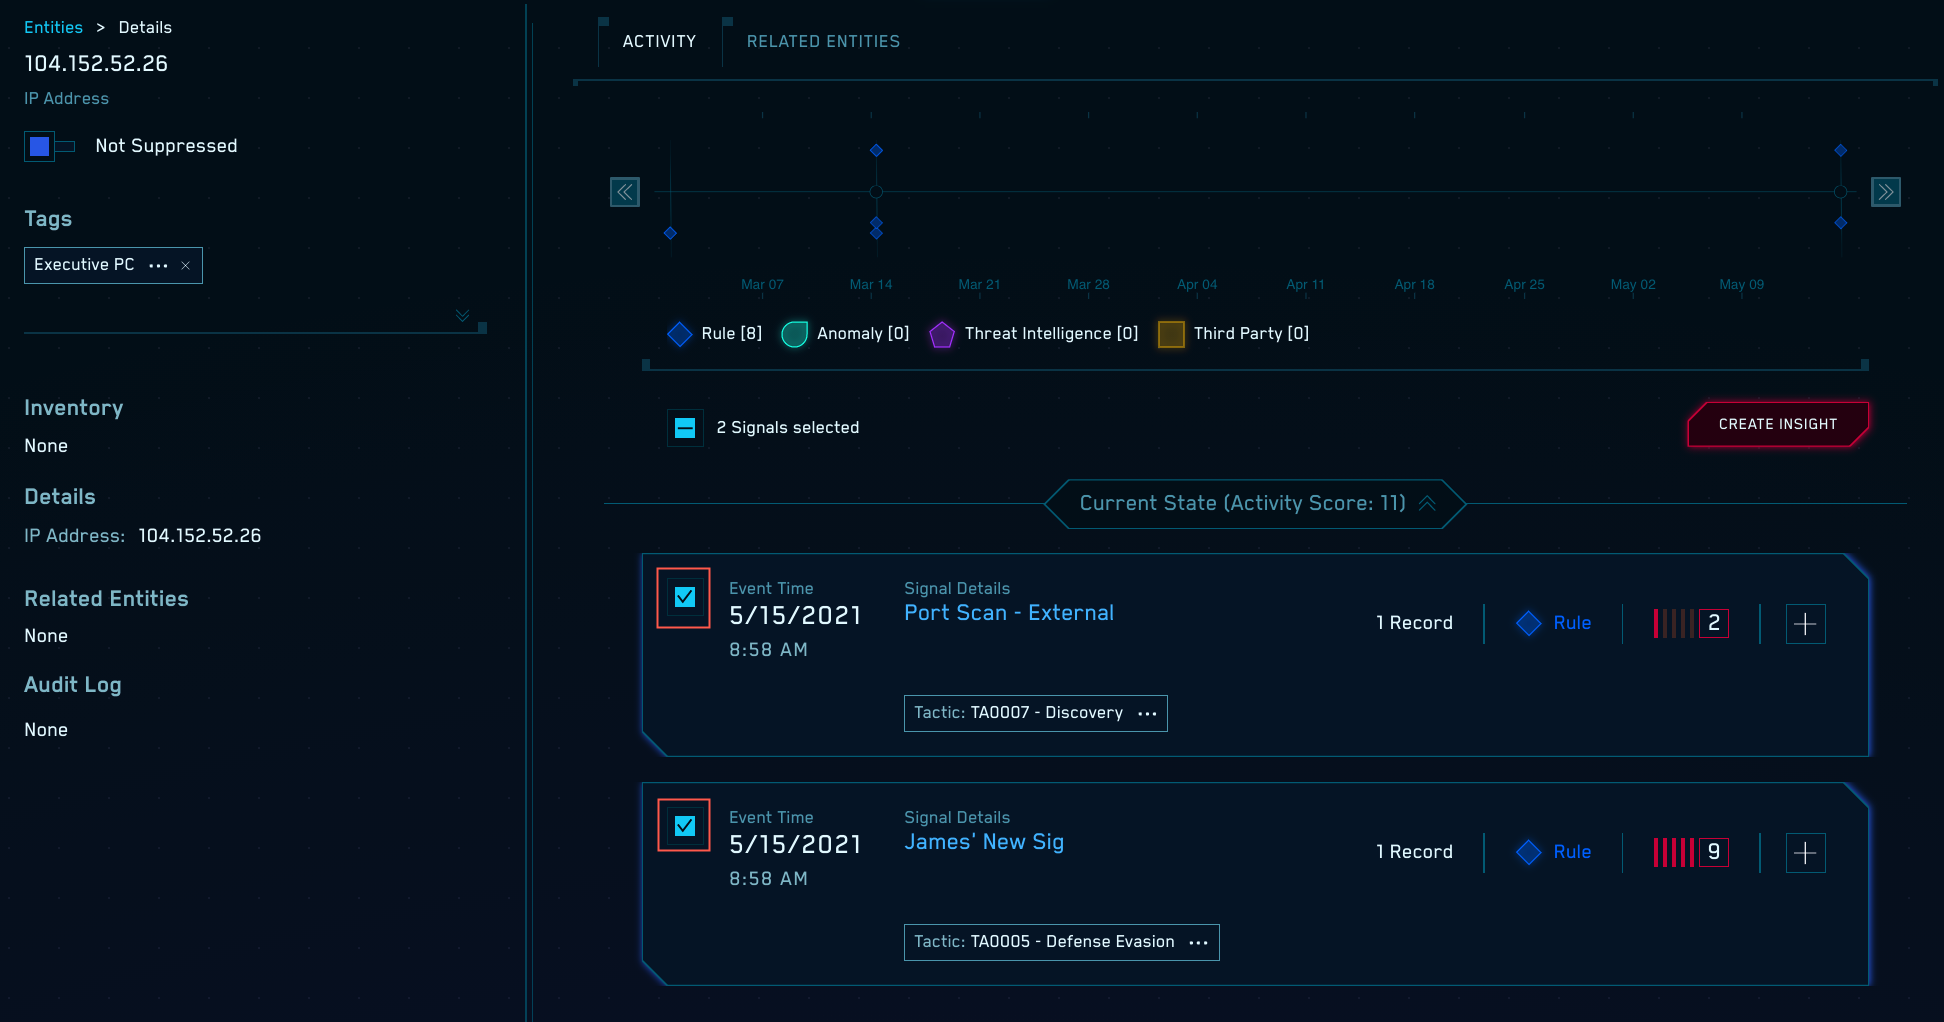
About the entities details page
When you click an entity on the Entities page, a details page for the entity appears.
| Letter | Description |
|---|---|
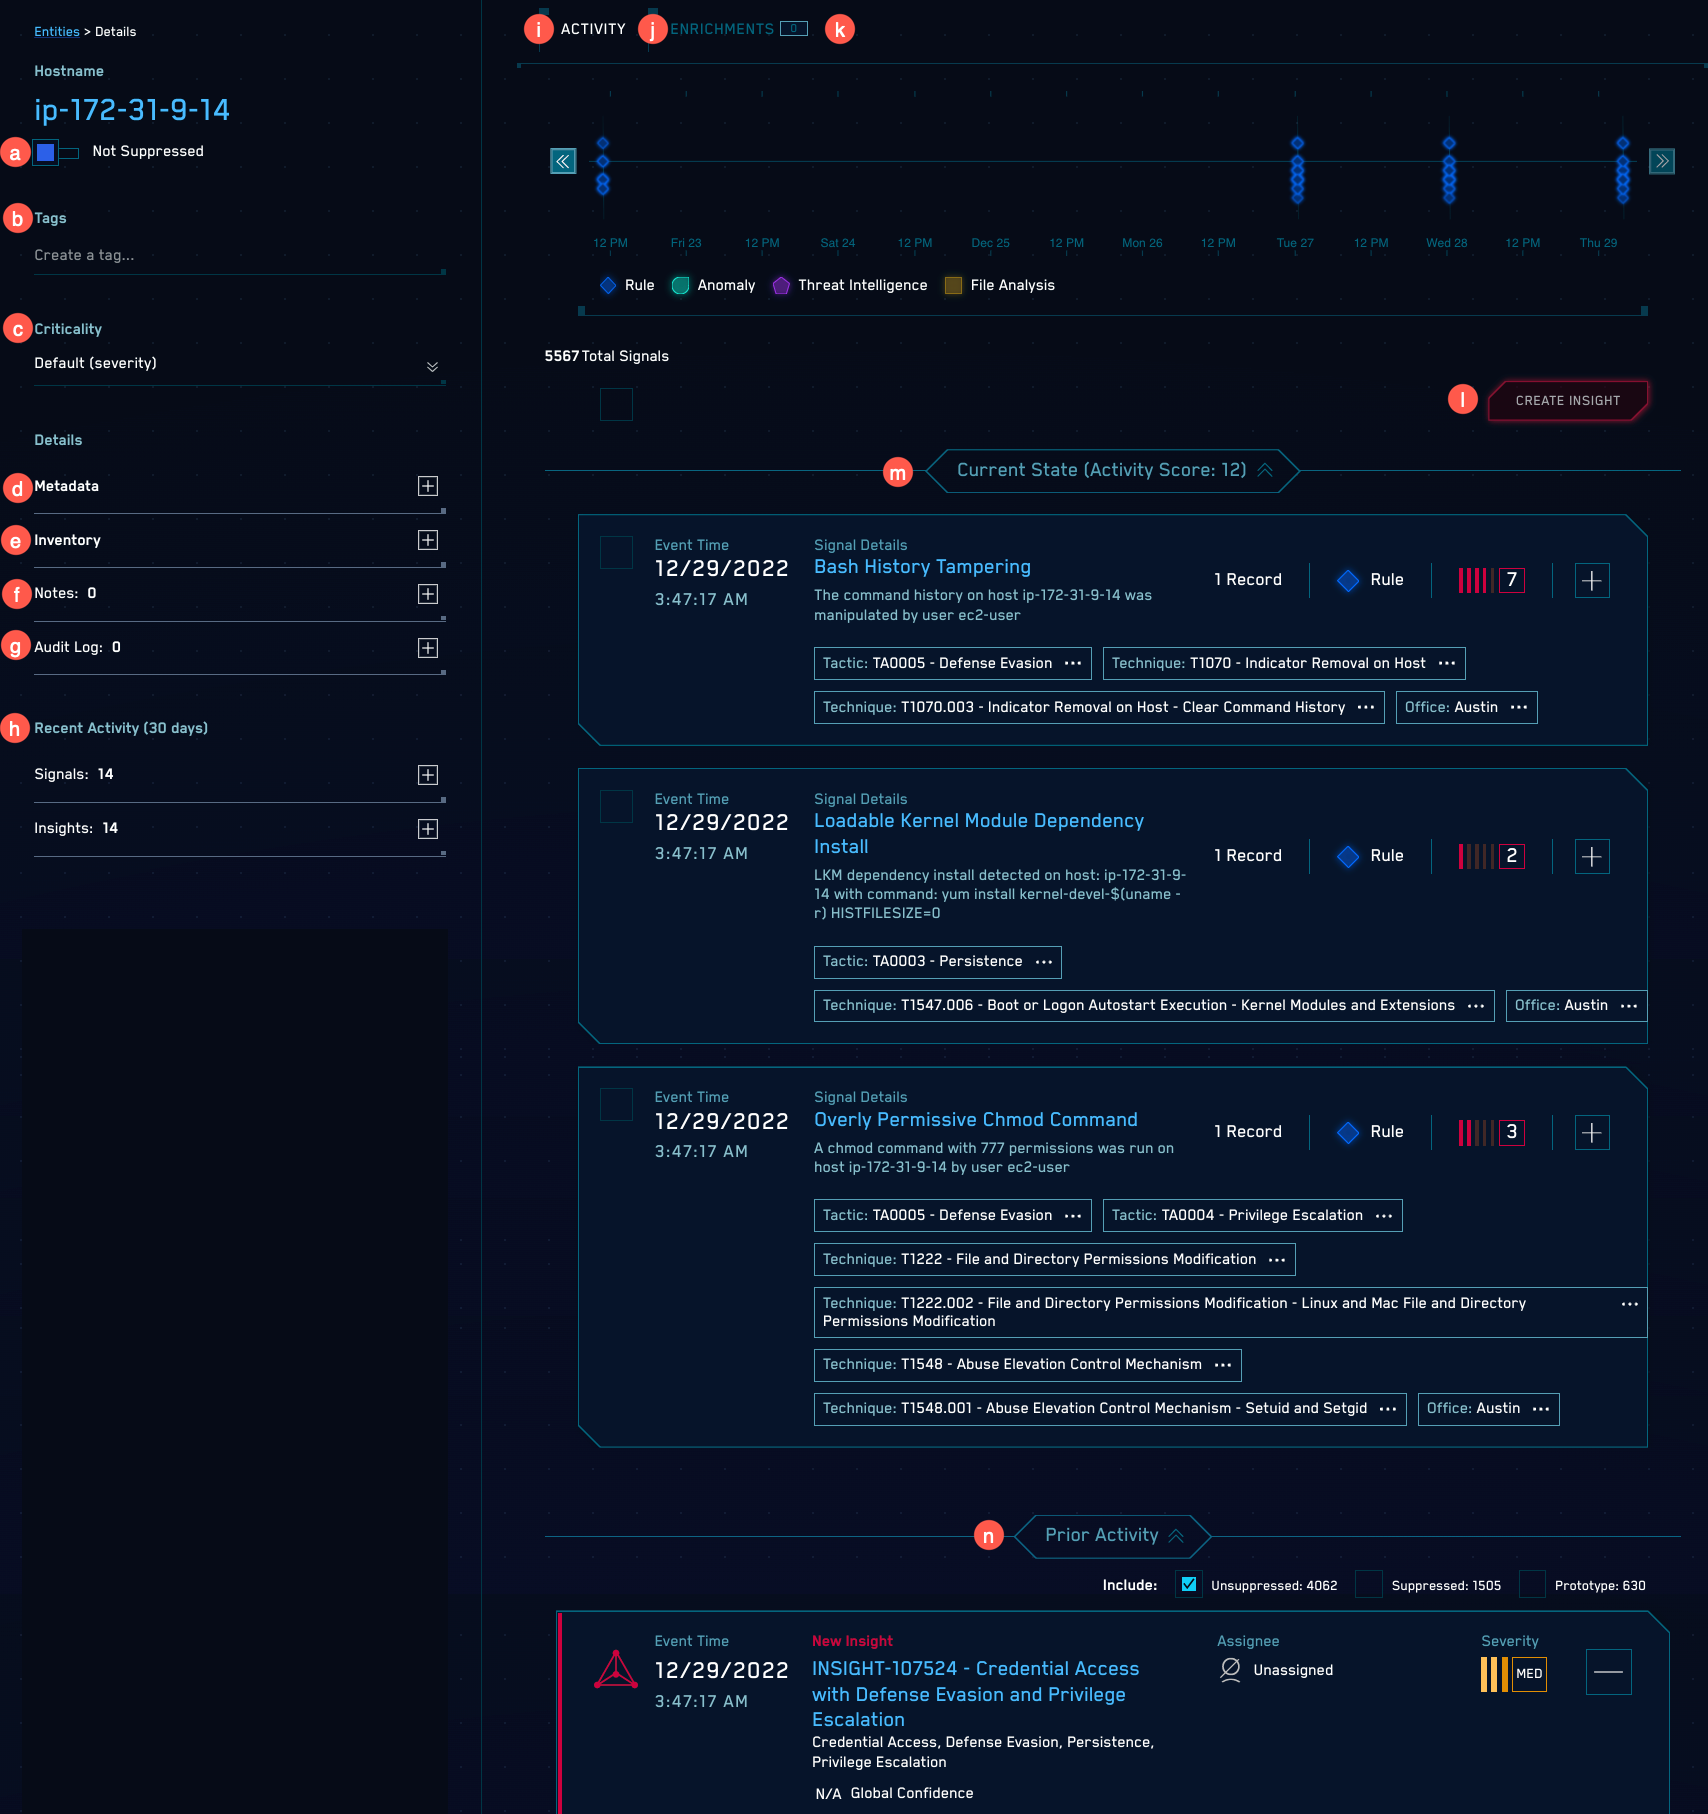
| a | Suppression. Shows whether or not the entity is currently suppressed. You can use the slider to suppress the entity so that it is excluded from the insight generation process. |
| b | Automations. Click to view automations available to be run on the entity. |
| c | Tags. Lists any tags assigned to the entity. You can add a new tag, select a tag to assign, or remove a tag from the entity. |
| d | Criticality. An entity’s criticality is a setting that adjusts the severity of signals that fire on the entity, based on a risk factor or other consideration. You can reset the criticality here. |
| e | Signal Severity Total. The total amount of signal severity for the entity. |
| f | Indicators. The indicators on the entity, whether from enrichments or threat intelligence. |
| g | Metadata. This section lists the contents of enrichment fields that were added during record processing. |
| h | Network Blocks. Network blocks for the entity. |
| i | Inventory. If the selected entity is standard entity type (as opposed to a custom entity type), this area provides selected information about the Inventory object associated with the entity. (Inventory information is not provided for custom entity types.) Inventory data is customer or 3rd-party provided information that describes devices and users along with contact information and job descriptions. Cloud SIEM joins inventory data on demand with data from entities in insights data to provide context to signals. |
| j | Notes. Contains any notes added to the entity. |
| k | Audit Log. This area will list any audit events that have been logged for the entity. An audit log is generated each time an entity is suppressed or unsuppressed. |
| l | Recent Activity. Provides a count of how many signals or insights included the entity within the last 30 days. Click the plus sign (+) next to Signals or Insights to expand the list. |
| m | Activity. This tab displays a visualization of signals on the entity over time.The x-axis is time, the y-axis is severity. The icons represent signals. |
| n | Enrichments tab. If you use Cloud SIEM’s automation as a service, entity enrichments obtained from Cloud SOAR may be available on this tab. |
| o | Timeline. A timeline appears for the entity's activity over a three-day period. For more information, see About the Entity Timeline tab. |
| p | Related Entities. Entities related to the current entity. |
| q | Automations. Automations that have been run on the entity. |
| r | Create Insight. You can use this option to create an insight on the entity, as described below in Create an insight, below. |
| s | The Current State section lists signals that were generated for the entity during the current detection window that are not already part of an insight. (The detection window is the period over which Cloud SIEM evaluates signals, which is 14 days, by default. The detection window is configured on the Custom Insights page in the Cloud SIEM UI.) |
Below the Current State section there may be a Prior Activity section. This section lists signals that were generated for the entity prior to the current detection window, and all insights for the entity.
About the Entity Timeline tab
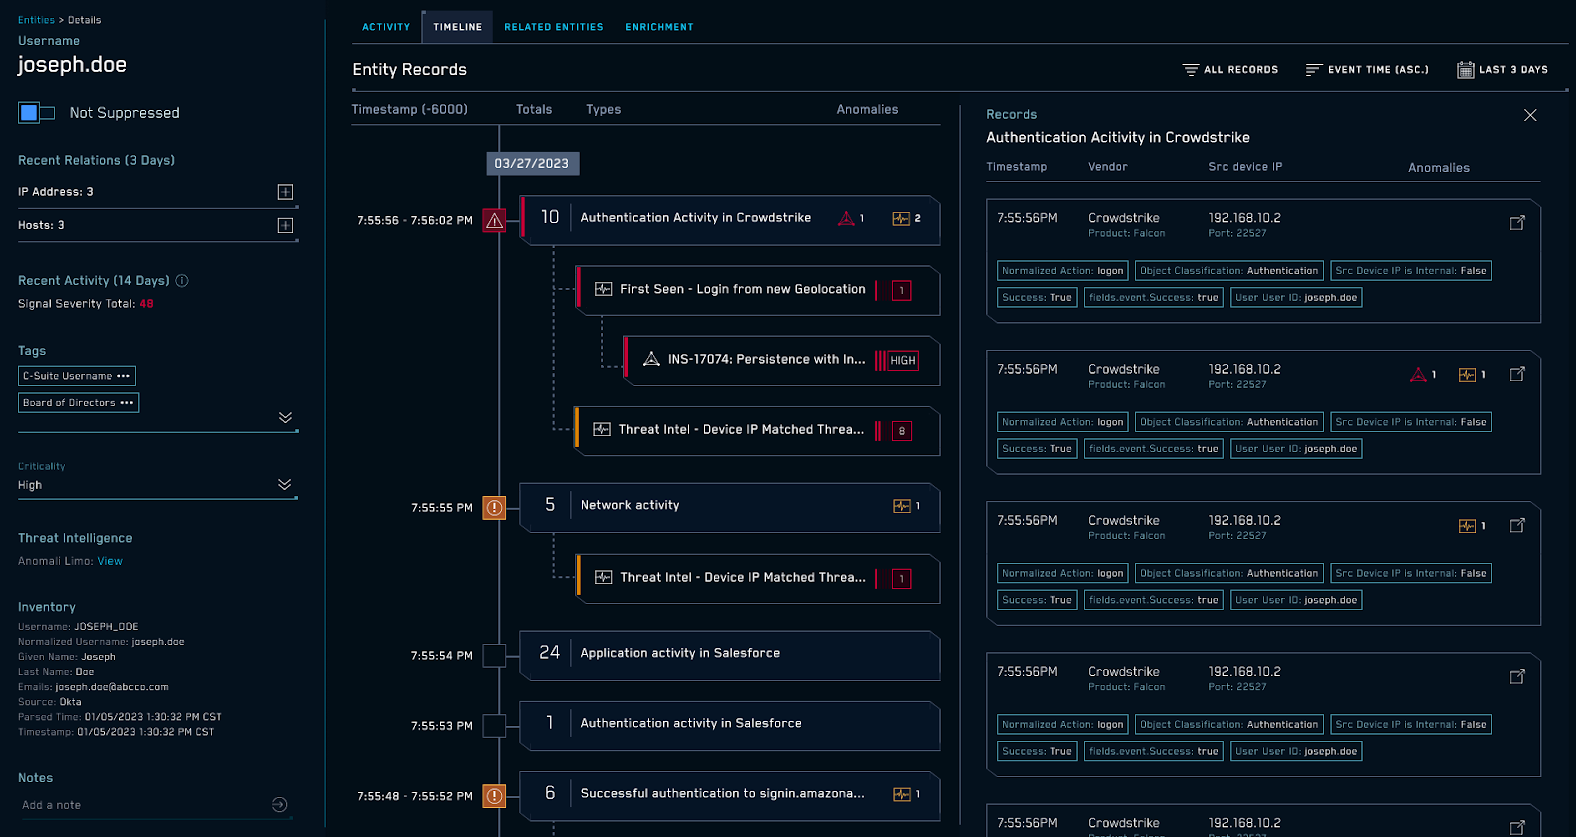
The Entity Timeline tab provides visibility into entity inventory data, entity relationships, records, signals, and insights over a default three-day time period. This view gives information about what else the entity doing before, during, and after signals and insights involving the entity were generated.
The right side of the tab organizes records by record type and vendor, with a record count. For example, the screenshot below indicates that there were two email records from Microsoft Office 365 at 4:41:02 AM. The orange icon to the left of the record summary indicates that the record aggregation contains a signal. The indented item below the record summary is a link to the signal.
Similarly, a red icon indicates that the record set contains an insight, and the link below the summary is a link to the insight.
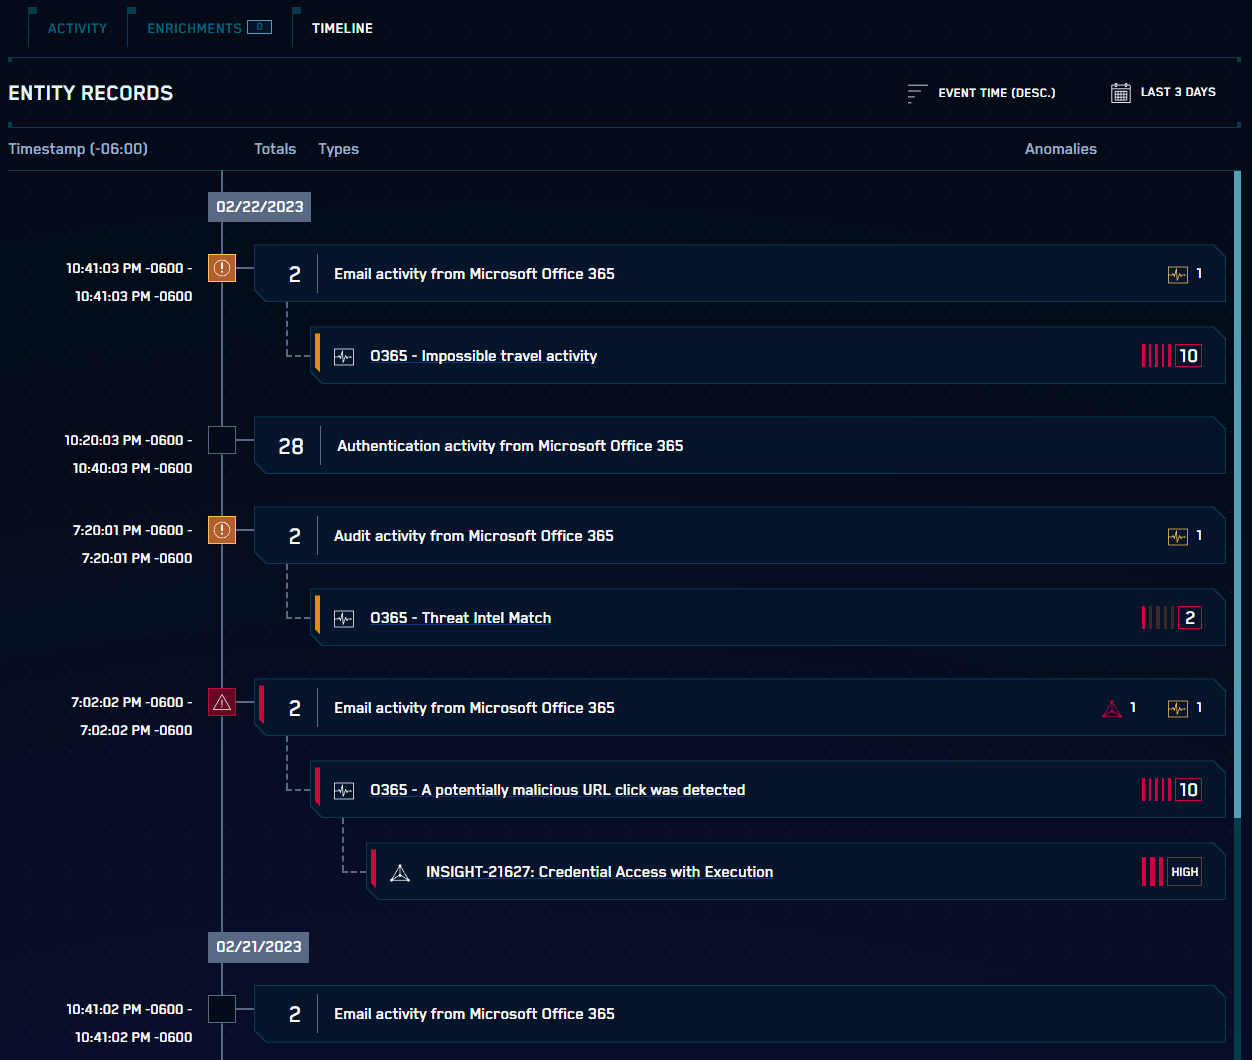
You can view a summary of the records in a record set by clicking on it. The records are listed on the right side of the Entity Timeline tab. To view the complete record, click the link in the upper right corner of the card for a record.
Create an insight
You can create an insight for an entity based on one or more signals on the entity. To do so, checkmark each signal you want to include in the insight, and click Create Insight.
The page refreshes and shows the selected signals grouped in a new insight.
Update multiple entities
This section describes how to update the tags, suppression state, or criticality for one or more entities.
Update entities from the UI
- Classic UI. Click Entities at the top of the screen.
New UI. In the main Sumo Logic menu select Cloud SIEM > Entities. You can also click the Go To... menu at the top of the screen and select Entities. - Note that there is a checkbox at the left end of each entity row, and one above the entities list.
- Click the top checkbox to select all of the entities on the page, or click the checkbox next to each entity you want to update.
- Note that once you select an entity, three options appear at the top of the entities list.
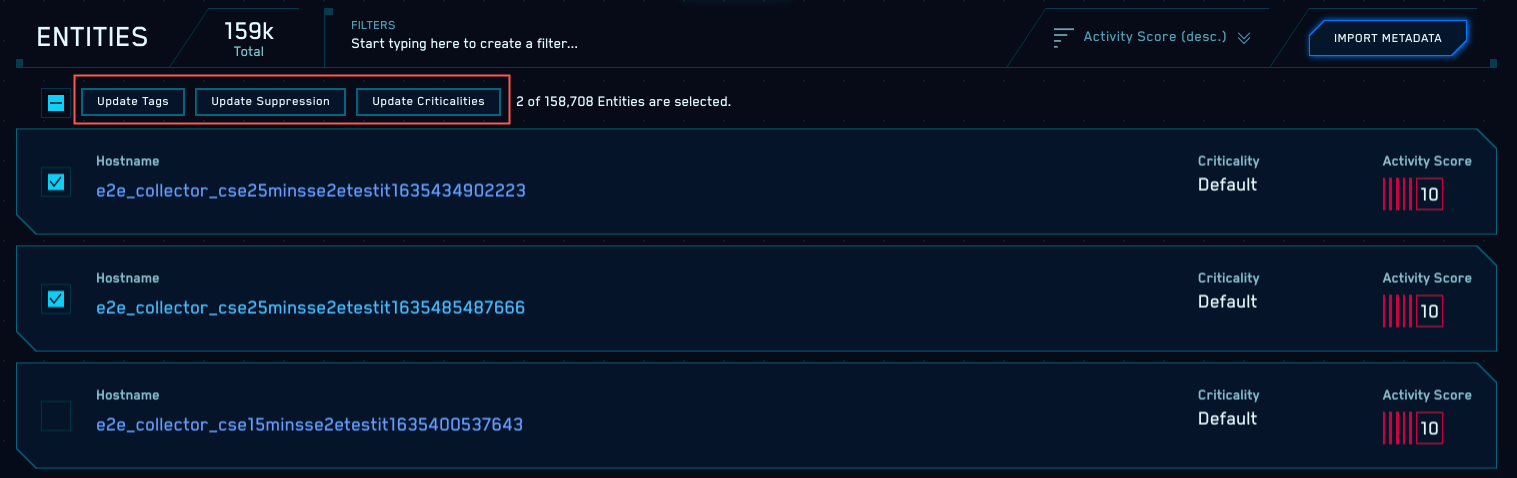
See the instructions for each option below:
Update Tags
- After selecting the entities you want to update, click Update Tags.
- Click the down arrow to display the options:
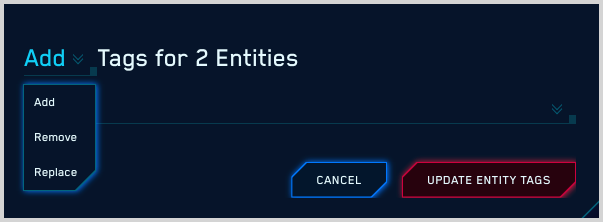
- Add. Select this option to add one or more tags to the entity, without affecting any tags already assigned to the entity. You’re prompted to select a tag. If you select a schema tag, you’re prompted to select a tag value. You can select multiple tags to add.
- Remove. Select his option to remove one or more tags from the entity. You’re prompted to select a tag. If you select a schema tag, you’re prompted to select a tag value. You can select multiple tags to remove. If a selected entity doesn't have the specified tags, no change will be made to the entity.
- Replace. Select this option to remove all of the tags currently assigned to the entity and add one or more specified tags. You’re prompted to select a tag. If you select a schema tag, you’re prompted to select a tag value.
infoWhen you use the Replace option, be sure to specify new tags. If you do not, the existing tags will still be removed.
- As you select tags, they’ll appear in the update popup.
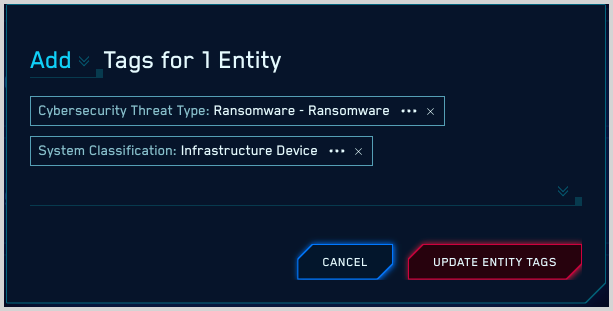
- When you are done selecting tags, click Update Entity Tags.
Update Suppression
- After selecting the entities you want to update, click Update Suppression.
- The Update Suppression popup appears, with the suppression toggle set to Not Suppressed.
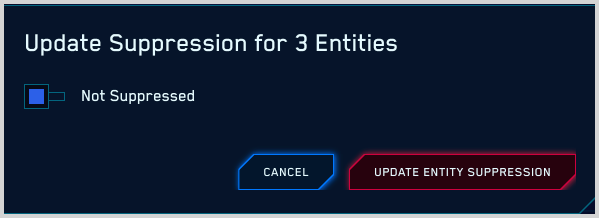
- If you want to unsuppress the selected entities, click Update Entity Suppression. Otherwise, if you want to suppress the entity, toggle the slider to Suppressed, supply a comment if desired, and then click Update Entity Suppression.
Update Criticality
- After selecting the entities you want to update, click Update Criticality.
- The Update Criticality popup appears.
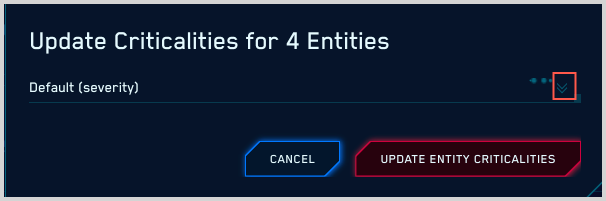
- If you want to assign default criticality to the selected entities, click Update Entity Criticality. Otherwise, use the down arrow to view defined Criticalities, select one, and then click Update Entity Criticality.
Import entity updates from a CSV file
You can update entities by uploading a .csv file to Cloud SIEM.
CSV file format
There are two supported formats. The difference is in how you identify the target entity.
- Format 1—You use the
idfield to specify a target entity.id, suppressed, criticality, tags, tags_to_add, tags_to_remove - Format 2—You use the
typeandvaluefields to specify the target entity.type, value, suppressed, criticality, tags, tags_to_add, tags_to_remove
Regardless of the format you use, there are a couple of approaches to updating entity tags.
- You can use
tags_to_addandtags_to_removeto add new tags and remove existing tags, respectively. - You can use a
tagsvalue to specify replacement tags. This will remove all existing tags and add all of the specified replacement tags.
See the next section for column definitions.
CSV columns
The table below defines the columns in the .csv file.
Note that:
- The first row of the .csv file must contain all supported columns.
- The .csv file must contain either values in the
idcolumn or values in both thetypeandvaluecolumn, and a value in at least one other column. - If a row has a value in the
tagscolumn, it can’t have values in either thetags_to_addor thetags_to_removecolumn.
| Column | Description |
|---|---|
id | This field is required for Format 1. To form the id field value, concatenate the entity type and the value of the entity, separated by a dash character (-) where the entity type is one of the following:_ip_hostname_username_mac_process_command_hash_domain_useragent_email_url_file<CustomEntityTypeId>The id for an IP address would look like:_ip-1.2.3.4 You can optionally specify an entity’s sensor zone as a part of the id column, in this format:_<entity_type>-<sensor_zone>-<entity_value> For example: _ip-zone1-172.18.20.3 |
type | This field is required for Format 2. Identifies the type of entity, one of: _ip_hostname_username_mac_process_command_hash_domain_useragent_email_url_file<CustomEntityTypeId> |
value | This field is required for Format 2. The value of the entity, for example, for an IP address: 1.2.3.4 |
sensor_zone | Identifies the sensor zone for the entity. Don’t include this column if you are specifying entity sensor zones in the id column, as described above. |
suppressed | When true, Cloud SIEM suppresses the entity. |
criticality | Assigns a criticality to the entity. (An entity’s criticality is a setting that adjusts the severity of signals that fire on the entity, based on a risk factor or other consideration.) You can only specify a criticality that has already been configured in Cloud SIEM. Allowable values:default<CustomCriticality> |
tags | The tags to assign to the target. This column can’t be present if the file contains a tags_to_add or tags_to_remove column. Specify a schema key tag as key:value.To assign multiple tags, enclose them in double quotes. For example: "<tag>,<tag>,<tag>" or "<key>:<value>,<key>:<value>" |
tags_to_add | The tag to assign to the target entity. This column can’t be present if the file contains a tags column. Specify a schema key tag as key:value. |
tags_to_remove | The tag to remove from the target entity. This column can’t be present if the file contains a tags column. Specify a schema key tag as key:value. |
Example CSV files
Format 1 example
id,suppressed,criticality,tags,tags_to_add,tags_to_remove
_ip-zone1-10.0.0.5,false,default,,Office-Based,
_ip-zone1-10.0.0.6,true,default,,Office-Based,Remote
_ip-zone1-10.0.0.7,false,default,,Office-Based,
Format 2 example
type,value,sensor_zone,suppressed,criticality,tags,tags_to_add,tags_to_remove
_ip,10.0.0.5,zone1,false,default,Frequent-Travel,,
_ip,10.0.0.6,zone1,true,default,,Office-Based,Remote
_ip,10.0.0.7,zone1,false,default,,Office-Based,
Upload CSV file
After creating file, click Import Metadata in the upper right of the Entities page and upload the file.