Write an Aggregation Rule
This topic has information about Cloud SIEM aggregation rules and how to write them.
If you are new to writing your own Cloud SIEM rules, see Before You Write a Custom Rule for tips and techniques that are useful for getting started.
About aggregation rules
This section describes the purpose of aggregation rules, and gives an example of how you would use one. If you’re ready to jump in and configure a rule, see Create an aggregation rule below.
An aggregation rule is useful when you want to fire a signal based multiple conditions—up to six—being met over a period of time.
As an example, suppose you want to fire a signal when the ratio of failed to successful HTTP requests is too high—75% or more. You can use an aggregation rule to calculate the percentage of failed requests, and configure the rule to fire a signal when the request failure rate is 75% or higher.
The table below summarizes the rule configuration. Each row corresponds to an element of the sentence-style configuration UI for the If Triggered settings for an aggregation rule.
| Configuration setting | What it does |
|---|---|
When records matching the expression!isNull(http_response_statusCode) | Filters the records to which the rule will be applied: only records that contain a non-null http_response_statusCode field. |
grouped by device_ip | Specifies the field by which aggregation results will be grouped: device_ip |
| within 5 minutes | Specifies the duration across which records will be evaluated. |
| Aggregation 1 Name. goodFunction. countExpression. http_response_statusCode <= 201 | Defines an aggregation named “good”, which counts the number of records encountered during the within duration in which the http_response_statusCode value is less than or equal to 201, which indicates a request was successful. |
| Aggregation 2 Name. badFunction. countExpression. http_response_statusCode > 201 | Defines an aggregation named “bad”, which counts the number of records encountered during the within duration in which the http_response_statusCode value is less greater than 201, which indicates a request failed. |
that match the following condition(bad/(good+bad))*100 > 75 | Specifies the condition for firing a signal based on the results of the “good” and “bad” aggregation: more than 75% percent of requests failed during the within duration. |
The screenshot below shows the If Triggered configuration for the example rule in the Rules Editor.

Watch this micro lesson to learn how to create an aggregation rule.
Create an aggregation rule
- Classic UI. In the top menu select Content > Rules.
New UI. In the main Sumo Logic menu, select Cloud SIEM > Rules. You can also click the Go To... menu at the top of the screen and select Rules. - On the Create a Rule page, click Create in the Aggregation card.
- In the rules editor:
- Name. At the top of the Rules Editor, enter a name for the rule. Signals fired by the rule will have the same name as the rule.
- Enabled. By default the rule will be enabled. It's good practice to use the slider to disable the rule so that it won’t be applied to incoming records until you’ve tested it.
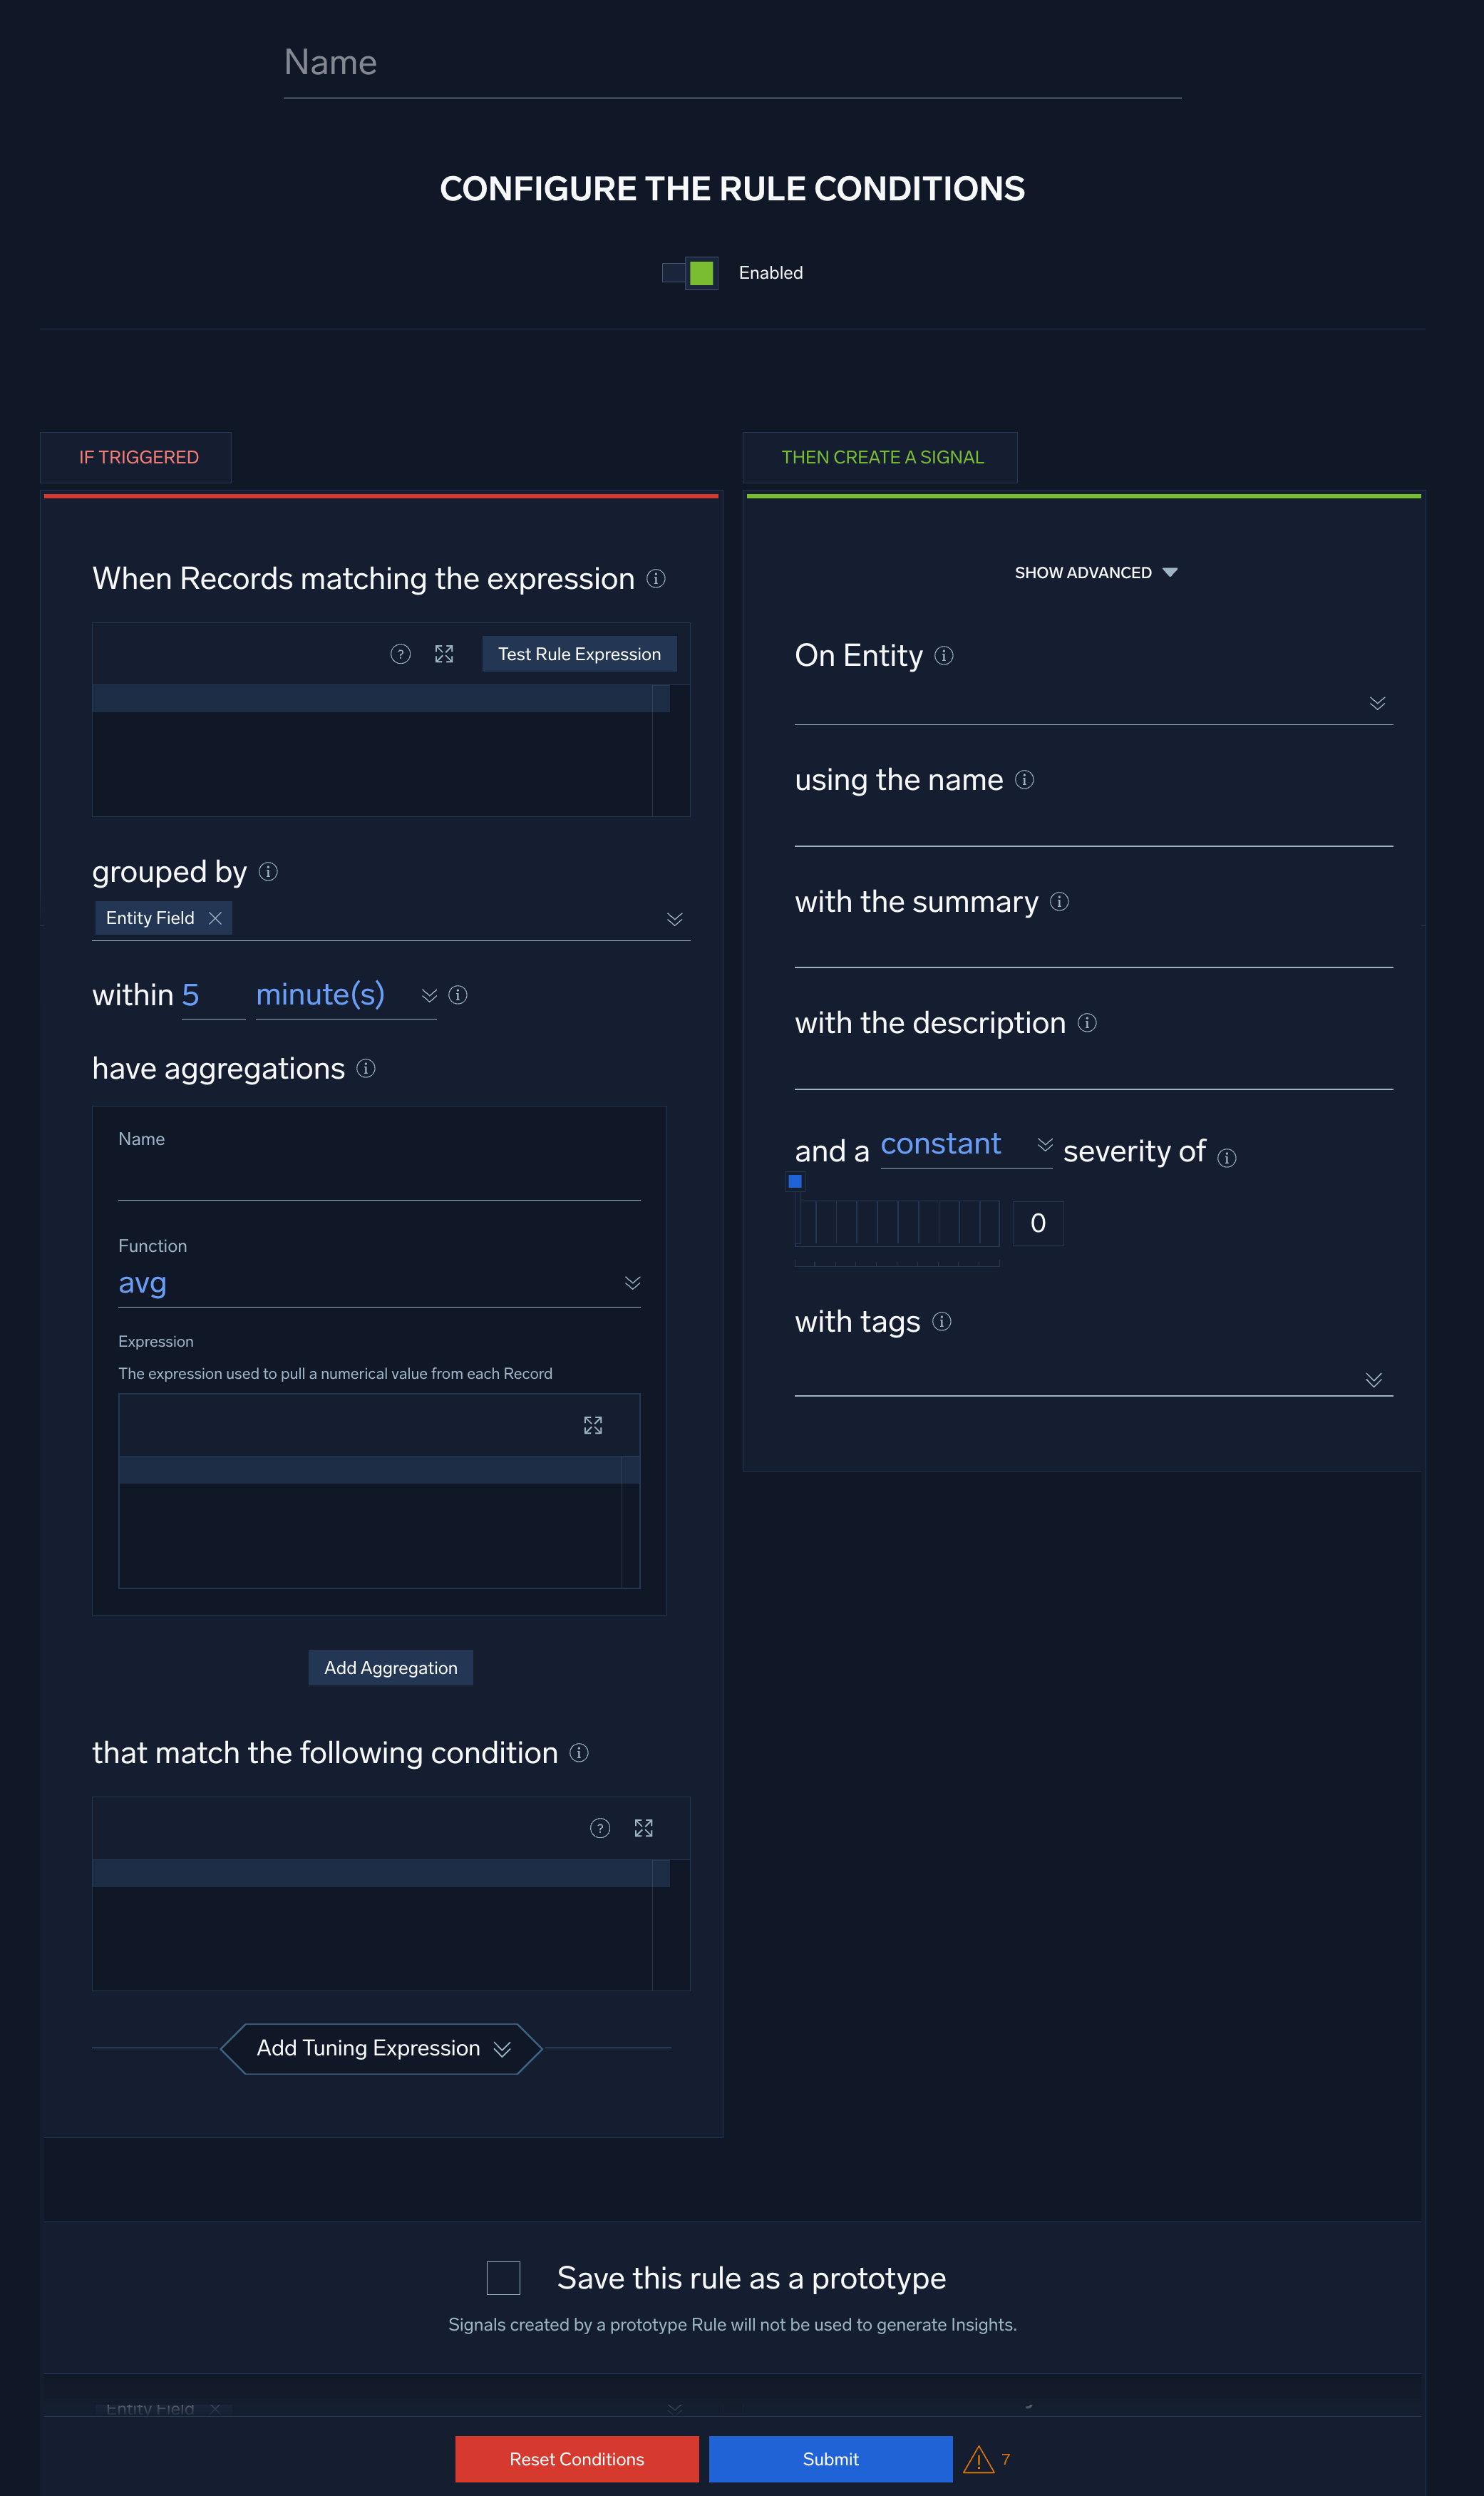
Configure “If Triggered” settings
On the left side of the Rules Editor, in the If Triggered section, you configure a filter that determines the records to which the rule will be applied, and the conditions under which you want the rule to fire a signal.
- When Records matching the expression. Enter one or more boolean expressions to filter the records you want to apply the rule to. For example:
!isNull(http_response_statusCode) - Click Test Rule Expression to test it against existing records in Cloud SIEM. The If Triggered section expands, and Cloud SIEM searches for records that match the rule expression. If there are no matching records, you'll see a There aren't any matches for the expression message. If no matches were returned, try changing the time range.
- grouped by. Specify the record field or fields by which aggregation results will be grouped. Note that when you define the On Entity field for the rule (in Configure “Then Create a Signal” settings below), the field you choose will automatically appear here. If you want to aggregate on other fields, you can select them from the selector list.
- within.... Select the length of time across which the rule is applied. The options range from 5 minutes to 5 days.
- have aggregations. To define an aggregation:
- Name. Give the aggregation a brief, meaningful name. You’ll reference the aggregation by its name in the trigger condition for the rule.
- Function. Select an aggregation function:
avg,count,count_distinct,first,last,max,min, orsum. - Expression. Enter an expression to filter the records to be aggregated. For example, the following expression results in the aggregation being applied to record whose
http_response_statusCodefield is greater than 201:
http_response_statusCode > 201
noteThe expression you enter should make sense with the aggregation function you chose. Specifically, if your aggregation function is
countorcount_distinct, your expression should return countable results, like the example above. However, if you use another aggregation function —avg,first,last,max,min, orsum— your expression should be a field name, for example:bytesorif(!isEmpty(bytes), bytes, bits), and the function will be applied to the value of that field.- To define another aggregation, click Add Aggregation and repeat the previous three steps.
- that match the following condition. Enter one or more boolean expressions, based on the results of the configured aggregations, which when true will cause the rule to fire a signal. For example, given the following expression, a rule will fire a signal when the sum of
Aggregation-1andAggregation-2is greater than 1.Aggregation-1 + Aggregation-2 > 1 - Select Add Tuning Expression if you want to add a rule tuning expression to the rule.
note
If you use Test Rule Expression on a rule that has one or more rule tuning expressions, you can test it without the tuning expressions, or with selected tuning expressions.
Configure “Then Create a Signal” settings
On the right side of the Rules Editor, in the Then Create a Signal section, you configure details of the signals that your rule will fire.
- Click Show Advanced if you want the rule to override global signal suppression.
- On Entity. Use the pull-down list to select one or more entity fields, for example, an IP address, MAC address, hostname, and so on. When the rule is triggered, it will fire a signal on each of the entity fields you select.
- using the name. Enter the name of the rule, which can be used to name the signal generated.
- with the summary. Enter a brief summary describing what causes the Rule to create a signal.
- with the description. Enter a description for the signal. The signal description should be a good indication of what the rule looks for.
note
You can add a markdown link (for example,
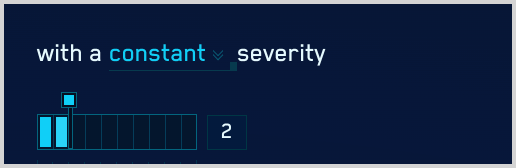
[link](https://link-target)) in the with the description field to add a link that will appear in the Signal that the rule fires. Then people viewing the Signal can click the link to access documentation about how to respond to the Signal. - and a severity of. Severity is an estimate of the criticality of the detected activity, from 1 (lowest) to 10 (highest). There are two ways to specify Severity:
- Constant. Every signal that the rule fires will have the same severity,
- Dynamic. Severity is based on the value of a field in the record.
- Configure constant severity. Choose Constant, and select a severity level. Then, proceed to Step 7.
- Configure dynamic severity.
- Choose Dynamic.
- The severity area updates.
- severity of. Use the pulldown to select a default severity value.
- for the record field. Use the down arrows to display a list of fields, and select one. The dynamic severity will be based on the value of (or existence of) that field in the record that matched the rule expression.
- The Add More Mappings option appears.
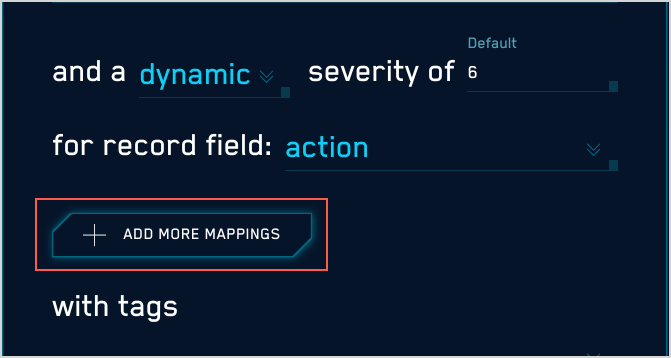
- Click Add More Mappings. (Optional) You can define additional mappings if desired. If you don’t, the severity value will be the value of the record field you selected above.
- The if the value is option appears.
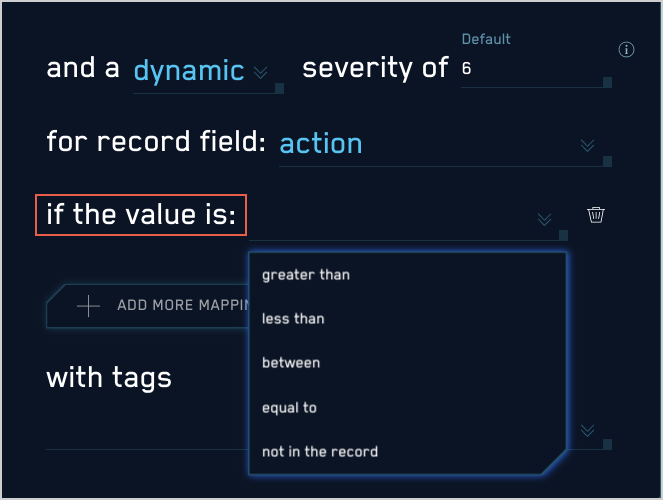
- Select one of the following options:
- equal to. The record field’s value must exactly match the string or numeric value you supply. For example "equal to 4" will match "4" and “4.0” but not “4.01”.
- less than. The record field’s value must be less than the numeric value you supply. The match is not inclusive. For example "less than 5" will match “4.9” but not “5”.
- greater than. The record field’s value must be greater than the numeric value you supply. The match is not inclusive. For example "greater than “5" will match “5.1”, but not “5”.
- between. The record field’s value must be between the two numeric values you supply. The match is inclusive. For example, "Between 5 and 10" will match “5”, “7”, or “10”, but not “10.1”.
- not in the record. Will match when the attribute is found in the record. For example, if the selected field is
broirc_value, and that field is not present in a record, the rule will match. Ifbroirc_valueexists but is null or empty, the rule will not match.
- You can define additional conditions, as desired. To define an additional conditions, repeat the steps above, starting with Add More Mappings.
noteThe conditions you define will be processed in the order you define them. Once a match occurs, processing stops–remaining conditions are ignored.
- with tags. If desired, you can add metadata tags to your rule. Tags are useful for adding context to items like Rules, insights, signals, entities. You can also search for and filter items by tag. Tags you set here will be automatically set on any signals created from this rule, and inherited by any insights generated from those signals.
Save as prototype
If you are not sure that your rule is ready for prime time, you can save it as a prototype. A prototype rule generates signals, but those signals won't contribute to insights. (Signals generated by a prototype rule do not increment the rule's On Entity entity's Activity Score.) Running the rule as a prototype for a while allows you to determine whether the rule is too noisy and fires too many signals.
To make the rule a prototype, click the box next to Save this rule as a prototype. When you are satisfied with the rule's behavior you can uncheck the box.
Click Submit to save the rule.
Duplicate signals?
If you determine that a threshold, chain, or aggregation rule is firing identical signals for the same conditions during the same time interval, there’s a likely explanation. This situation can arise due to how these rule types are processed: they are evaluated differently than match rules, because they support time duration conditions. For example, a threshold rule fires when its rule expression is matched at least a certain number of times during a specified length of time.
To successfully apply a rule across a sliding time window, Cloud SIEM evaluates records across overlapping time spans. Consider a rule that requires three matches across five minutes. With non-overlapping windows, we could detect one match at the end of one time window, and two more in the following time window. This should cause the rule to fire a signal, but would not, because the required five minute span is split between two evaluation windows. Overlapping evaluation windows solves this problem. In some cases though, it can also result in duplicate signals. However, as long as you don’t run the rule as a prototype, duplicate signals will be suppressed, as described in About Signal Suppression.