Linux Cloud Security Monitoring and Analytics

The Cloud Security monitoring and Analytics app for Linux ingests any distribution of linux data to gain a better understanding of your production environments, and surface relevant insights by tuning out-of-the-box content to align with your security team’s focus. Consolidate analytics across various instances by wildcarding on data sources and gain full visibility into your Linux data for both monitoring and analytics use cases.
Follow the steps in this topic to install or uninstall a collector on Linux. See Installed Collectors for information on other OSs.
System requirements
- Linux, major distributions 64-bit, or any generic Unix capable of running Java 1.8
- Single core, 512MB RAM
- 8GB disk space
- Package installers require TLS 1.2 or higher.
Collecting Data for the Linux Integration
Download the Collector
Download the collector in either of the following ways:
- Sumo Logic
- Classic UI. In the main Sumo Logic menu, select Manage Data > Collection > Collection.
New UI. In the Sumo Logic top menu select Configuration, and then under Data Collection select Collection. You can also click the Go To... menu at the top of the screen and select Collection. - Click Add Collector.
- Click Installed Collector.
- Click the link for the collector to begin the download.
- Classic UI. In the main Sumo Logic menu, select Manage Data > Collection > Collection.
- Browser
- Open a browser.
- Enter the static URL for your pod. See Download a Collector from a Static URL for a list of URLs for your deployment pod. The download begins immediately.
Install the Collector on Linux
Choose one of these methods to install the Collector:
Install Using the UI Installer
Run the installer on your server with root or Administrator privileges. If you are not logged in as root or Administrator, you might be prompted to reauthenticate to your system when you start the UI Installer.
- Open the downloaded installer file.
- If prompted, enter the root or Administrator user name and password for the system.
- Open the wizard to show the Welcome page. Click Next.
- Accept the license agreement and click Next.
- Browse to select a location for the collector or accept the default and click Next to install the Collector files on your machine.
- The Installer displays the summary of the default settings. If you want to change any of these, click Advanced UI Installer Settings and follow the instructions. Click Next.
- Choose an authentication method.
- Access Key. If you have a Sumo Logic access ID and key, click Next, enter the access ID and key, and click Next.
- Installation Token. Enter the Token String you want to use to register the Collector in the input box.
- Click Finish to complete the setup.
- Classic UI. In the main Sumo Logic menu, select Manage Data > Collection > Collection.
New UI. In the Sumo Logic top menu select Configuration, and then under Data Collection select Collection. You can also click the Go To... menu at the top of the screen and select Collection. - Verify that you can see the Collector. Look for the name that is listed as Collector Name in the confirmation step of this procedure (the name can be customized under Advanced Settings). If a Collector with that name already exists, a suffix is appended to uniquely identify it. If you don’t see the collector, check the Error Codes list to help troubleshoot.
Install Using the Command-Line Installer
- Add execution permissions to the downloaded Collector file (.sh):
chmod +x SumoCollector.sh
- Run the script with the parameters that you want to configure. See Parameters for the Command Line Installer for a description of the parameters. By default, the Collector will be installed in either /opt/SumoCollector or /usr/local/SumoCollector.
Examples
sudo ./SumoCollector.sh -q -Vsumo.token_and_url=<installationToken> -Vsources=<absolute_filepath>
sudo ./SumoCollector.sh -q -Vsumo.accessid=<accessId> -Vsumo.accesskey=<accessKey> -Vsources=<absolute_filepath>
sudo ./SumoCollector.sh -q -Vsumo.accessid=<accessId> -Vsumo.accesskey=<accessKey> -Vsources=<absolute_filepath> -Vproxy.host=<proxyHost> -Vproxy.port=<proxyPort>
sudo ./SumoCollector.sh -q -Vsumo.accessid=<accessId> -Vsumo.accesskey=<accessKey> -VsyncSources=<absolute_filepath> -Vcollector.name=<name>
Install Using the RPM or Debian Package
You can use the RPM or Debian package to install a Collector on a Linux 64-bit system.
-
Install the Collector using the downloaded installation package.
- For the RPM package, use the command:
sudo rpm -i SumoCollector-19.XXX-XX.x86_64.rpm- For the Debian package, use the command:
sudo dpkg -i SumoCollector-19.XXX-XX.x86_64.debThe RPM and Debian packages install the collector in the /opt/SumoCollector directory. By default, the Collector is installed as a system service, but not yet started.
-
Configure the Collector user.properties file in the /opt/SumoCollector/config/ directory. The Collector uses the settings defined in user.properties to register and start. See user.properties for a full list of all the supported parameters.
- To use an access key, provide the accessid and accesskey parameters. For example:
name = <collectorName>
accessid = <accessId>
accesskey = <accessKey>- To use an installation token, provide the authentication parameters token and url. To use these two parameters you'll need to manually base64 decode the Token String. Once decoded, you'll have a string with a token and a URL. For example, the following decoded Token String:
sumoxxxxxxxxxxxxxxxxxxxxxxxxxxxxhttps://collectors.sumologic.comwould be used as:
name = <collectorName>
url=https://collectors.sumologic.com
token=SUMOXXXXXXXXXXXXXXXXXXXXXXXXXXXX
- Starting with collector 19.170+, the installation directory is secured to users belonging to the
sumologic_collectorgroup. - Modifying user.properties may require sudo privileges. For more information, see Enhanced File System Security for Installed Collectors.
- (Optional) Provide a JSON Source information. You can pass all Source settings in a UTF-8 encoded JSON file. If you're using a JSON file, you must provide the file before starting the Collector. See Using JSON to configure Sources. Alternatively, you can configure Sources at any time by using the Sumo web app. See Sources.
- (Optional) Set the run a user for the Collector if you want the Collector to run as a user other than root. See run as for a Collector.
- (Optional on Collector version 19.253-3+ in the Fed deployment) Enable FIPS 140-2 compliant Java Cryptography Extension (JCE) to encrypt your data to Sumo Logic's Fed deployment in US1 only. FIPS mode is not supported for any other deployment. If you are unsure whether you are on the Fed deployment, check our deployments. To enable, locate and run the script
configureFipsMode.shcontained in Collector's installation directory under/script:
$ sh ./script/configureFipsMode.sh
- Start the Collector using the following command.
sudo service collector start
Install using the Binary Package
- Install the version of JRE you want to use from the following location. (The collector requires Java 8 or higher). The binary installation process does not include JRE installation. https://docs.aws.amazon.com/corretto/latest/corretto-8-ug/downloads-list.html
- Check the version of Java is 8 or higher:
java -version
- Untar the downloaded binary file inside your desired destination directory to create a subdirectory named
sumocollector:
tar -xvf SumoCollector_unix_XXX.tar.gz
- Copy the platform-specific wrapper file to the sumocollector directory:
cp tanuki/wrapper-<platform>
- Make the wrapper, collector, and script directory files executable:
chmod ug+x wrapper-<platform>
chmod ug+x collector
chmod ug+x script/*
- Configure the Collector user.properties file in the /opt/SumoCollector/config/ directory. The Collector uses the settings defined in user.properties to register and start. See user.properties for a full list of all the supported parameters. To use an access key, provide the accessid and accesskey parameters. For example:
name = <collectorName>
accessid = <accessId>
accesskey = <accessKey>
wrapper.java.command = java
To use an installation token, provide the authentication parameters token and url. To use these two parameters you'll need to manually base64 decode the Token String. Once decoded you'll have a string with a token and a URL.
For example, the following decoded Token String:
SUMOXXXXXXXXXXXXXXXXXXXXXXXXXXXXhttps://collectors.sumologic.com
would be used as:
name = <collectorName>
url=https://collectors.sumologic.com
token=SUMOXXXXXXXXXXXXXXXXXXXXXXXXXXXX
wrapper.java.command = java
- Set access control for files under the sumocollector directory:
sudo script/secureFiles.sh
- (Optional) Provide JSON Source information. You can pass all Source settings in a UTF-8 encoded JSON file. If you're using a JSON file, you must provide the file before starting the Collector. See Using JSON to configure Sources. Alternatively, you can configure sources at any time by using the Sumo web app. See Sources.
- (Optional) Set the run as user for the Collector if you want the Collector to run as a user other than root. See run as for a Collector.
- (Optional on Collector version 19.253-3+) Enable FIPS 140-2 compliant Java Cryptography Extension (JCE) to encrypt your data. Once enabled, the Collector version cannot be downgraded below version 19.253-3. To enable, locate and run the script configureFipsMode.sh contained in Collector's installation directory under /script:
$ sh ./script/configureFipsMode.sh
- Install the Collector as a service. Use the following command to install the Collector as a service that is started when the machine starts.
sudo ./collector install
- Start the Collector service. Use the following command to start the collector service.
sudo ./collector start
- Verify that you can see the collector. Classic UI. In the main Sumo Logic menu, select Manage Data > Collection > Collection.
New UI. In the Sumo Logic top menu select Configuration, and then under Data Collection select Collection. You can also click the Go To... menu at the top of the screen and select Collection.
You can build a Collector into a Linux machine image such as an Amazon AMI or VMware image.
After installing Collectors, you can configure Sources from Sumo Logic or by providing the Source settings in a JSON file. If you're using a UTF-8 encoded JSON file, you must provide the file before starting the collector. The JSON file needs to be UTF-8 encoded.
Uninstalling the Collector
Uninstalling a collector requires the following two steps:
- Uninstall the collector from the Linux system using any of these methods:
Uninstall using the UI Installer
- On your system, in the Applications folder, find the Sumo Logic Collector folder.
- Double-click the file Sumo Logic Collector Uninstaller.
- If prompted, select your language and click OK.
- Enter the user name and password for the system.
- When the Sumo Logic Collector Uninstall wizard is displayed, click Next to remove the collector.
- When the success message is displayed, click Finish.
Uninstall using the Command Line
- In a terminal prompt, change the directory to the collector installation directory. By default, the collector will be installed in either /opt/SumoCollector or /usr/local/SumoCollector.
cd /usr/local/SumoCollector
- Run the uninstall binary with the -q option. The -q option executes the command without presenting additional prompts.
sudo ./uninstall -q
Uninstall using the RPM/Debian packages
For the RPM package, use the command:
sudo rpm -e SumoCollector
For the Debian package, use the command:
sudo dpkg -r SumoCollector
Uninstall using the binary package
- Uninstall the collector service.
sudo <Collector Installation Directory>/collector remove
- Remove the collector installation directory.
sudo rm -rf <Collector Installation Directory>
- (Optional) On some distributions, for instance, Ubuntu, you may need to re-synchronize the daemon setting before installing the collector again.
sudo systemctl daemon-reload
- Remove the collector from Sumo Logic:
- Classic UI. In the main Sumo Logic menu, select Manage Data > Collection > Collection.
New UI. In the Sumo Logic top menu select Configuration, and then under Data Collection select Collection. You can also click the Go To... menu at the top of the screen and select Collection. - Find the collector you want to remove, and click Delete.
- When the Confirm dialog displays, click OK.
- Classic UI. In the main Sumo Logic menu, select Manage Data > Collection > Collection.
A success message is displayed and the collector is removed from the list.
Installing the Linux app
Now that you have set up collection, install the Sumo Logic App for PCI Compliance for Linux to use the preconfigured searches and Dashboards that provide insight into your data.
To install the app, do the following:
Next-Gen App: To install or update the app, you must be an account administrator or a user with Manage Apps, Manage Monitors, Manage Fields, Manage Metric Rules, and Manage Collectors capabilities depending upon the different content types part of the app.
- Select App Catalog.
- In the 🔎 Search Apps field, run a search for your desired app, then select it.
- Click Install App.
note
Sometimes this button says Add Integration.
- Click Next in the Setup Data section.
- In the Configure section of your respective app, complete the following fields.
- Field Name. If you already have collectors and sources set up, select the configured metadata field name (eg _sourcecategory) or specify other custom metadata (eg: _collector) along with its metadata Field Value.
- Click Next. You will be redirected to the Preview & Done section.
Post-installation
Once your app is installed, it will appear in your Installed Apps folder, and dashboard panels will start to fill automatically.
Each panel slowly fills with data matching the time range query received since the panel was created. Results will not immediately be available but will be updated with full graphs and charts over time.
Viewing Linux Security Monitoring dashboards
All dashboards have a set of filters that you can apply to the entire dashboard. Use these filters to drill down and examine the data to a granular level.
- You can change the time range for a dashboard or panel by selecting a predefined interval from a drop-down list, choosing a recently used time range, or specifying custom dates and times. Learn more.
- You can use template variables to drill down and examine the data on a granular level. For more information, see Filtering Dashboards with Template Variables.
- Most Next-Gen apps allow you to provide the scope at the installation time and are comprised of a key (
_sourceCategoryby default) and a default value for this key. Based on your input, the app dashboards will be parameterized with a dashboard variable, allowing you to change the dataset queried by all panels. This eliminates the need to create multiple copies of the same dashboard with different queries.
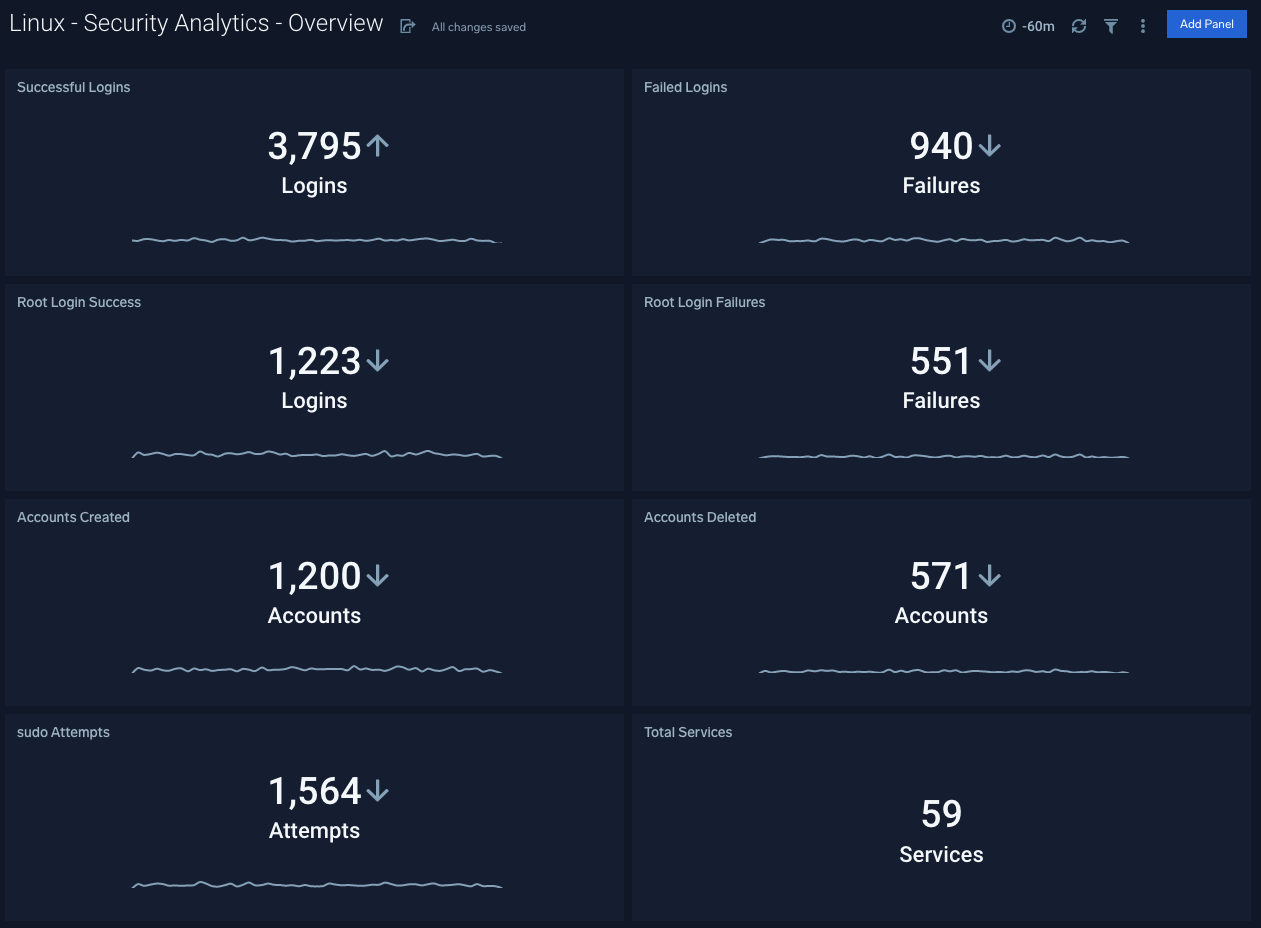
Security Monitoring - Overview
The Security Monitoring - Overview dashboard provides an overview of security statistics relevant for Linux systems. It presents information about successful and failed logins, root login successes and failures, user accounts created and deleted, sudo attempts and total Services.
Use case: Use this dashboard to monitor administrative actions (create, delete users) performed by end users, ensure proper services are running on all systems, detect attempts to change the system time, and verify that critical systems are up and running.You can also monitor excessive failed login attempts to detect attempts to break into the system.
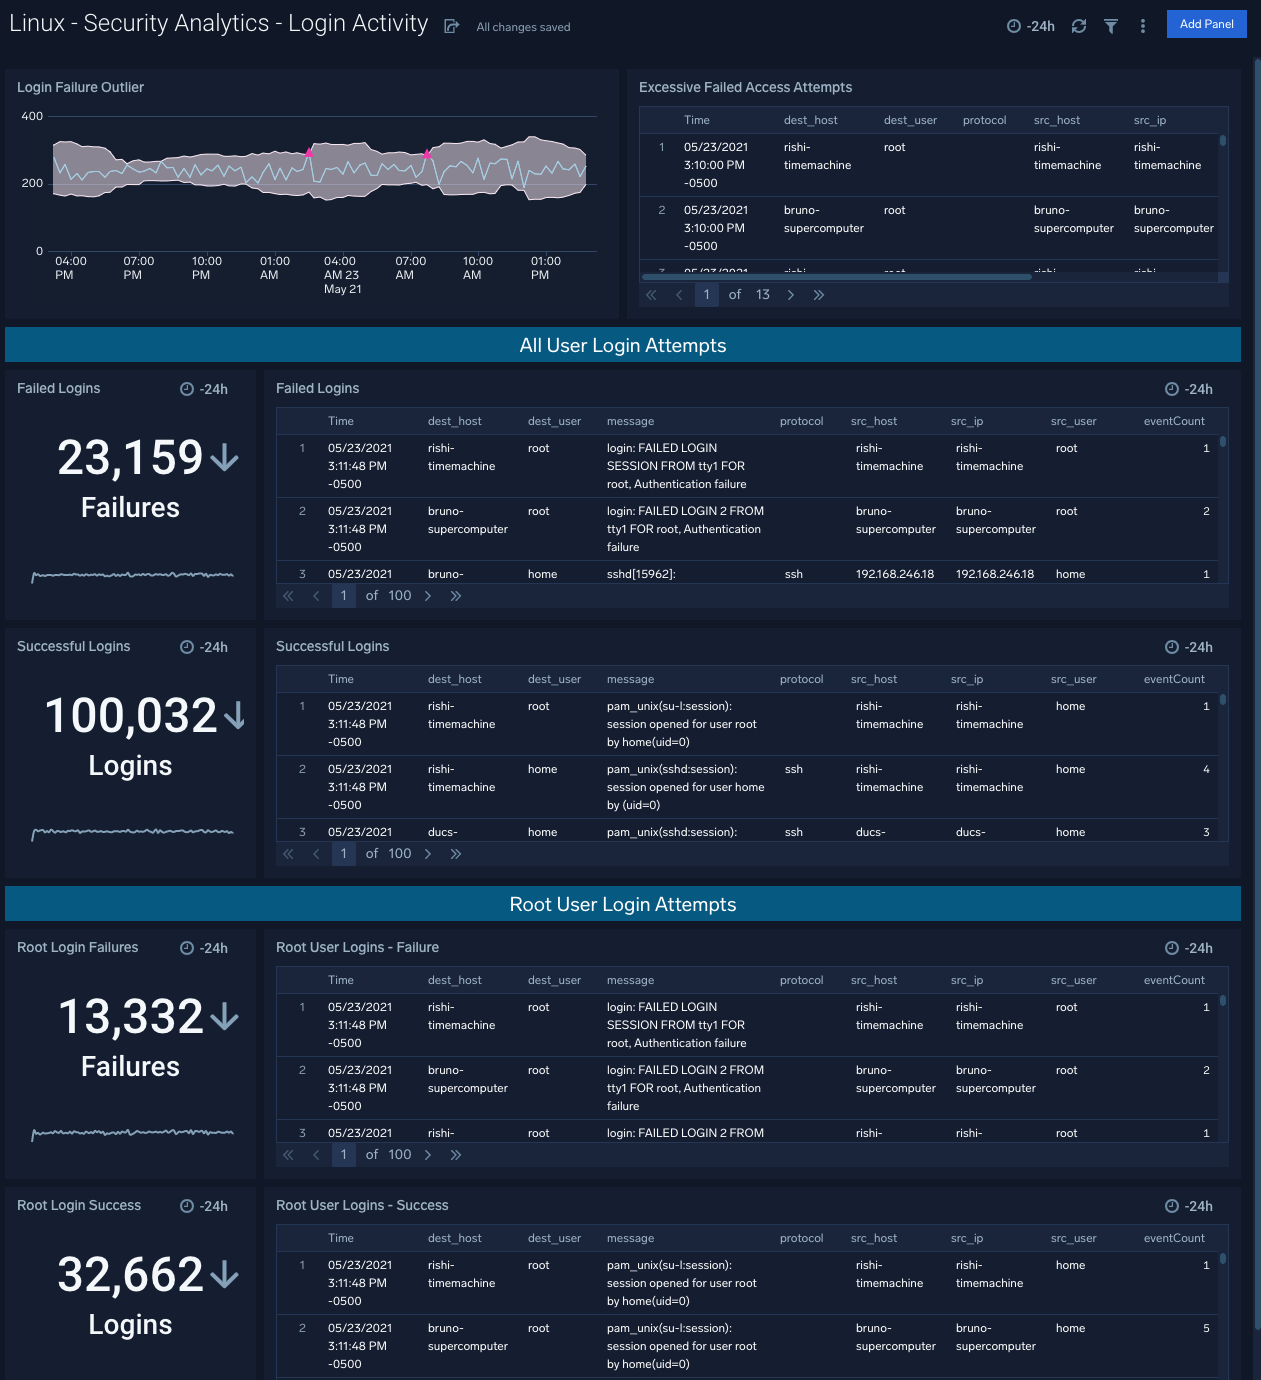
Security Analytics - Login Activity
The Security Analytics - Login Activity dashboard tracks login activity. It provides information about failed and successful user logins, and failed and successful root logins.
Use case: Use this dashboard to monitor access to the linux computing environment. You can monitor failed and successful user logins.
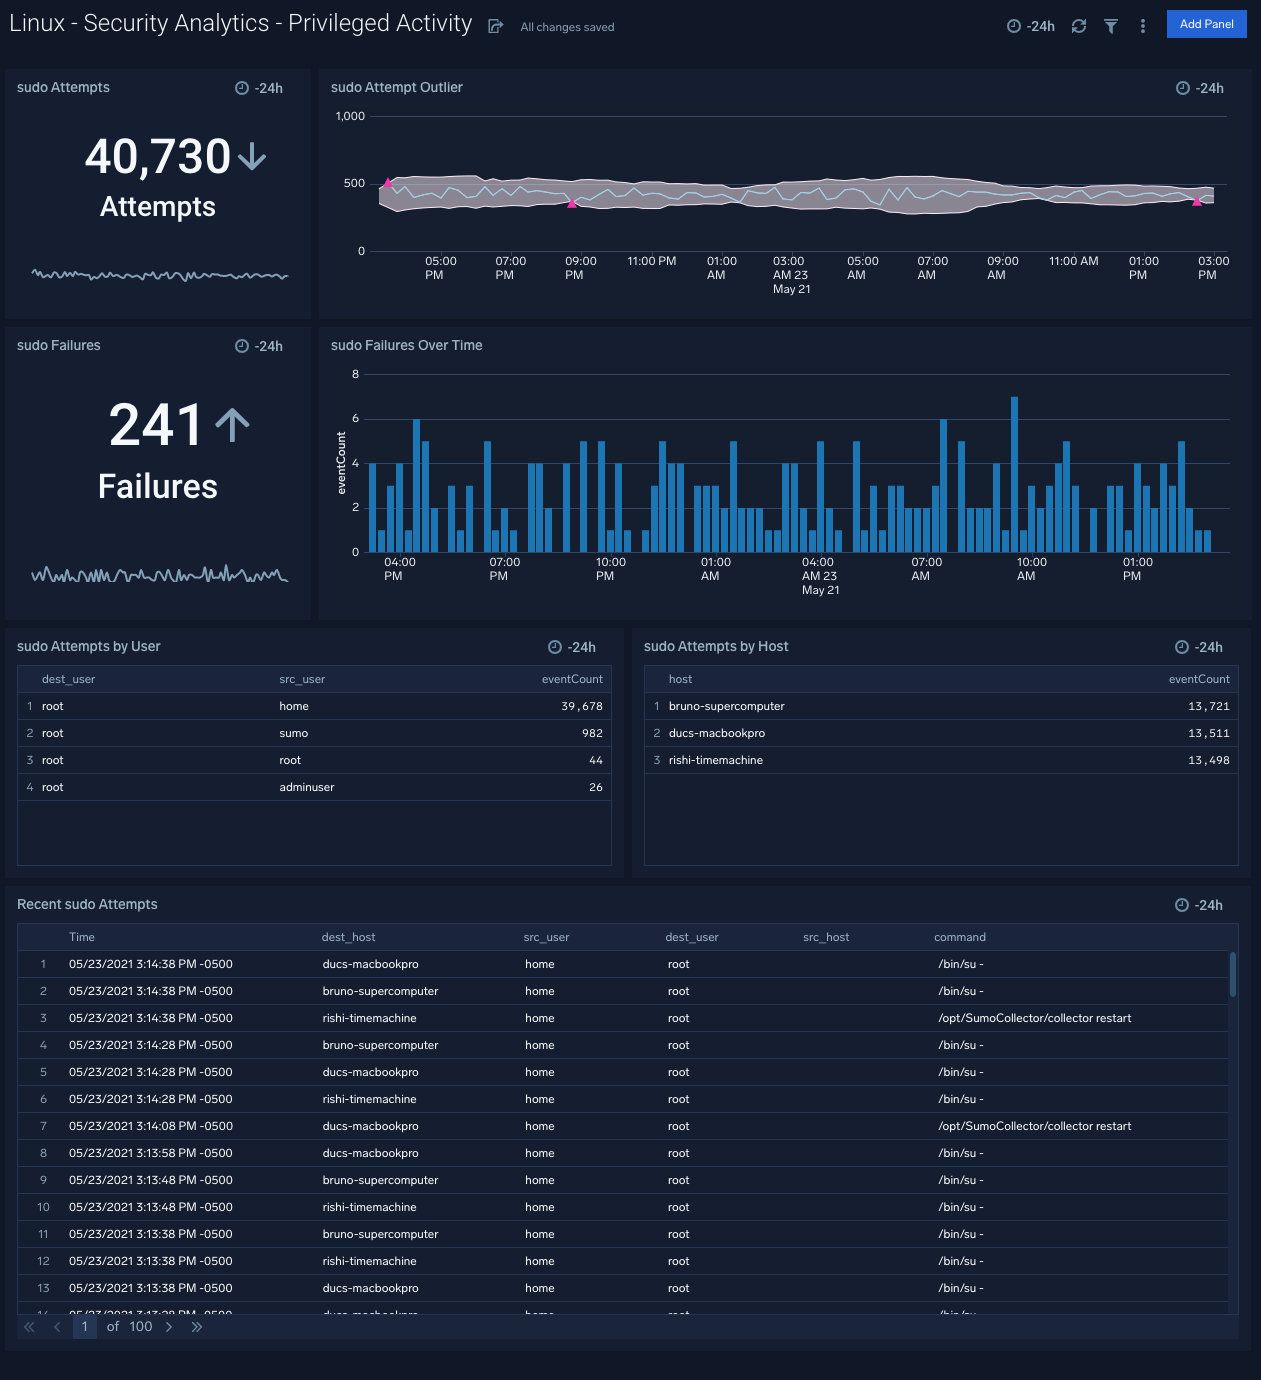
Security Analytics - Privileged Activity
The Security Analytics - Privileged Activity dashboard provides information about total sudo attempts, failed sudo attempts, the top 10 users and hosts that have issued sudo attempts, recent sudo attempts, and sudo attempts over time.
Use case: Use this dashboard to monitor successful and failed access attempts to systems, especially with administrative privileges. It also helps monitor actions performed by users with administrative privileges.
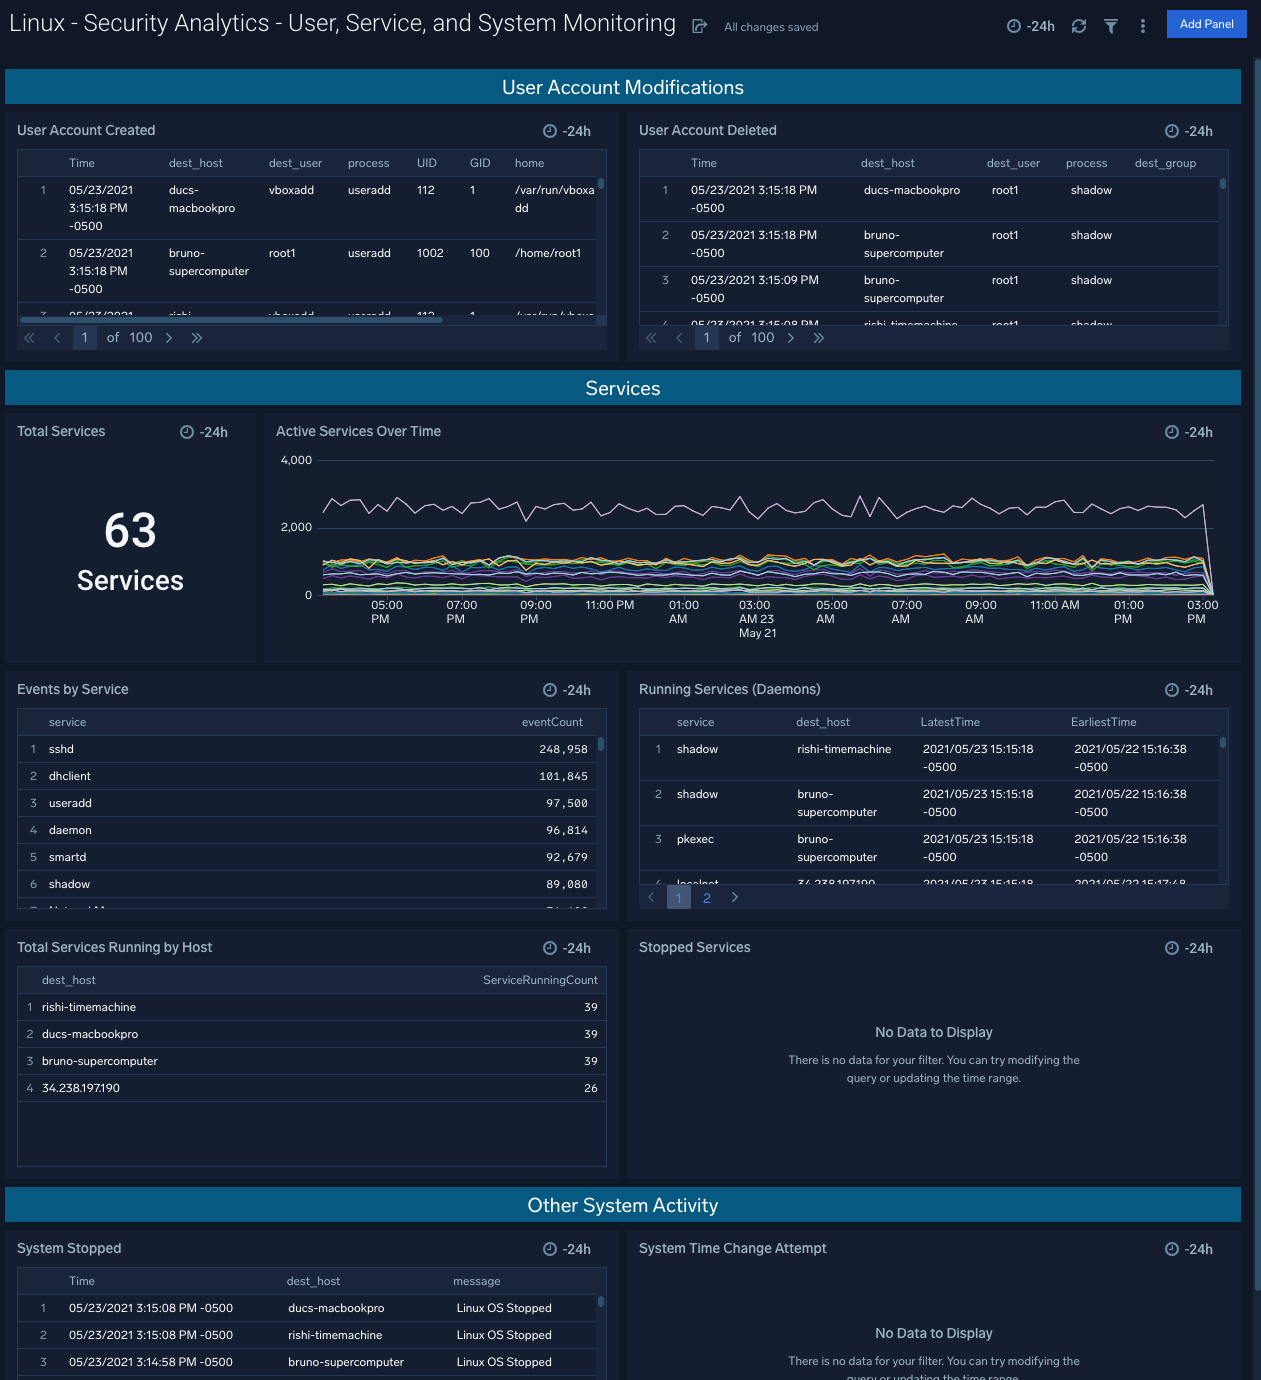
Security Monitoring - User, Service, and System Monitoring
The Security Monitoring - User, Service, and System Monitoring dashboard provides information about total sudo attempts, failed sudo attempts, the top 10 users and hosts that have issued sudo attempts, recent sudo attempts, and sudo attempts over time.
Use case: Use this dashboard to monitor accounts created and deleted. It also helps monitor service usage and other system activity.
Upgrade/Downgrade the Linux app (Optional)
To update the app, do the following:
Next-Gen App: To install or update the app, you must be an account administrator or a user with Manage Apps, Manage Monitors, Manage Fields, Manage Metric Rules, and Manage Collectors capabilities depending upon the different content types part of the app.
- Select App Catalog.
- In the Search Apps field, search for and then select your app.
Optionally, you can identify apps that can be upgraded in the Upgrade available section. - To upgrade the app, select Upgrade from the Manage dropdown.
- If the upgrade does not have any configuration or property changes, you will be redirected to the Preview & Done section.
- If the upgrade has any configuration or property changes, you will be redirected to the Setup Data page.
- In the Configure section of your respective app, complete the following fields.
- Field Name. If you already have collectors and sources set up, select the configured metadata field name (eg _sourcecategory) or specify other custom metadata (eg: _collector) along with its metadata Field Value.
- Click Next. You will be redirected to the Preview & Done section.
Post-update
Your upgraded app will be installed in the Installed Apps folder and dashboard panels will start to fill automatically.
See our Release Notes changelog for new updates in the app.
To revert the app to a previous version, do the following:
- Select App Catalog.
- In the Search Apps field, search for and then select your app.
- To version down the app, select Revert to < previous version of your app > from the Manage dropdown.
Uninstalling the Linux app (Optional)
To uninstall the app, do the following:
- Select App Catalog.
- In the 🔎 Search Apps field, run a search for your desired app, then select it.
- Click Uninstall.