Evident.io ESP

The Evident.io ESP app provides pre-configured searches and dashboards that allow you to investigate Evident-specific events and provide operational visibility to team members without logging into Evident.io.
The Evident.io Evident Security Platform (ESP) streamlines and optimizes vulnerability and risk management. It continuously monitors the AWS cloud, automatically identifies security misconfigurations, enables rapid mitigation of risk through guided remediation and provides visibility to their service through integrations with a central security analytics platform like Sumo Logic. By combining the vulnerability and identified security misconfigurations from Evident and other data sources, you can reduce your security risk and improve your overall security posture.
Log types
The Evident.io ESP App collects monitoring alerts.
For details on the log format and definitions, refer to Evident.io documentation at http://docs.evident.io/.
Sample log messages
Click to expand
{
   "data":{
      "id":"881237069",
      "type":"alerts",
      "attributes":{
         "created_at":"2017-10-02t18:39:11.577Z",
         "status":"fail",
         "risk_level":"medium",
         "resource":"dgadoury",
         "updated_at":"2017-10-02t18:39:11.577Z",
         "started_at":"2017-10-02T18:39:11.578Z",
         "ended_at":null
      },
      "relationships":{
         "external_account":{
            "data":{
               "id":"3256",
               "type":"external_accounts"
            },
            "links":{
               "related":"https://esp.evident.io/api/v2/external_accounts/3256.json"
            }
         },
         "region":{
            "data":{
               "id":"8",
               "type":"regions"
            },
            "links":{
               "related":"https://esp.evident.io/api/v2/regions/8.json"
            }
         },
         "signature":{
            "data":{
               "id":"83",
               "type":"signatures"
            },
            "links":{
               "related":"https://esp.evident.io/api/v2/signatures/83.json"
            }
         },
         "custom_signature":{
            "data":null,
            "links":{
               "related":null
            }
         },
         "suppression":{
            "links":{
               "related":null
            }
         },
         "metadata":{
            "data":{
               "id":"262926952",
               "type":"metadata"
            },
            "links":{
               "related":"https://esp.evident.io/api/v2/alerts/264543844/metadata.json"
            }
         },
         "cloud_trail_events":{
            "data":[

            ],
            "links":{
               "related":"https://esp.evident.io/api/v2/alerts/264543844/cloud_trail_events.json"
            }
         },
         "tags":{
            "data":[

            ],
            "links":{
               "related":"https://esp.evident.io/api/v2/alerts/264543844/tags.json"
            }
         },
         "compliance_controls":{
            "links":{
               "related":"https://esp.evident.io/api/v2/alerts/2645:43844/compliance_controls.json"
            }
         }
      }
   },
   "included":[
      {
         "id":"2433",
         "type":"external_accounts",
         "attributes":{
            "created_at":"2016-03-22t20:55:47.000Z",
            "name":"Test",
            "updated_at":"2016-10-05t01:05:22.000Z",
            "arn":"arn:aws:iam::926226587429:role/Evident_Service",
            "account":"123226587429",
            "external_id":"62dd0abc-5b44-410b-99d9-063f2c2b203e",
            "cloudtrail_name":null
         },
         "relationships":{
            "organization":{
               "links":{
                  "related":"https://esp.evident.io/api/v2/organizations/1000.json"
               }
            },
            "sub_organization":{
               "links":{
                  "related":"https://esp.evident.io/api/v2/sub_organizations/2000.json"
               }
            },
            "team":{
               "links":{
                  "related":"https://esp.evident.io/api/v2/teams/3000.json"
               }
            },
            "scan_intervals":{
               "links":{
                  "related":"https://esp.evident.io/api/v2/external_accounts/5000/scan_intervals.json"
               }
            }
         }
      },
      {
         "id":"8",
         "type":"regions",
         "attributes":{
            "code":"ap_southeast_1",
            "created_at":"2014-06-05t23:42:37.000Z",
            "updated_at":"2014-06-05t23:42:37.000Z"
         }
      },
      {
         "id":"83",
         "type":"signatures",
         "attributes":{
            "created_at":"2014-06-09t22:33:54.000Z",
            "description":"Ensure RDS restorable windows are within bounds -- exceeding 5 minutes is problematic.",
            "identifier":"AWS:ELB-070",
            "name":"ELB SSL Expiry 90day",
            "resolution":"RDS Restorable Windows are the timeframe to which the latest data is restorable. If these windows begin to exceed 5 minutes, then something is generally lagging in the system and could be broken. This signature alerts users if the 'latest restorable time' stops working as intended, which increases your potential risk if you need to recover data from your backups. Overall, it is expect to see this alert switch from PASS to FAIL on occasion with ESP due to transient delays from AWS.  If this alert fails consistently for one of your accounts, we recommend contacting AWS Support and asking them to take a look. For more information, AWS has information explaining how the Latest Restorable Time impacts your ability to restore a DB instance to a specific point in time http://docs.aws.amazon.com/AmazonRDS/latest/UserGuide/USER_PIT.html",
            "risk_level":"Low",
            "updated_at":"2016-10-13t00:00:15.000Z"
         },
         "relationships":{
            "service":{
               "links":{
                  "related":"https://esp.evident.io/api/v2/services/10.json"
               }
            }
         }
      }
   ]
}
Sample queries
_sourceCategory=security_evident
| json "data.id", "data.attributes" as id, data_attrib
| json "included.[0].attributes.name" as account_name
| json "included.[1].attributes.code" as region
| json "included.[2].attributes" as sig_attrib
| json field=data_attrib "resource", "status", "started_at", "created_at", "ended_at", "updated_at"
| json field=sig_attrib "description", "identifier", "name", "resolution", "risk_level"
| first(updated_at) by id, status
| count by status
Collecting logs for the Evident.io ESP app
This page demonstrates how to configure log collection for the Evident.io ESP App, and provides an example log message and query.
Step 1. Add a Sumo Logic Collector and Source
- In Sumo Logic, configure a Hosted Collector.
- Configure an HTTP Source.
- Name. Enter Evident.io SNS Integration.
- Source Category. Enter security_evident.
- In the Advanced section, configure:
- Enable Timestamp Parsing. Activate the check box Extract timestamp information from log files.
- Time Zone. Select Ignore time zone from log file, and select (UTC) Etc/UTC
- Processing Rules. Create the following Mask Rule:
- Name. Enable proper timestamp parsing.
- Filter. Enter the following:
\"(?:created_at|updated_at|ended_at)\":\"\d+-\d+-\d+(T)\d+:\d+:\d+.\d+Z\"- Type. Select Mask messages that match.
- Mask String. Enter t.
- Click Apply.
- Click Save.
- Copy the HTTP Source Address URL and use it in the following section.
Step 2. Configure an Evident.io Integration with Amazon SNS
To configure an Evident.IO Integration with Amazon SNS:
- In Evident.io, add an Integration.
- Enable an Amazon SNS integration.
Step 3. Subscribe to SNS Notifications
Once the Hosted Collector and HTTP Source are configured, subscribe your Hosted Collector to the topic collecting data from Evident.io.
If this is a new SNS topic, first subscribe an email address to it to make sure the path from ESP to the SNS topic works correctly before subscribing the Hosted Collector.
-
In the AWS Management Console, go to SNS > Topics, and find the topic you created in Configure an Evident.IO Integration with Amazon SNS.
-
Select the checkbox for the topic.
-
Under Amazon SNS, in the Actions menu, select Subscribe to Topic.
-
Under Protocol, select HTTPS, and paste the Sumo Logic HTTP Source URL you created in the first step into the Endpoint field.
-
Click Create Subscription.
-
In a few minutes, a confirmation message is sent to Sumo Logic.
-
In Sumo Logic, find the confirmation message from your HTTP Source by searching for
SubscribeURL. For example, use the query:_sourceCategory=security_evident SubscribeURL -
Then, in the Messages tab, find the JSON field
SubscribeURL, and copy the URL to your clipboard, as shown. -
In the AWS Management Console, select SNS >Topics.
-
Under Amazon SNS > Actions, select Confirm a subscription.
-
Paste the
SubscribeURLinto the field Subscription confirmation URL, and click Confirm subscription.
Step 4. Enable Raw Message Delivery
Enable Raw Message Delivery for the topic.
For details, see http://docs.aws.amazon.com/sns/latest/dg/large-payload-raw-message.html.
- Select the AWS Topic.
- Click Other subscription actions.
- Click Edit subscription attributes.
- Select the Raw message delivery check box.
- Click Set subscription attributes.
Installing the Evident.io ESP app
To install the app, do the following:
Next-Gen App: To install or update the app, you must be an account administrator or a user with Manage Apps, Manage Monitors, Manage Fields, Manage Metric Rules, and Manage Collectors capabilities depending upon the different content types part of the app.
- Select App Catalog.
- In the 🔎 Search Apps field, run a search for your desired app, then select it.
- Click Install App.
note
Sometimes this button says Add Integration.
- Click Next in the Setup Data section.
- In the Configure section of your respective app, complete the following fields.
- Field Name. If you already have collectors and sources set up, select the configured metadata field name (eg _sourcecategory) or specify other custom metadata (eg: _collector) along with its metadata Field Value.
- Click Next. You will be redirected to the Preview & Done section.
Post-installation
Once your app is installed, it will appear in your Installed Apps folder, and dashboard panels will start to fill automatically.
Each panel slowly fills with data matching the time range query received since the panel was created. Results will not immediately be available but will be updated with full graphs and charts over time.
Viewing Evident.io ESP dashboards
All dashboards have a set of filters that you can apply to the entire dashboard. Use these filters to drill down and examine the data to a granular level.
- You can change the time range for a dashboard or panel by selecting a predefined interval from a drop-down list, choosing a recently used time range, or specifying custom dates and times. Learn more.
- You can use template variables to drill down and examine the data on a granular level. For more information, see Filtering Dashboards with Template Variables.
- Most Next-Gen apps allow you to provide the scope at the installation time and are comprised of a key (
_sourceCategoryby default) and a default value for this key. Based on your input, the app dashboards will be parameterized with a dashboard variable, allowing you to change the dataset queried by all panels. This eliminates the need to create multiple copies of the same dashboard with different queries.
Evident.io ESP - Overview

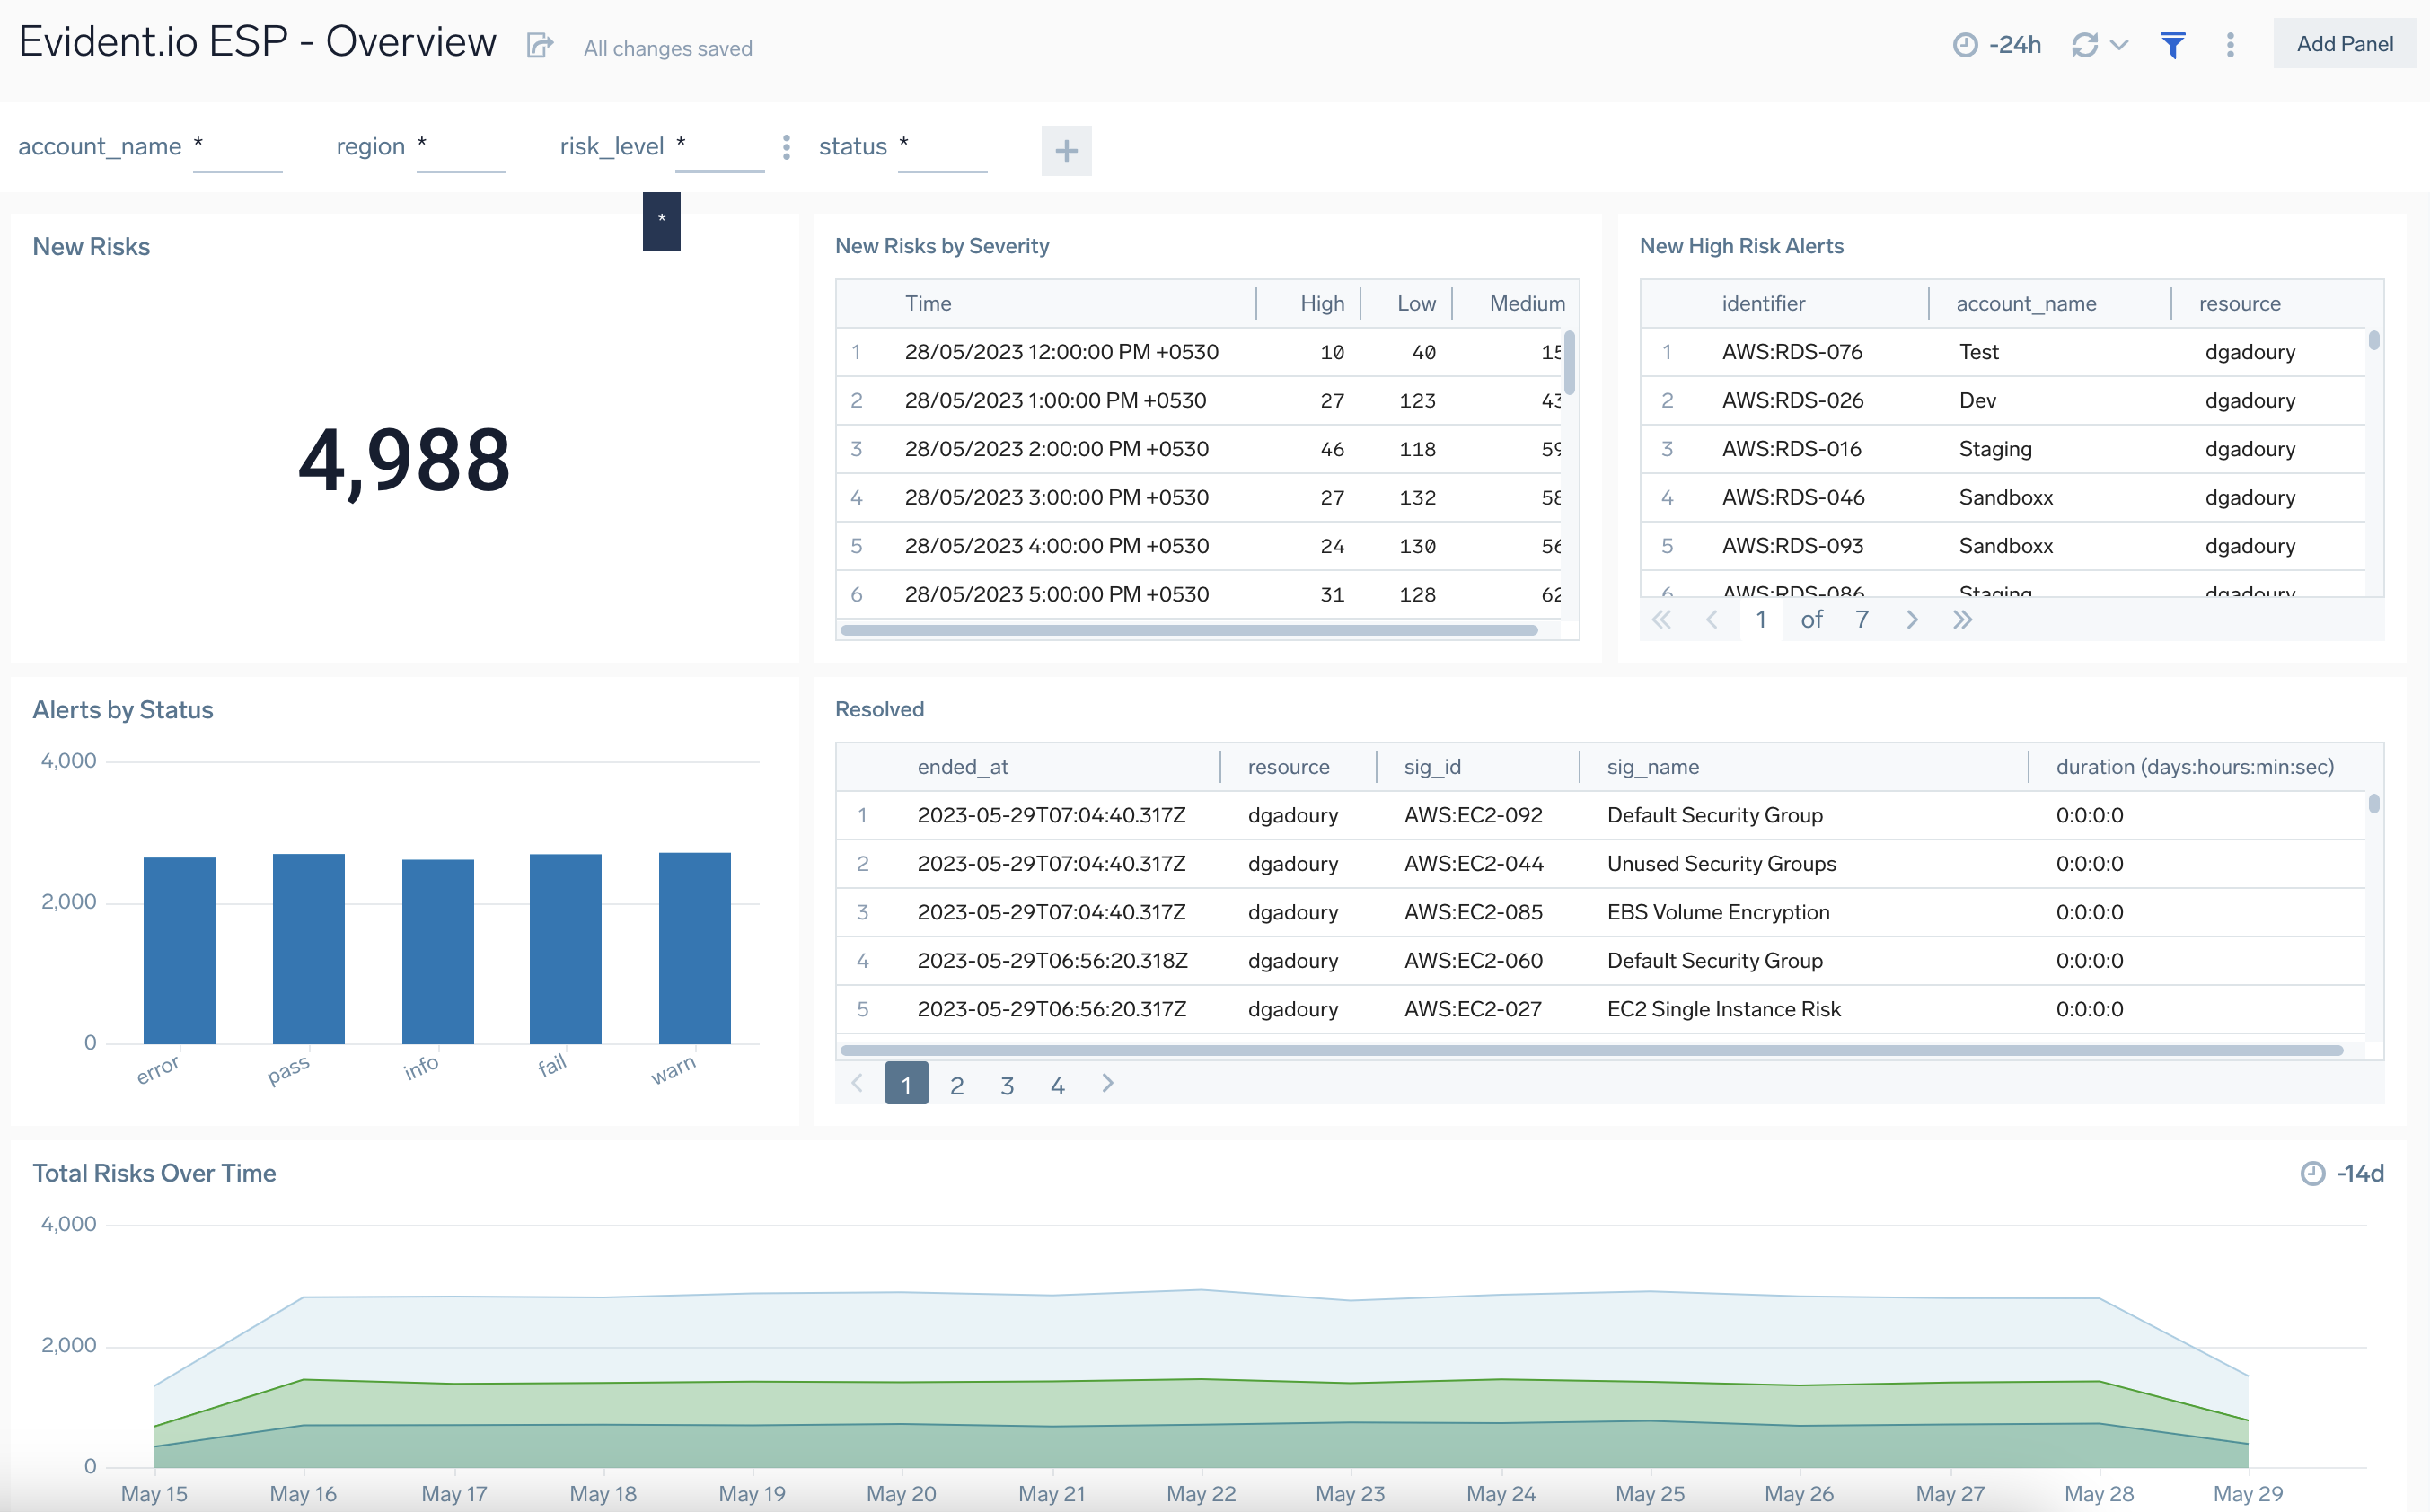
New Risks. Displays the number of new risks in a single value chart over the previous 24 hours.
New Risks by Severity. Shows the severity of new risks in a stacked column chart on a timeline for the last 24 hours.
New High Severity Risks. Provides details on the new high severity risks in a table chart over the last 24 hours.
Alerts by Status. Provides details on the number and status of new alerts over the last 24 hours in a column chart
Resolved Risks. Shows which risks have been resolved over the last 24 hours in a table chart.
Total Risks over Time. Shows a trendline of all alerts over the last 14 days in a stacked area chart.
Detailed Risks

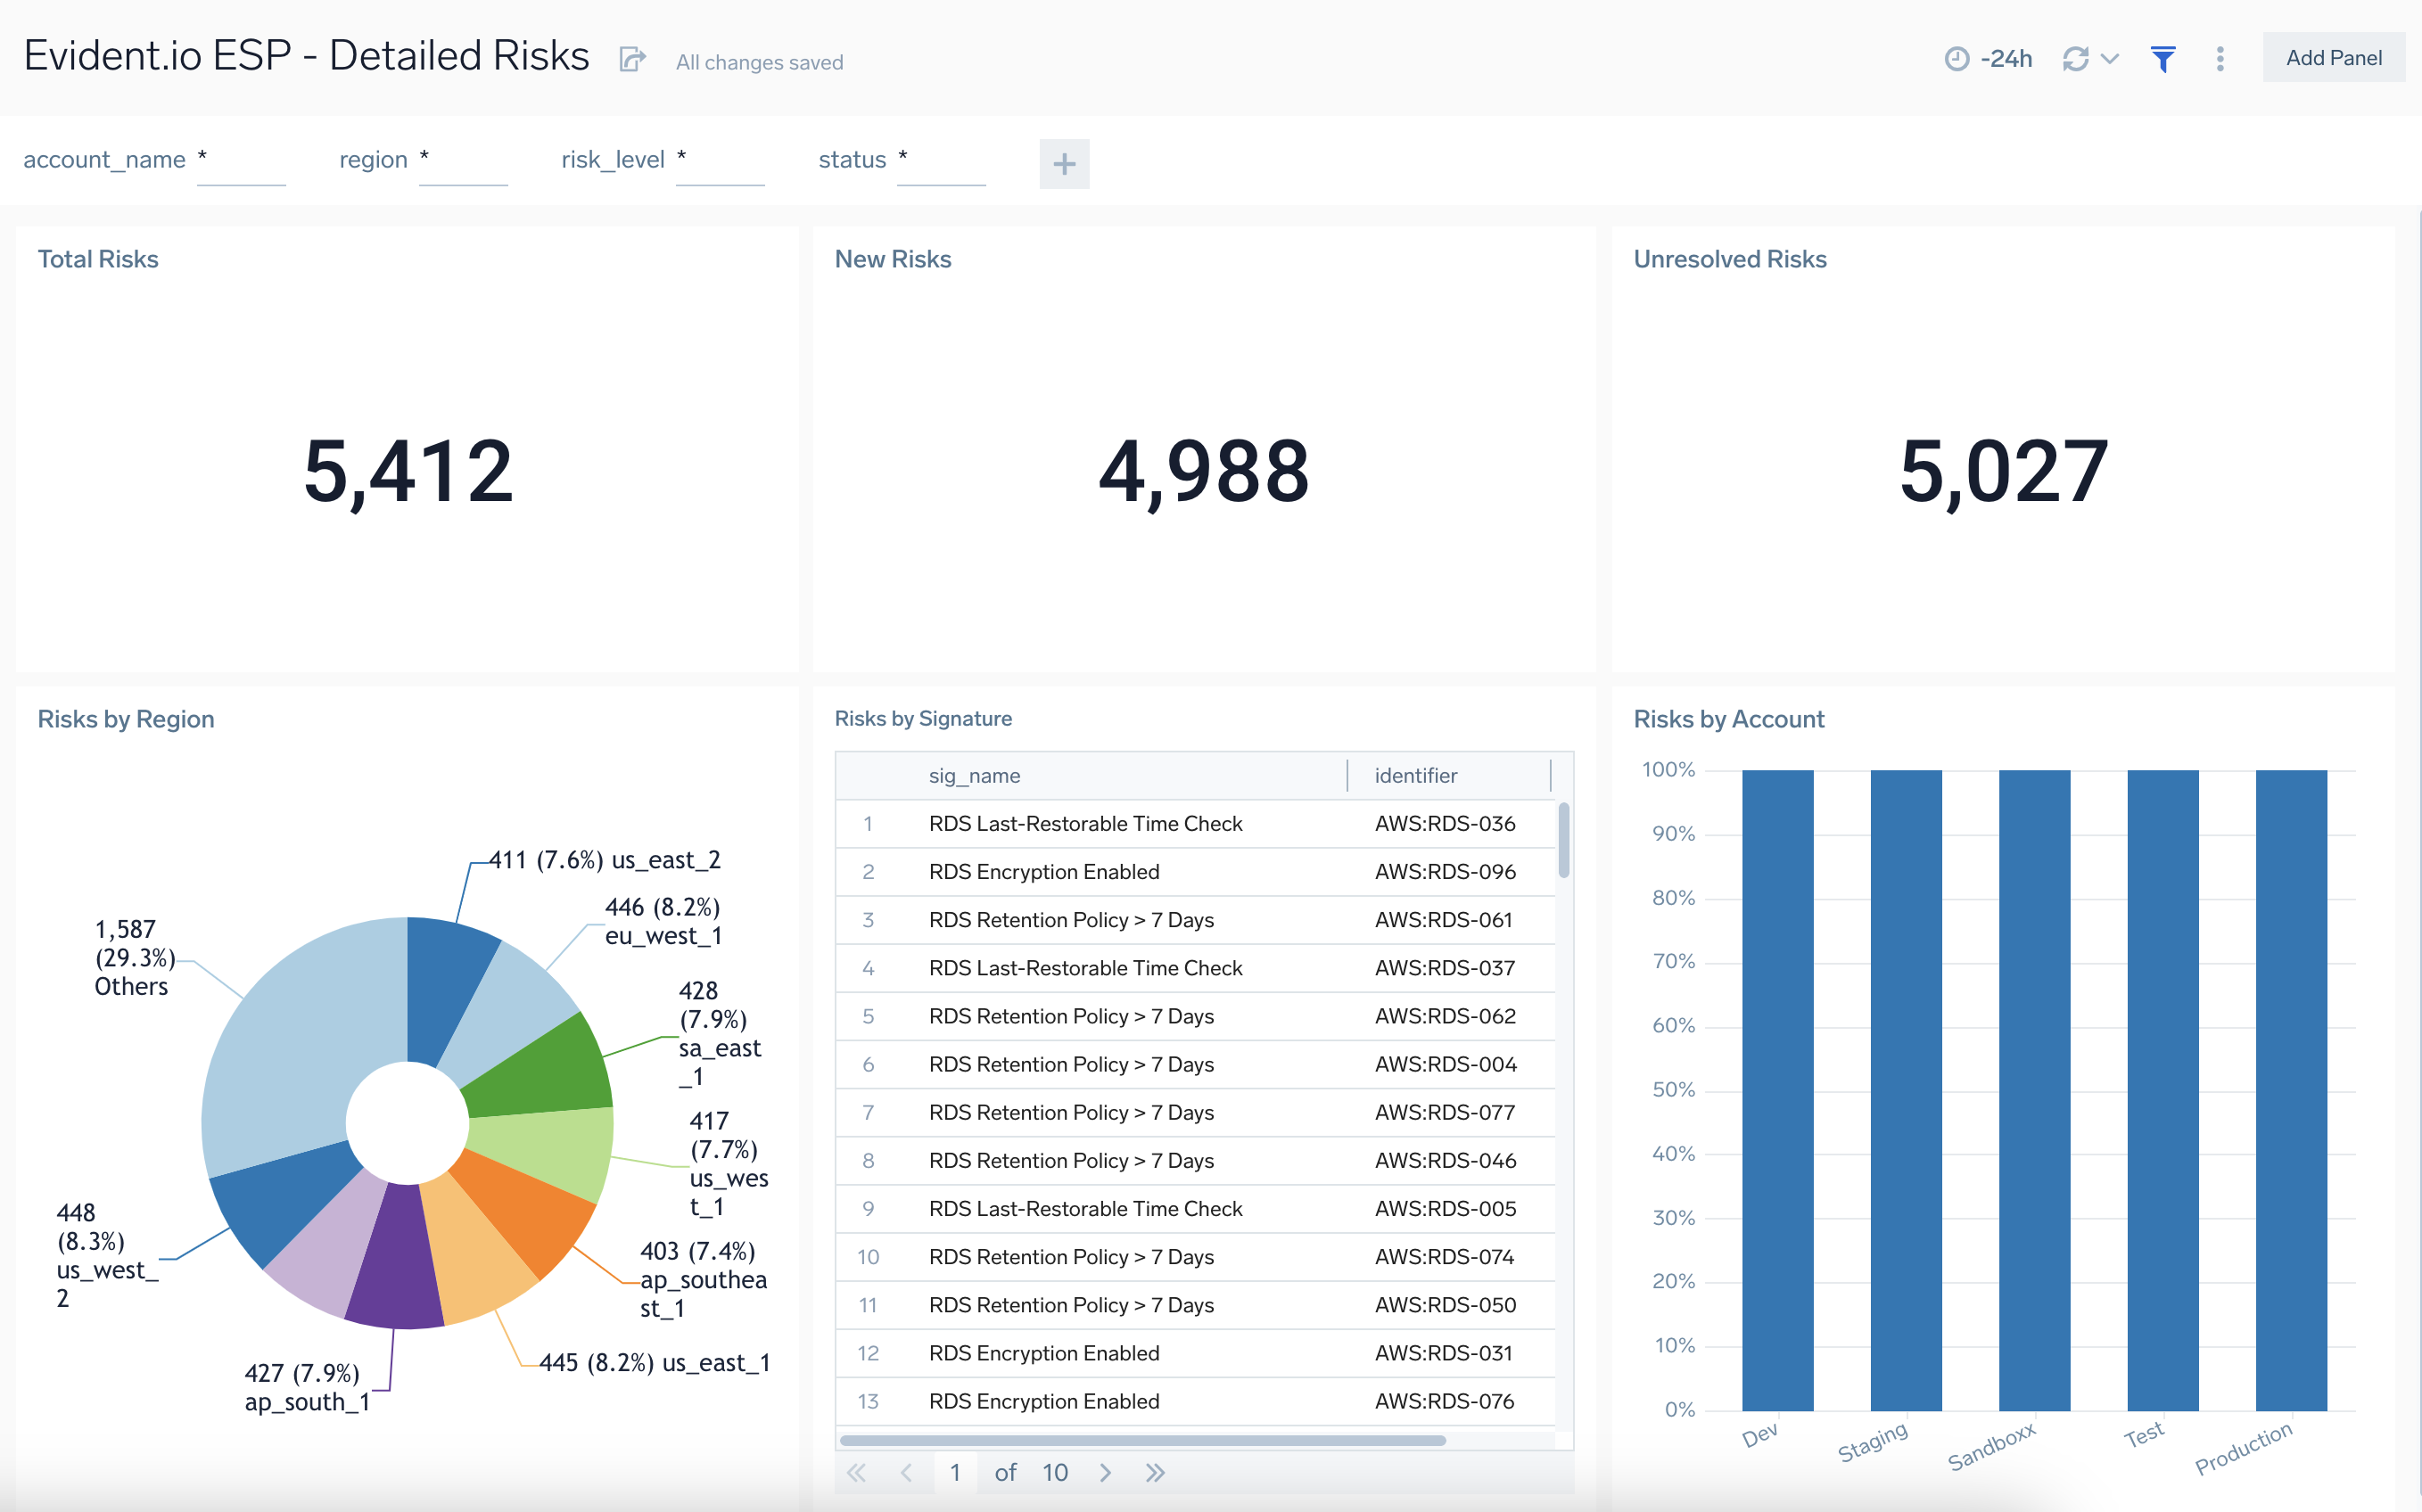
Total Risks. Shows the number of total risks in a single value chart over the last 24 hours
New Risks. Displays the number of new risks for the last 24 hours in a single value chart.
Unresolved Risks. Displays the number of unresolved risks reported over the last 24 hours in a single value chart.
Risks by Region. Displays the total number of risks by region over the last 24 hours in a donut chart.
Risks by Signature. Provides details on risks by signature name and identifier over the last 24 hours in a table chart.
Risks by Account. Displays the total number of risks by account name over the last 24 hours in a column chart.
Upgrade/Downgrade the Evident.io ESP app (Optional)
To update the app, do the following:
Next-Gen App: To install or update the app, you must be an account administrator or a user with Manage Apps, Manage Monitors, Manage Fields, Manage Metric Rules, and Manage Collectors capabilities depending upon the different content types part of the app.
- Select App Catalog.
- In the Search Apps field, search for and then select your app.
Optionally, you can identify apps that can be upgraded in the Upgrade available section. - To upgrade the app, select Upgrade from the Manage dropdown.
- If the upgrade does not have any configuration or property changes, you will be redirected to the Preview & Done section.
- If the upgrade has any configuration or property changes, you will be redirected to the Setup Data page.
- In the Configure section of your respective app, complete the following fields.
- Field Name. If you already have collectors and sources set up, select the configured metadata field name (eg _sourcecategory) or specify other custom metadata (eg: _collector) along with its metadata Field Value.
- Click Next. You will be redirected to the Preview & Done section.
Post-update
Your upgraded app will be installed in the Installed Apps folder and dashboard panels will start to fill automatically.
See our Release Notes changelog for new updates in the app.
To revert the app to a previous version, do the following:
- Select App Catalog.
- In the Search Apps field, search for and then select your app.
- To version down the app, select Revert to < previous version of your app > from the Manage dropdown.
Uninstalling the Evident.io ESP app (Optional)
To uninstall the app, do the following:
- Select App Catalog.
- In the 🔎 Search Apps field, run a search for your desired app, then select it.
- Click Uninstall.