Manage Permissions with ADFS
Sumo Logic provides this information about configuring ADFS as a courtesy to customers. These instructions apply to ADFS, which is a Microsoft product, and is NOT supported by Sumo Logic. If you have any issues regarding these instructions, refer to the Microsoft ADFS documentation or Microsoft support services https://msdn.microsoft.com/en-us/lib.../bb897402.aspx.
You can manage Sumo Logic user permissions using ADFS and SAML. To do this, you will configure ADFS to sync roles to Sumo Logic via SAML.
Before you begin, here are a few key points, limitations, and tips:
- User permissions are updated upon every SSO login. This allows you to manage permissions for Sumo Logic users within Active Directory.
- SAML does not provide a deprovisioning mechanism. This means that if a user is deleted or disabled in Active Directory, it will not be reflected in Sumo Logic. However, these users would no longer be able to sign in to Sumo Logic via SSO. The exception is Access Keys, and if SAML lockdown is not enabled, users would still be able to login via native accounts.
- Access Keys are NOT controlled by SAML. This means that if a user has been turned off on the SSO side, their Access Keys would still be valid. For this reason, administrators should audit users regularly and disable Access Keys when necessary.
- By default, administrators can create new Sumo Logic native logins in addition to SAML provisioned users. This creates the need to either audit your accounts or ask Sumo Logic Support to enable SAML Lock Down.
- SAML Lock Down disables the ability for users to login directly to Sumo Logic using username and password. There are also a few minor changes to user management behavior, such as not sending an email when a user’s email account is modified.
- After you have successfully set up your SAML configuration, turn on Debug within the SAML configuration in Sumo Logic to identify any issues.
Create a New Claim Rule
Create a claim rule that gathers AD groups.
For more information on “The Role of Claims”, see this Microsoft TechNet article: https://technet.microsoft.com/en-us/...(v=ws.11).aspx.
To create a new Claim Rule:
- Complete the provisioning steps in Set Up SAML for Single Sign-On.
- Open the ADFS Management application.
- Click Edit Claims.
- Select the template Send Claims Using a Custom Rule.
- Click Next.
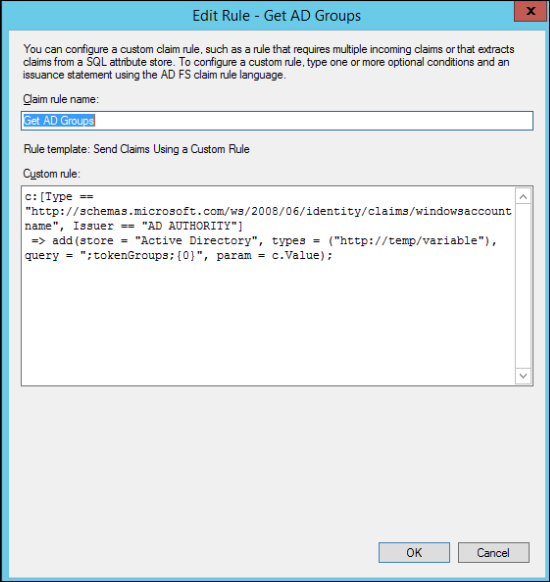
- For Claim rule name, enter Get AD Groups.
- For Custom rule, copy and paste the following code:
c:[Type == "http://schemas.microsoft.com/ws/2008/06/identity/claims/windowsaccountname", Issuer == "AD AUTHORITY"]
=> add(store = "Active Directory", types = ("http://temp/variable"), query = ";tokenGroups;{0}", param = c.Value); - Click OK.
Create a New Role
Create a new role that modifies the Group name and supplies the claim/attribute name that will be passed.
This role will:
- Pipe all the groups that the authenticated user is part of to the variable
http://temp/variable. - Search the contents of
http://temp/variablefor Active Directory groups that have aSUMO_ prefix. TheSUMO_ prefixis used to allow the ADFS Rule to identify Sumo Logic groups within the list of roles assigned to every user. Once the groups are identified, theSUMO_ prefixis removed. - The results are passed to an attribute called
https://sumologic.com/SAML/Attributes/Role. This attribute contains a list of values that contain your of Sumo Logic Active Directory groups.
Here is a sample Role attribute contained within the XML Assertion:
<Attribute Name="https://sumologic.com/SAML/Attributes/Role">
    <AttributeValue>Analyst</AttributeValue>
    <AttributeValue>Administrator</AttributeValue>
</Attribute>
To create a new Role:
- In the ADFS Management Application, click Edit Claims.
- Select the template Send Claims Using a Custom Rule.
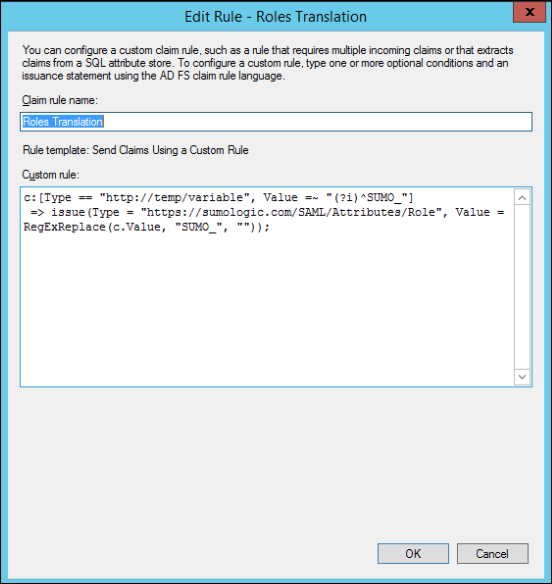
- For Claim rule name, enter Roles Translation.
- For Custom rule, copy and paste the following code:
c:[Type == "http://temp/variable", Value =~ "(?i)^SUMO_"]
=> issue(Type = "https://sumologic.com/SAML/Attributes/Role", Value = RegExReplace(c.Value, "SUMO_", "")); - Click OK.
Update the Roles Attribute in Sumo Logic
Now that you have setup SAML successfully, update the Roles Attribute (Optional) in Sumo Logic to match the attribute name defined in your role translation claim.
To update the roles attribute:
- Classic UI. In the main Sumo Logic menu, select Administration > Security > SAML.
New UI. In the top menu select Administration, and then under Account Security Settings select SAML. You can also click the Go To... menu at the top of the screen and select SAML. - Click Configure.
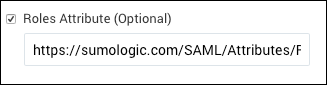
- Activate the Roles Attribute (Optional) check box.
- Enter the URL, for example,
https://sumologic.com/SAML/Attributes/Role. - Click Save.