Create and Manage Roles
This section has instructions for creating and managing Sumo Logic roles. The roles you assign to a user control what Sumo Logic capabilities are available to the user and what log data the user can access. This functionality is referred to as role-based access control.
Built-in Administrator and Analyst roles
There are two built-in roles in a Sumo Logic account: Administrator and Analyst.
The Administrator role is a super user. It has all of the capabilities that can be assigned to a role, and its role search filter enables access to all data in Sumo Logic. You cannot edit or delete the Administrator role.
Users with the Analyst role have a single capability: View Collectors. Its role search filter enables access to all data in Sumo Logic. You can edit the Analyst role filter to change the capabilities assigned to it and to make the role filter more restrictive. You can also delete the Analyst role if desired. For more information, see Edit a role and Delete a role below.
Create a role
To create a role:
- New UI. In the main Sumo Logic menu select Administration, and then under Users and Roles select Roles. You can also click the Go To... menu at the top of the screen and select Roles.
Classic UI. In the main Sumo Logic menu select Administration > Users and Roles > Roles. - Click + Add Role on the upper right side of the page.
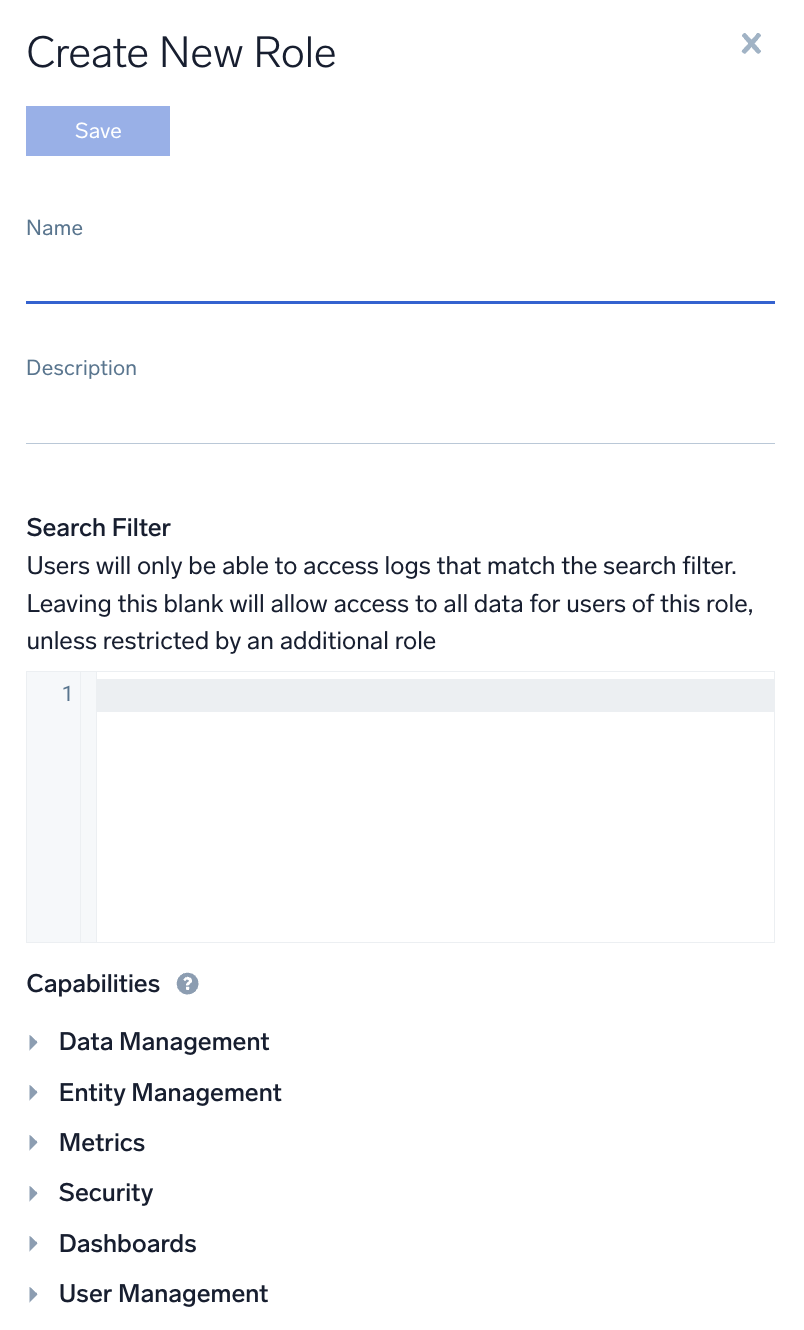
- The Create New Role pane appears on the right side of the page.

- Name. Enter a name for the role.
- Description. Enter a description of the role to help other Administrators understand the purpose or limitations of the role.
- Search Filter. Select one of the following to create a filter that allows access to only the logs that match the defined conditions. Only one is allowed for each. (For general guidance on creating search filters, see Construct a Search Filter for a Role.)
- Log Analytics data filter. This filter applies to all the partitions and LiveTail.
- Audit data filter. This filter applies to all the logs in Audit Indexes and LiveTail. For example, you could include filters for
sumologic_audit_events,sumologic_search_events,sumologic_search_usage_per_query, orsumologic_system_events,sumologic_volume, to name a few. - Security data filter. This filter applies on all logs in Cloud SIEM security indexes.
- Index Access. Allows or denies access to search indexes. Select one of the following and choose the indexes in the Select Indexes box that appears:
- All indexes. Allow access to all indexes.
- Allow few indexes. Allow access to only the selected indexes.
- Deny few indexes. Deny access to the selected indexes.
warning
Use Deny few indexes with caution. We do not recommend filtering to deny access, as conflicting roles can create access inconsistencies—one role may deny access while another grants it. Whenever possible, apply filtering to allow access rather than deny it. This ensures roles work additively for more predictable access management. For more information, see Index Access behavior when a user has multiple roles below.
- Capabilities. In this section, click the checkbox beside each capability you want to grant to users with this role. For information about what each capability enables, see Role Capabilities.
- Click Save.
Restrict access using Search Filter and Index Access
Index Access only appears if the feature has been deployed to your environment. For more information, see our release note.
Follow this process to restrict access using the Search Filter and Index Access sections on the Create New Role pane:
- Identify the dataset you would like to control access to. Test it out using a search query.
- Create the role using the Search Filter and/or Index Access sections.
- Verify the dataset access is correct using emulation.
- Assign the role to the relevant users.
Index Access behavior when a user has multiple roles
This section describes what happens when a user is assigned multiple roles ("role stacking") and each role has different settings for Index Access.
As a best practice, avoid "role stacking" and assign all necessary access within a single role to prevent conflicts. When multiple roles are applied, conflicting permissions can arise. However, if role stacking is necessary, use filtering to allow access rather than deny it. This way, each additional role expands access rather than creating conflicts between "allow" and "deny" filters from different roles.
A role can have one of the following Index Access settings:
- All indexes. Allows access to all indexes.
- Allow few indexes. Allows access to only the selected indexes.
- Deny few indexes. Denies access to the selected indexes.
However, if a user is assigned multiple roles that each have different Index Access settings, following is how they are evaluated:
- All indexes + Allow few indexes. Indexes in the "Allow few indexes" list are allowed, and all other indexes are allowed.
- All indexes + Deny few indexes. Indexes in the deny list are denied, but all other indexes are allowed.
- Allow few indexes + Deny few indexes. Indexes in the "Allow few indexes" list are allowed, indexes in the deny list are denied, and all other indexes are denied.
- All indexes + Deny few indexes + Allow few indexes. Indexes in the "Allow few indexes" list are allowed, indexes in the deny list are denied, and the rest of the indexes are allowed.
Test a role's log access rights
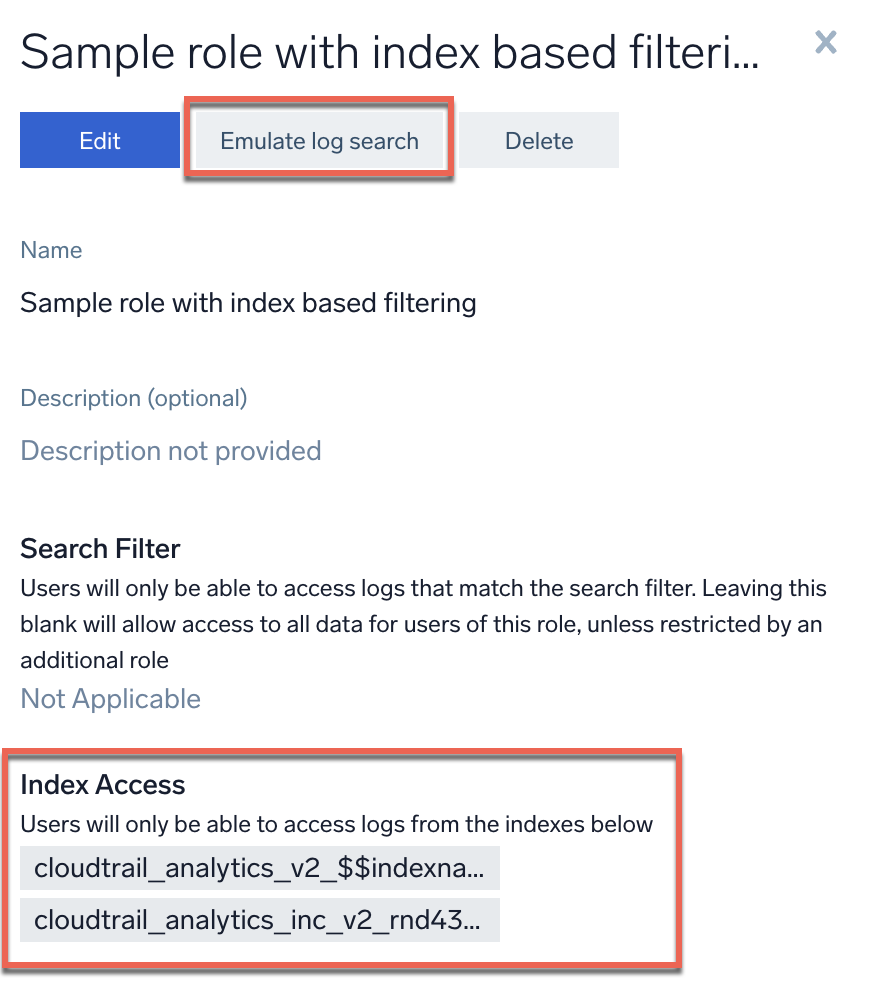
To test a role to see if it displays the expected log access behavior, select a role and click Emulate log search. (You can also test a user. See Test a user's log access rights.)
- New UI. In the main Sumo Logic menu select Administration, and then under Users and Roles select Roles. You can also click the Go To... menu at the top of the screen and select Roles.
Classic UI. In the main Sumo Logic menu select Administration > Users and Roles > Roles. - Select a role.
- Click Emulate log search. The search will be emulated for the permissions of the role, including the filtering defined in the role. (In the example below, an index access filter is defined.)

- Enter your search parameters in the log search emulation window. The search will return only what is allowed by the role.

Add a user to a role
- New UI. In the main Sumo Logic menu select Administration, and then under Users and Roles select Roles. You can also click the Go To... menu at the top of the screen and select Roles.
Classic UI. In the main Sumo Logic menu select Administration > Users and Roles > Roles. - Navigate to the role and click the number in the Users column.

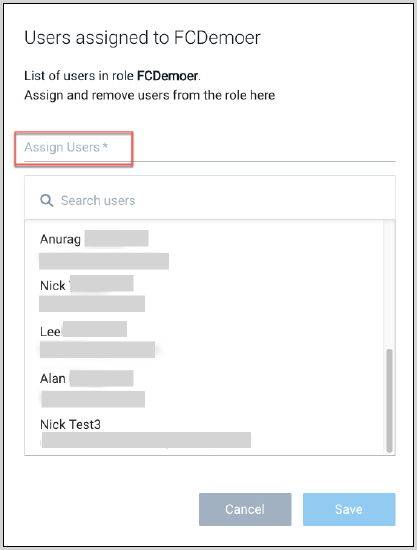
- A list of users currently assigned to the role appears.

- Click the Assign Users field. A list of users that are not currently assigned to the role appears. Click a user’s name to add the user to the role.
- Add additional users to the role, as desired.
- Click Save when you are done adding users to the role.
When you add or remove a role from a user, it can take about an hour for the RBAC changes to take effect on an existing real-time alert. For example, when a user creates a real-time alert, the user’s search filter governs what log data is returned by the scheduled search. If an admin subsequently makes that user’s search filter more restrictive or removes that role from the user, for about an hour, alerts triggered by data that the user’s updated search filter now prohibits will still fire. (Changes take effect immediately for manually run searches.)
Remove a user from a role
- New UI. In the main Sumo Logic menu select Administration, and then under Users and Roles select Roles. You can also click the Go To... menu at the top of the screen and select Roles.
Classic UI. In the main Sumo Logic menu select Administration > Users and Roles > Roles. - Navigate to the role and click the number in the Users column.

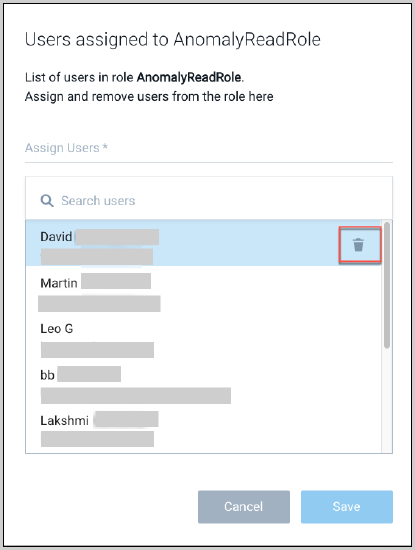
- A list of users currently assigned to the role appears.
- Navigate to the user you want to remove from the role, and click the trash can icon in that row.

- Click Save when you are done removing users from the role.
When you add or remove a role from a user, it can take about an hour for the RBAC changes to take effect on an existing real-time alert. For example, when a user creates a real-time alert, the user’s search filter governs what log data is returned by the scheduled search. If an admin subsequently makes that user’s search filter more restrictive or removes that role from the user, for about an hour, alerts triggered by data that the user’s updated search filter now prohibits will still fire. (Changes take effect immediately for manually run searches.)
See which users are assigned to a role
- New UI. In the main Sumo Logic menu select Administration, and then under Users and Roles select Roles. You can also click the Go To... menu at the top of the screen and select Roles.
Classic UI. In the main Sumo Logic menu select Administration > Users and Roles > Roles.
- Navigate to the role and click the number in the Users column to see a list of users assigned to the role.
Edit a role
To edit a role:
- New UI. In the main Sumo Logic menu select Administration, and then under Users and Roles select Roles. You can also click the Go To... menu at the top of the screen and select Roles.
Classic UI. In the main Sumo Logic menu select Administration > Users and Roles > Roles. - Click the row for the role you want to edit.
- The current configuration of the role appears in a pane on the right side of the page.
- Click Edit at the top of the right side of the page.
- Make your edits. For information about edit options, see Create a role above.
- After editing the role, click Save.
Delete a role
You can only delete a role to which no users are assigned. Before deleting a role, you must unassign any users currently assigned to it. For information about unassigning a user from a role, see Remove a User from a Role.
To delete a role:
- New UI. In the main Sumo Logic menu select Administration, and then under Users and Roles select Roles. You can also click the Go To... menu at the top of the screen and select Roles.
Classic UI. In the main Sumo Logic menu select Administration > Users and Roles > Roles. - Click the row for the role you want to delete.
- The current configuration of the role appears in a pane on the right side of the page.
- Click Delete at the top of the right side of the page.
- If there are users currently assigned to the role, an error message will appear. Otherwise, you’ll be prompted to confirm that you want to delete the role.