CyberArk PAM

Version: 1.3
Updated: March 20, 2024
CyberArk Privileged Access Manager (PAM) secures privileged access, centralizes credentials, and monitors sessions for robust IT security.
Actions
- Add Account (Containment) - Adds a new privileged account or SSH key to the Vault.
- Add Safe (Containment) - Adds a new Safe to the Vault. The user who runs this web service must have Add Safes permissions in the Vault.
- Delete Account (Containment) - Deletes a specific account in the Vault. The user who runs this web service requires Delete Accounts permissions in the Vault.
- Delete Safe*(Containment)* - This method deletes a Safe from the Vault. The user who runs this web service must have Manage Safe permissions in the Safe.
- Get Account Details (Enrichment) - Returns information about an account identified by its ID. The user who runs this web service requires List Accounts permissions in the Safe where the account is located inside the Vault.
- Get Safe Details (Enrichment) - Returns information about a specific Safe in the Vault.
- List Accounts (Enrichment) - Returns a list of all the accounts in the Vault. The user who runs this web service requires List Accounts permissions in the Safe.
- List Safes (Enrichment) - Returns a list of all Safes in the Vault that the user has permissions for. Must be a member of the Safes in the Vault that are returned in the list.
Configure CyberArk PAM in Automation Service and Cloud SOAR
Before you can use this automation integration, you must configure its authentication settings so that the product you're integrating with can communicate with Sumo Logic. For general guidance, see Configure Authentication for Automation Integrations.
How to open the integration's configuration dialog
- Access App Central and install the integration. (You can configure at installation, or after installation with the following steps.)
- Go to the Integrations page.
Classic UI. In the main Sumo Logic menu, select Automation and then select Integrations in the left nav bar.
New UI. In the main Sumo Logic menu, select Automation > Integrations. You can also click the Go To... menu at the top of the screen and select Integrations. - Select the installed integration.
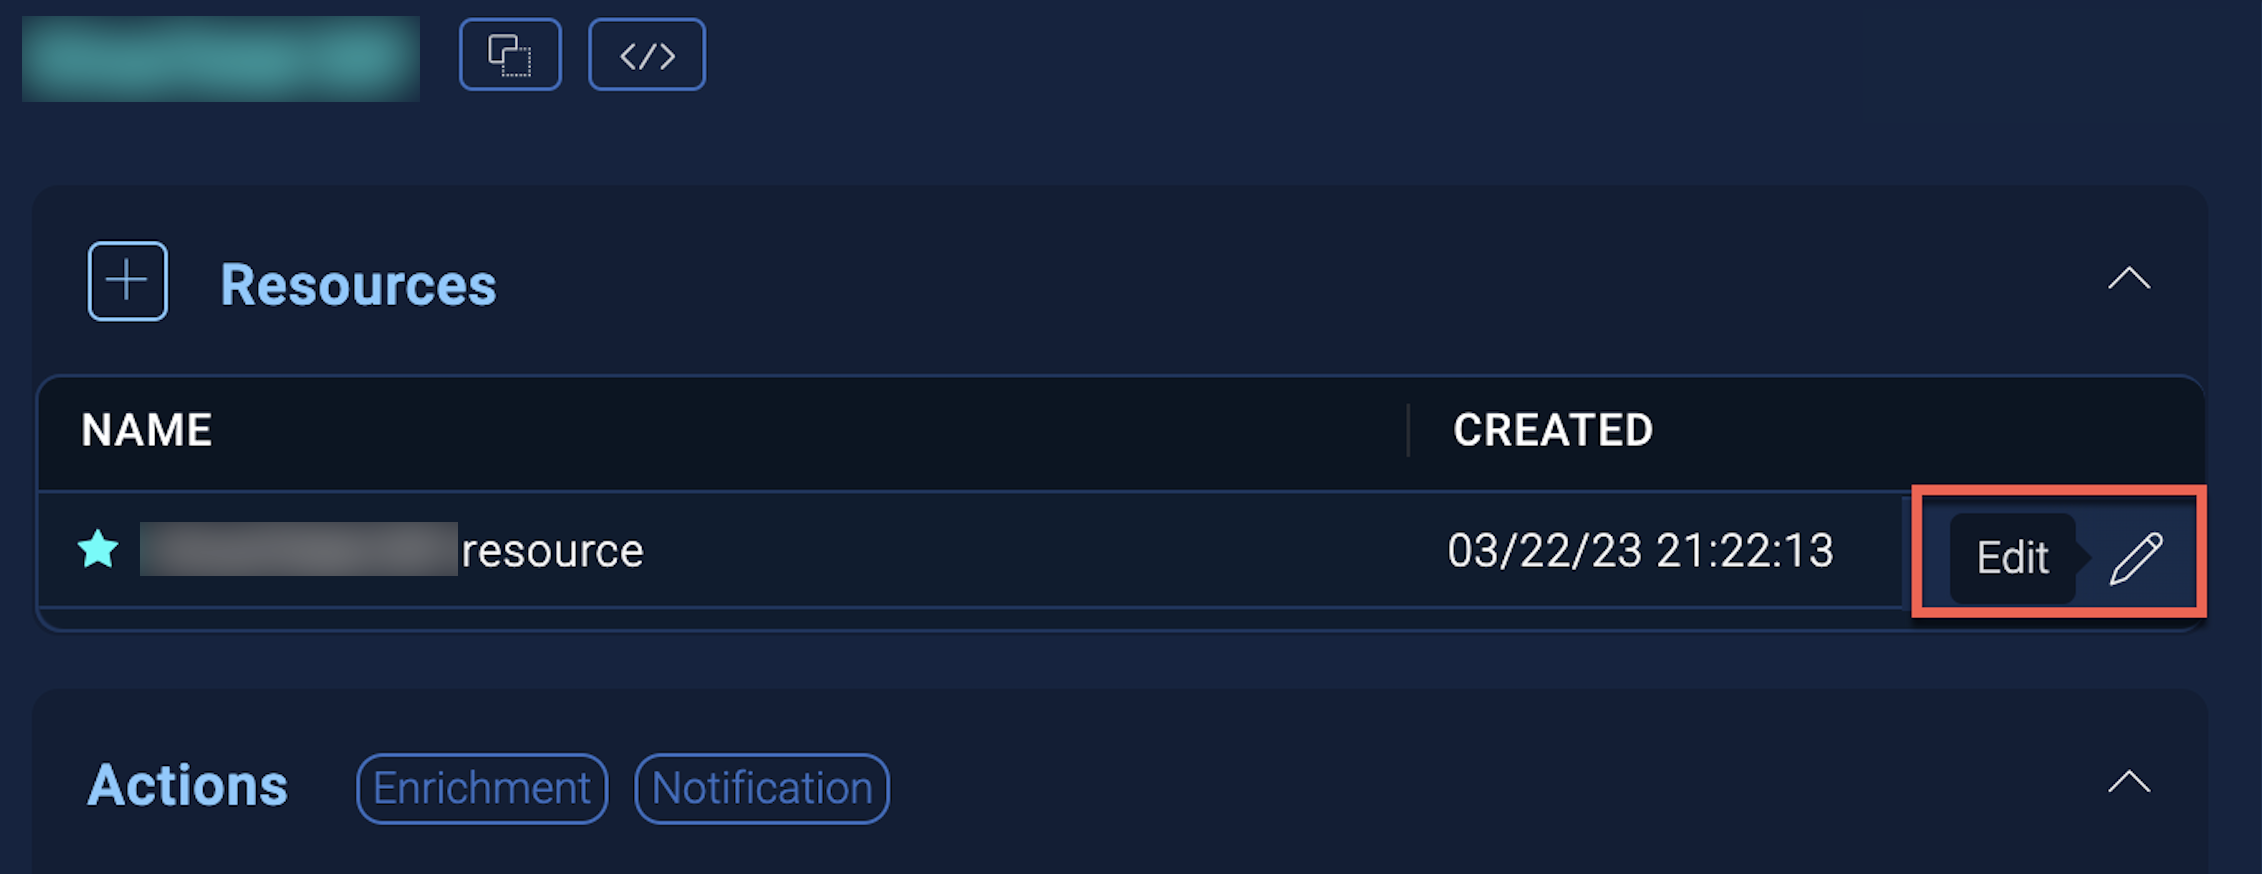
- Hover over the resource name and click the Edit button that appears.
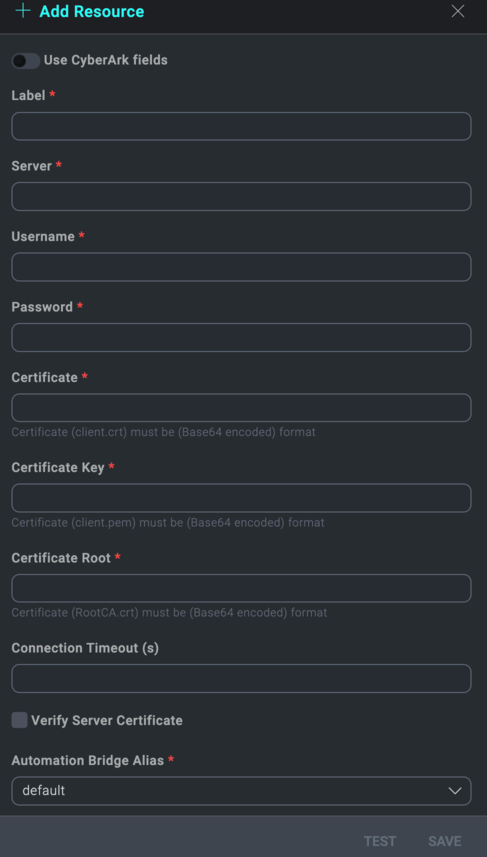
In the configuration dialog, enter information from the product you're integrating with. When done, click TEST to test the configuration, and click SAVE to save the configuration:
-
Label. Enter the name you want to use for the resource.
-
API URL. Enter the API URL in the form
https://<IIS_Server_Ip>where<IIS_Server_Ip>is the IP address or domain name of your CyberArk PAM server. -
Username. Enter the name of the user who is logging in to the Vault.
-
Password. Enter the password used by the user to log in to the Vault.
-
Certificate. Enter the client certificate in Base64 encoded format. This certificate contains your public key and is used to authenticate your identity to the server. If you have a combined .pem file that includes both the Certificate and the Private Key, use this field. Field requirement conditional on CyberArk.
-
Certificate Key. Enter the client private key in Base64 encoded format. Keep your private key confidential. It is used to securely authenticate and establish an encrypted connection. If your Private Key is included in the combined Client Certificate .pem file, leave this field empty. Field requirement conditional on CyberArk.
-
Certificate Root. Enter the root CA certificate in Base64 encoded format. Required if your server uses a certificate not trusted by default by your system or browser. This root certificate establishes trust with the server's SSL/TLS certificate.
-
Connection Timeout (s). Set the maximum amount of time the integration will wait for a server's response before terminating the connection. Enter the connection timeout time in seconds (for example,
180). -
Verify Server Certificate. Select to validate the server’s SSL certificate.
-
Automation Engine. Select Cloud execution for this certified integration. Select a bridge option only for a custom integration. See Cloud or Bridge execution.
-
Proxy Options. Select whether to use a proxy. (Applies only if the automation engine uses a bridge instead of cloud execution.)
- Use no proxy. Communication runs on the bridge and does not use a proxy.
- Use default proxy. Use the default proxy for the bridge set up as described in Using a proxy.
- Use different proxy. Use your own proxy service. Provide the proxy URL and port number.
For information about CyberArk, see CyberArk documentation. For information about CyberArk APIs, see their REST APIs documentation.
Encode the certificates
It is necessary to encode the certificates in Base64 format. To encode a certificate in Base64 format using OpenSSL, perform the following steps:
- Open a Command Prompt or Terminal: Access your command line interface. On Windows, you can search for "cmd" or "Command Prompt" in the start menu. On macOS or Linux, you can open the "Terminal" application.
- Navigate to the Certificate Directory: Change the directory to where your certificate file is located using the
cdcommand. For example,cd /path/to/your/certificate. Replace/path/to/your/certificatewith the actual path to your certificate file. - Encode the Certificate: Execute the OpenSSL command to convert the certificate to Base64 format:
openssl base64 -in your_certificate.crt -out your_certificate_base64.crtReplaceyour_certificate.crtwith the actual filename of your certificate. The fileyour_certificate_base64.crtis where the Base64-encoded certificate will be saved. If you want to save the encoded certificate with the same name but with a.base64extension, you can do so. - Verify the Output File: Ensure that the Base64-encoded file has been created successfully and contains the expected content. You can do this by opening the file in a text editor. For example, Visual Studio Code or alternatively, you can use any text editor you prefer, such as Notepad on Windows or TextEdit on macOS.
- Use the Encoded Certificate: Once you have verified the content, you can copy the Base64-encoded text and paste it into the appropriate field in your integration resource.
Permissions
The integration has different types of actions, and different permissions are required depending on the specific action you want to perform:
- Add Safe - The user who runs this web service must have Add Safes permissions in the Vault.
- Add Account - To run this web service, you must have the following permissions in the Vault:
- Add account
- Update password or Update password properties
- Delete Account - The user who runs this web service requires Delete Accounts permissions in the Vault
- Delete Safe - The user who runs this web service must have Manage Safe permissions in the Safe.
- List Accounts - The user who runs this web service requires List Accounts permissions in the Safe.
- Get Account Details - The user who runs this web service requires List Accounts permissions in the Safe where the account is located inside the Vault.
- List Safes - The user who runs this web service must be a member of the Safes in the Vault that are returned in the list.
Change Log
- June 19, 2020 (v1.0) - First upload
- March 6, 2023 (v1.1) - Integration refactored
- June 15, 2023 (v1.2) - Updated the integration with Environmental Variables
- March 20, 2024 (v1.3)
- Enabled resource testing capability
- Certificate fields have been made optional, depending on CyberArk configuration settings.
- Extended output mappings
- Implemented various minor enhancements