Playbooks
A playbook is a predefined set of actions and conditional statements that run in an automated workflow to respond to a certain event or incident type. Playbooks can allow your organization's teams to respond to an incident in a consistent, focused, and repeatable fashion.
Playbooks can be configured to execute automatically without user intervention, acting on information from the incident, or can be executed in interactive mode, where user input is required to authorize predefined actions.
To run a playbook, add it to an automation. You can run playbooks in monitors, Cloud SIEM, and Cloud SOAR. Sumo Logic provides a number of out-of-the-box playbooks that you can use install to use your automations. See Playbooks in App Central.
The number of actions that can be run per hour is limited to prevent abuse of system resources or runaway processes. For more information, see Actions limit.
View playbooks
The following procedure describes how to view playbooks already installed in your environment. To add more playbooks, create a playbook, or install a playbook from App Central.
- Classic UI. In the main Sumo Logic menu, select Automation > Playbooks.
New UI. In the main Sumo Logic menu, select Automation > Playbooks. You can also click the Go To... menu at the top of the screen and select Playbooks.
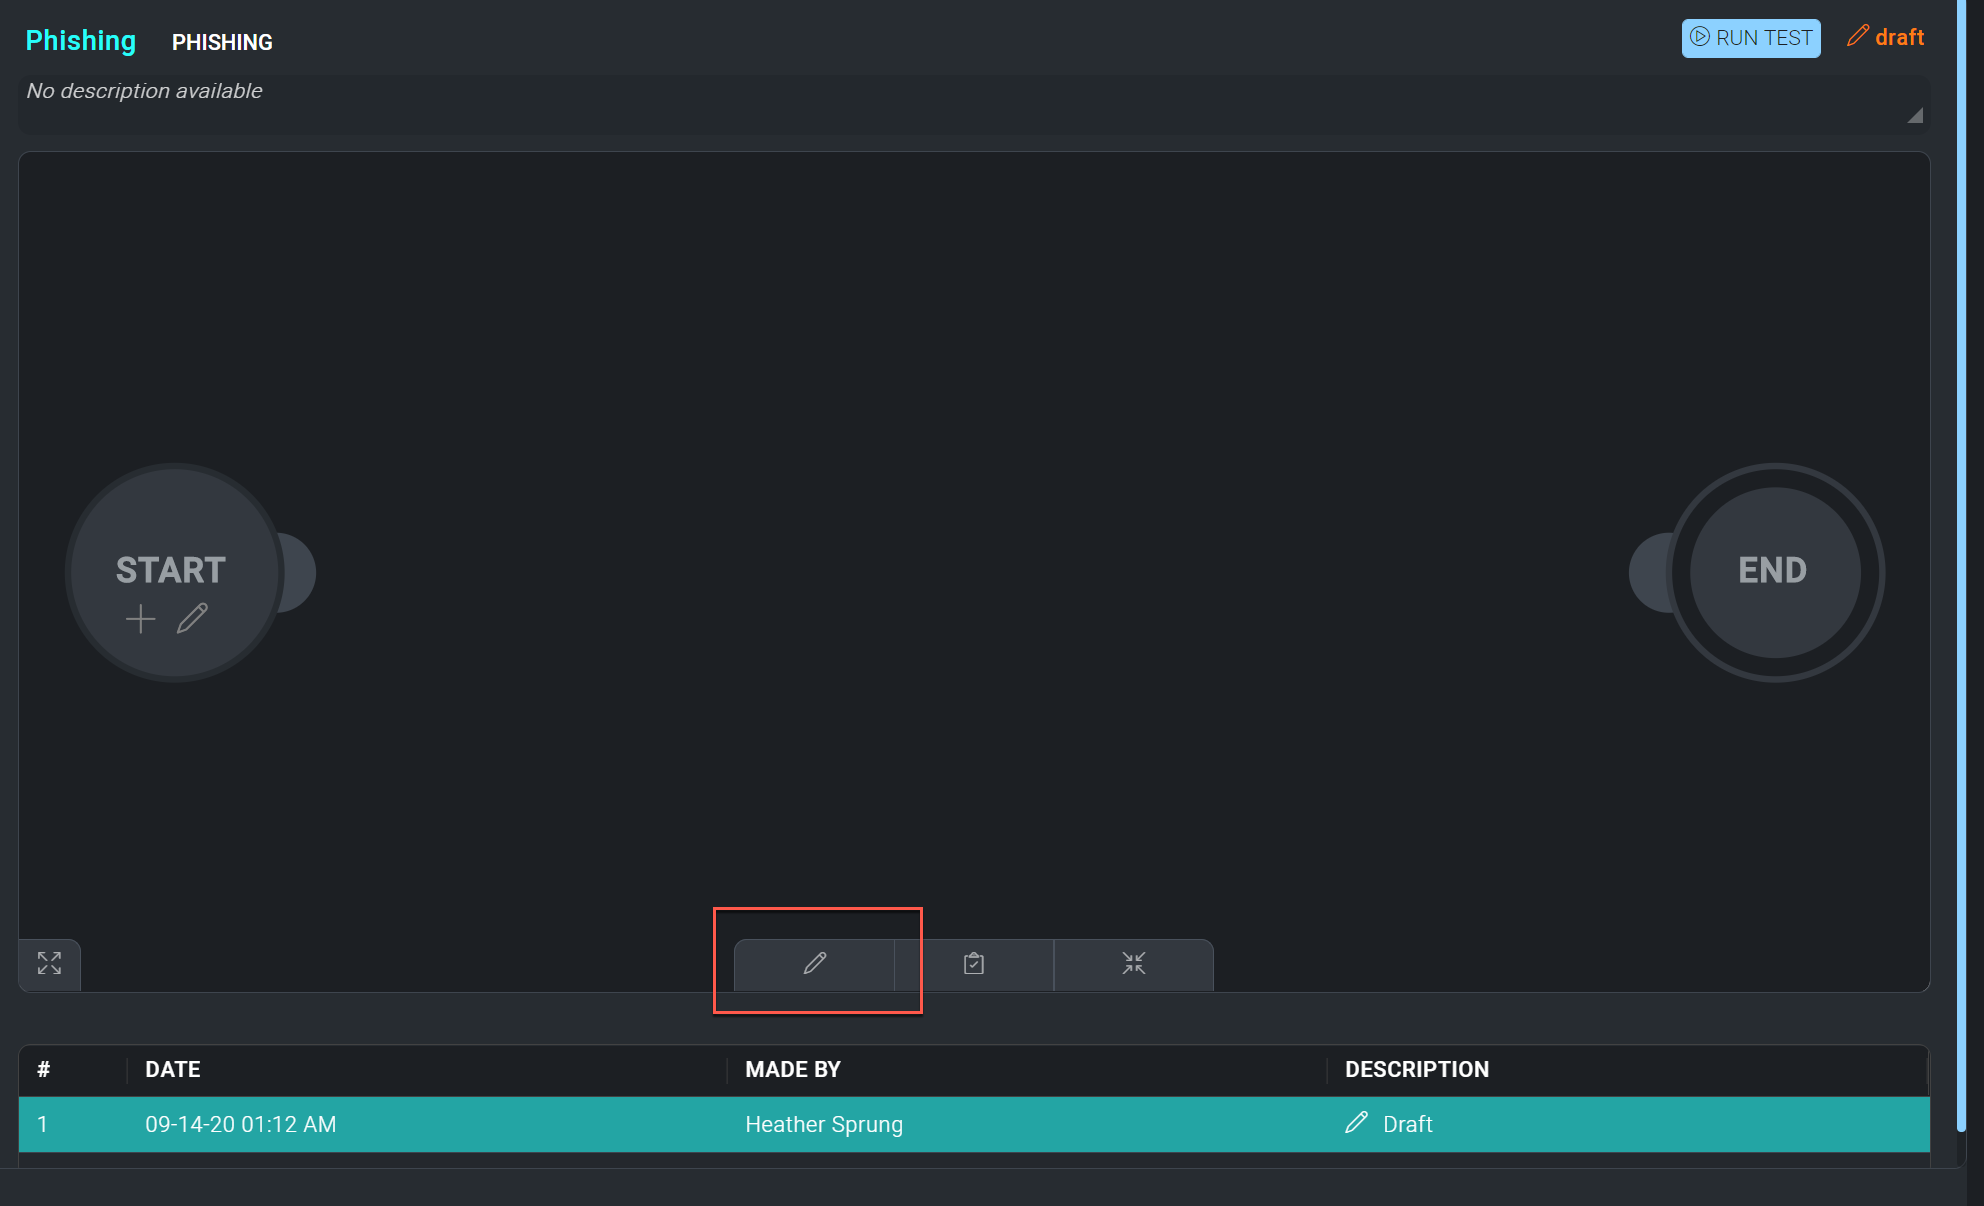
The list of playbooks displays.

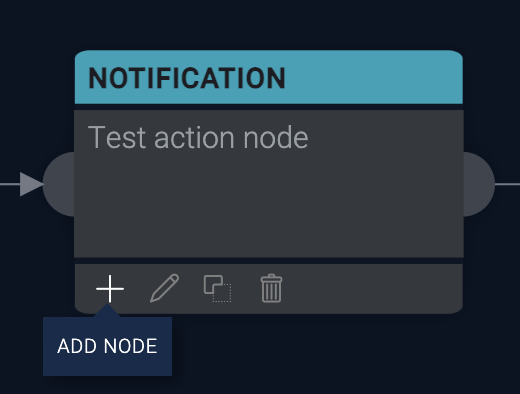
- Select a playbook to see the elements in the workflow.
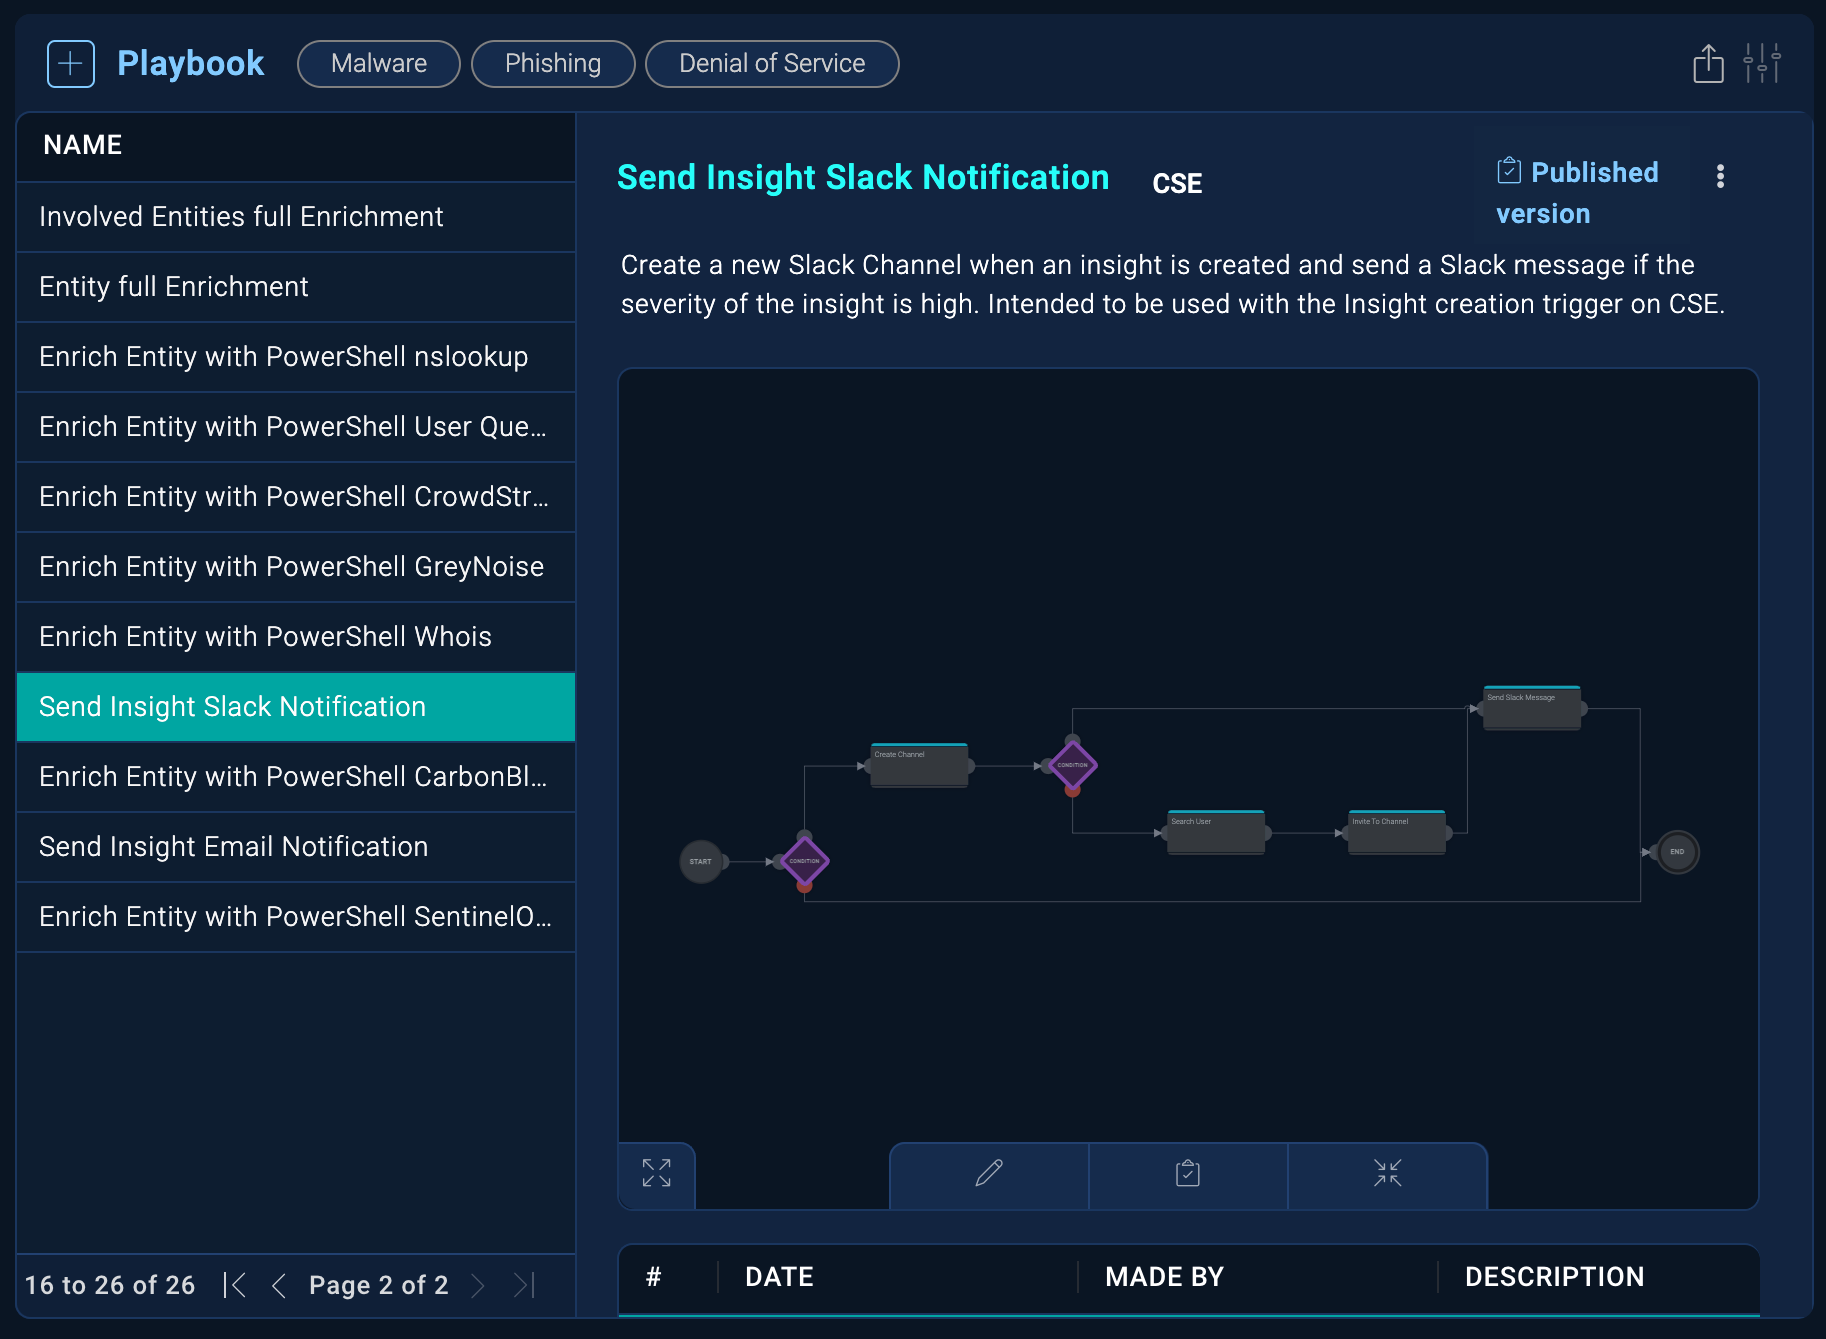
- Click the elements in the playbook to see their details. For example, click actions (the boxes in the flow) to see the integration resources that provide the actions.
Create a new playbook
Before you create your own playbook, first view playbooks to make sure there isn't one already that does what you want to accomplish, and also check to see if you can install a playbook from App Central that does what you need. After you create a playbook, you can run it in automations for monitors, Cloud SIEM, or Cloud SOAR.
The following procedure provides a brief introduction to how to create a playbook. For detailed examples of how to create playbooks, see the Cloud SIEM automation examples.
- Classic UI. In the main Sumo Logic menu, select Automation.
New UI. In the main Sumo Logic menu, select Automation > Playbooks. You can also click the Go To... menu at the top of the screen and select Playbooks.
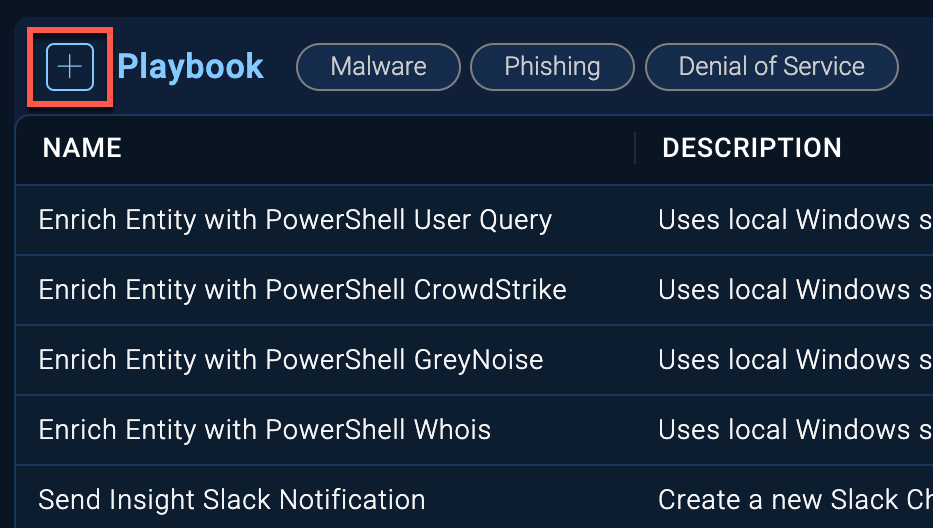
Previously-created playbooks display. - Click the + button to the left of Playbook.
- A new configuration box will be displayed. Name your new playbook.
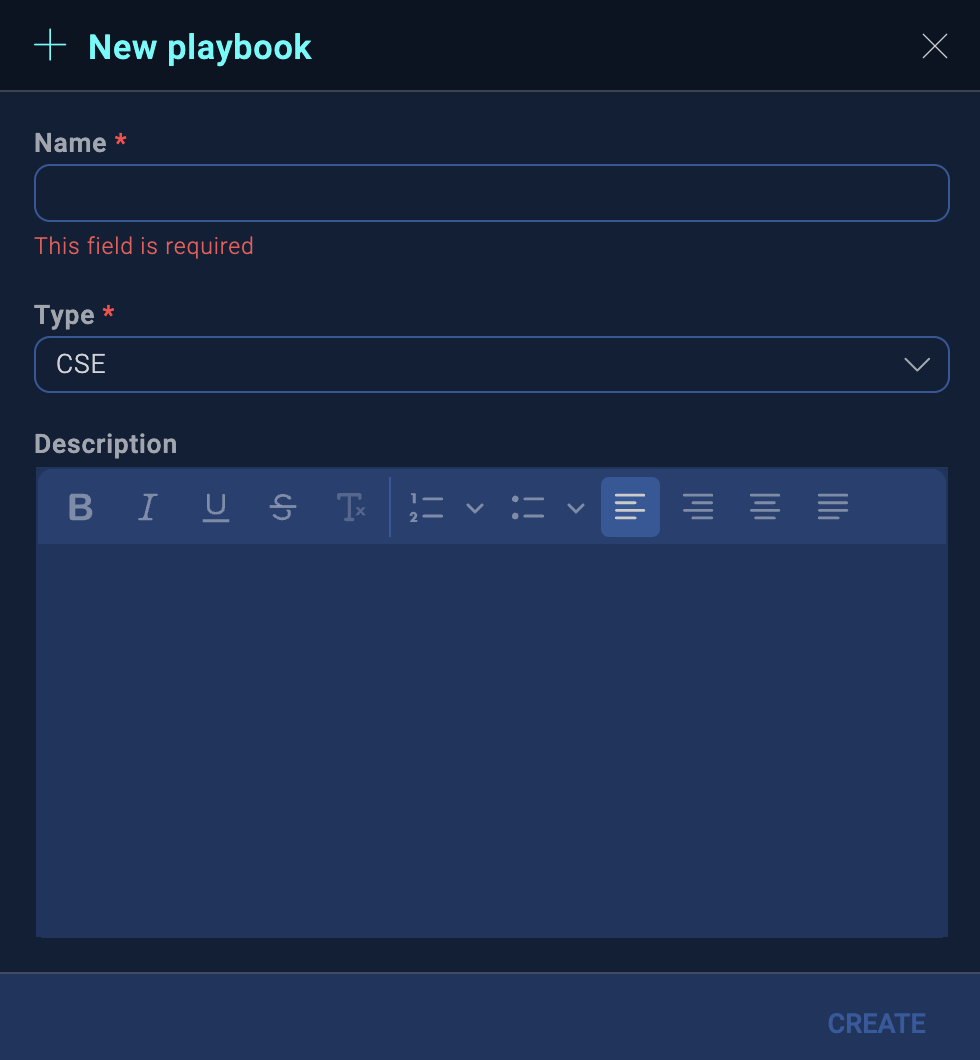
- Select the incident Type. (For example, for Cloud SIEM automations, select CSE. For playbooks run from inside another playbook, you can select another incident type to associate with it, for example, Denial of Service, Malware, Phishing, and so on.)
- Enter a Description of the playbook to help others understand how to use it.
- Click Create. The new playbook appears in the list of available playbooks.
- To configure the new playbook, select it from the list and click the Edit button at the bottom of the screen.
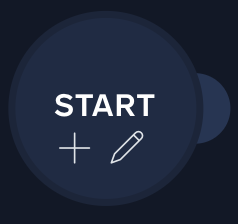
- The Start node displays a + icon and an Edit icon. Click the Edit icon.
The Edit node dialog appears.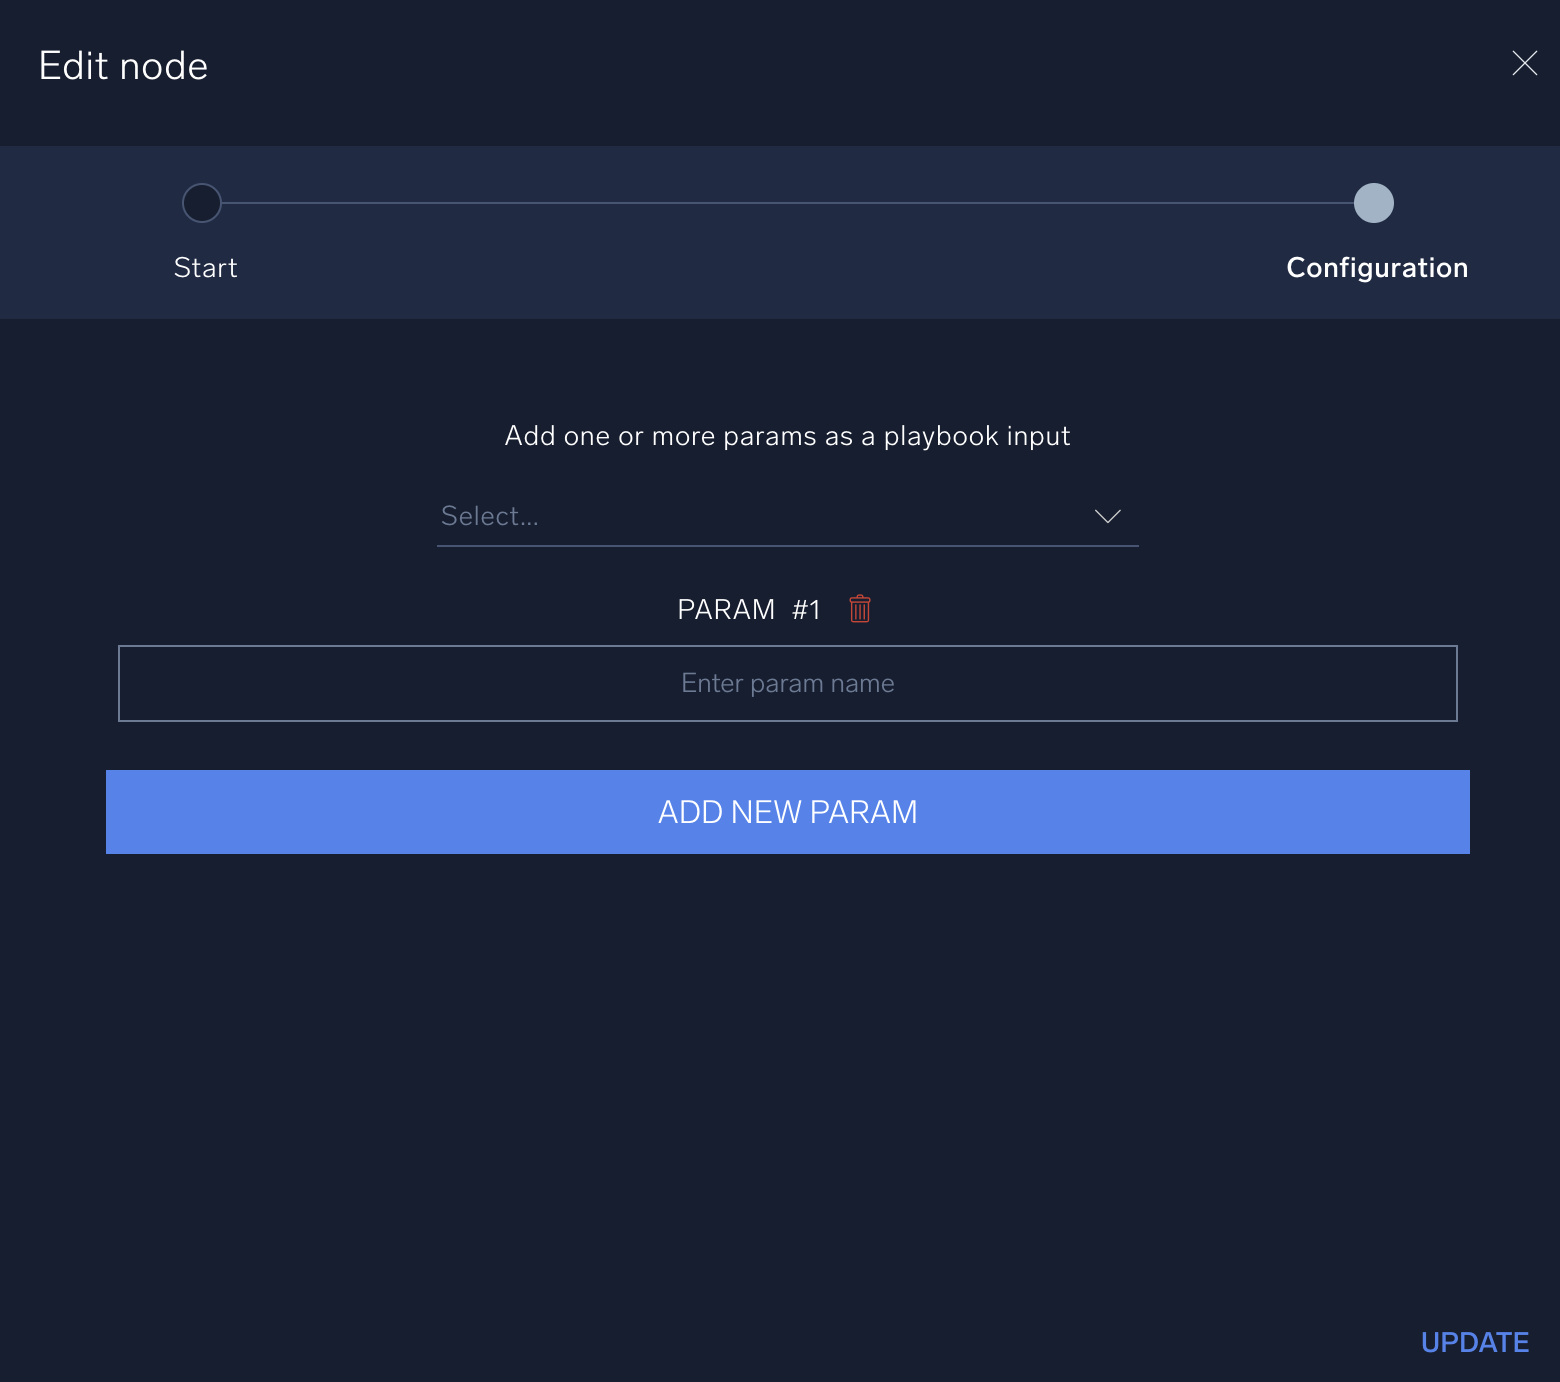
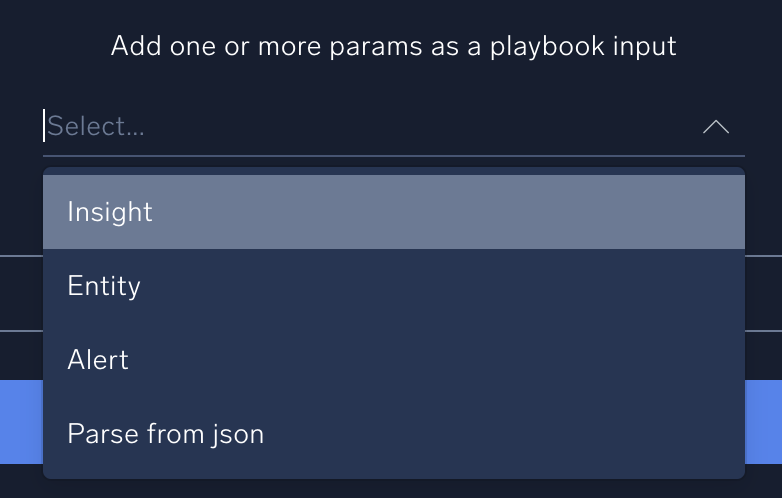
- Click the dropdown arrow on Add one or more params as a playbook input and select the kind of trigger that will execute the playbook:
- Insight. An Insight from an automation in Cloud SIEM.
- Entity. An Entity from an automation in Cloud SIEM.
- Alert. An alert from an automated playbook in a monitor.
- Parse from json. A payload from a parent playbook. (You can also select this option if you want to pass a custom payload from an alert.)
- Leave blank if the trigger will run by a Cloud SOAR incident. See Run playbooks in Cloud SOAR.
- When you select one of these options, standard parameters for the trigger type are displayed. (If you select Parse from json, a box appears for you to enter the JSON payload.) Click the Remove icon to remove any parameters you don't want passed into the playbook, and if you want to add more parameters, click Add New Param at the bottom of the dialog.
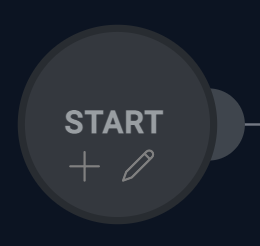
- Click Update. The playbook will display a black screen with a Start node and an End node. These nodes dictate the beginning and the end of the playbook's automation sequence. You can drag and drop them anywhere on the screen to allow you space to add multiple nodes between them.
- To add the first node in the playbook, click the + on the Start node. The Add node page is displayed.
See Add nodes to a playbook for next steps.
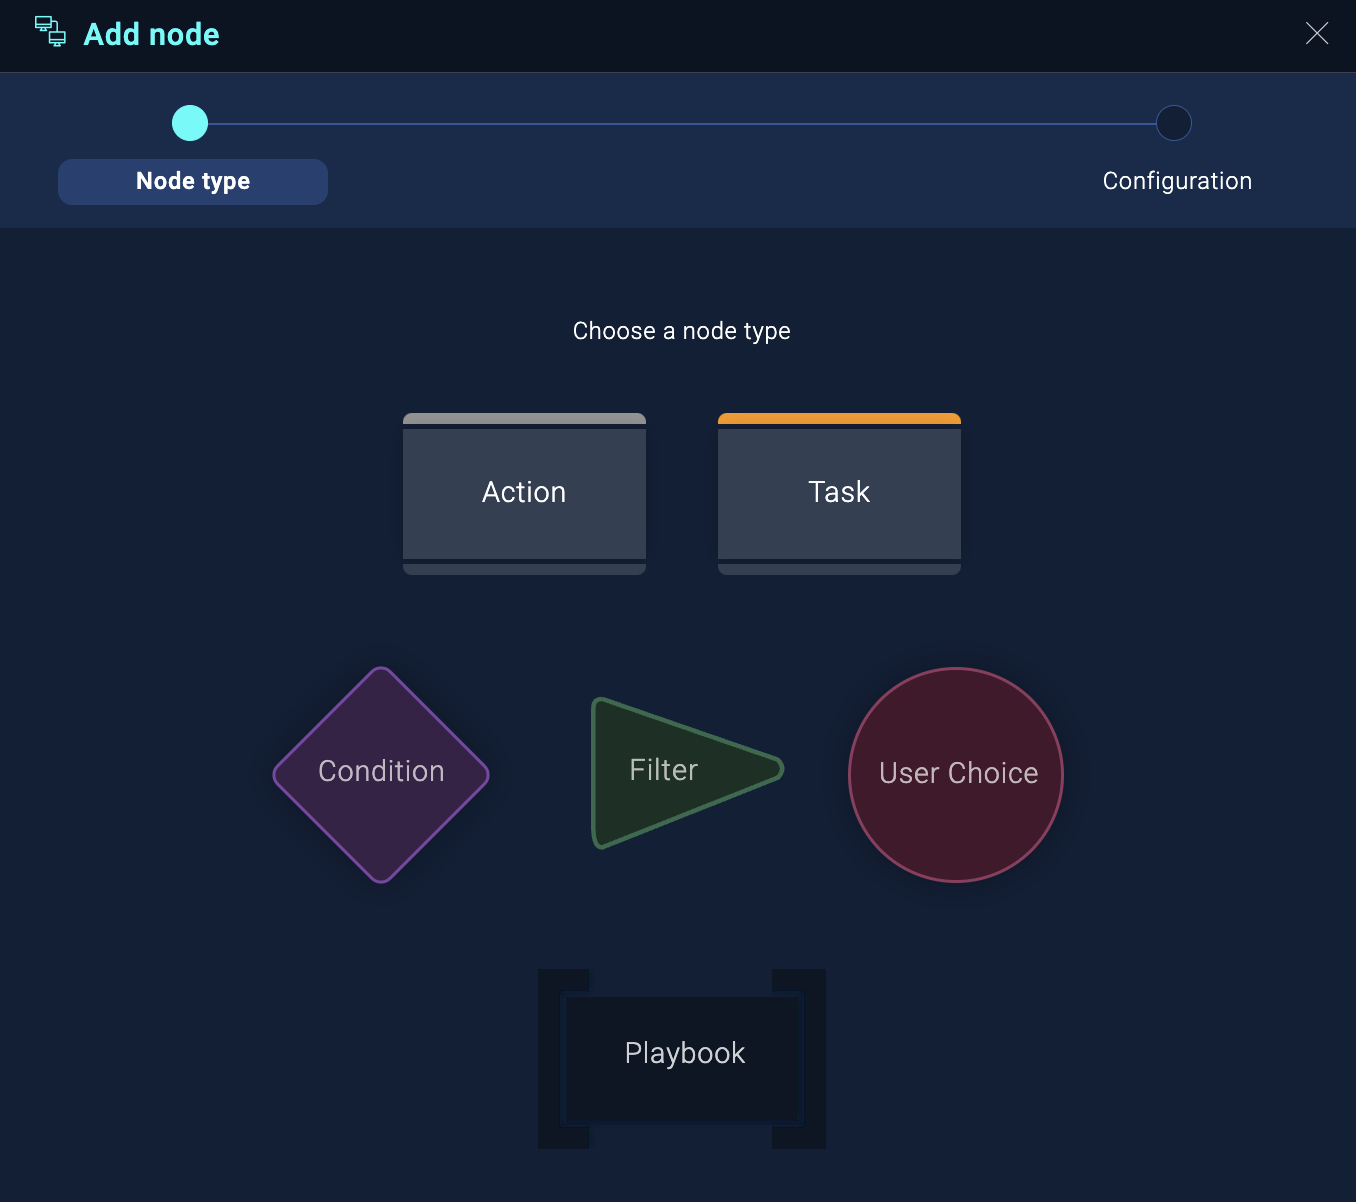
Add nodes to a playbook
You can add nodes to a playbook when you either create a new playbook, or edit an existing playbook. To add a node to a playbook, hover your mouse over an existing node, such as the Start node, and click on the + button that appears on the node. A node is a step in a playbook. Nodes run in the order they are placed in a playbook. When all nodes run without error, the playbook is considered to have executed successfully.
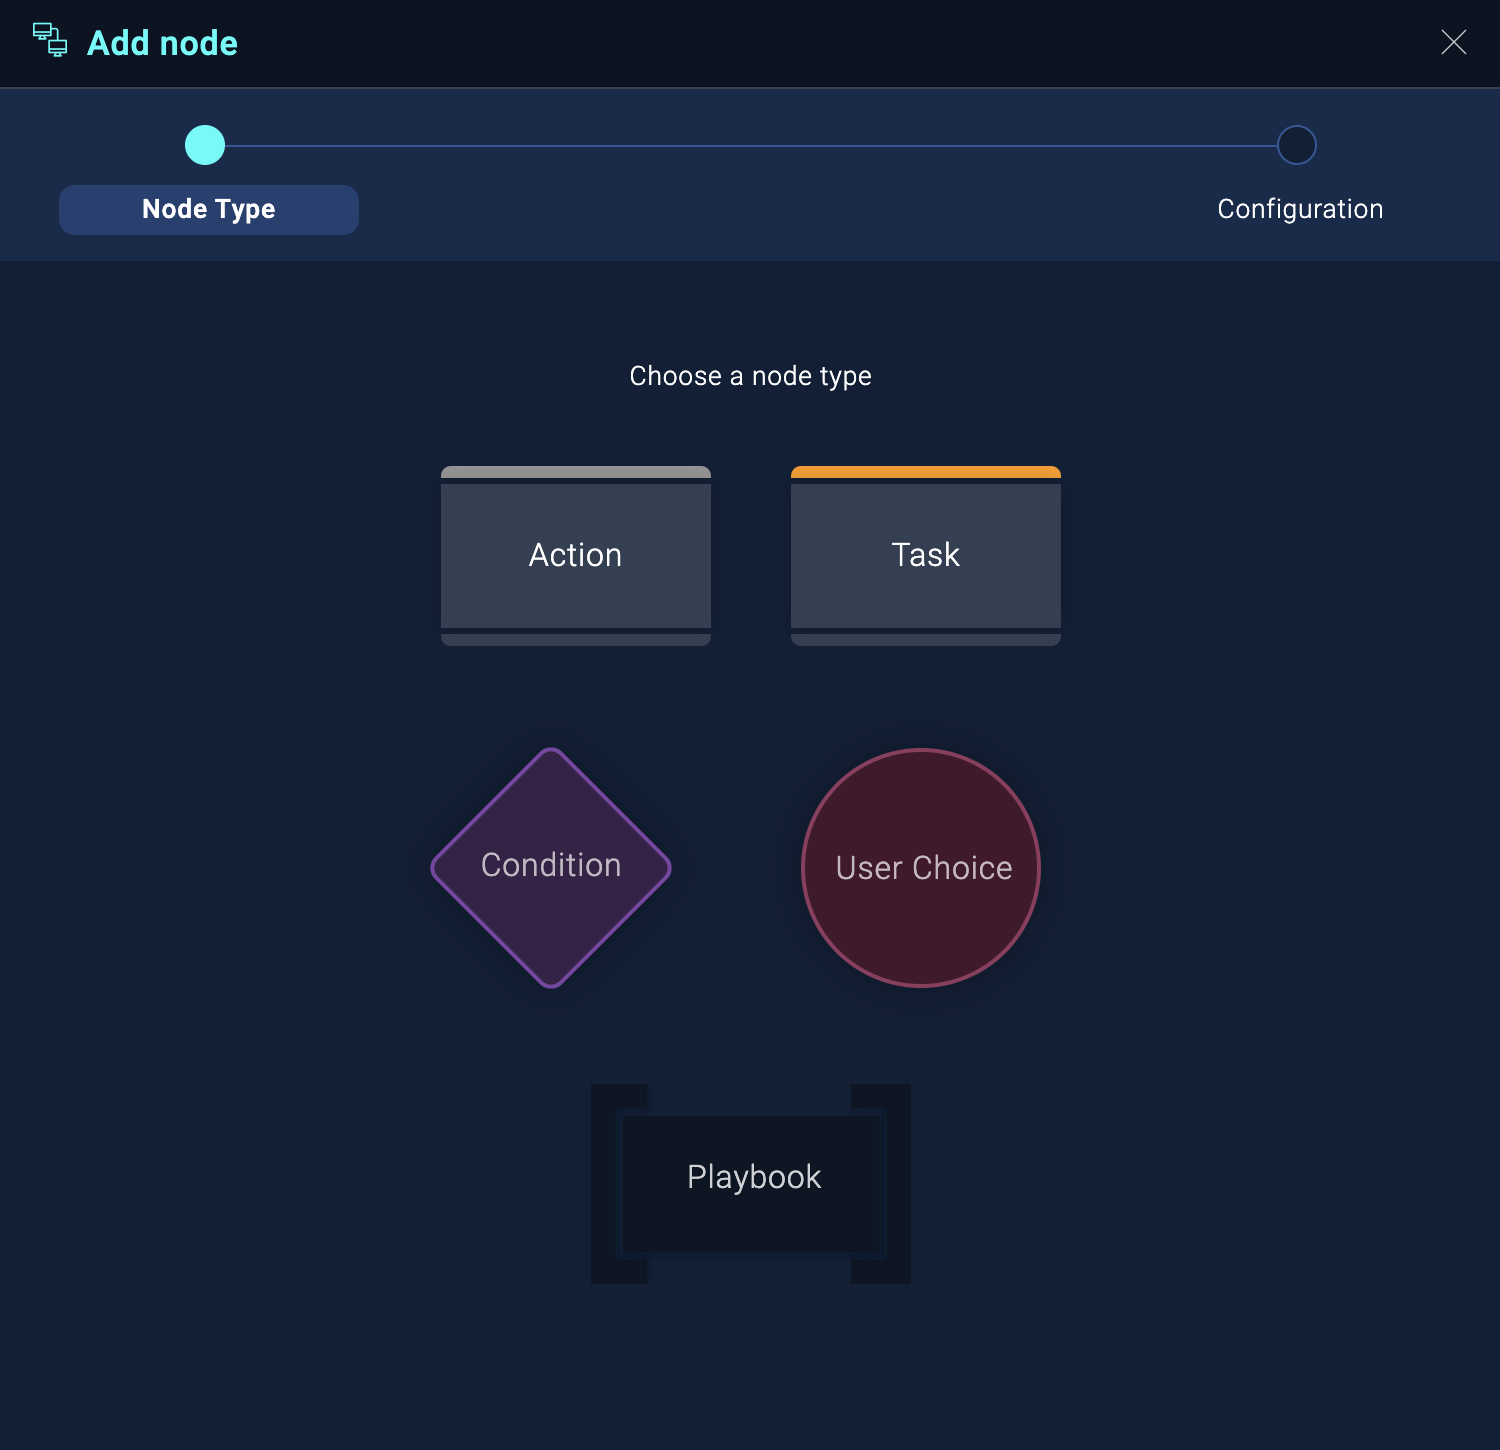
See the following sections to learn how to add the following node types:
- Action. Automatically take specific actions such as enriching data or taking containment steps.
- Condition. Use conditional statements to define what actions should be taken in response to previous inputs.
- Playbook. Call other playbooks in response to conditional statements.
- Task. Assign a task to an individual.
- User Choice. Pause playbook execution until a user selects an option.
- Filter. Filter results from the preceding action.
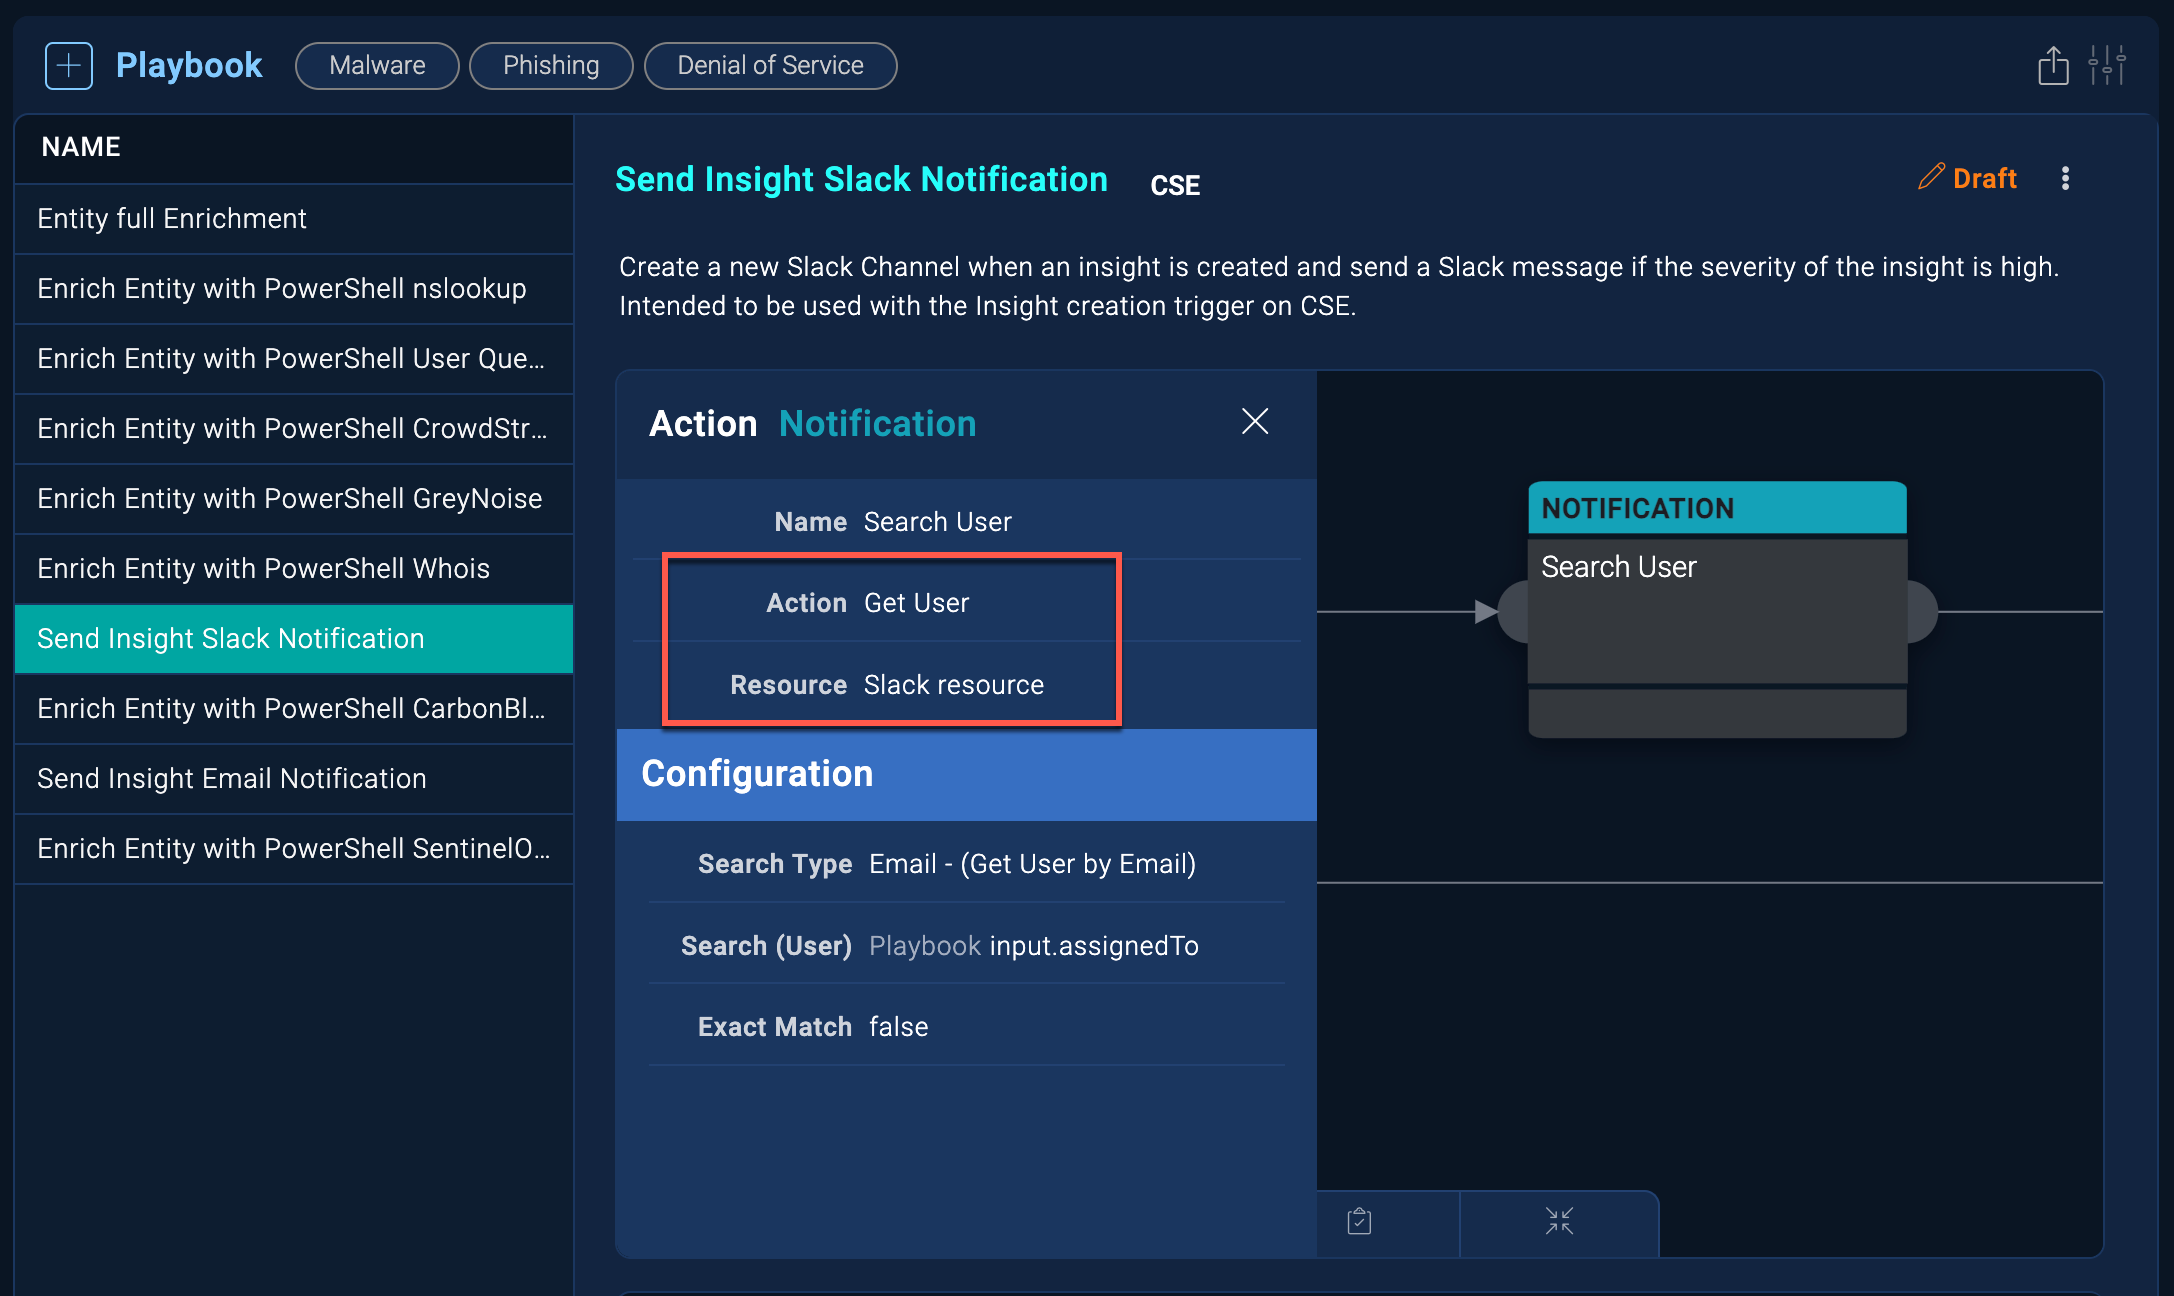
Add an action node to a playbook
An action node in a playbook runs an operation. You can string actions together in the playbook to perform a workflow.
For examples of adding actions to playbooks, see the Cloud SIEM automation examples.
Before you can add action nodes to a playbook, you must configure the connection for each integration resource that actions originate from.
- Either create a new playbook as described above, or edit an existing playbook.
- Hover your mouse over an existing node, such as the Start node, and click on the + button that appears.
- The Add node page displays.
- Select Action. The action node configuration screen displays.

- Give a Node name that identifies the action being taken.
- Select Manual execution if the node will require manual intervention to run. For example, an analyst may need to add information before executing the node.
- Select the Integration to supply the action for the node.
- Select the Type of action:
- Containment. Performs some sort of response or remediation action, such as resetting a user's password or blocking a domain on your firewall.
- Custom. Performs an action defined in a custom action YAML file. For an example of a custom action created for Cloud SIEM, see Advanced example: Configure a custom integration.
- Enrichment. Enriches data with additional information, such as adding information about a known malicious IP address.
- Notification. Sends a notification, for example, an email or a post in a messaging service.
- Scheduled. Runs an action on a schedule once the playbook starts. For example, the action regularly checks a condition, and once the condition is met, the next playbook actions are executed.
noteThe Type drop-down menu shows only the action types available in the selected integration.
- Select the Action from the drop-down list. The dialog updates to show the integration resource that the action originates from, along with additional fields you must fill out to configure how you would like the action to be performed.
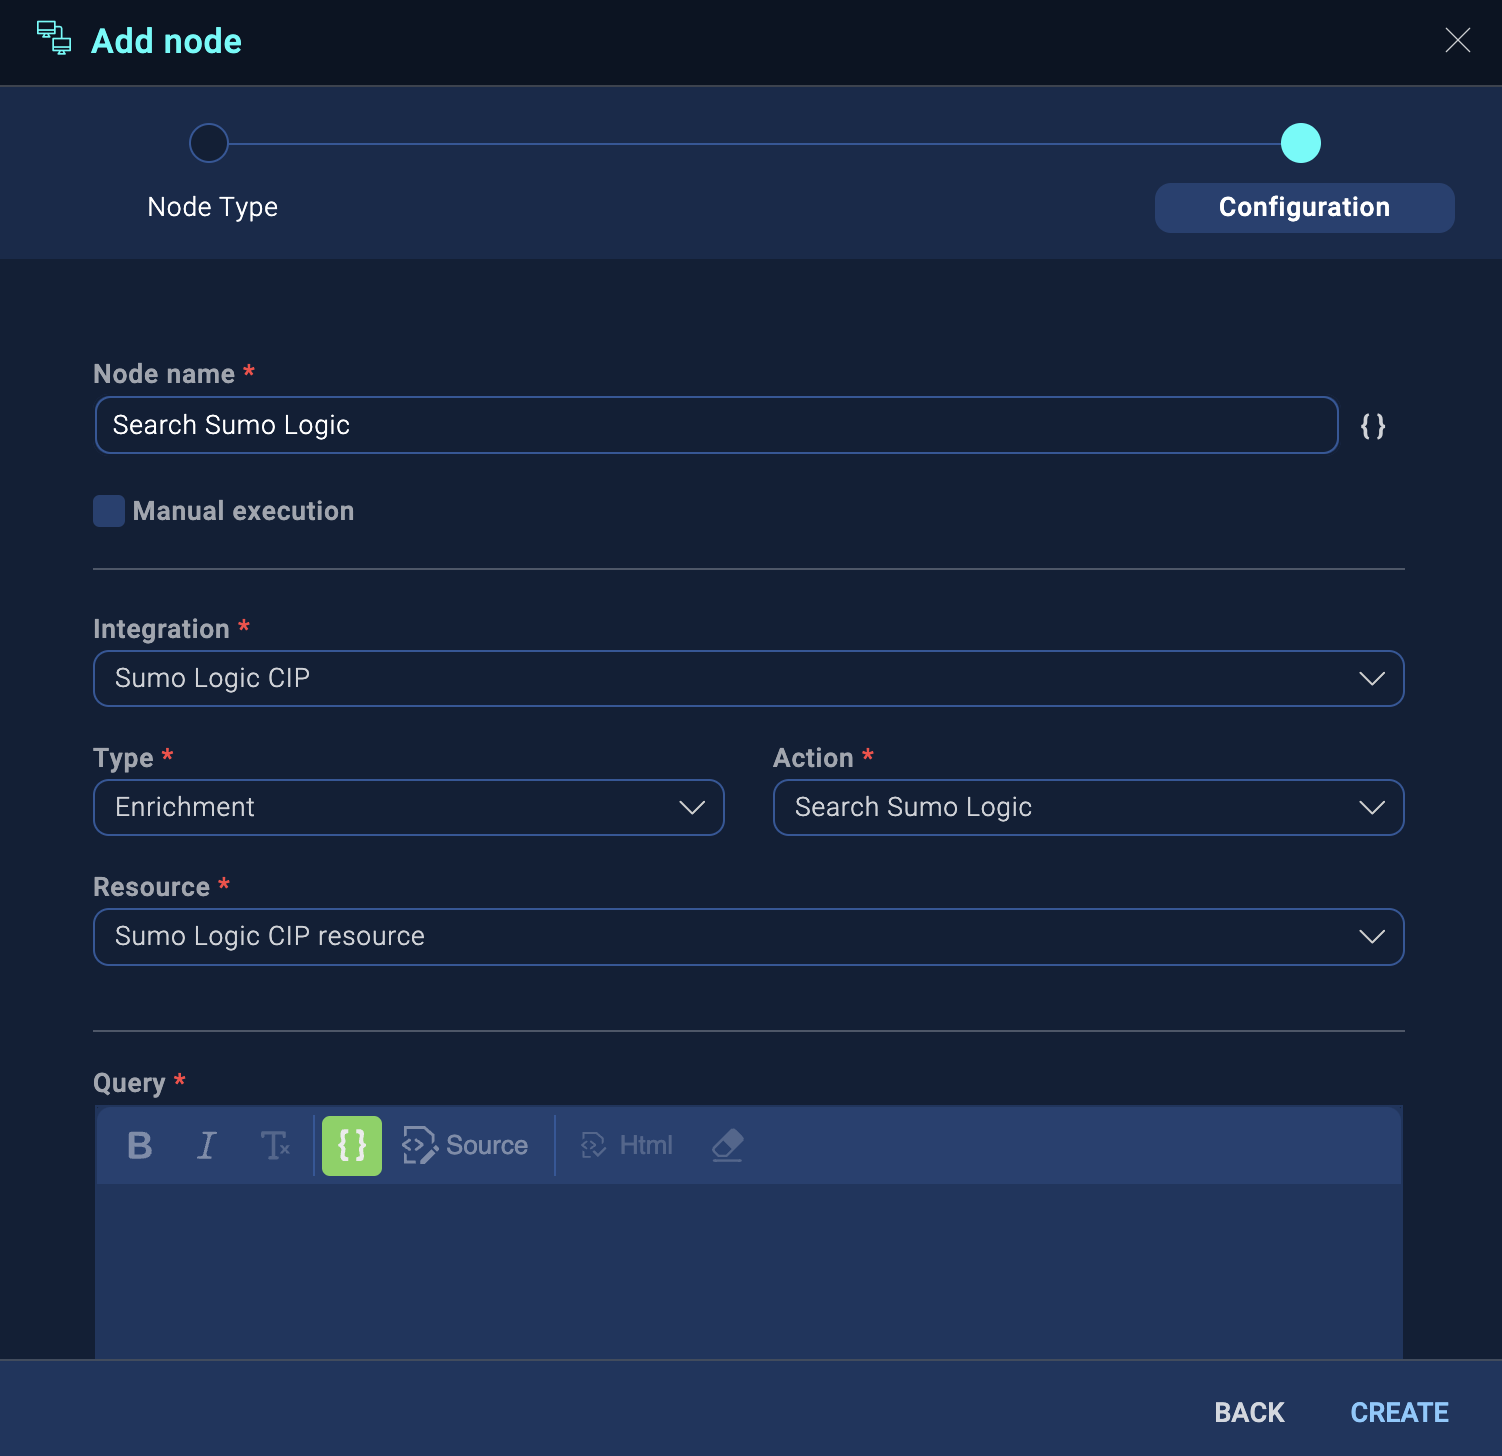
- Fill out the fields with the specific information required by the action. For more information about the action, you can view the integration that provides the action.
- Deselect the Cartesian product checkbox.
warning
Use the Cartesian product checkbox with caution. In most cases, you should deselect this checkbox. For more information, see Cartesian product.
- Once you have entered all the information requested, click Create. The action node is added to the playbook.
- Repeat the steps to add other action nodes.
- Add condition nodes if desired.
- When you are done configuring your playbook, click Save at the bottom of the window.
- When you are ready to allow the playbook to be used in automations, click the Publish button at the bottom of the playbook window.

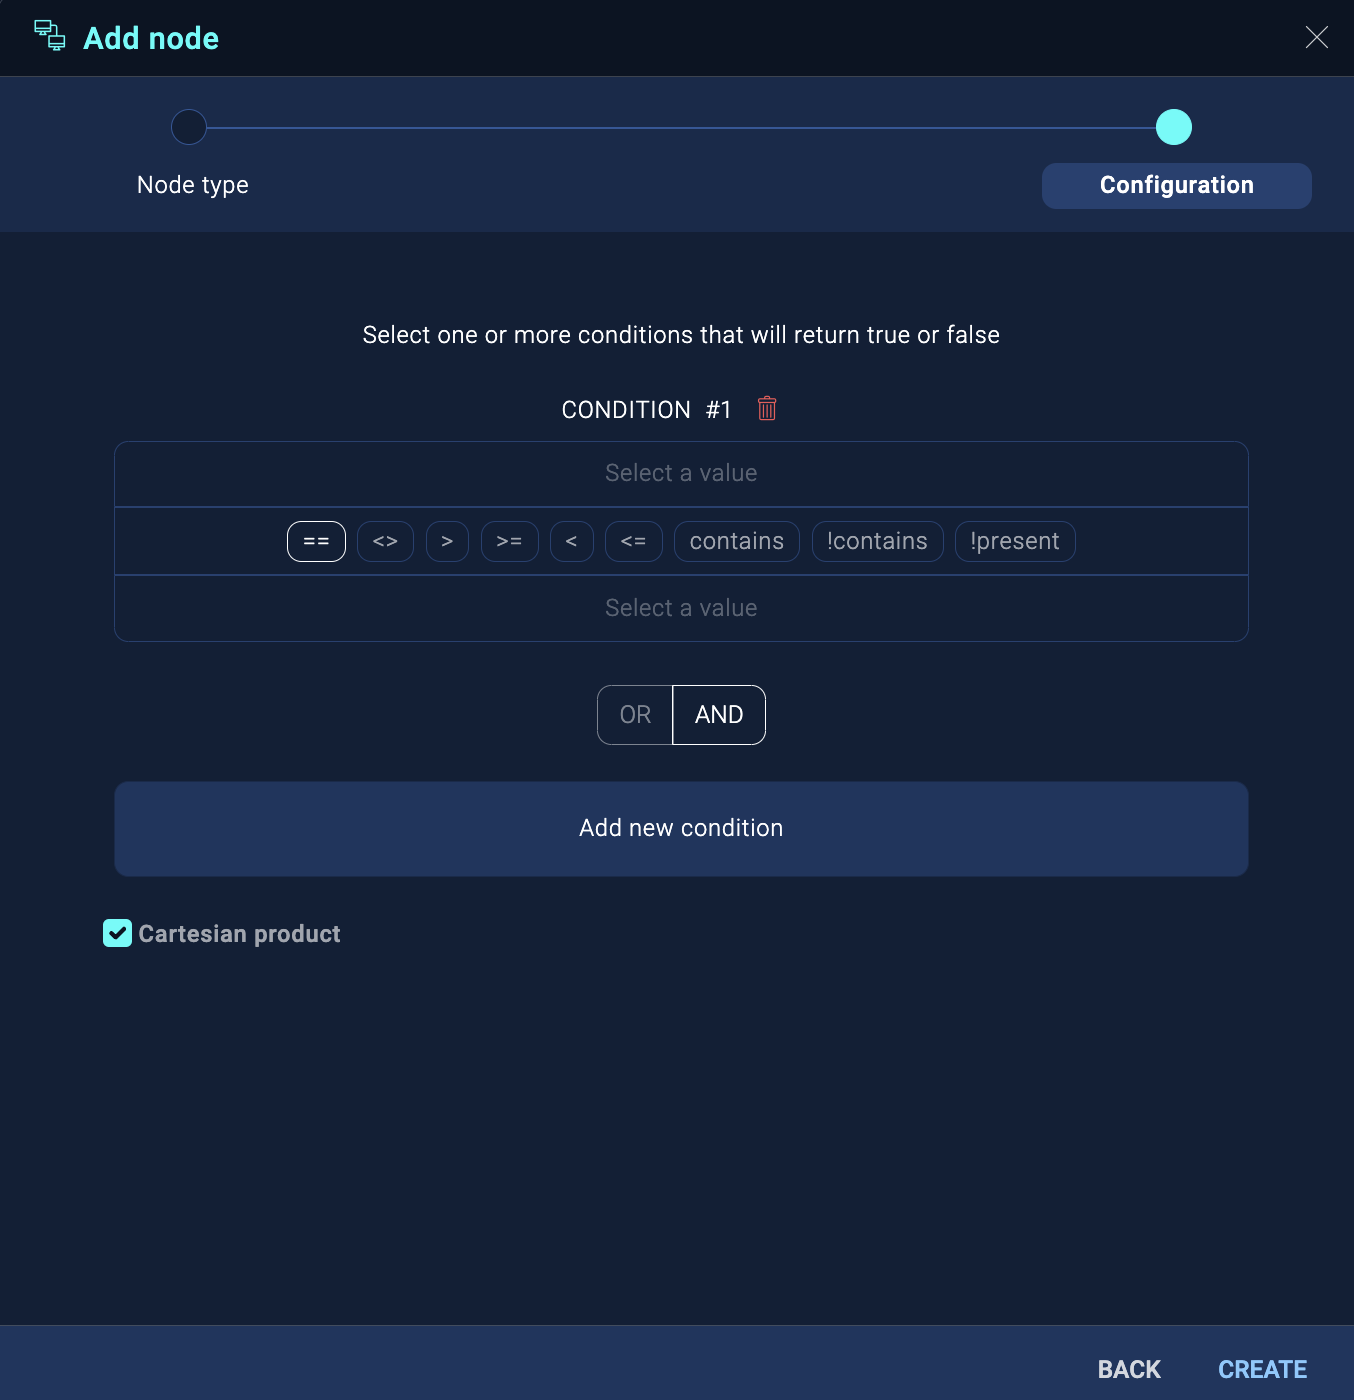
Add a condition node to a playbook
Define a conditional statement to be met before the next node can be executed.
For examples of adding conditions to playbooks, see the Cloud SIEM automation examples.
- Either create a new playbook as described above, or edit an existing playbook.
- Hover your mouse over an existing node and click on the + button that appears.
- The Add node dialog displays.
- Select Condition. The condition node configuration dialog displays.
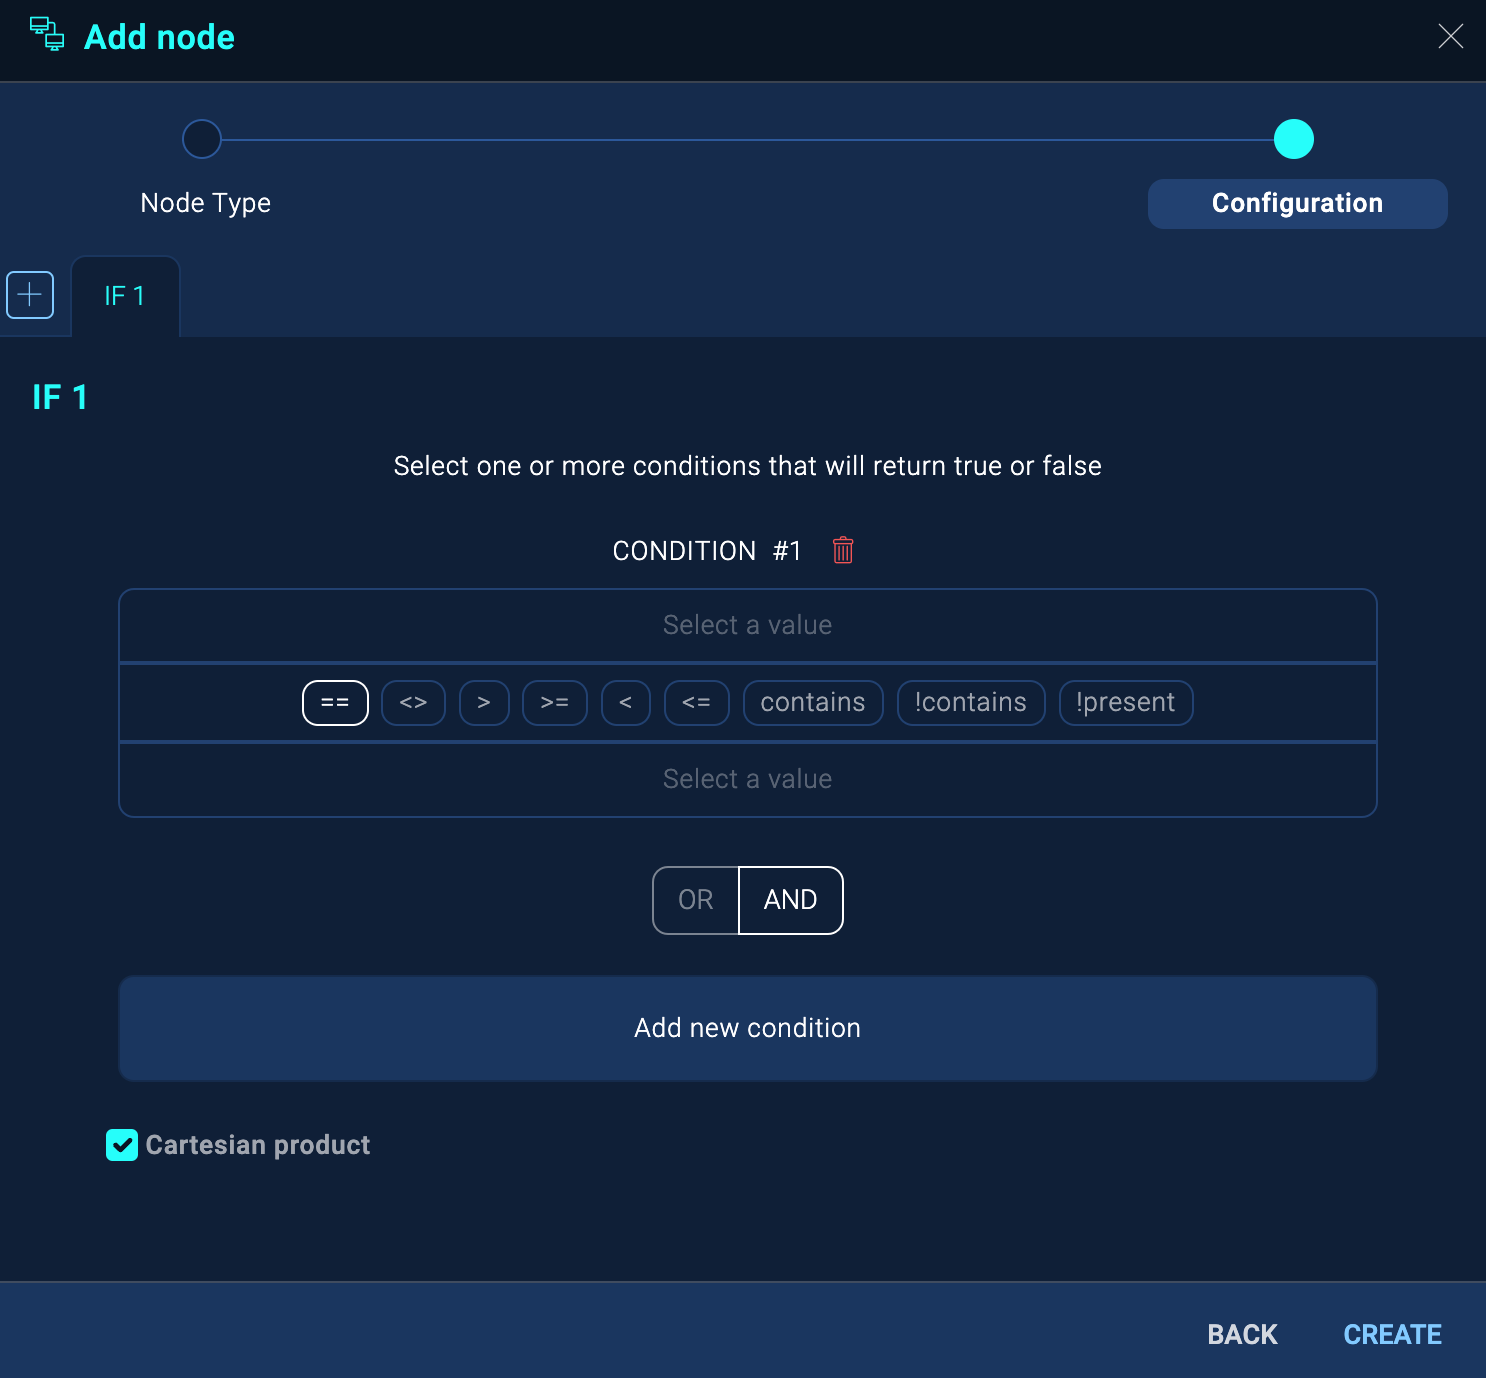
- Deselect the Cartesian product checkbox.
warning
Use the Cartesian product checkbox with caution. In most cases, you should deselect this checkbox. For more information, see Cartesian product.
- Click Create. The empty condition appears on the playbook.
- Draw a line from a previous action node to the new condition node. This is required to allow the condition to evaluate the output values from the previous action.
- Now that you've linked the condition to an action, hover the mouse over the condition node and click the edit button on the node to configure the condition settings.
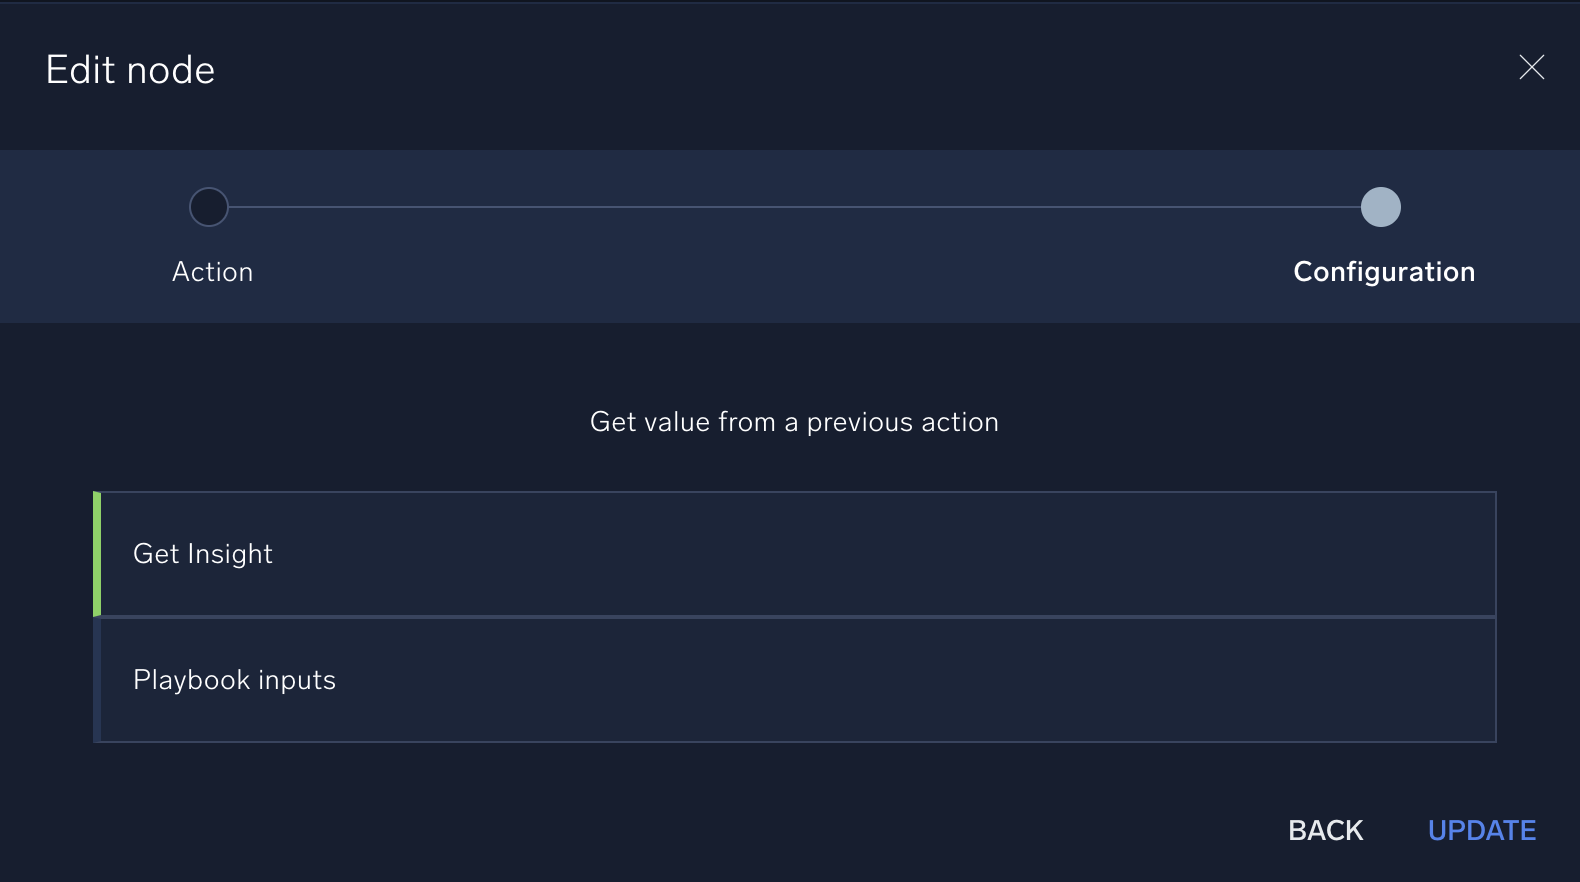
- The condition node configuration dialog displays again. Under Condition1, click Select a value.
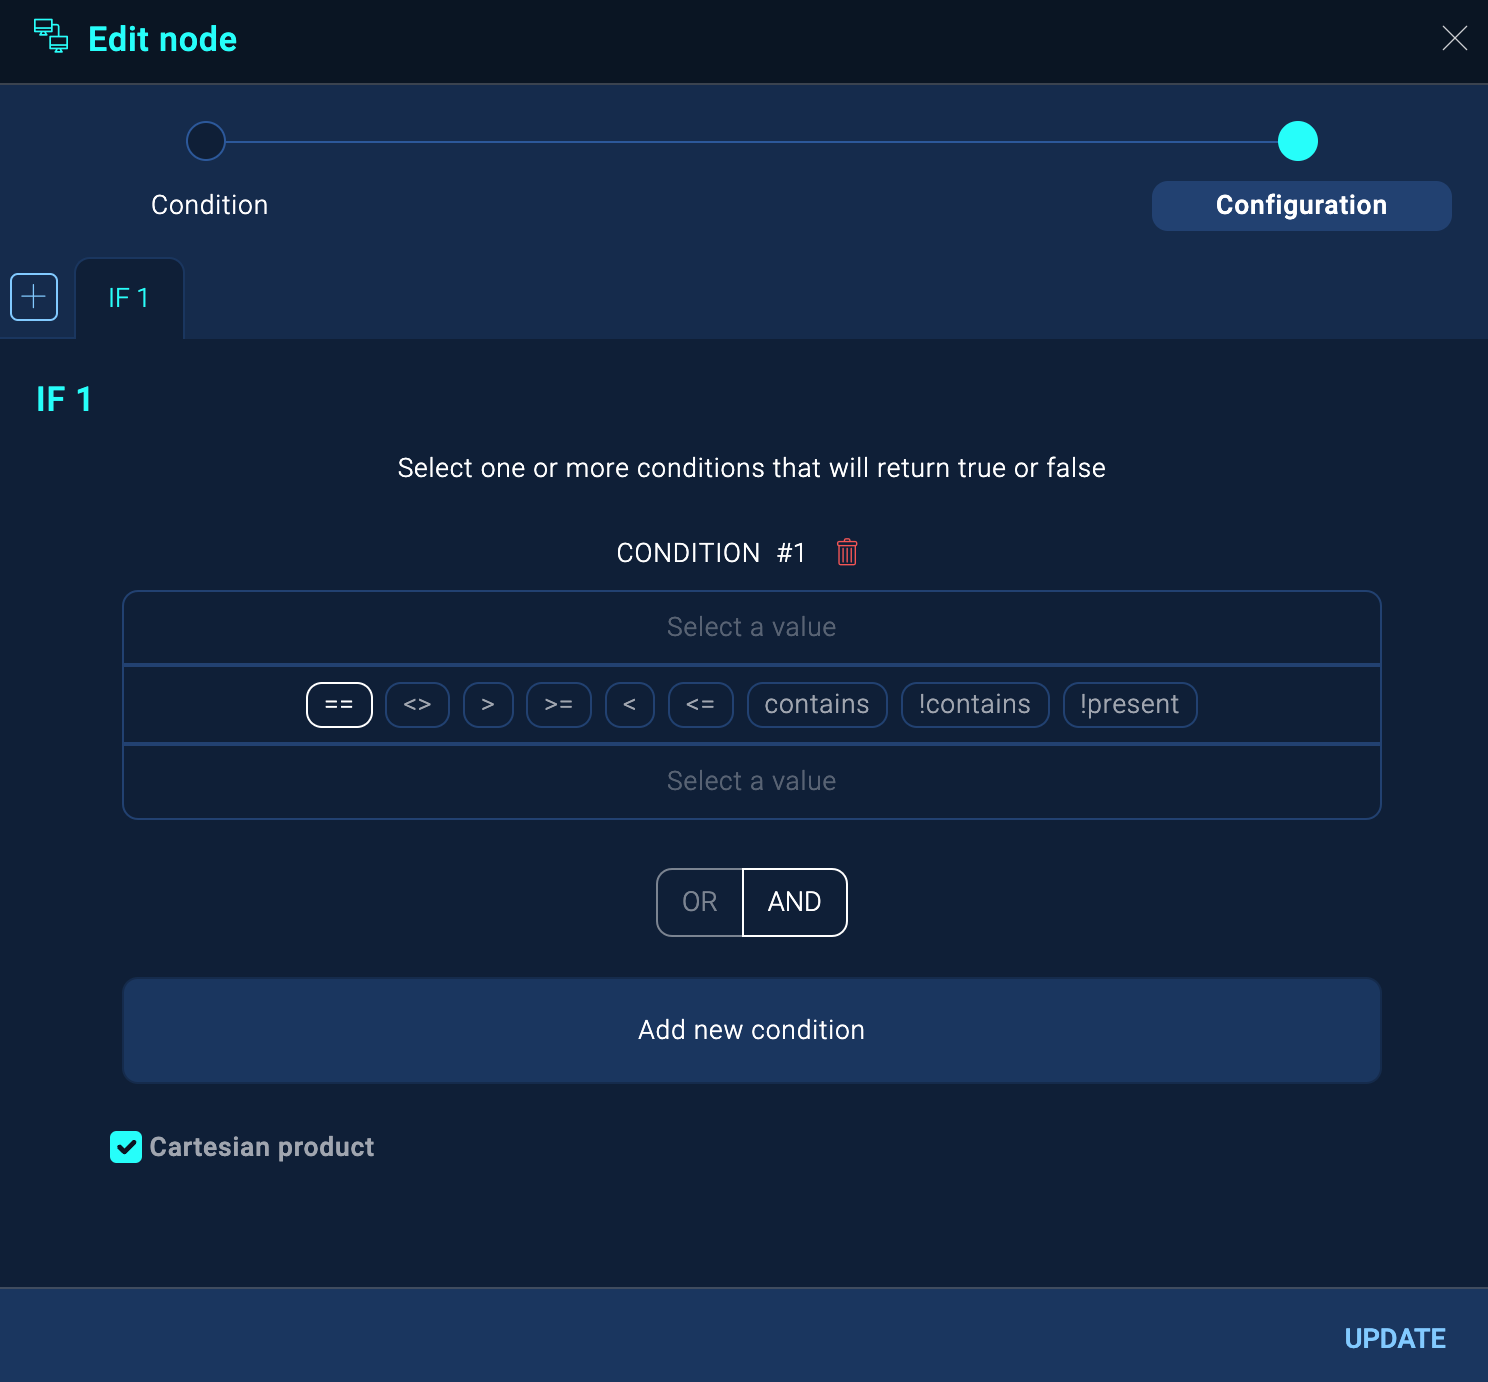
- Click Get Value and select from the drop-down menu whether the value will evaluate to true (bool), false (bool), or empty. You can also manually enter a value, such as a string or numeric literal.
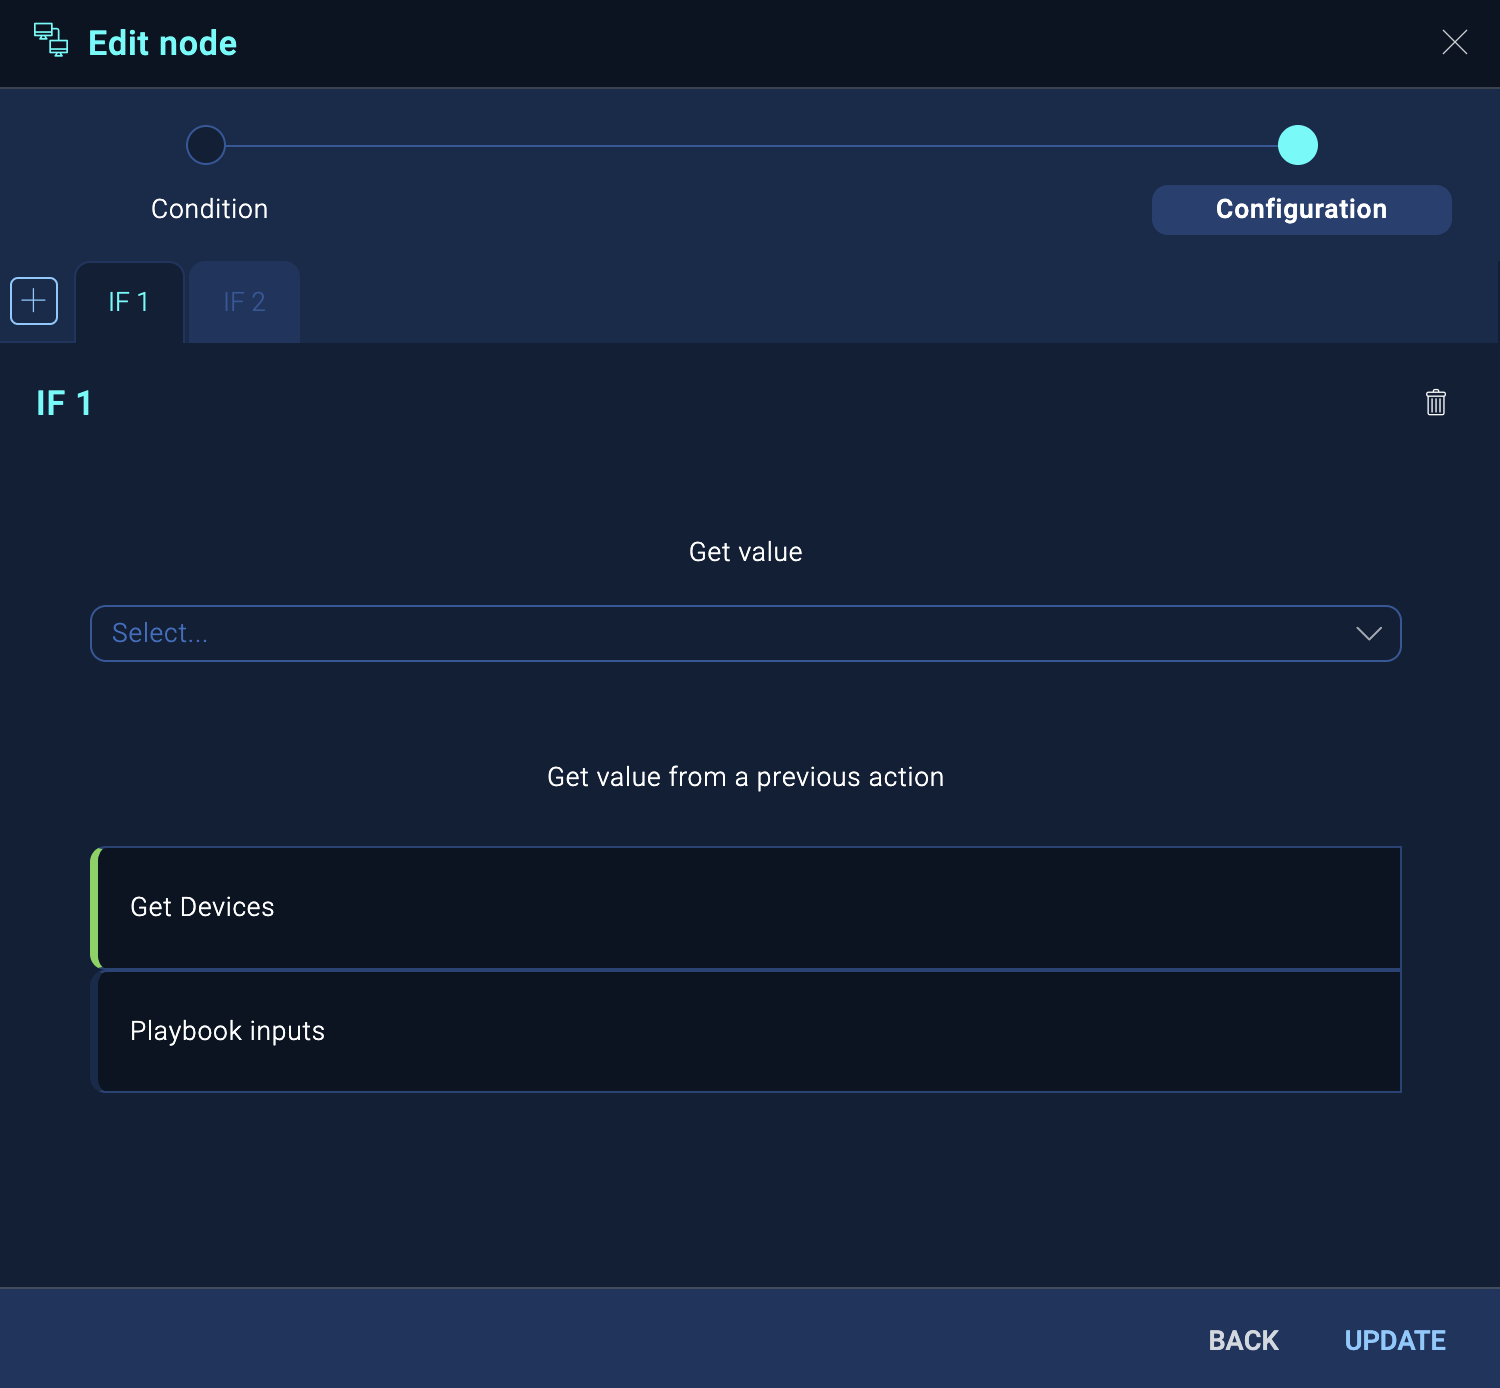
- Under Get value from a previous action, select the value to feed into the condition. The example shows Get Devices and Playbook inputs that came from the previous action. (The condition must be linked by a line to the previous action node to receive outputs from the action.) Click the options from the previous action and select which output type (for example, hashes, IP addresses, domains) to evaluate and add it to the condition.
- The selected output type will be displayed under Condition 1. Select which condition you would like for the output results to meet from the inequality operators below and click Select a value to define the condition.
- Now that Condition 1 is defined, you can choose to filter your results further by selecting an AND/OR operator to define another condition.
warning
If you define multiple conditions, all the conditions must be filtered with either AND or OR. If some are filtered with AND and some with OR, then the condition evaluation will fail.
- Click Update.
- When you create a new condition, you need to define what happens when the results meet one of your criteria. Draw lines to nodes to define the flow for success, failure, or other condition options.
Add a task node to a playbook
Define a task to assign to an individual, such as a security analyst.
- Either create a new playbook as described above, or edit an existing playbook.
- Hover your mouse over an existing node and click on the + button that appears.
- The Add node dialog displays.
- Select Task. The task node configuration dialog displays.
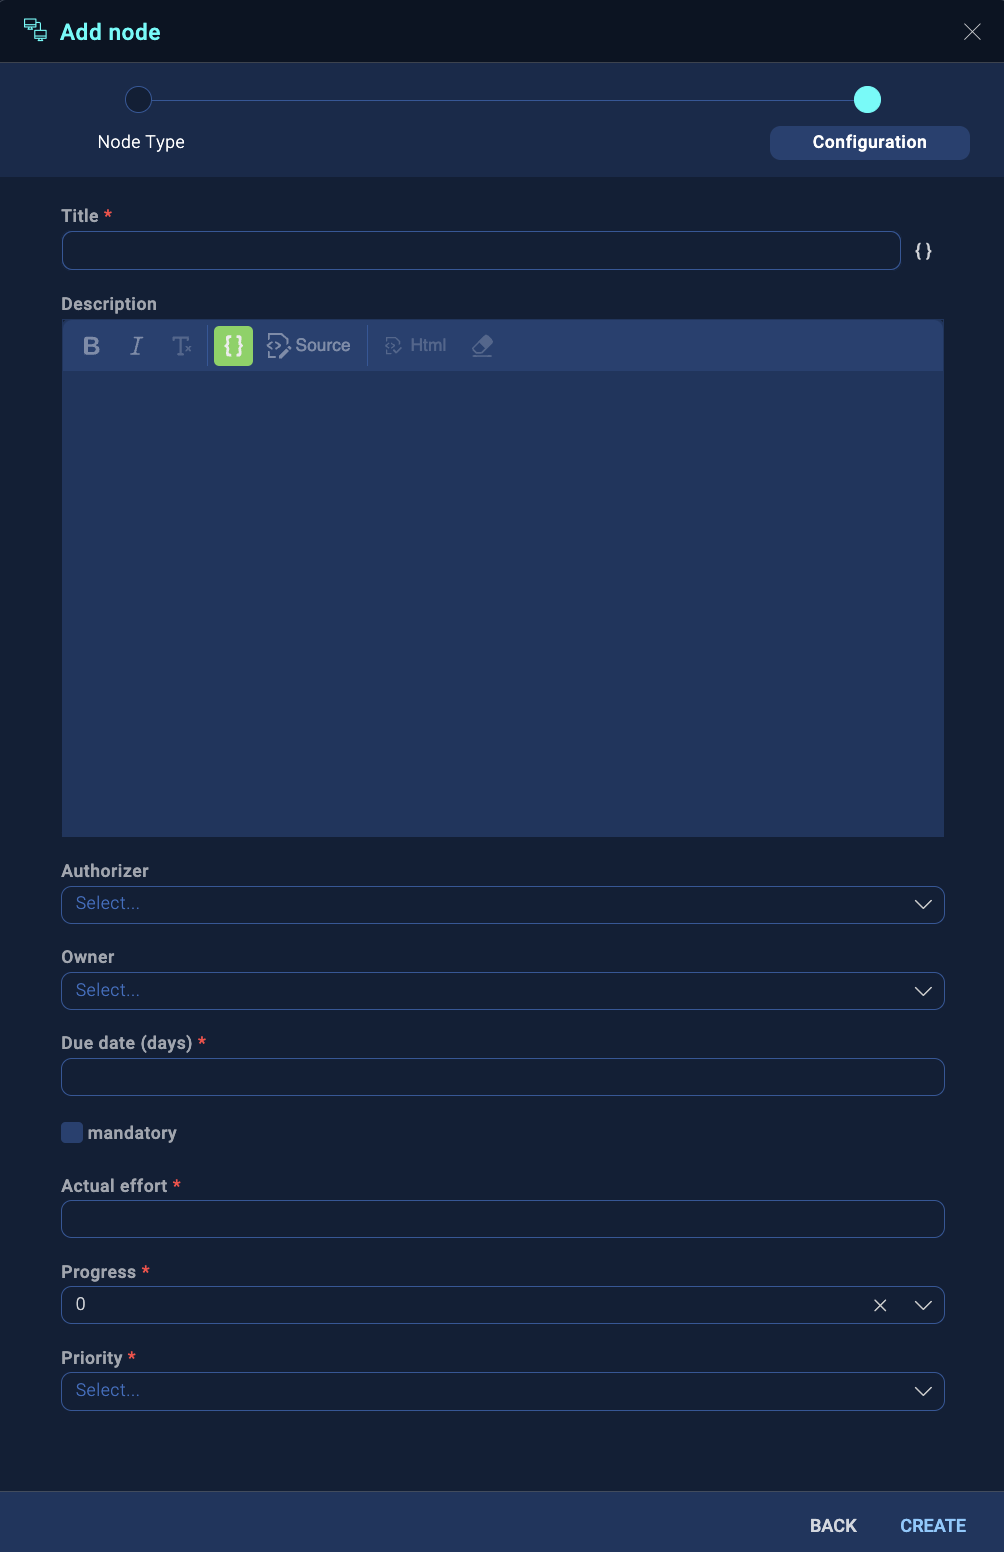
- Give the node a Title that will display in the playbook.
- Type a Description of the task the owner will perform.
If desired, you can click the variable icon and click in the resulting box to display a list of variables you can add to the description.
 - For Authorizer, select the user assigning the task.
- For Owner, select the user assigned the task.
- In Due date, enter the number of days from the time when the action is run before the task is due.
- Select mandatory if the task must be performed in order for the playbook to continue.
- In Actual effort, enter the number of days expected to complete the task. (The owner will subsequently record the actual number of days spent on the effort.)
- In Progress, select percent toward completion, for example, 10%, 20%, and so on. (The owner will subsequently record their progress.)
- Select the Priority (Low, Normal, Important, or Urgent).
- Click Create.
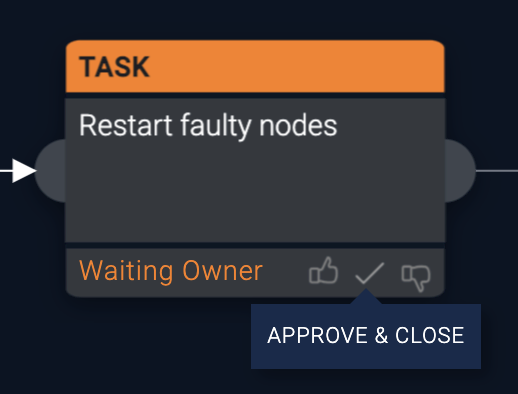
Following is an example of a task node in a running playbook. Click the Task node to view more about its status. Status information opens in a box to the left. In the following example of an action whose status is Waiting Owner, an Action Task appears in the box that describes user interaction required to complete the task.
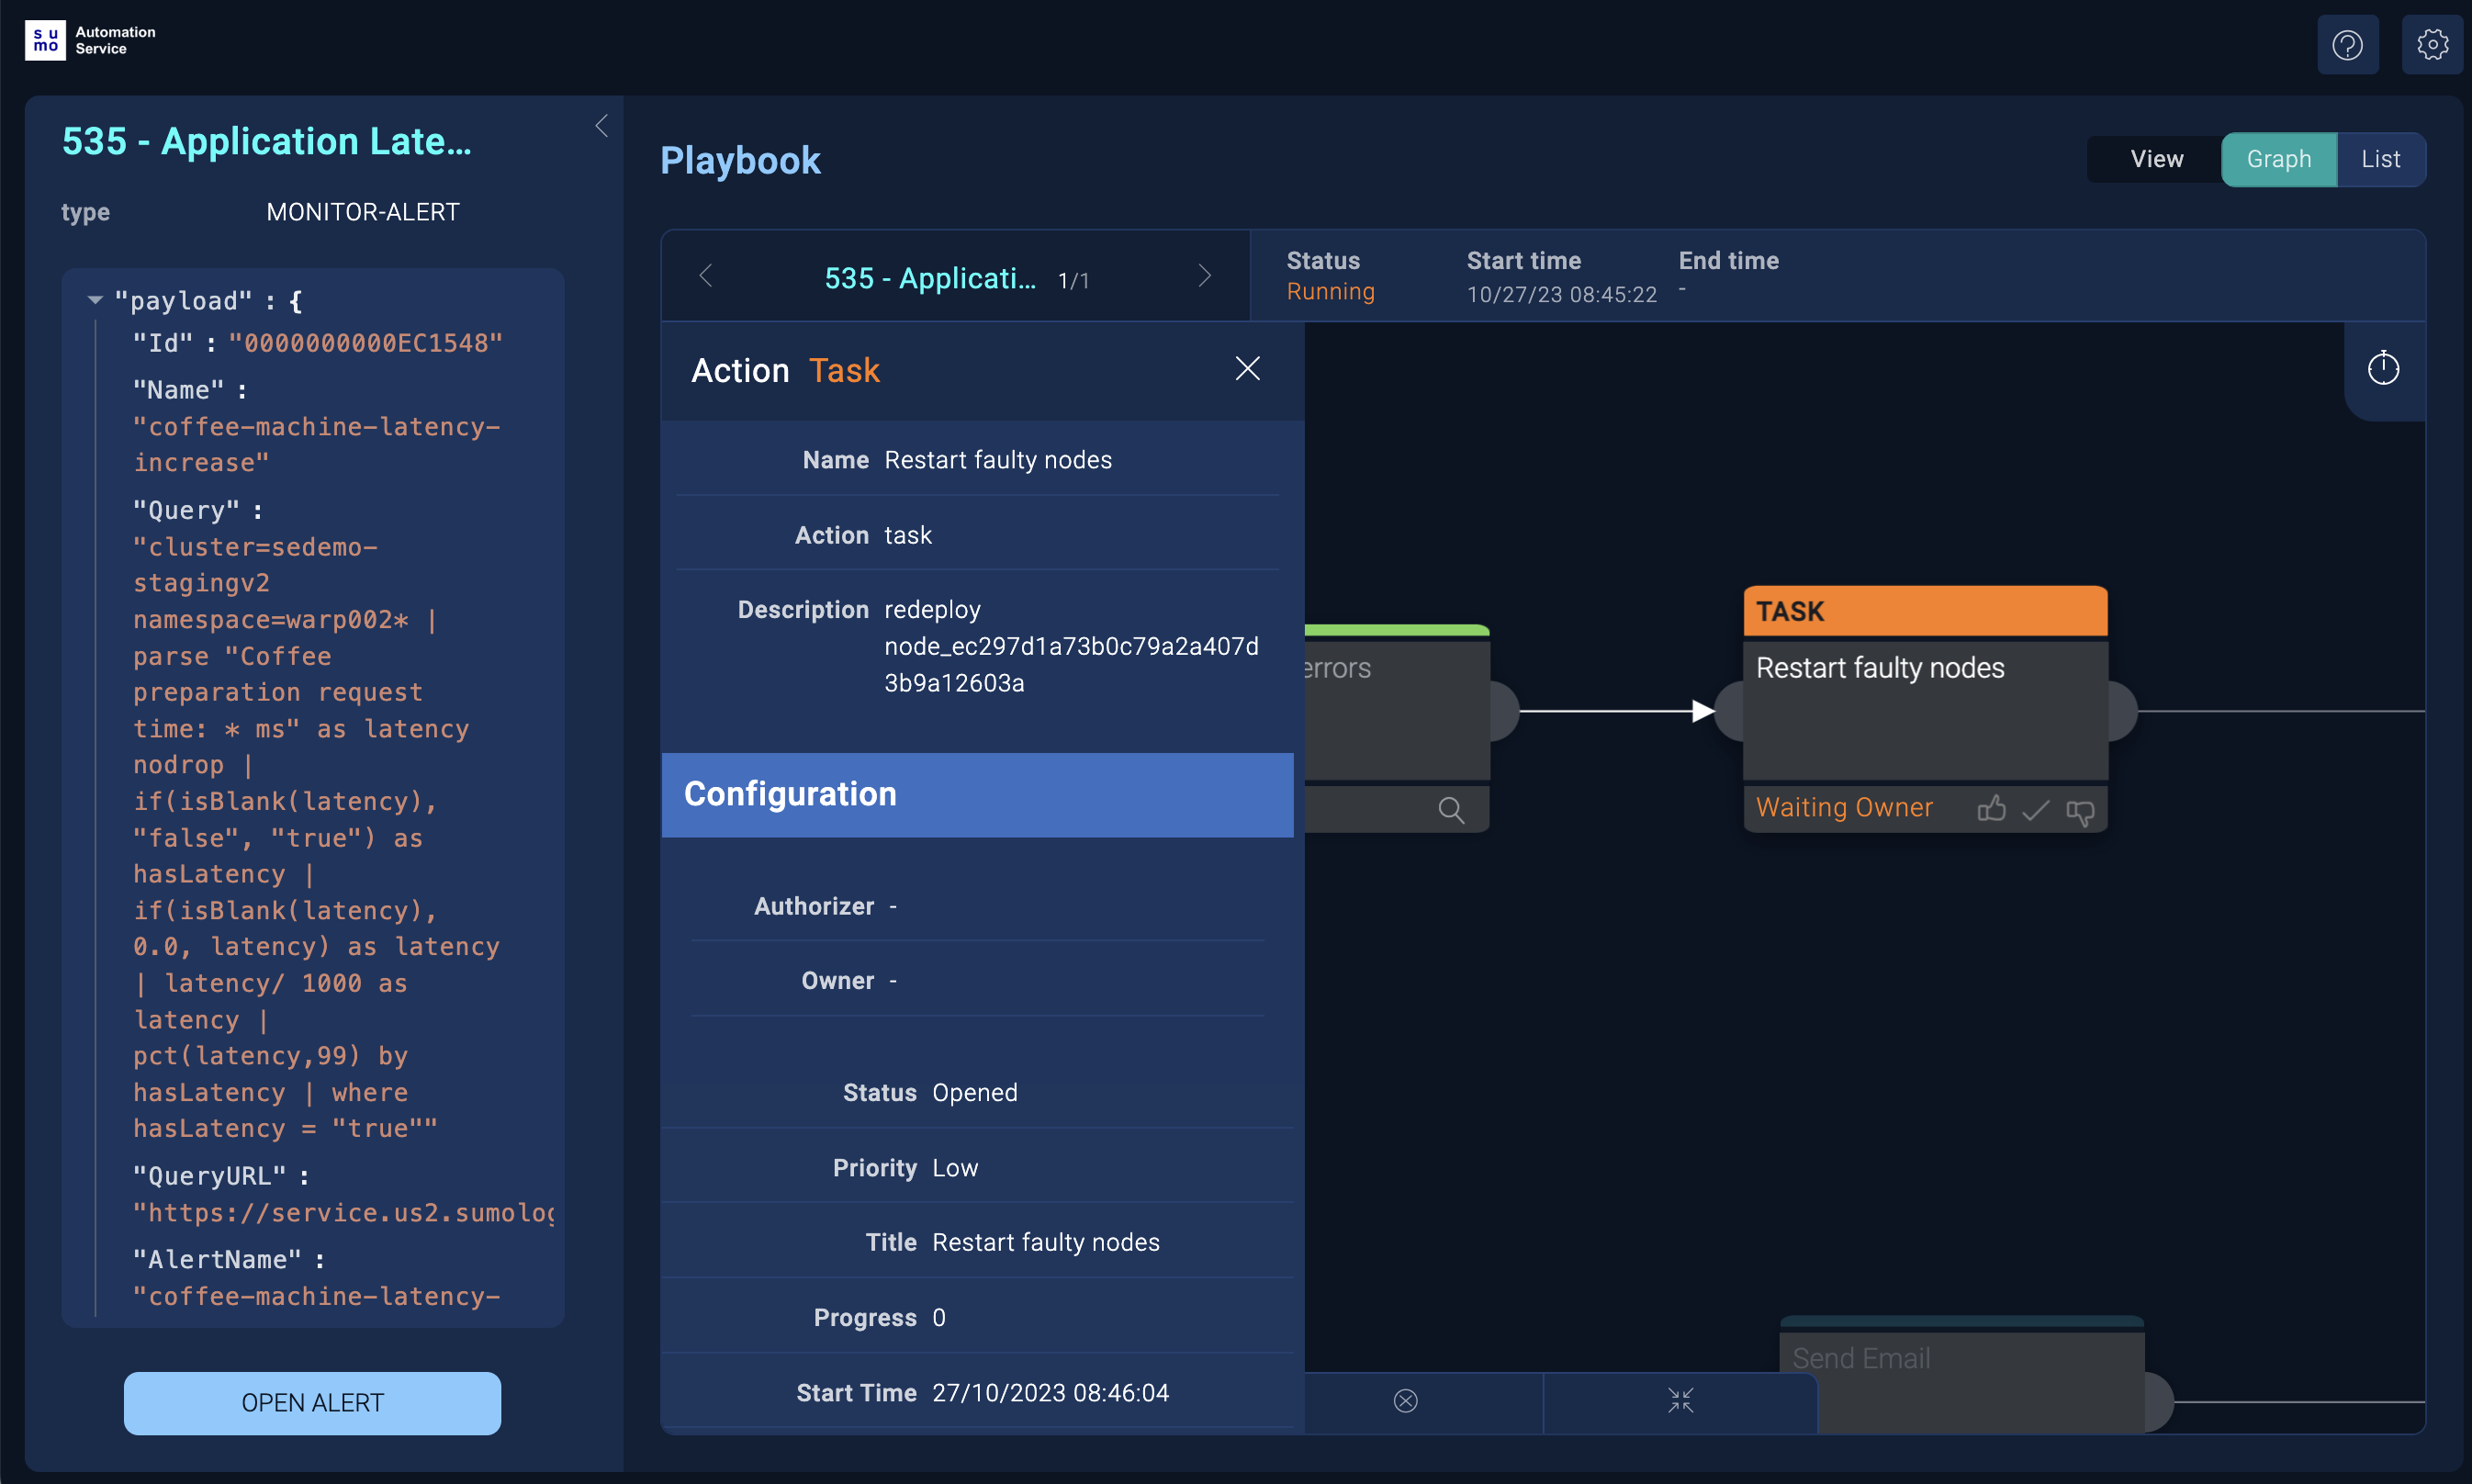
If a user has an action marked as Waiting Owner, they must perform the steps needed to complete the Action Task. When done, they click the appropriate button at the bottom of the Waiting Owner action box (Approve, Approve & Close, or Reject). The action completes, and the subsequent remaining actions in the playbook run.
Add a user choice node to a playbook
When a user choice node is encountered, the execution will pause until a user selects an option. For example, after enrichment, a user could be asked whether to proceed with a containment action or to perform additional enrichment first. When a playbook is paused at a user choice node, the status of that playbook will say Waiting user interaction.
- Either create a new playbook as described above, or edit an existing playbook.
- Hover your mouse over an existing node and click on the + button that appears.
- The Add node dialog displays.
- Select User Choice. The user choice node configuration dialog displays.
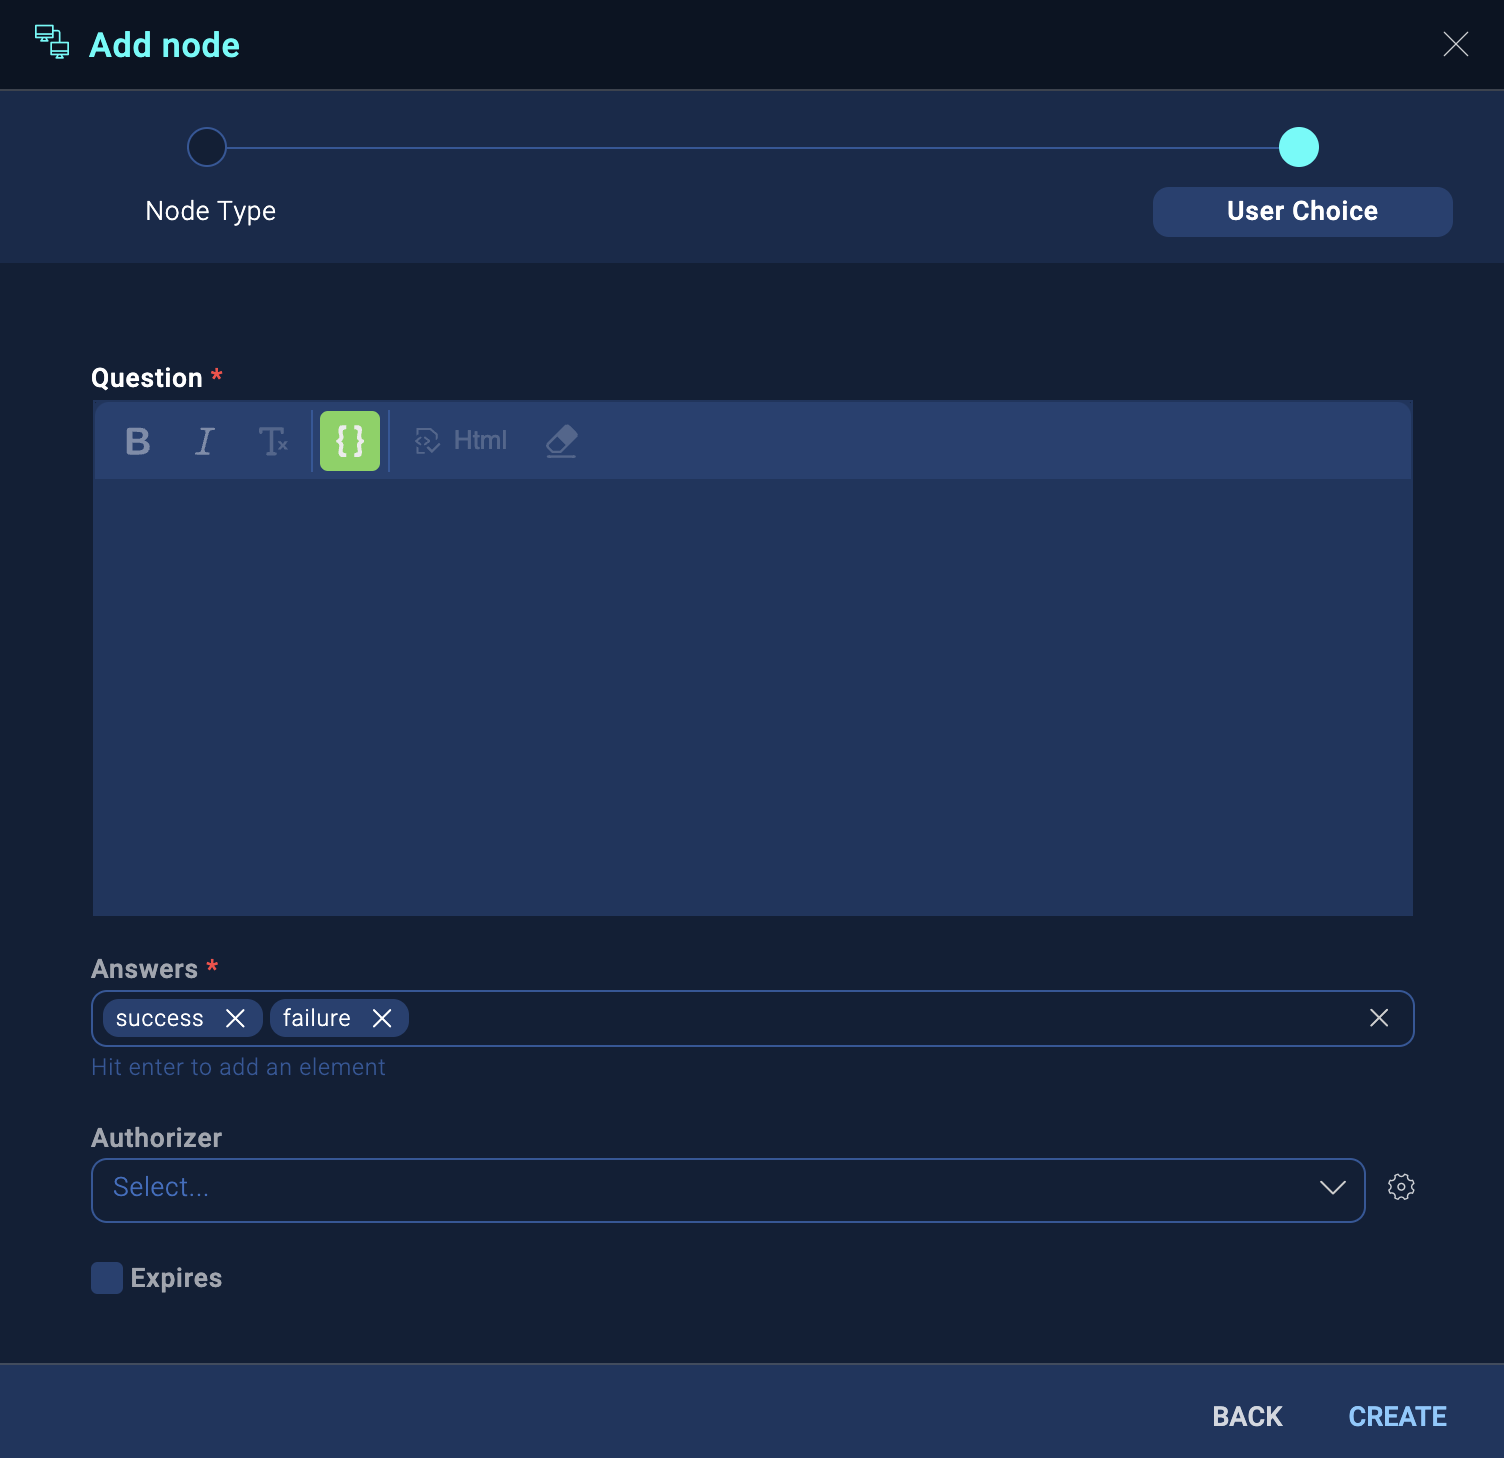
- Type a Question for the user. The answers they can choose from are provided by the Answers field.
If desired, you can click the variable icon and click in the resulting box to display a list of variables you can add to the description. - In Answers, enter selections that the user can choose from. By default, success and failure are provided.
- For Authorizer, select the authorizer of the user choice.
- Select Expires if you want the user choice to expire after a set amount of time so that the playbook can proceed when no choice is made. If you do not select Expires, the playbook does not proceed until the user makes a choice. If you select Expires, fill out additional fields for the amount of time to pass before expiration, and the Default answer to automatically be chosen at the end of the expiration period.
- Click Create.
Following is an example of a user choice node. Note the the node branches to the next node depending on the user's answer.

Add a playbook node to a playbook
Define a playbook to run inside another playbook. For example, you may want to call another playbook in response to a condition statement.
- Either create a new playbook as described above, or edit an existing playbook.
- Hover your mouse over an existing node and click on the + button that appears.
- The Add node dialog displays.
- Select Playbook. The playbook node configuration dialog displays.
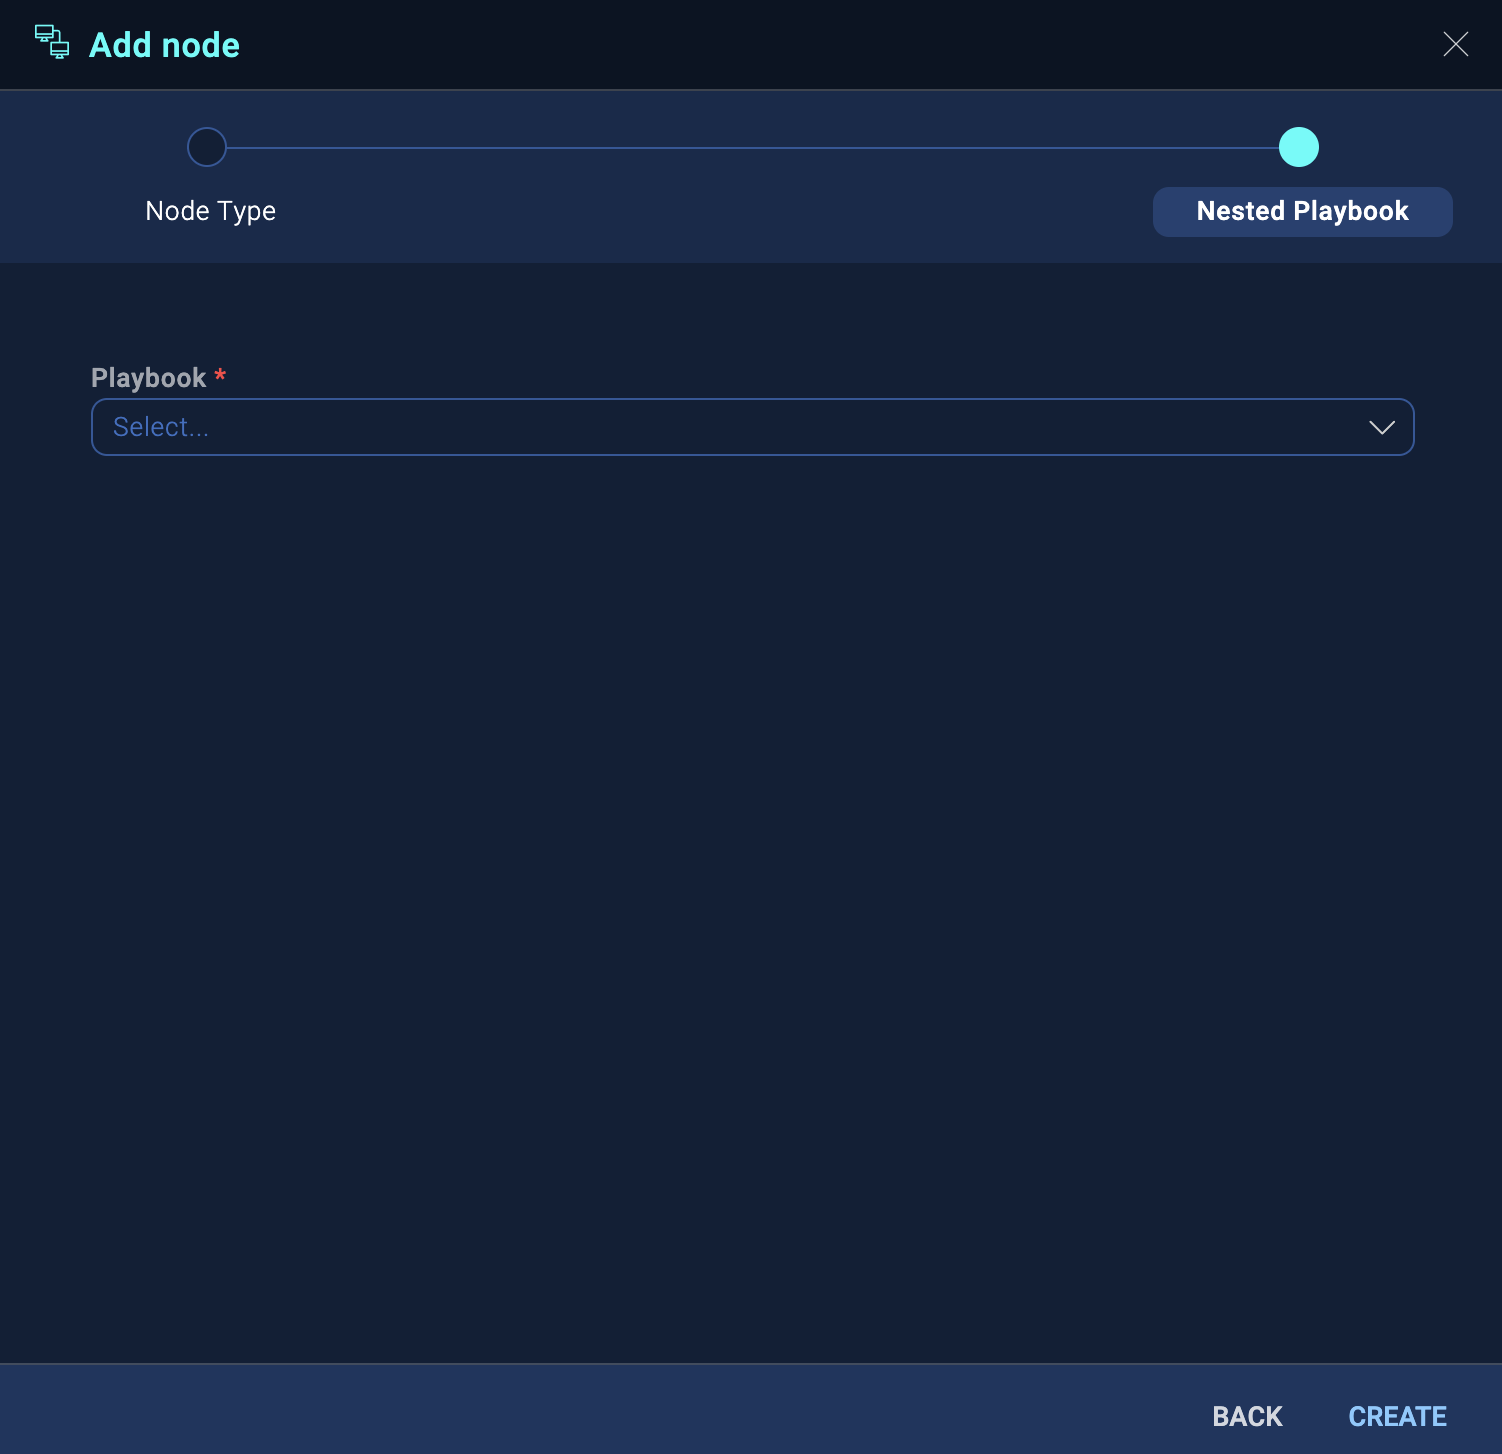
- In the Playbook drop-down menu, select the playbook to run.
- Click Create.
Add a filter node to a playbook
A filter node filters results from the preceding action based on the condition you write. You can only add a filter node after an action node. For example, let's suppose that the action feeding into the filter has 10 results, but you want to filter out all but the best two results. You can write a condition in the filter to do the filtering.
- Add an action node.
- Hover your mouse over an action node and click the + button. The available nodes are displayed.
- Click Filter. The filter node configuration dialog displays.
- (Optional) Use Split by to select an output if it is a list (array) and you want to evaluate each item separately. See "Split by" field in a filter node for more information.
- Configure the conditions you want to use for filtering.
- Deselect the Cartesian product checkbox.
warning
Use the Cartesian product checkbox with caution. In most cases, you should deselect this checkbox. For more information, see Cartesian product.
- Click Create.
Playbook versioning
Autosave
Every time you edit a playbook draft, the draft is automatically saved, and the following notification briefly appears in the lower right corner of the playbook screen:
When the automatic save is complete, the following notification lets you know.
To enable or disable autosave, use playbook preferences.
Versions
To publish a playbook so that others may use it, click the publish button at the bottom of the playbook screen.
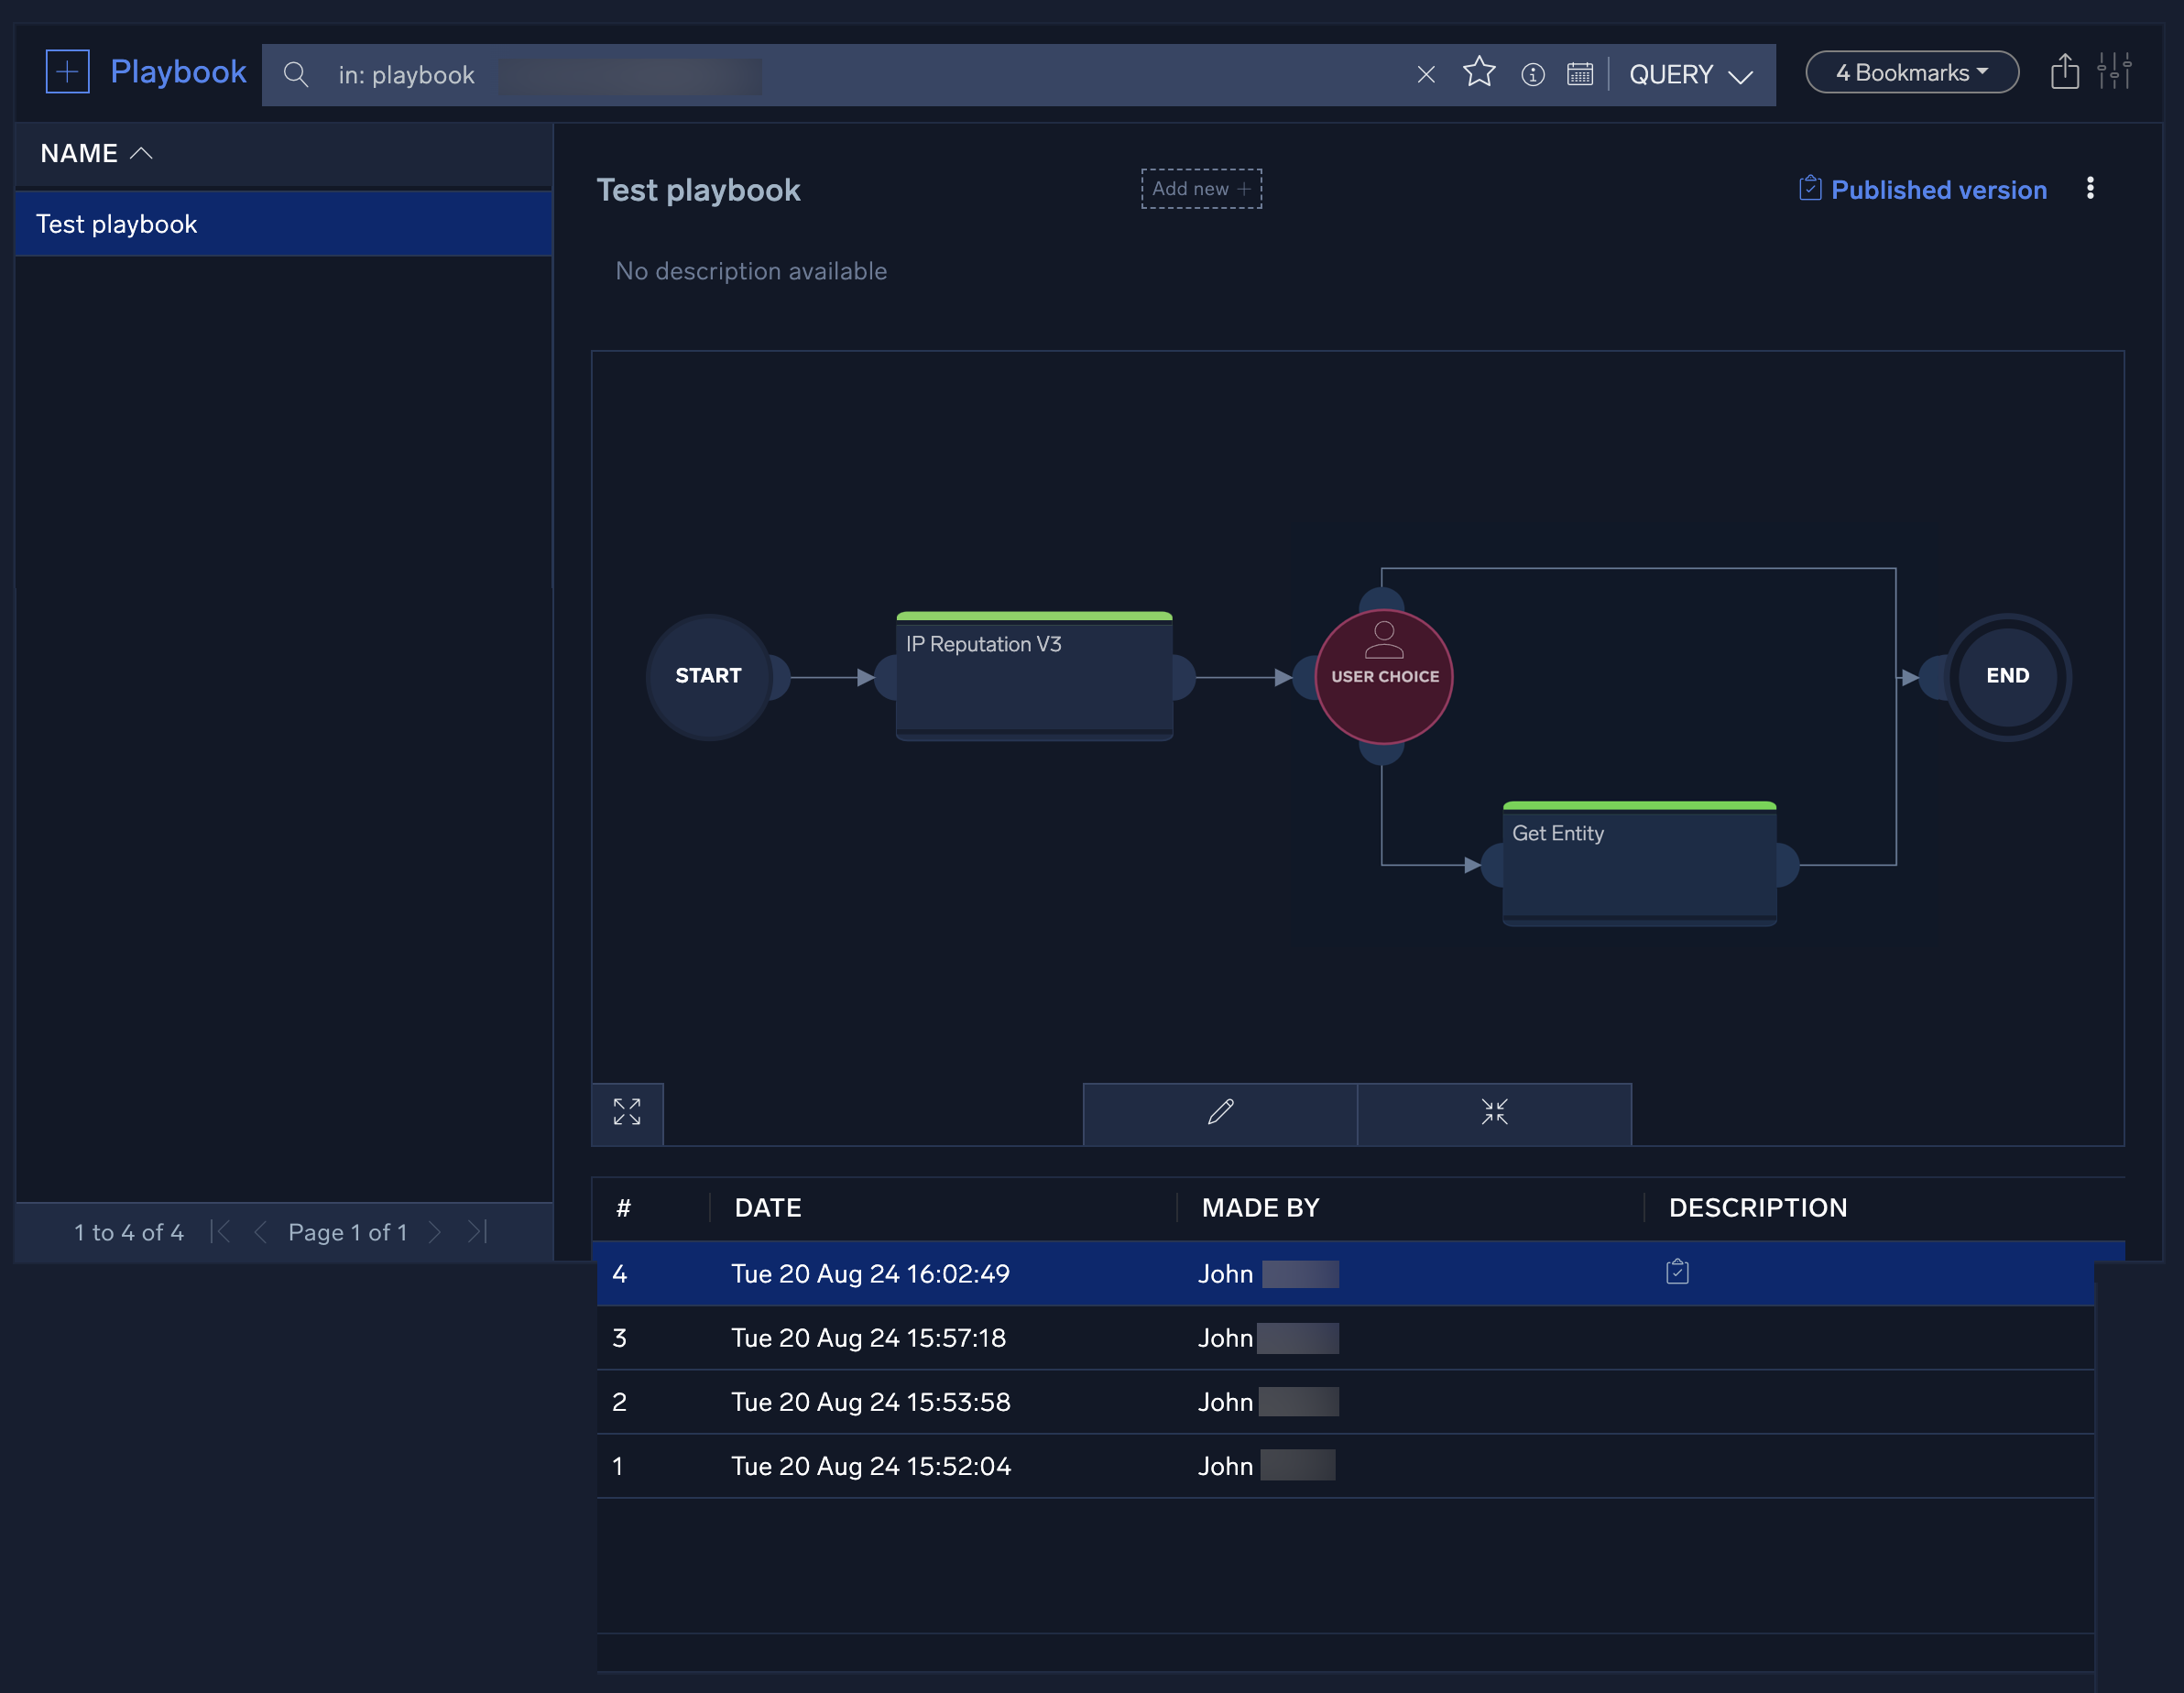
Every time you publish a playbook, a new version of the playbook is retained. In the screen image below, notice how all the versions of the playbook are listed (#4 being the published version as indicated by the publish icon). Click on a version to edit it, and if you want, publish it. In this way, you maintain version control of your playbooks, and ensure that all versions are retained.
Enable or disable playbooks
You can enable playbooks for use in automations, or disable them to prevent them from being used. This gives you greater control over when a playbook can be run. If for example a playbook is causing a problem, such as exceeding your actions limit or sending too many emails, you could temporarily disable the playbook until you remedy the issue.
When enabling or disabling playbooks, keep in mind:
- By default, draft playbooks are disabled.
- Playbooks without any published versions are initially disabled and will be automatically enabled upon publishing their first version.
- Disabled playbooks cannot be triggered automatically.
- Deleted playbooks are set to disabled and remain so after restoration.
- Cloned or imported playbooks are enabled by default, irrespective of the original playbook's status.
- Audit logs are generated whenever playbooks are enabled or disabled manually.
How to enable or disable a playbook
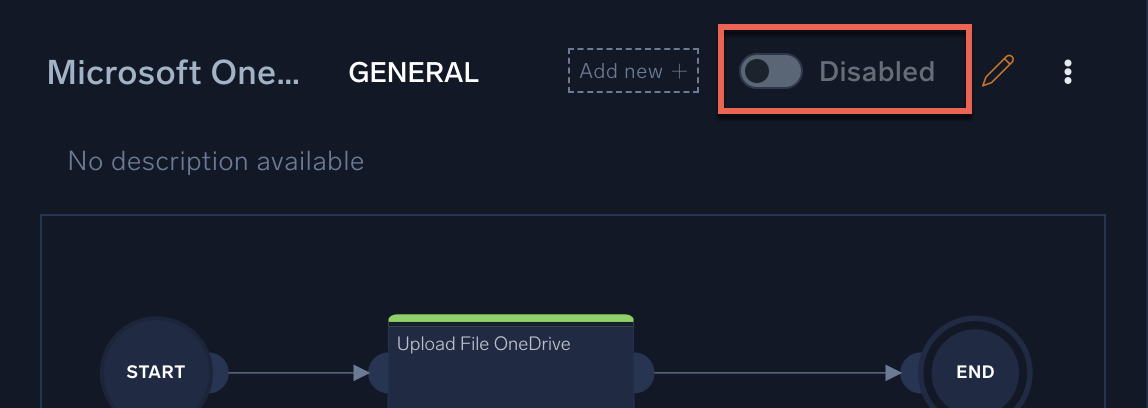
To enable or disable a playbook, open the playbook and click the toggle.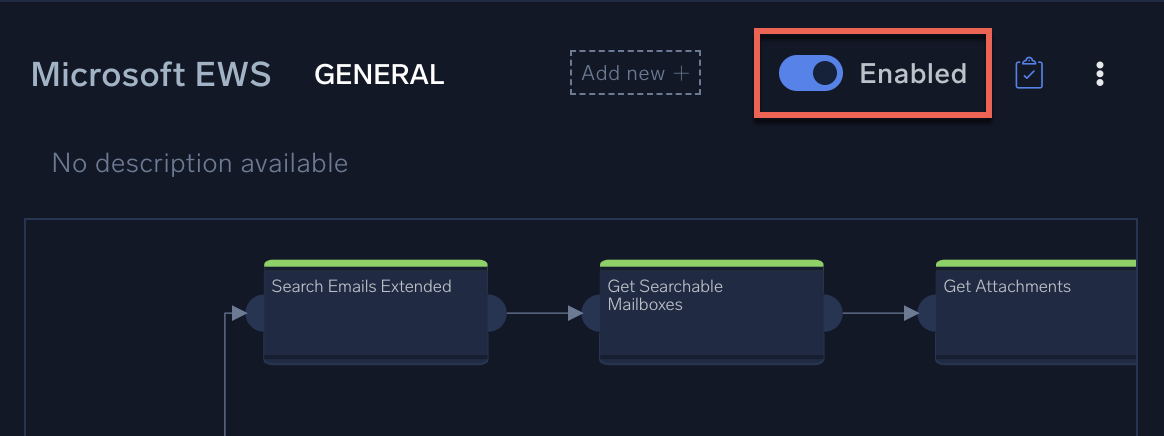
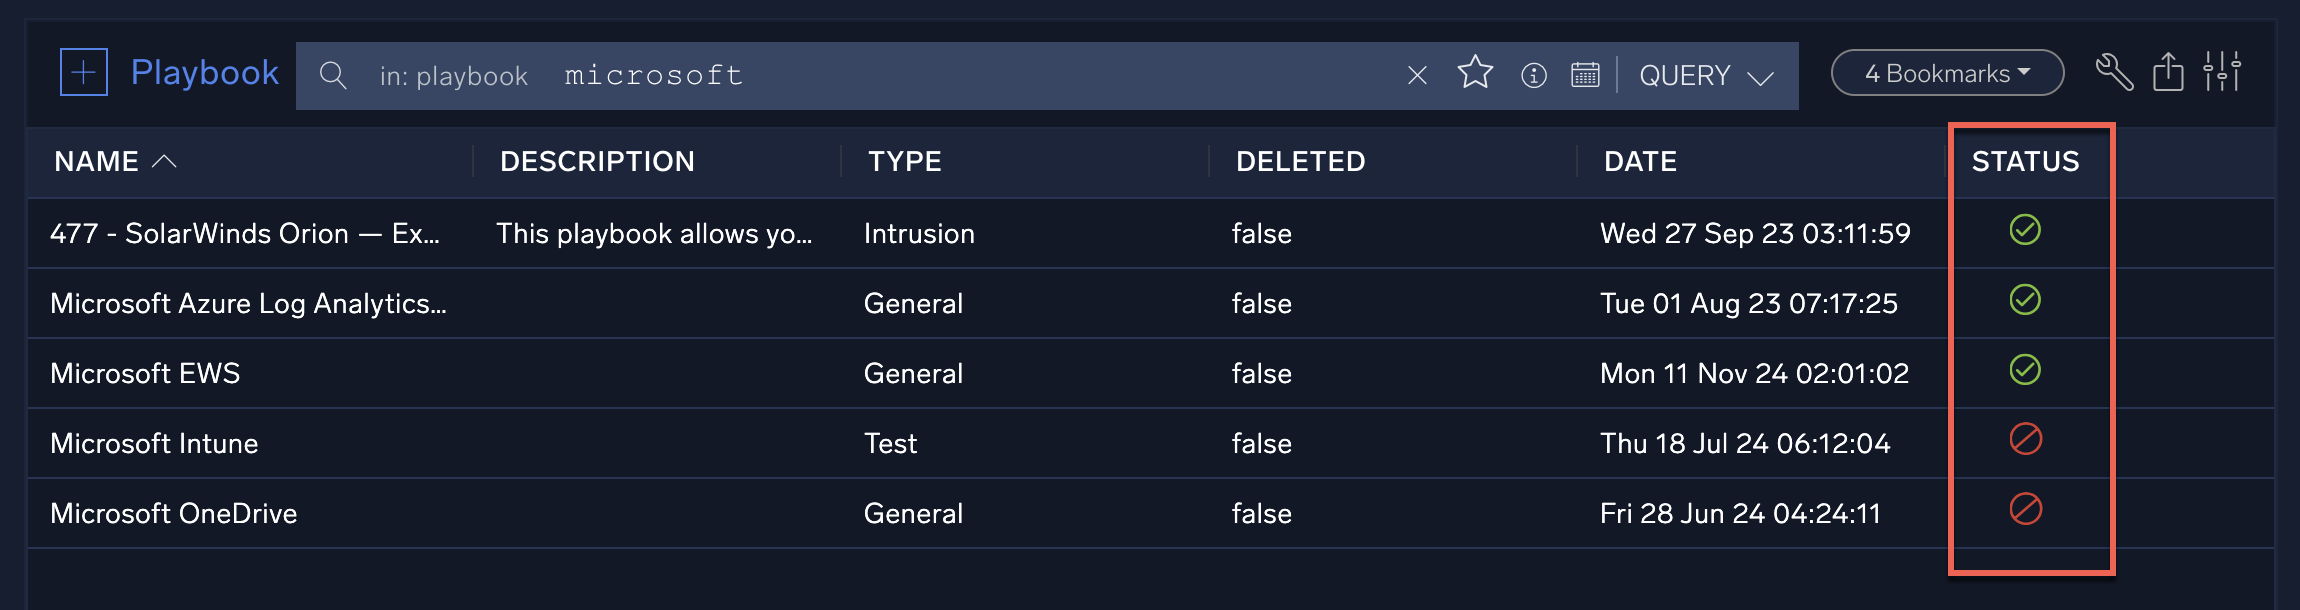
The Status column shows whether a playbook is enabled ![]() or disabled
or disabled ![]() .
.
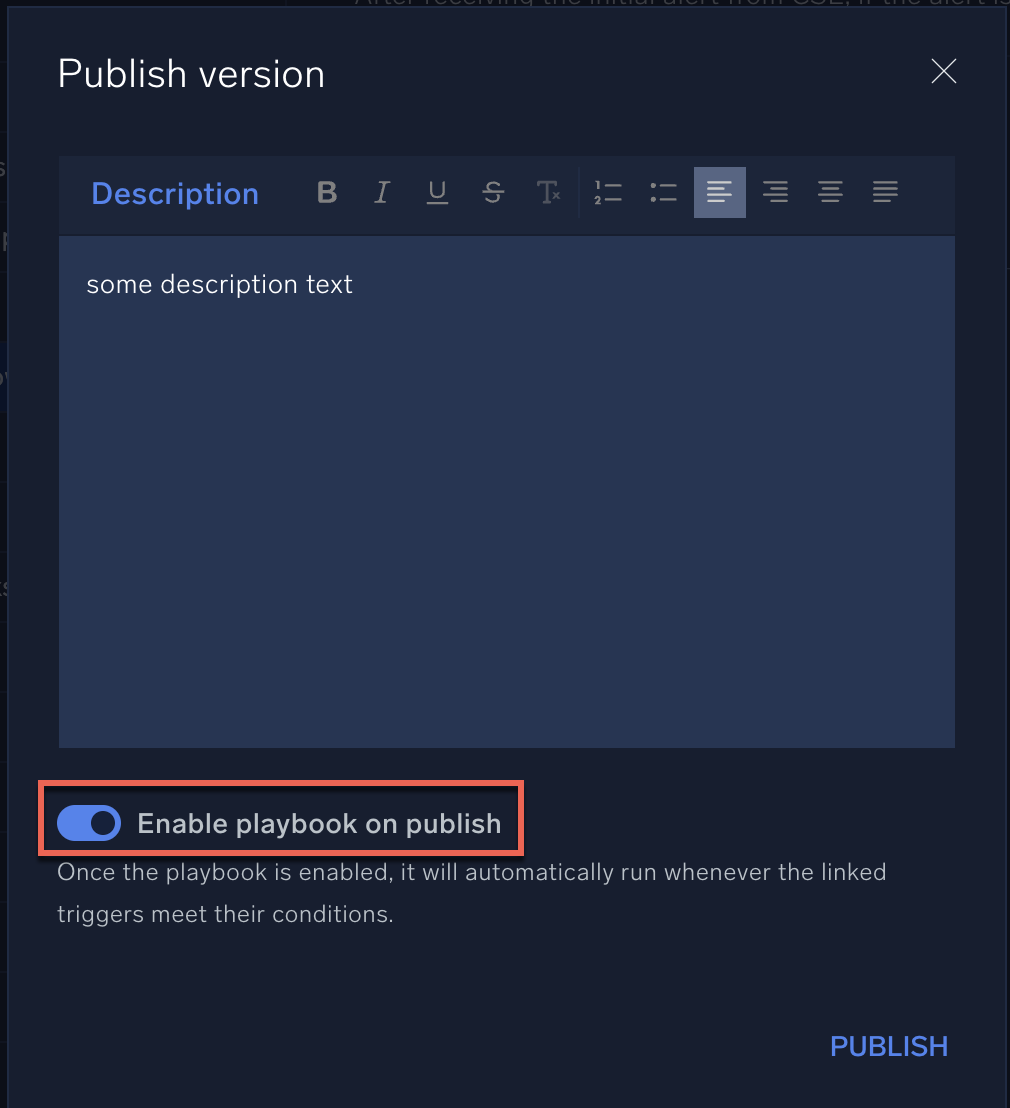
Enable on publish
To publish a playbook, click the Publish button at the bottom of the playbook window:
When you publish a playbook:
- Playbooks without any published versions are automatically enabled.
- Playbooks that have previously published versions will display an Enable playbook on publish option if they are in a disabled state:
Playbook preferences
- Click the preferences button in the upper-right corner of the screen.
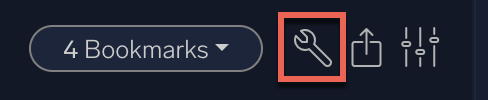
- Configure preferences in the Playbooks Preferences screen.
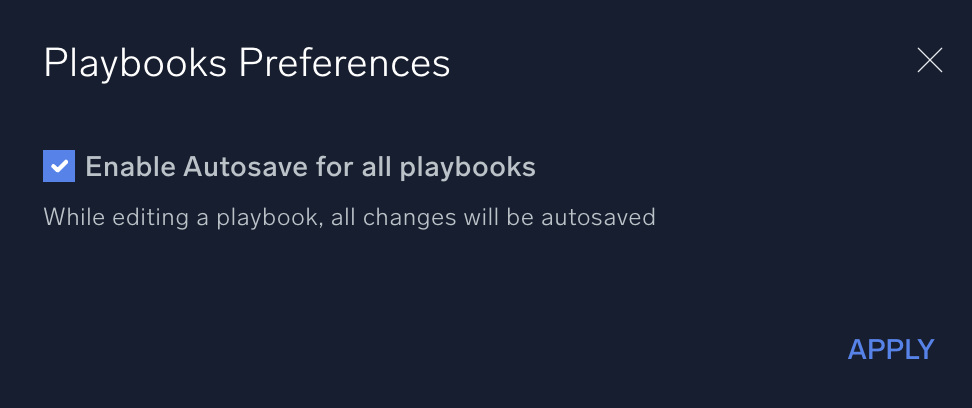
Autosave preference
Select Enable Autosave for all playbooks to ensure that while editing a playbook, all changes will be automatically saved to the draft. For more information, see Autosave.
Import and export playbooks
With the mechanism to import and export playbooks, you can move a playbook, along with all its configurations, from one instance to another. The file should be in tar.gz format and adhere to naming conventions.
- Click on the Export icon located next to the playbook name.
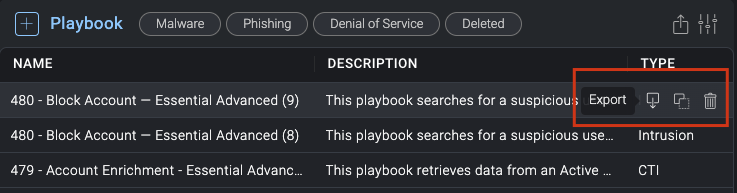
- Upon clicking, the tar.gz archive download will be initiated.
- At this point, you can open the archive, modify the configuration data, recreate a tar.gz archive, and upload it. To upload the file, click on the Import icon.

- Select the desired file and click Import.
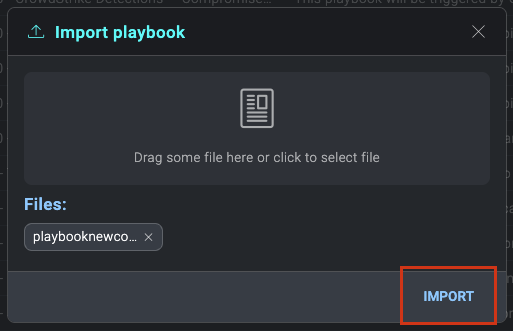
It is crucial that the file names inside the tar.gz adhere to the following format: <unique_id>.<file_representing_name>.<file_type>.<file_extension>, for example, 97ad7d6e.IP-Reputation.action.yaml
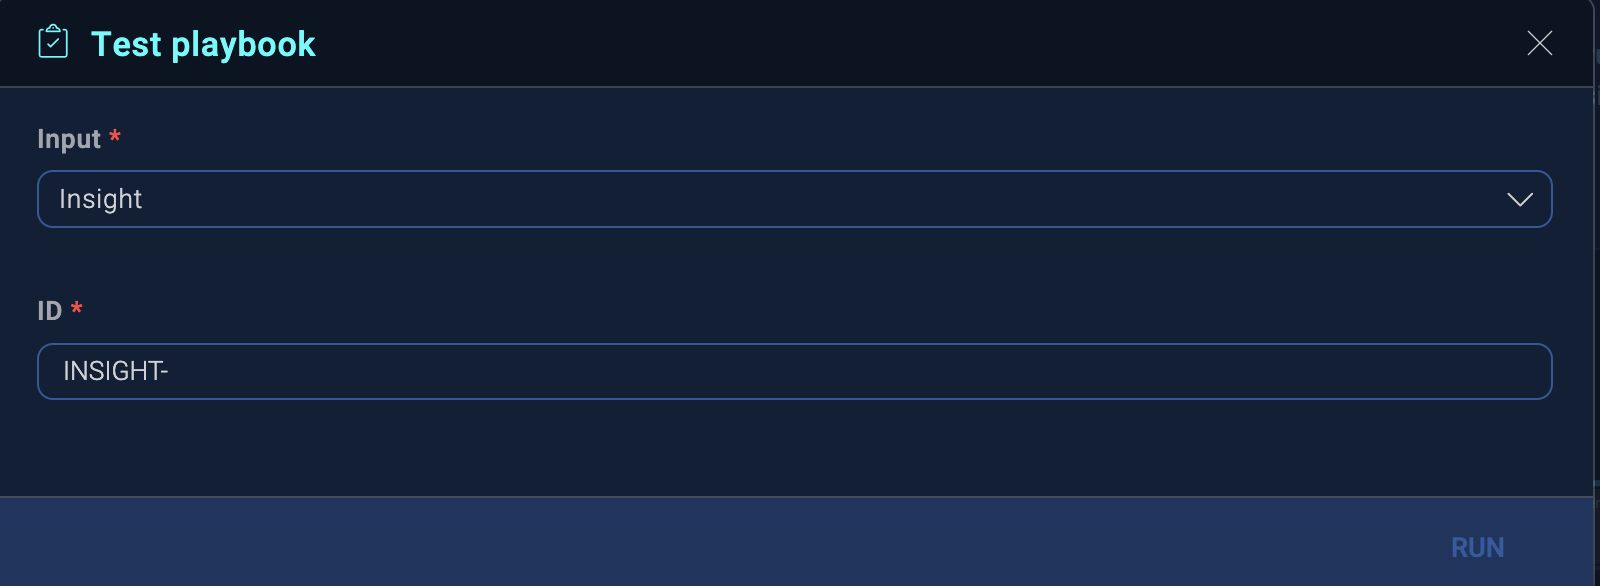
Test a playbook
You can test a playbook to verify that it works properly. The test results show the outcome as if the playbook actually ran.
- Select a playbook.
- Click the kebab button in the upper-right corner of the UI.
- Select Run Test.
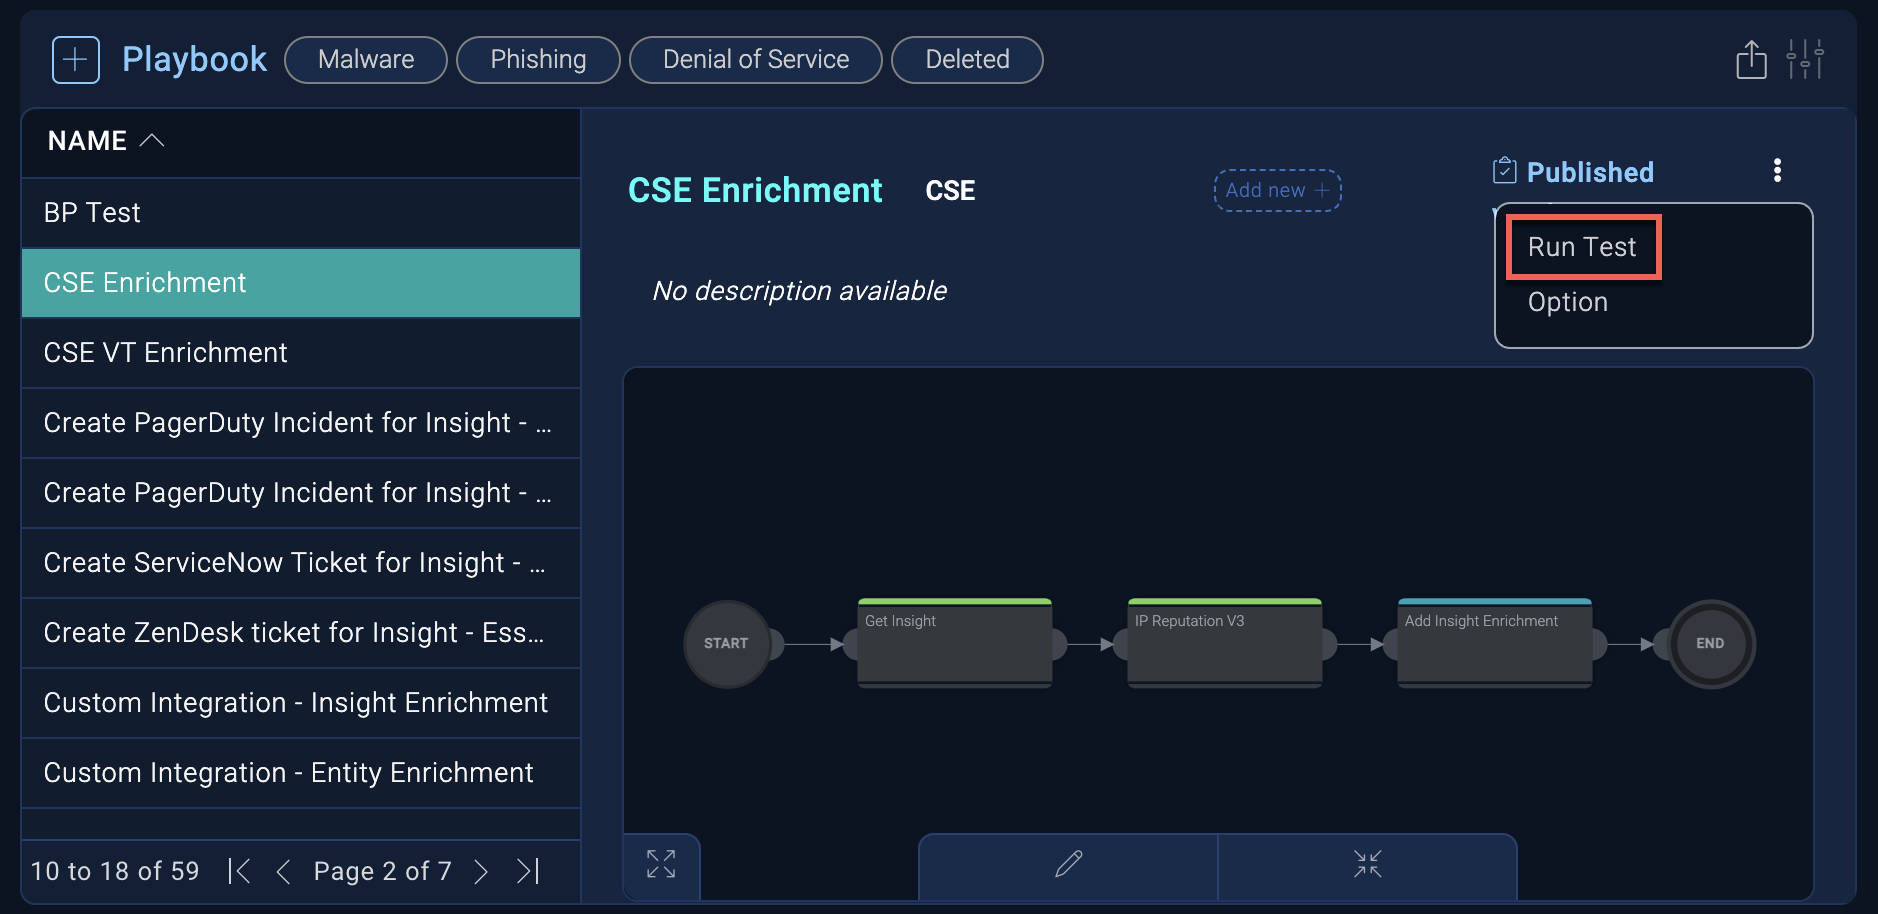
- In the Test playbook dialog, enter the requested information and click Run.
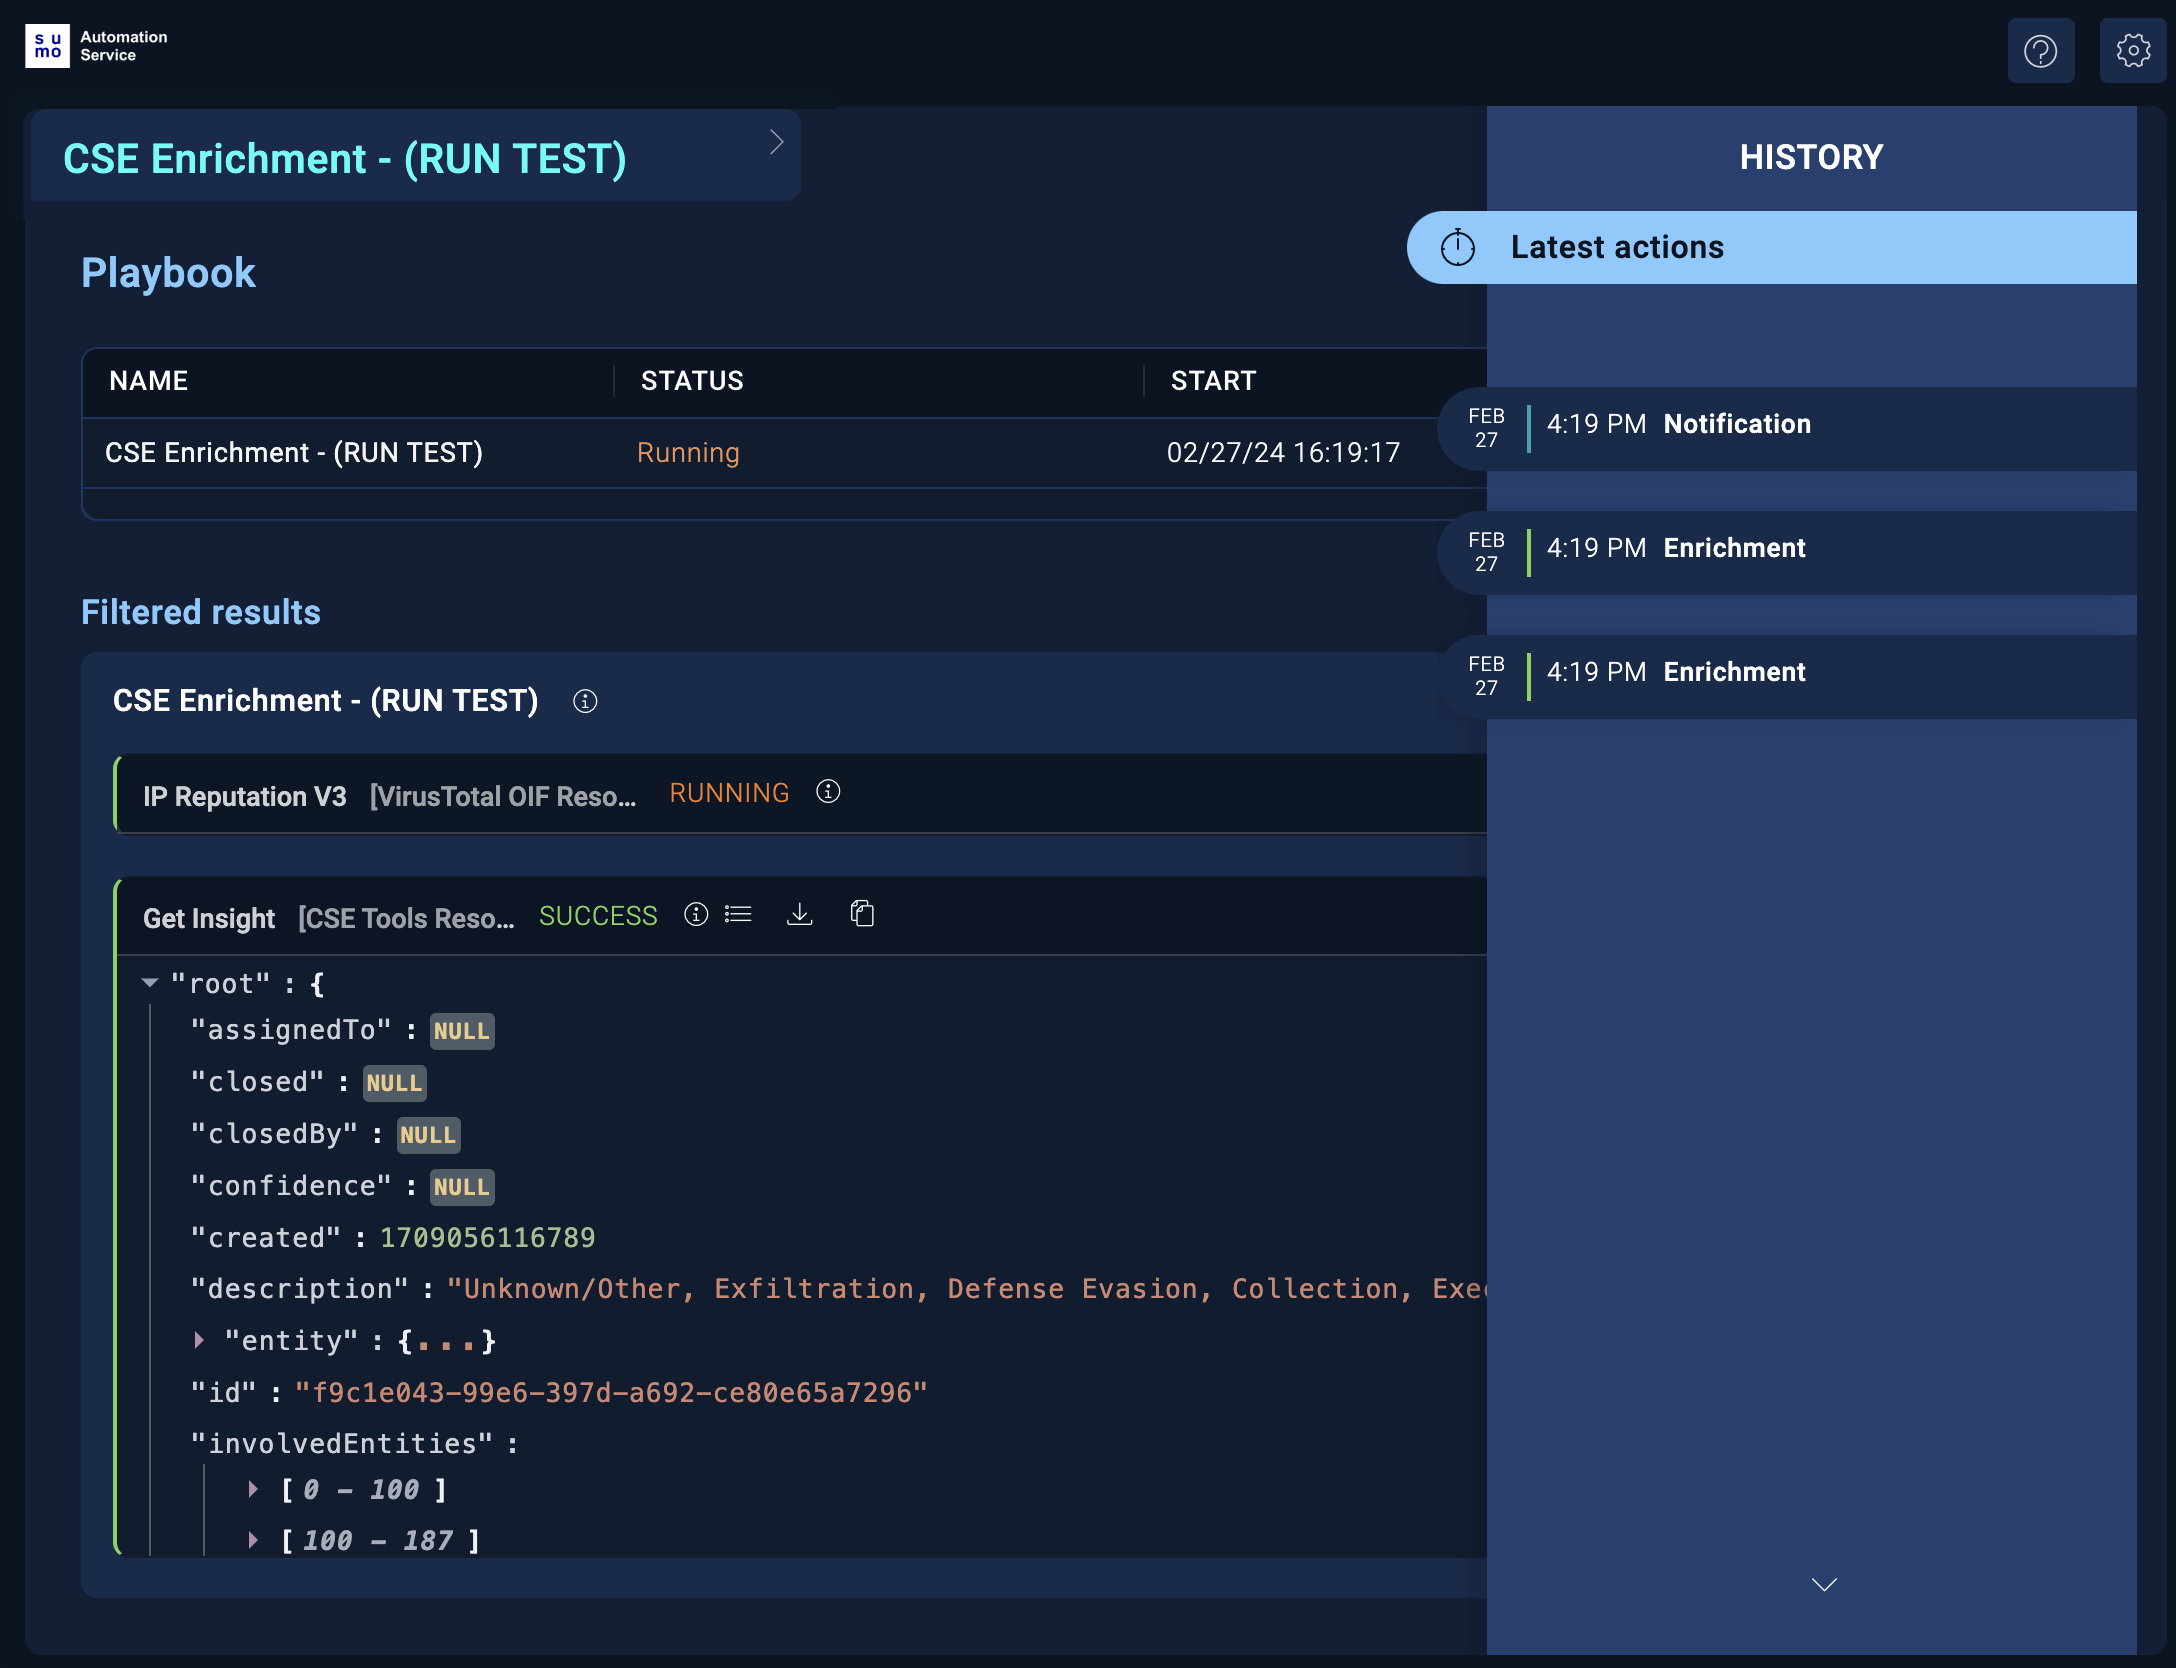
- The results of the test are displayed in a new window labeled with the playbook name and (RUN TEST).
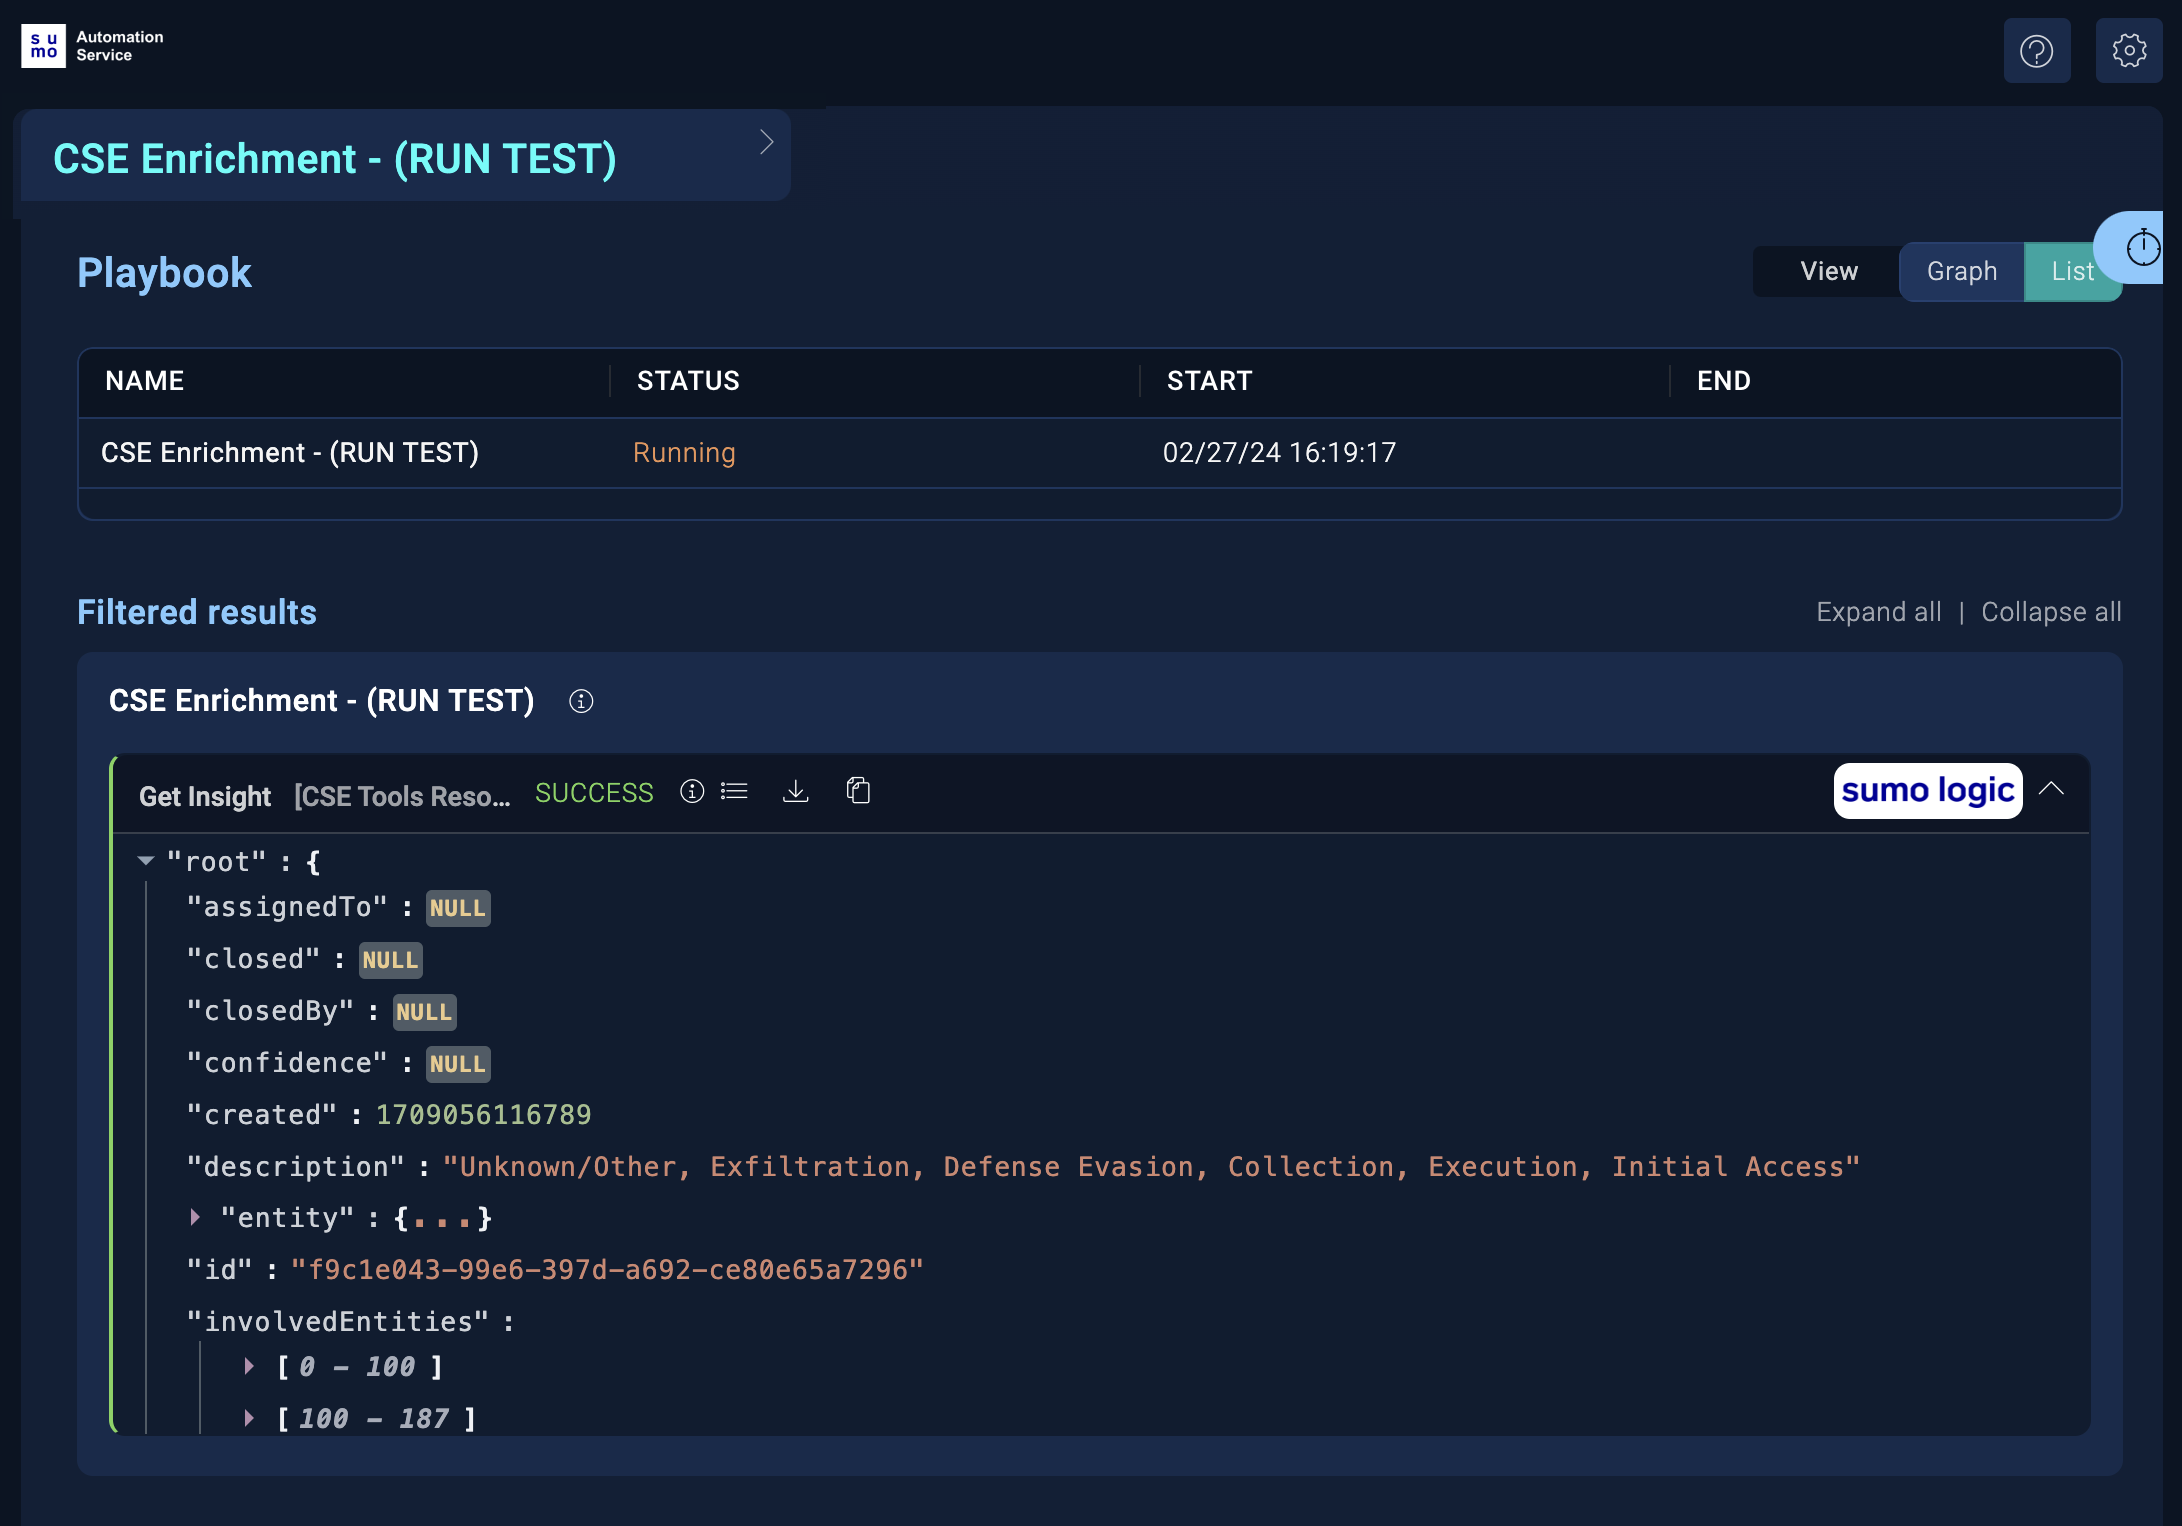
- Click the clock icon in the upper-right corner to see the testing history. Select Latest actions to see test results for all the actions on the playbook, or select items on the list to see results for individual actions.
Playbook payloads
When a playbook is run, a payload is passed from the initial object to the playbook (for example, from an alert, entity, or Insight). The variables in the payload can be assigned to parameters and used as inputs for different actions in the playbook.
You select the initial object to use for the payload when you create a playbook. In the Add one or more params as a playbook input field, you select the kind of trigger that will execute the playbook:
- Insight. An Insight from an automation in Cloud SIEM.
- Entity. An entity from an automation in Cloud SIEM.
- Alert. An alert from an automated playbook in a monitor.
- Parse from json. A payload from a parent playbook. You can also select this option if you want to pass a custom payload from an alert.
- Leave blank if the trigger will be a Cloud SOAR incident or triage.
If you are using nested playbook nodes, then you will need to configure the parameters of the Start Node in the child playbook to include the outputs of the parent playbook that are passed to the child playbook. It is not recommended to use parameter arrays (for example, signals[].id) as the Start Node parameters for the child playbook; you should use a standard parameter names instead (for example, signals.id).
Following are examples of payloads from different trigger types:
Alert payload
View an alert payload
- Access the alert list.
- Open an alert that uses a playbook.
- On the alert details page, click the Playbooks button to see automated playbooks attached to the alert.
- Click the playbook name. The playbook opens in the Automation Service.
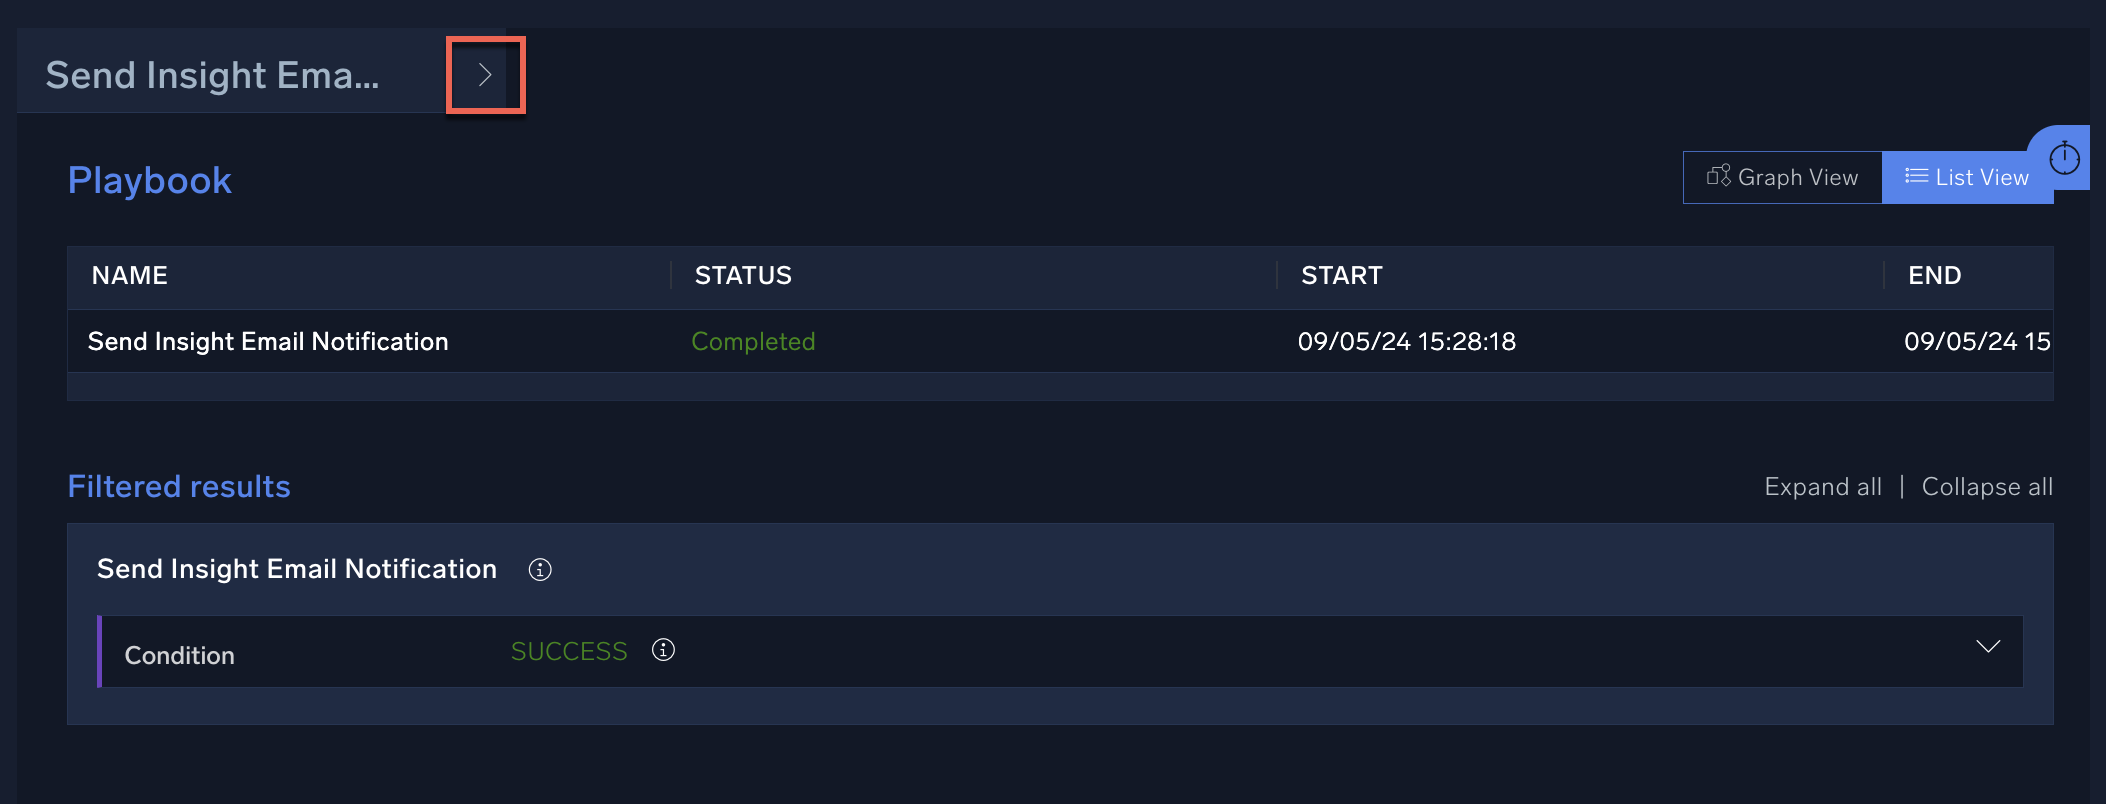
- To view the playbook's payload, click > to the right of the playbook name.
The alert payload appears.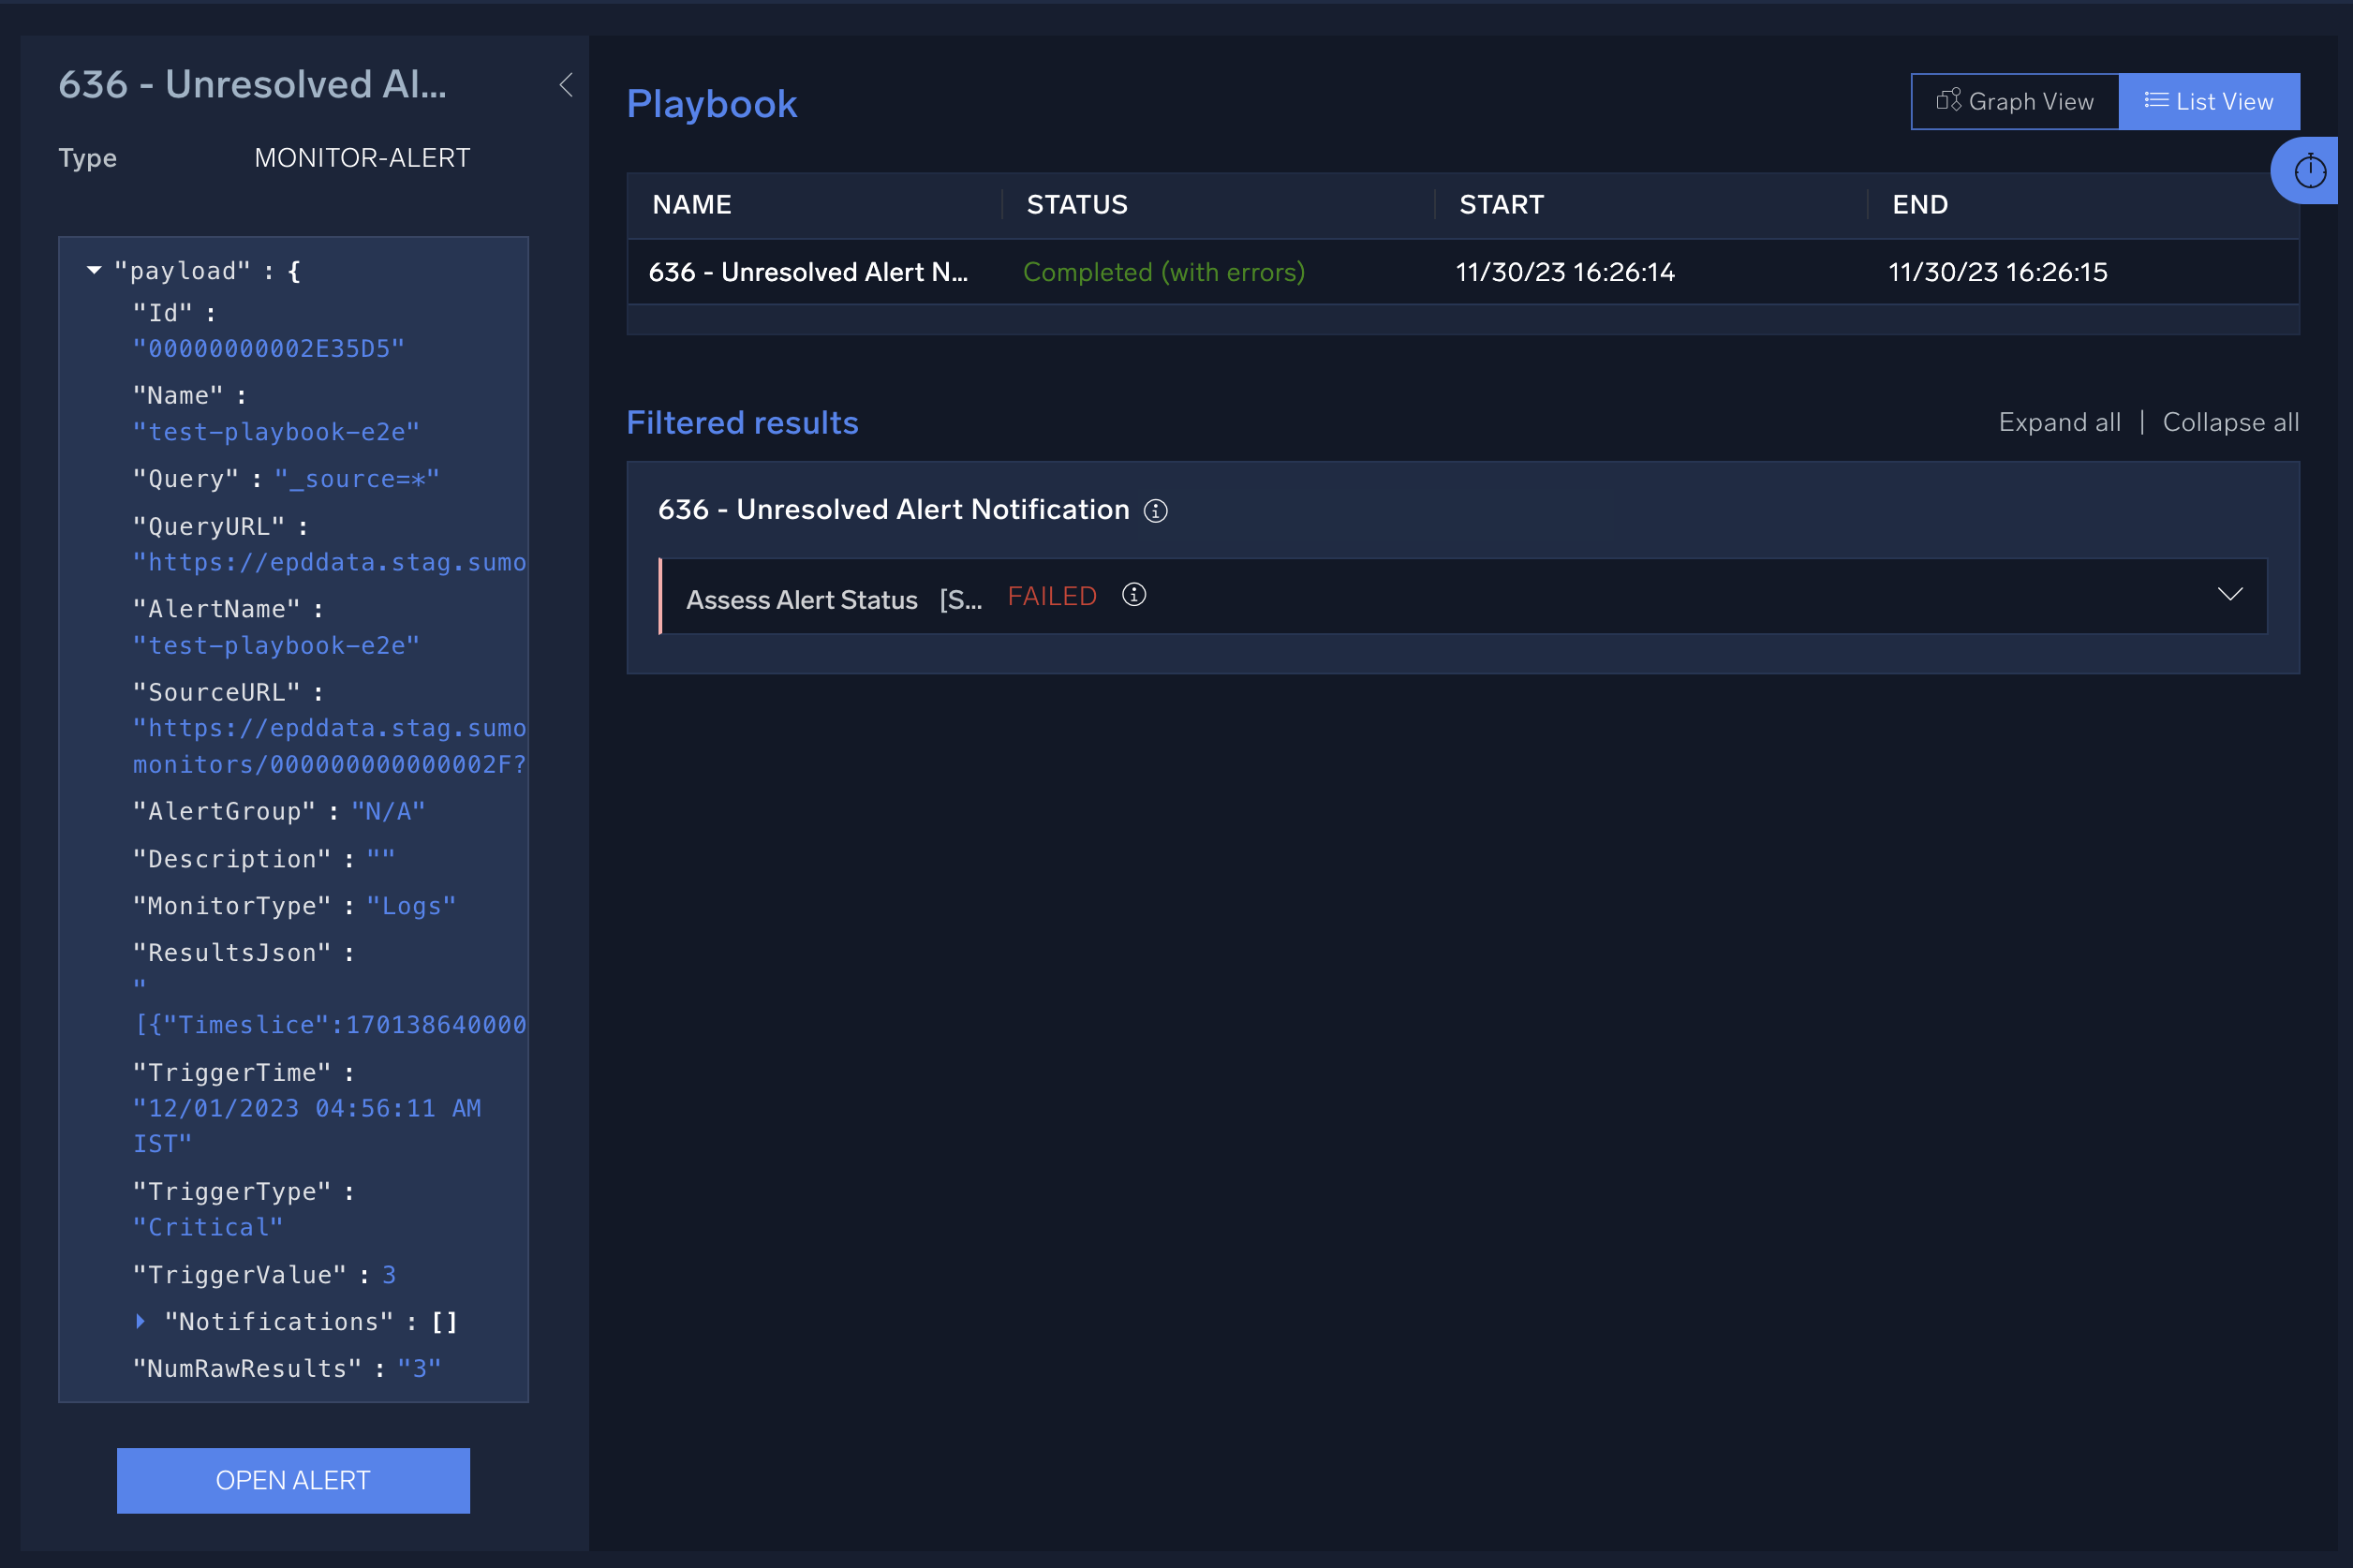
Alert payload variables
The following variables are passed in the payload from an alert to a playbook.
| Variable | Description |
|---|---|
Id | The unique identifier for alert that triggered the playbook. |
Name | The name of the monitor. |
Query | The query used in the monitor. |
QueryURL | The URL to the logs or metrics query within Sumo Logic. |
AlertName | The name of the alert. |
SourceURL | The URL to the configuration or status page of the monitor in Sumo Logic. |
AlertGroup | The alert grouping that triggered the alert, including associated values for that field. |
Description | The description of the monitor. |
MonitorType | The type of alert, either Logs or Metrics. |
ResultsJson | JSON object containing the query results that triggered the alert. |
TriggerTime | The date and time the query triggered the alert. |
TriggerType | The status of the alert or recovery. Alert will have a status of Normal, Critical, Warning, or Missing Data. Recovery will have a status of ResolvedCritical, ResolvedWarning, or ResolvedMissingData. |
TriggerValue | The value that triggered the alert. |
Notifications | The details for the notifications configured in the monitor. |
NumRawResults | Number of results returned by the search. |
DetectionMethod | The type of detection method used to detect alerts. Values are based on static or outlier triggers and data type, either logs or metrics. The value will be LogsStaticCondition, MetricsStaticCondition, LogsOutlierCondition, MetricsOutlierCondition, LogsMissingDataCondition, or MetricsMissingDataCondition. |
NumQueryResults | The number of results the query returned. |
SloDashboardURL | The URL to the SLO dashboard. |
TriggerQueryURL | The URL to the log search for the query that triggered the alert. |
AlertResponseURL | The URL to the alert page for the corresponding alert ID. |
TriggerCondition | The condition that triggered the alert. |
TriggerTimeRange | The time range of the query that triggered the alert. |
ResultsJsonParsed | The parsed fields from ResultsJson. |
AggregateResultsJson | JSON object containing the query results that triggered the alert, along with aggregate values such as message count. |
customPlaceholderMap | The parsed fields from ResultsJson and the aggregate values returned from the query. The fields specific to the query that triggered the alert can be referenced by using customPlaceholderMap. For example, if the result of the query includes a field named user_name, this can be referenced by calling customPlaceholderMap[].user_name. |
AggregateResultsJsonParsed | The parsed fields from AggregateResultsJson. |
Alert payload example
{
  "Id": "00000000016CCCDD",
  "Name": "Amazon Guard Duty Brute Force",
  "Query": "_sourceCategory=Labs/AWS/GuardDuty_V3 | parse \"{\\\"key\\\":\\\"Owner\\\",\\\"value\\\":\\\"*\\\"}\" as owner_key | json field=_raw \"service.action.networkConnectionAction.remotePortDetails.portName\"as port_name | json field=_raw \"service.action.networkConnectionAction.remotePortDetails.port\" as port | json field=_raw \"service.action.networkConnectionAction.remoteIpDetails.ipAddressV4\" as ip_address | json field=_raw \"accountId\", \"region\", \"partition\", \"id\", \"arn\", \"type\",\"service.serviceName\",\"service.detectorId\",\"service.action\",\"severity\",\"title\",\"description\", \"vpcId\", \"subnetId\", \"groupId\" , \"tags\", \"groupName\", \"resource.instanceDetails.instanceId\" as account_id, region, partition, id, arn, type, service_name, detector_id, action, severity, title, description, vpcId, subnetId , securityGroupId, tags, securityGroupName, instanceid nodrop  | where type matches \"*BruteForce*\" | count by instanceid, ip_address, port, port_name, owner_key",
  "QueryURL": "https://live.us2.sumologic.com/ui/index.html#/search/1IzrB2mrW6L7egF1GY3zwnqJW663xPamyh9oe1AcFBanRckiRpXQiuPU2hOngFWnHO9bOLhpZ1GnssHTKtQpcLPBAOBp8wwW9VerT83Fj77k6hXQqMl5lI3tqsPv5bMG",
  "AlertName": "Amazon GuardDuty Brute Force Finding",
  "SourceURL": "https://live.us2.sumologic.com/ui/#/alerts/unified-monitors/00000000000007A0?selectedRows=0000000000593B6D",
  "AlertGroup": "instanceid=i-F56tg45tty5gfgd45",
  "Description": "",
  "MonitorType": "Logs",
  "ResultsJson": "[{\"Count\":1,\"instanceid\":\"i-F56tg45tty5gfgd45\",\"ip_address\":\"78.24.180.93\",\"owner_key\":\"security@lxechip.com\",\"port\":\"22\",\"port_name\":\"SSH\"}]",
  "TriggerTime": "05/01/2024 02:08:46 PM CDT",
  "TriggerType": "Critical",
  "TriggerValue": 1,
  "Notifications": [
    {
      "notification": {
        "images": [],
        "subject": "Monitor Alert: {{TriggerType}} on {{AlertName}}",
        "actionId": -4194941809035894000,
        "jsonClass": "EmailAction",
        "ccRecipients": [],
        "templateName": "Default Unified Monitor Email With Alert Response Variables",
        "toRecipients": [
          "example@sumologic.com"
        ],
        "bccRecipients": [],
        "relatedContent": [],
        "emailBodyMessage": ""
      },
      "runForTriggerTypes": [
        "Critical"
      ]
    }
  ],
  "NumRawResults": "45",
  "DetectionMethod": "LogsStaticCondition",
  "NumQueryResults": "1",
  "SloDashboardURL": "",
  "TriggerQueryURL": "https://live.us2.sumologic.com/ui/index.html#/search/1IzrB2mrW6L7egF1GY3zwnqJW663xPamyh9oe1AcFBanRckiRpXQiuPU2hOngFWnHO9bOLhpZ1GnssHTKtQpcLPBAOBp8wwW9VerT83Fj77k6hXQqMl5lI3tqsPv5bMG",
  "AlertResponseURL": "https://live.us2.sumologic.com/ui/#/alert/00000000016CCCDD",
  "TriggerCondition": "ResultCount is Greater than 0.0 in the last 1440 minutes",
  "TriggerTimeRange": "04/30/2024 02:06:46 PM CDT to 05/01/2024 02:06:46 PM CDT",
  "ResultsJsonParsed": [
    {
      "port": "22",
      "Count": 1,
      "owner_key": "security@example.com",
      "port_name": "SSH",
      "instanceid": "i-F56tg45tty5gfgd45",
      "ip_address": "78.24.180.93"
    }
  ],
  "AggregateResultsJson": "[{\"Count\":1,\"instanceid\":\"i-F56tg45tty5gfgd45\",\"ip_address\":\"78.24.180.93\",\"owner_key\":\"security@lxechip.com\",\"port\":\"22\",\"port_name\":\"SSH\"}]",
  "customPlaceholderMap": [
    {
      "port": "22",
      "Count": "1",
      "_count": "1",
      "owner_key": "security@example.com",
      "port_name": "SSH",
      "instanceid": "i-F56tg45tty5gfgd45",
      "ip_address": "78.24.180.93"
    }
  ],
  "AggregateResultsJsonParsed": [
    {
      "port": "22",
      "Count": 1,
      "owner_key": "security@example.com",
      "port_name": "SSH",
      "instanceid": "i-F56tg45tty5gfgd45",
      "ip_address": "78.24.180.93"
    }
  ]
}
Entity payload
View an entity payload
- Open an entity that uses playbooks (that is, that has automations).
- Click the Automations button at the top of the entity details page to view the automations on the entity.
- Click View Playbook on an automation. The automation's playbook opens in the Automation Service.
- To view the playbook's payload, click > to the right of the playbook name.
The entity payload appears.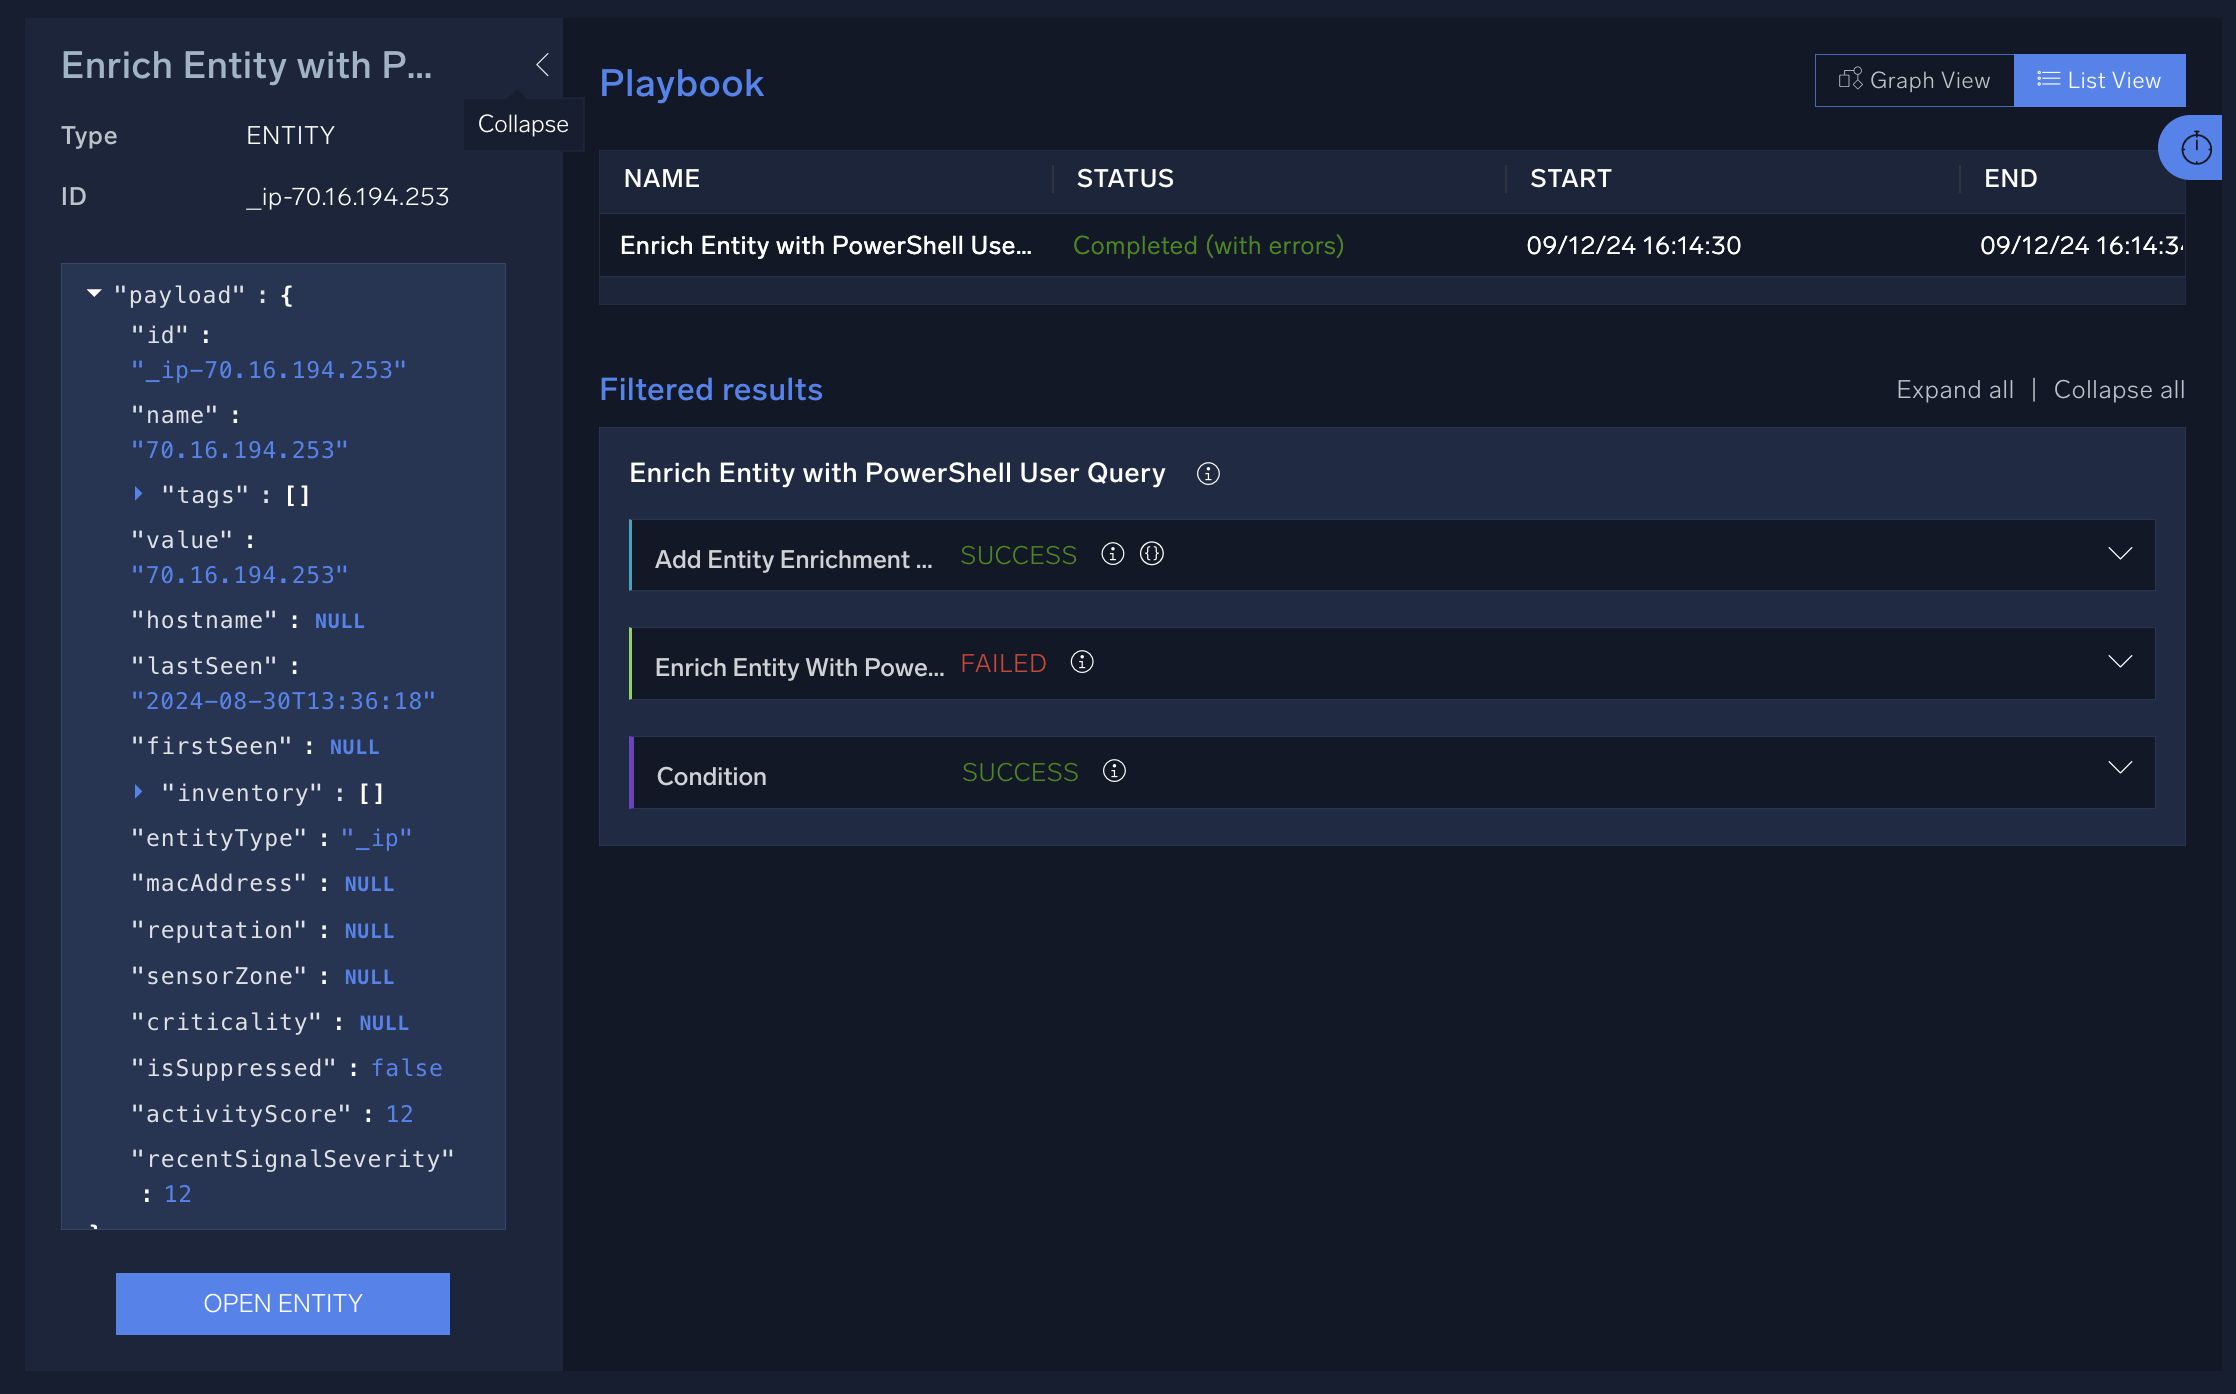
Entity payload variables
| Variable | Description |
|---|---|
Id | The unique ID of the entity whose information is provided in the payload. |
name | The entity’s name. |
tags | Tags attached to the entity. |
value | The value of the entity. |
hostname | The hostname of the entity (if the entity is an item that can have a hostname, such as a computer). |
lastSeen | When the entity was last seen in a record. |
firstSeen | When the entity was first seen in a record. |
inventory | The inventory source for the entity (if it originated in an inventory). |
entityType | The type of entity. |
macAddress | The medium access control (MAC) address assigned to the entity (if the entity is a piece of hardware). |
reputation | The reputation score for the entity. |
sensorZone | Sensor zone for the entity. |
criticality | The criticality of the entity. |
isSuppressed | Whether the entity is suppressed. |
activityScore | The entity’s activity score. |
recentSignalSeverity | The most recent severity of the signal that the entity appeared on. |
Entity payload example
{
  "id": "_ip-198.51.100.0",
  "name": "198.51.100.0",
  "tags": [],
  "value": "198.51.100.0",
  "hostname": null,
  "lastSeen": "2024-08-30T13:36:18",
  "firstSeen": null,
  "inventory": [],
  "entityType": "_ip",
  "macAddress": null,
  "reputation": null,
  "sensorZone": null,
  "criticality": null,
  "isSuppressed": false,
  "activityScore": 12,
  "recentSignalSeverity": 12
}
Insight payload
View an Insight payload
- Open an Insight that uses playbooks (that is, that has automations).
- Click the Automations button at the top of the Insight details page to view the automations on the Insight.
- Click View Playbook on an automation. The automation's playbook opens in the Automation Service.
- To view the playbook's payload, click > to the right of the playbook name.
The Insight payload appears.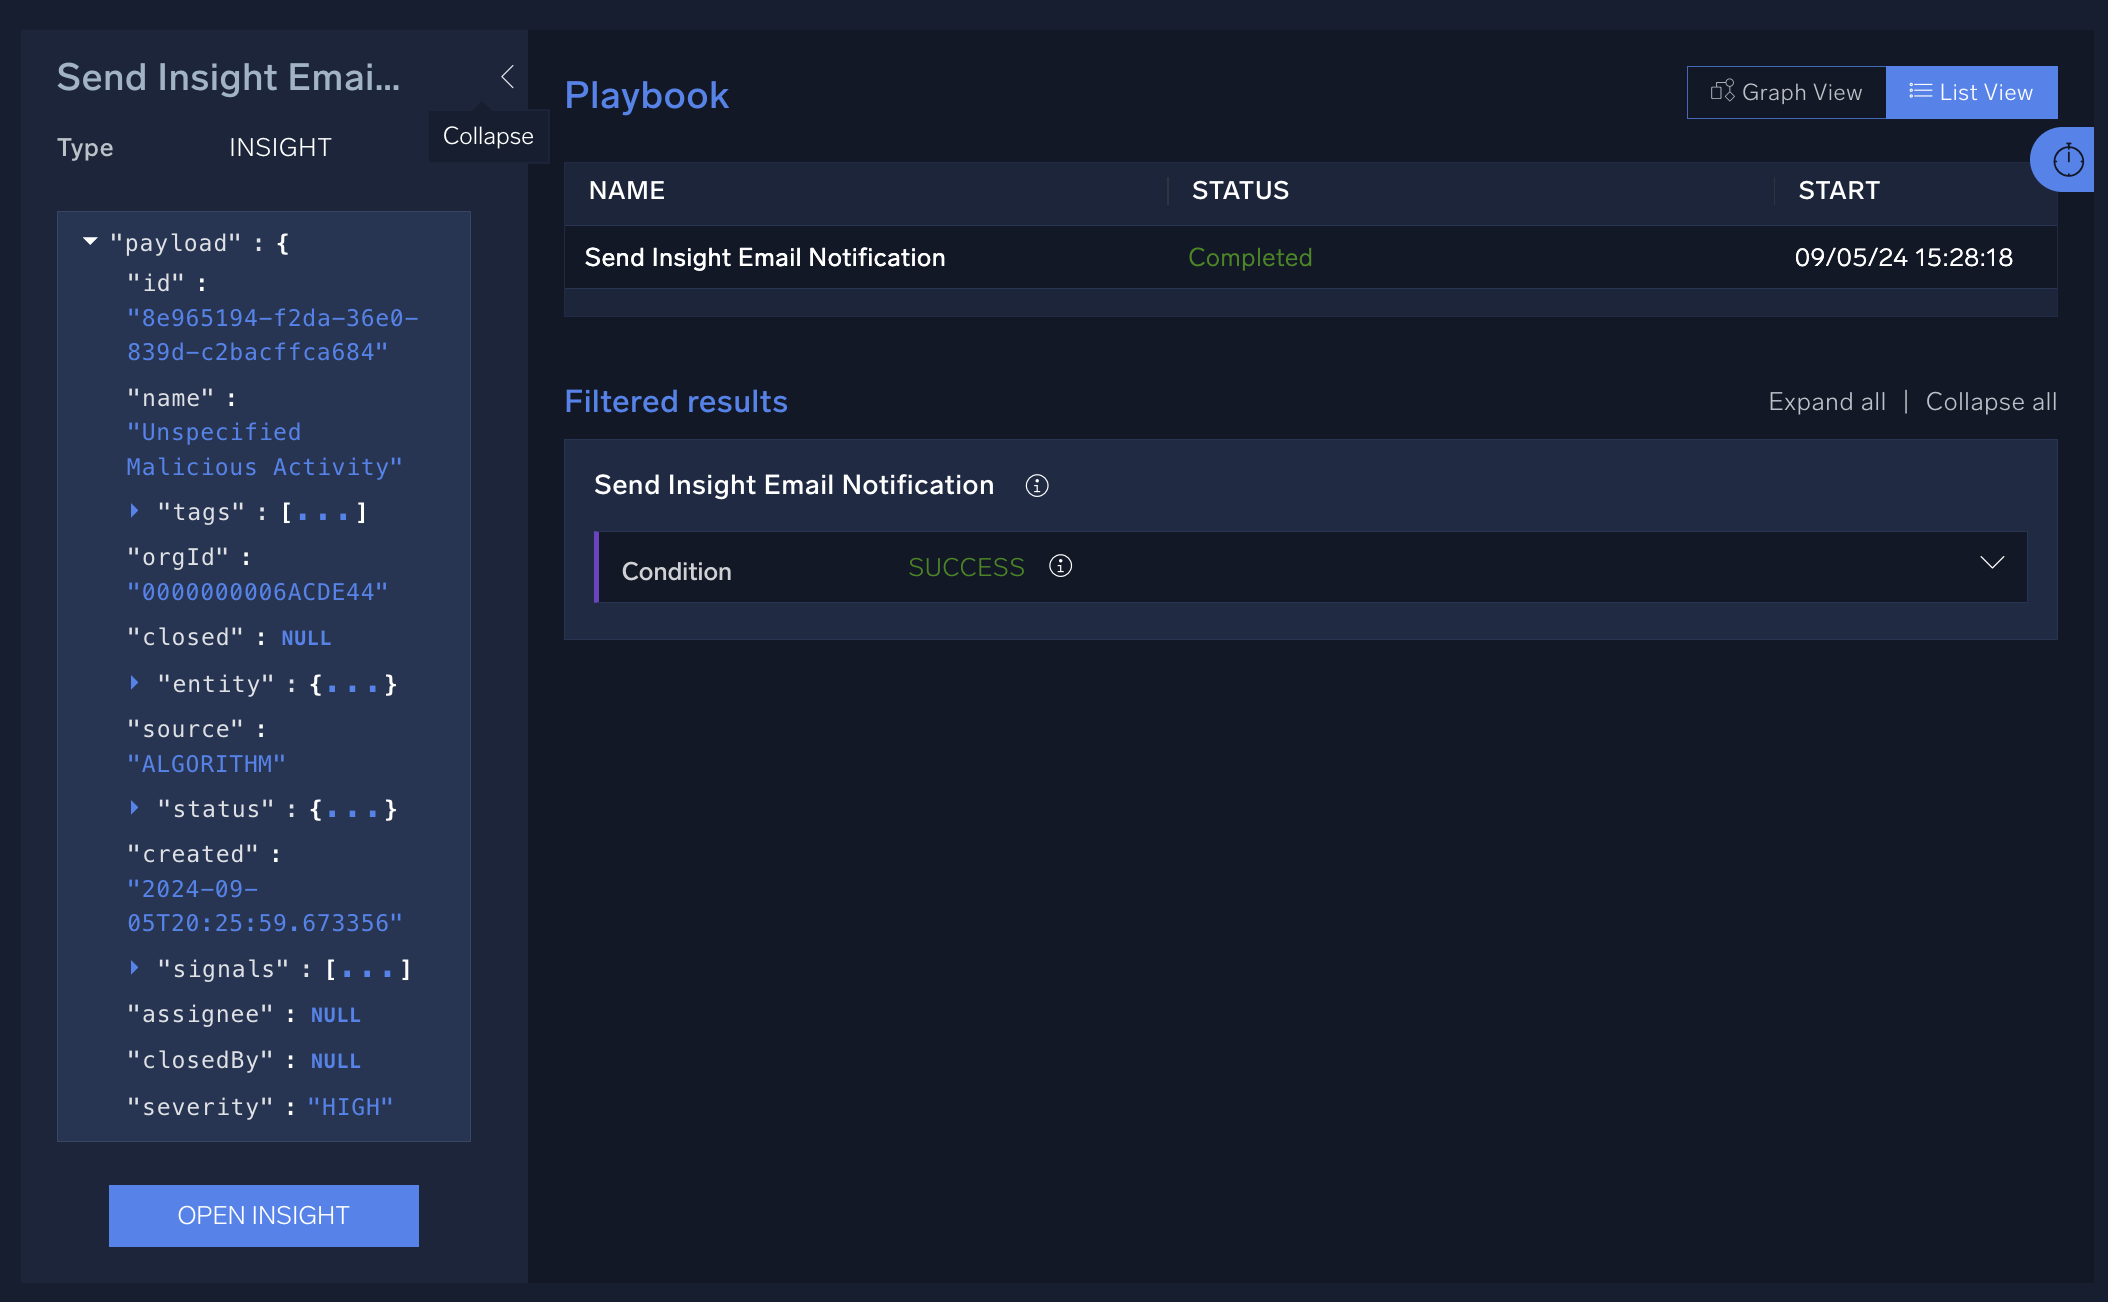
Insight payload variables
| Variable | Description |
|---|---|
id | The unique ID of the Insight whose information is provided in the payload. |
name | The name of the Insight. |
tags | Tags attached to the Insight. |
orgId | The ID of the Sumo Logic organization where the Insight originated. |
closed | Whether the Insight is closed. |
entity | The entity the Insight fired on. |
source | The source of the Insight data. |
status | The current status of the Insight. |
created | When the Insight was created. |
signals | The Signals in the Insight. |
assignee | The analyst assigned to the incident. |
closedBy | The analyst who closed the Insight (if it’s status is closed). |
severity | The severity of the Insight. |
timestamp | The timestamp when the Insight fired. |
assignedTo | The analyst assigned to the incident. |
confidence | If sufficient data is available, a Global Confidence score for the Insight is shown. |
readableId | The human-readable ID of the Insight. |
resolution | The resolution of the Insight (if the Insight is resolved). |
description | A description of the Insight. |
lastUpdated | When the Insight was last updated. |
lastUpdatedBy | The analyst who last updated the Insight. |
subResolution | The sub-resolution of the Insight (if the Insight is resolved and if a sub-resolution is applied). |
teamAssignedto | The team the Insight is assigned to. |
timeToResponse | The time it took to respond to the Insight. |
timeToDetection | The time it took to detect the Insight. |
involvedEntities | The entities involved in the Insight. |
timeToRemediation | The time it took to resolve the Insight. |
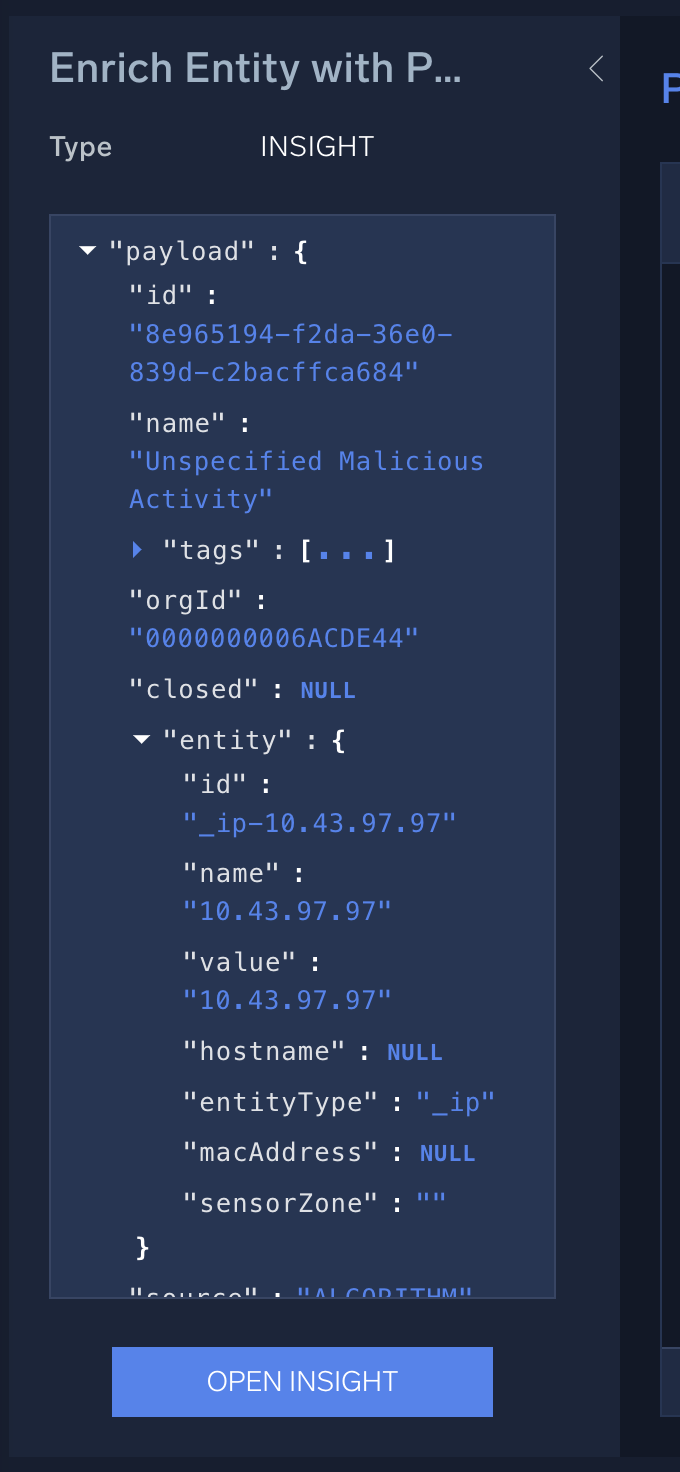
Insight payload example
{
  "id": "8e965194-f2da-36e0-839d-c2bacffca684",
  "name": "Unspecified Malicious Activity",
  "tags": [
    "custom-tag",
    "dataComponent:File",
    "foo",
    "MITRE_Expansion_C2",
    "testtag"
  ],
  "orgId": "0000000006ACDE44",
  "closed": null,
  "entity": {
    "id": "_ip-192.0.2.0",
    "name": "192.0.2.0",
    "value": "192.0.2.0",
    "hostname": null,
    "entityType": "_ip",
    "macAddress": null,
    "sensorZone": ""
  },
  "source": "ALGORITHM",
  "status": {
    "name": "new",
    "displayName": "New"
  },
  "created": "2024-09-05T20:25:59.673356",
  "signals": [
    {
      "id": "d02c5f27-5925-54a0-b0dd-0fee9ee2de2d",
      "name": "CrowdStrike Aggregation Rule test signal",
      "tags": [],
      "stage": "Unknown/Other",
      "entity": {
        "id": "_ip-192.0.2.0",
        "name": "192.0.2.0",
        "value": "192.0.2.0",
        "hostname": null,
        "entityType": "_ip",
        "macAddress": null,
        "sensorZone": ""
      },
      "ruleId": "AGGREGATION-U07128",
      "created": "2024-09-05T20:20:51.904000",
      "severity": 4,
      "artifacts": [],
      "timestamp": "2024-09-05T20:20:51.904000",
      "contentType": "RULE",
      "description": "test description",
      "recordCount": 1,
      "recordTypes": [],
      "recordSearchDetails": {
        "query": "_index=sec_record_* | where (if (isNull(metadata_vendor), true, metadata_vendor != \"CrowdStrike\") and if (isNull(objectType), true, objectType != \"email\") and if (isNull(srcDevice_ip), false, srcDevice_ip == \"192.0.2.0\"))",
        "queryEndTime": "2024-09-05T20:24:00",
        "queryStartTime": "2024-09-05T19:24:00"
      }
    },
    {
      "id": "34b173fe-792b-55b0-8723-808ded9547ce",
      "name": "Exclude CrowdStrike and Email Chain Rule",
      "tags": [
        "custom-tag",
        "foo",
        "testtag"
      ],
      "stage": "Unknown/Other",
      "entity": {
        "id": "_ip-192.0.2.0",
        "name": "192.0.2.0",
        "value": "192.0.2.0",
        "hostname": null,
        "entityType": "_ip",
        "macAddress": null,
        "sensorZone": ""
      },
      "ruleId": "CHAIN-U07162",
      "created": "2024-09-05T20:20:51.904000",
      "severity": 4,
      "artifacts": [],
      "timestamp": "2024-09-05T20:20:51.904000",
      "contentType": "RULE",
      "description": "chain rule test description",
      "recordCount": 1,
      "recordTypes": [],
      "recordSearchDetails": {
        "query": "_index=sec_record_* | where ((if (isNull(metadata_vendor), true, metadata_vendor != \"CrowdStrike\") or if (isNull(objectType), true, objectType != \"email\")) and if (isNull(srcDevice_ip), false, srcDevice_ip == \"192.0.2.0\"))",
        "queryEndTime": "2024-09-05T20:24:00",
        "queryStartTime": "2024-09-05T19:24:00"
      }
    },
    {
      "id": "f7ee1ba7-fb69-51e3-8cbe-a7673e237dfe",
      "name": "CrowdStrike First Seen Rule test signal",
      "tags": [
        "testtag",
        "foo",
        "custom-tag"
      ],
      "stage": "Unknown/Other",
      "entity": {
        "id": "_ip-192.0.2.0",
        "name": "192.0.2.0",
        "value": "192.0.2.0",
        "hostname": null,
        "entityType": "_ip",
        "macAddress": null,
        "sensorZone": ""
      },
      "ruleId": "FIRST-U00161",
      "created": "2024-09-05T20:20:51.904000",
      "severity": 4,
      "artifacts": [],
      "timestamp": "2024-09-05T20:20:51.904000",
      "contentType": "ANOMALY",
      "description": "test description",
      "recordCount": 1,
      "recordTypes": [],
      "recordSearchDetails": null
    },
    {
      "id": "5f0db81c-c11a-5b13-b2e0-8a25de6ba376",
      "name": "Exclude CrowdStrike and Email Threshold Rule test",
      "tags": [
        "MITRE_Expansion_C2",
        "testtag",
        "dataComponent:File"
      ],
      "stage": "Unknown/Other",
      "entity": {
        "id": "_ip-192.0.2.0",
        "name": "192.0.2.0",
        "value": "192.0.2.0",
        "hostname": null,
        "entityType": "_ip",
        "macAddress": null,
        "sensorZone": ""
      },
      "ruleId": "THRESHOLD-U07169",
      "created": "2024-09-05T20:25:51.043000",
      "severity": 4,
      "artifacts": [],
      "timestamp": "2024-09-05T20:25:51.043000",
      "contentType": "RULE",
      "description": "Test Threshold rule",
      "recordCount": 1,
      "recordTypes": [],
      "recordSearchDetails": {
        "query": "_index=sec_record_* | where (if (isNull(metadata_vendor), true, metadata_vendor != \"CrowdStrike\") and if (isNull(objectType), true, objectType != \"email\") and if (isNull(srcDevice_ip), false, srcDevice_ip == \"192.0.2.0\"))",
        "queryEndTime": "2024-09-05T21:36:00",
        "queryStartTime": "2024-09-05T09:36:00"
      }
    }
  ],
  "assignee": null,
  "closedBy": null,
  "severity": "HIGH",
  "timestamp": "2024-09-05T20:25:51.043000",
  "assignedTo": null,
  "confidence": null,
  "readableId": "INSIGHT-637",
  "resolution": null,
  "description": "Unknown/Other",
  "lastUpdated": "2024-09-05T20:25:59.673351",
  "lastUpdatedBy": null,
  "subResolution": null,
  "teamAssignedTo": null,
  "timeToResponse": null,
  "timeToDetection": 307.769356,
  "involvedEntities": [
    {
      "id": "_ip-192.0.2.0",
      "name": "192.0.2.0",
      "value": "192.0.2.0",
      "hostname": null,
      "entityType": "_ip",
      "macAddress": null,
      "sensorZone": null
    },
    {
      "id": "_username-pete@tclab.us",
      "name": "pete@tclab.us",
      "value": "pete@tclab.us",
      "hostname": null,
      "entityType": "_username",
      "macAddress": null,
      "sensorZone": null
    },
    {
      "id": "_username-key--d2b90316--a1d3--492d--beb5--308184ab4973 (Sumo Logic API client (read only))",
      "name": "key-d2b90316-a1d3-492d-beb5-308184ab4973 (Sumo Logic API client (read only))",
      "value": "key-d2b90316-a1d3-492d-beb5-308184ab4973 (Sumo Logic API client (read only))",
      "hostname": null,
      "entityType": "_username",
      "macAddress": null,
      "sensorZone": null
    }
  ],
  "timeToRemediation": null
}
Handling arrays in playbooks
An array is a collection of related data values grouped together. When you are handling output from a playbook action, you may want to treat the entire array as a single item you want to pass to the next action, or you may want to treat each element in the array as a separate item. In playbooks, you can do either.
Arrays in text areas
When you create an action, sometimes you are presented with a text area that includes an "Insert placeholder" icon ![]() . When you click the icon, it allows you to add placeholders to the text area for input or output.
. When you click the icon, it allows you to add placeholders to the text area for input or output.
Perform the following steps to add a placeholder to a text area to handle an array in output from a previous action. This allows you to process an array as a single element or multiple elements.
- Create a playbook and add action nodes.
- Edit an action node that displays a text area.
- In the following example, the Send Email action shows text areas for the email's subject, body, and HTML. Click an "Insert placeholder" icon
 for one of the fields, for example, HTML Content.
- Select a value from a previous action. In this example, we'll choose Get Insight.
- Select Outputs. Only the arrays in the output show these icons:

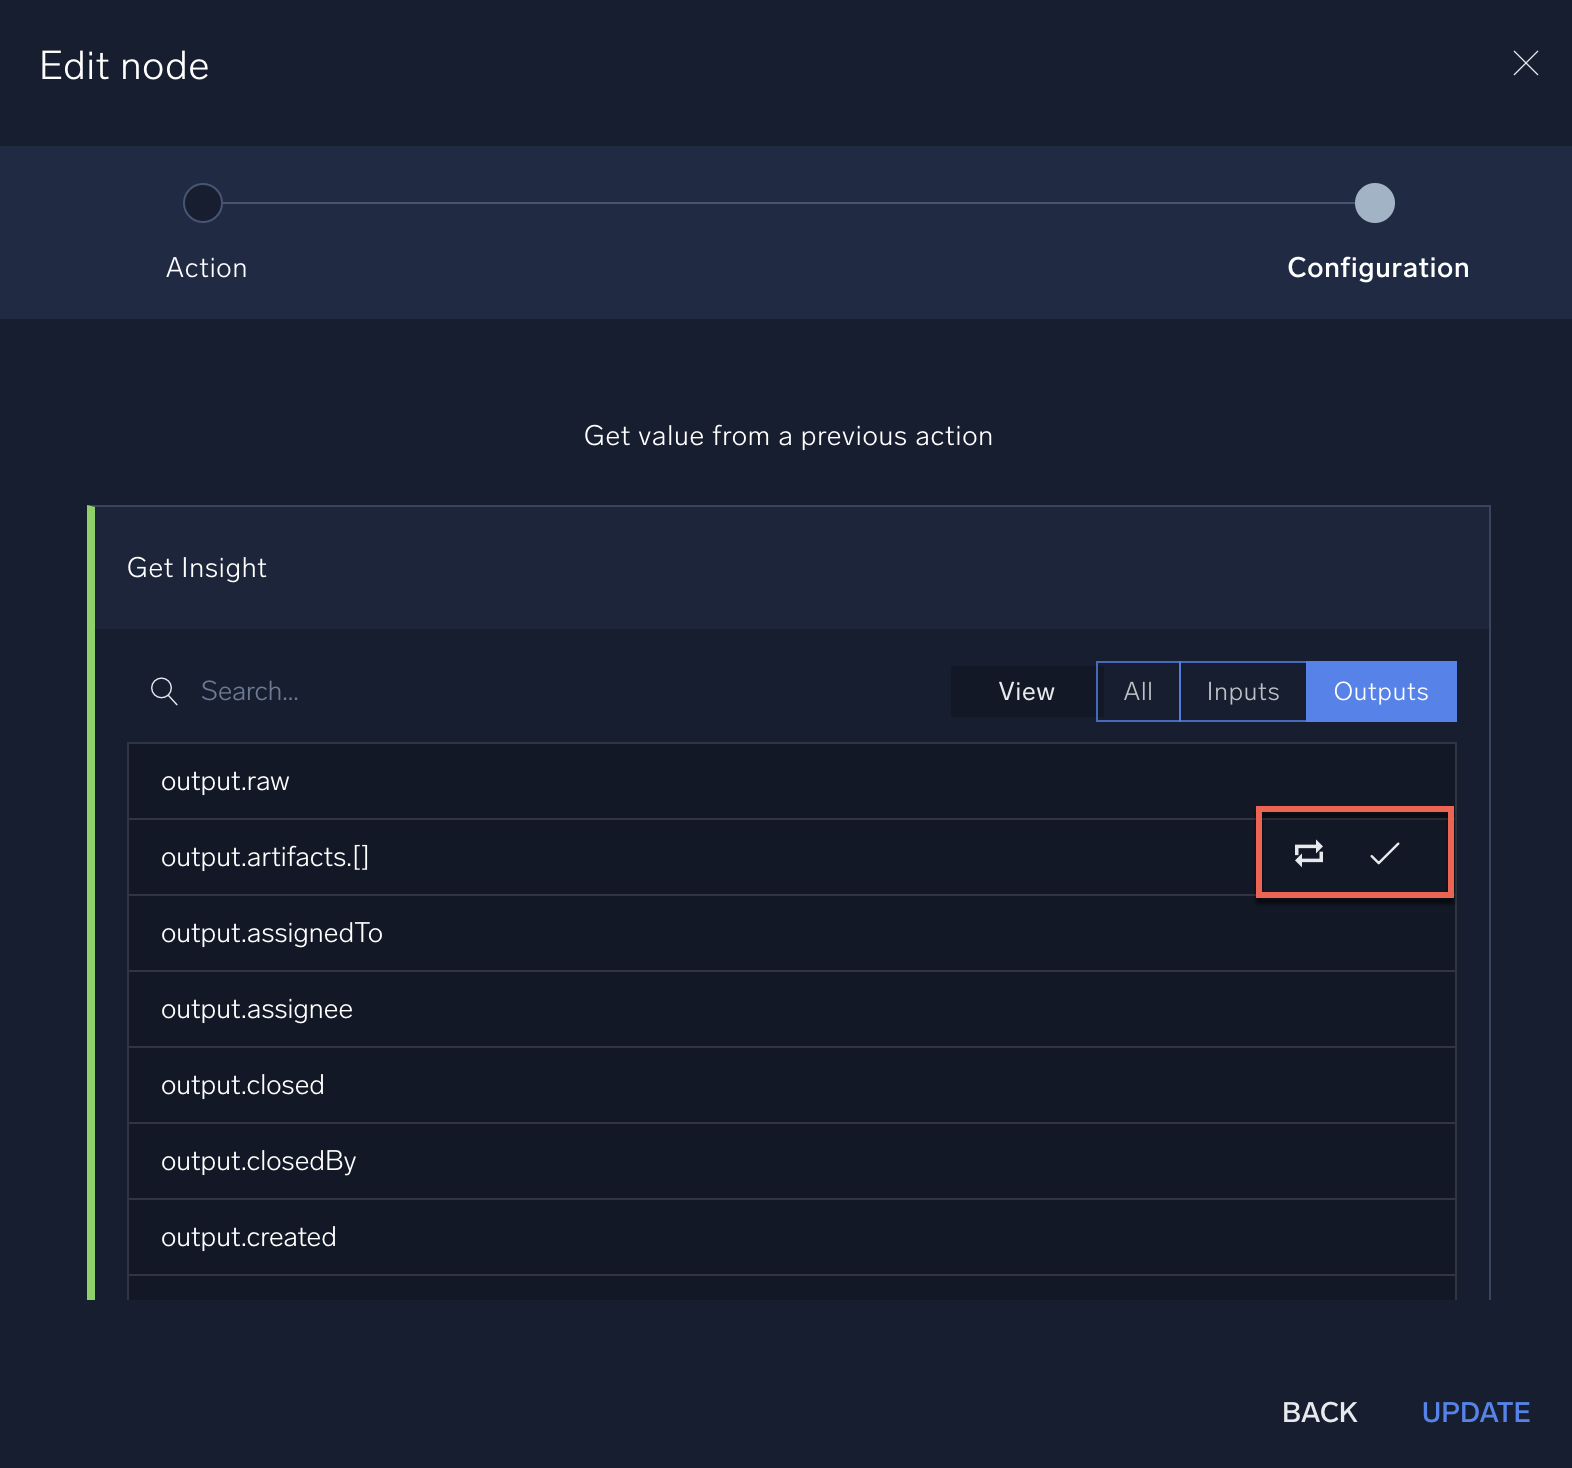
- Click the icon for how you want the array to be handled by the action:
 Loop. Loops through the array so that the action is run for each item in the array.
 Combine. Combines all items in the array into a single value run by the action.
- The variable is inserted into the text area preceded by the icon for whether the contents of the array are looped or combined.

In this example, the action will be run for each item in the array ("looped").
The Cartesian Product checkbox is disabled if any variable is selected using the loop feature in the text area.

Cartesian product
The Cartesian product checkbox appears on nodes you add to playbooks. Clicking this checkbox causes the node to use the Cartesian product method to loop through items in arrays processed by the node.

For example, suppose one input field is for signal name, and another is for signal value. If you have 2 arrays like this, and each array has 3 items, the Cartesian product evaluation pairs each item from the first set with each item from the second set, which will produce 9 pairs (3x3). Without Cartesian product evaluation, only matching position items are paired, which will produce 3 pairs (equal to the number of items).
Use the Cartesian product checkbox with caution. For most cases, deselect the Cartesian product checkbox when creating playbooks. Large array fields in the input can result in the action being called many times, causing the action to exceed the actions limit. Only select this checkbox if you want to evaluate data from array input fields using the Cartesian product method.
"Split by" field in a filter node
When you add a filter node, use the Split by field to evaluate each item separately in arrays (lists).
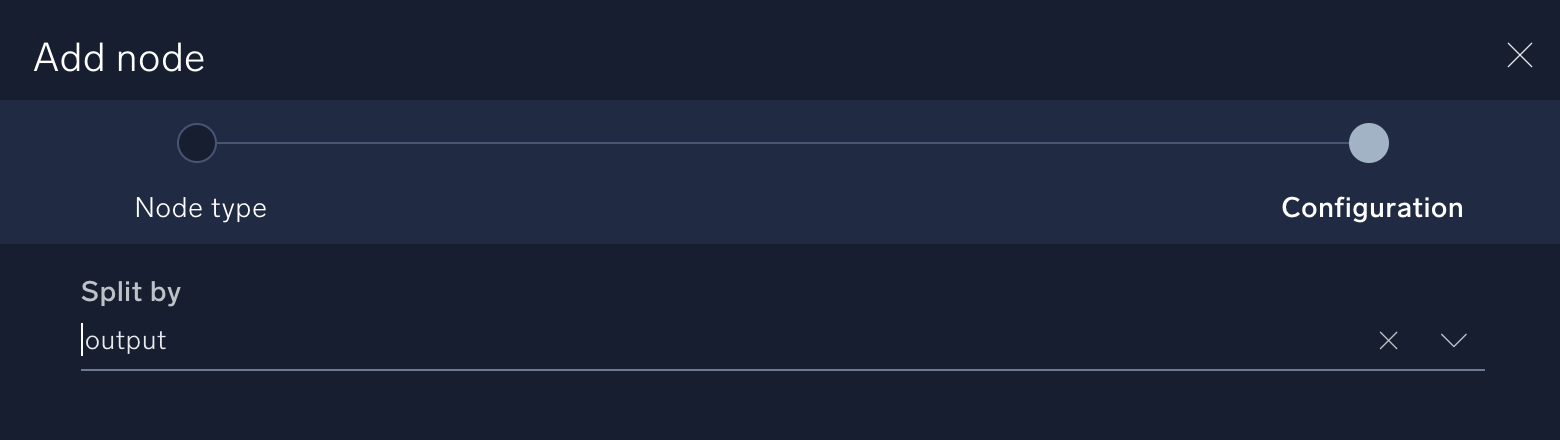
Each item in arrays is checked against the filter condition. If the condition is true for an item, the item is passed to the next node. If you do not use the Split by field on an output that is a list, then if the condition is true for any item in the list, the entire list moves forward to the next node.
Troubleshoot playbooks
You can run playbooks in automations for monitors, Cloud SIEM, or Cloud SOAR. If a playbook has a problem when it runs in an automation, an error message often displays in the playbook providing information about the problem.
To test a playbook before using it in an automation, see Test a playbook.
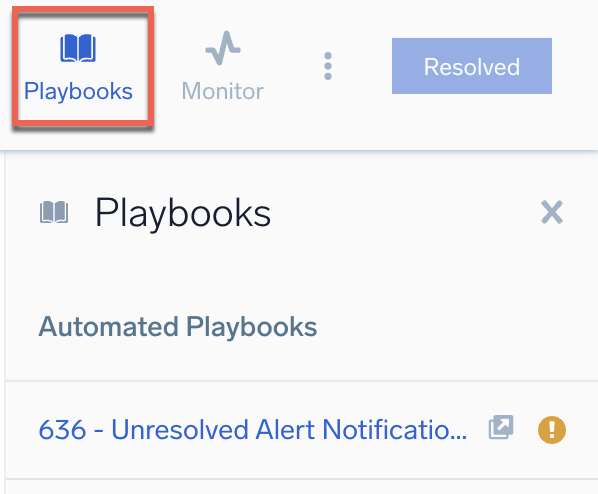
Open playbooks that require investigation
Open a playbook from an alert
- Access the alert list.
- Open an alert that uses a playbook.
- On the alert details page, click the Playbooks button to see automated playbooks attached to the alert.
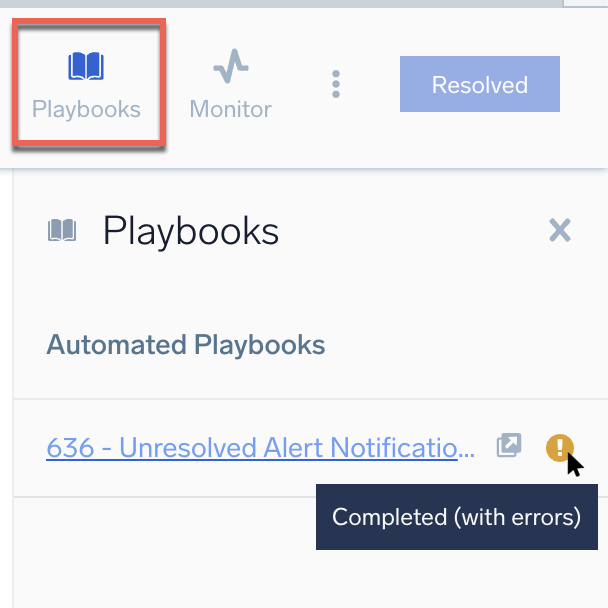
- Hover your mouse over the icon to the right of the playbook to see its status. In the example above, the playbook completed with errors.
- To investigate the problem, click the playbook name. The playbook opens in the Automation Service and any issues display in the results section.
Proceed to Investigate playbook problems below to look into playbook problems.
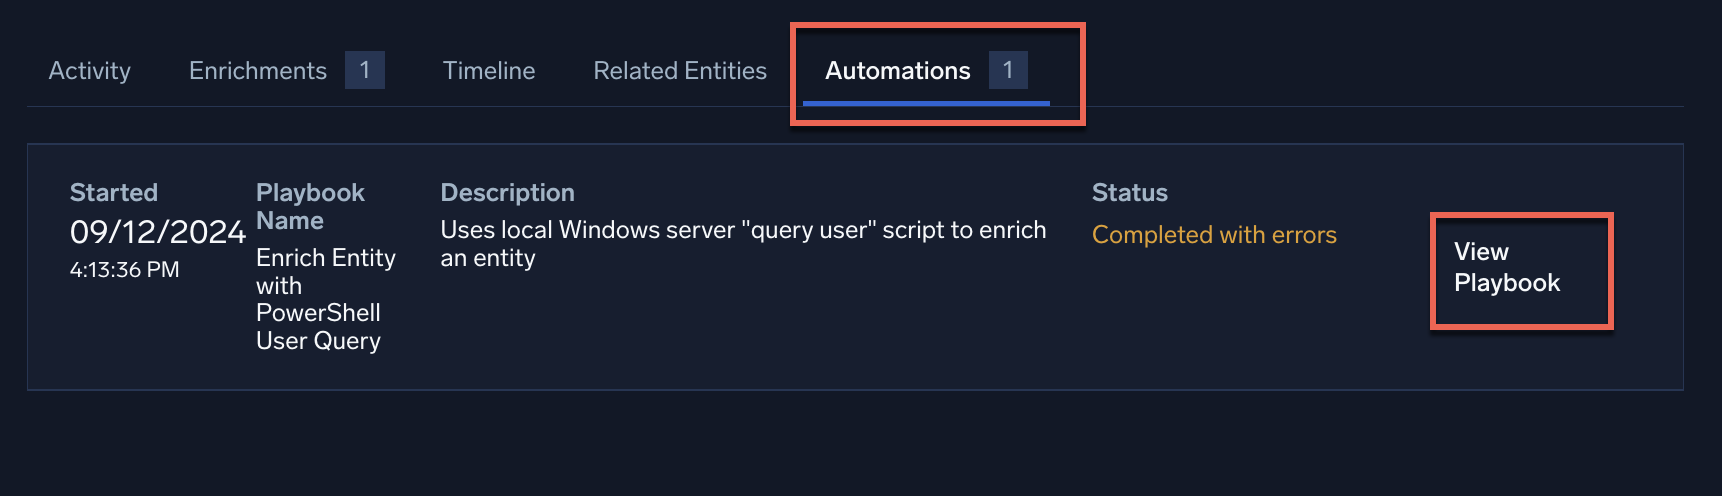
Open a playbook from Cloud SIEM
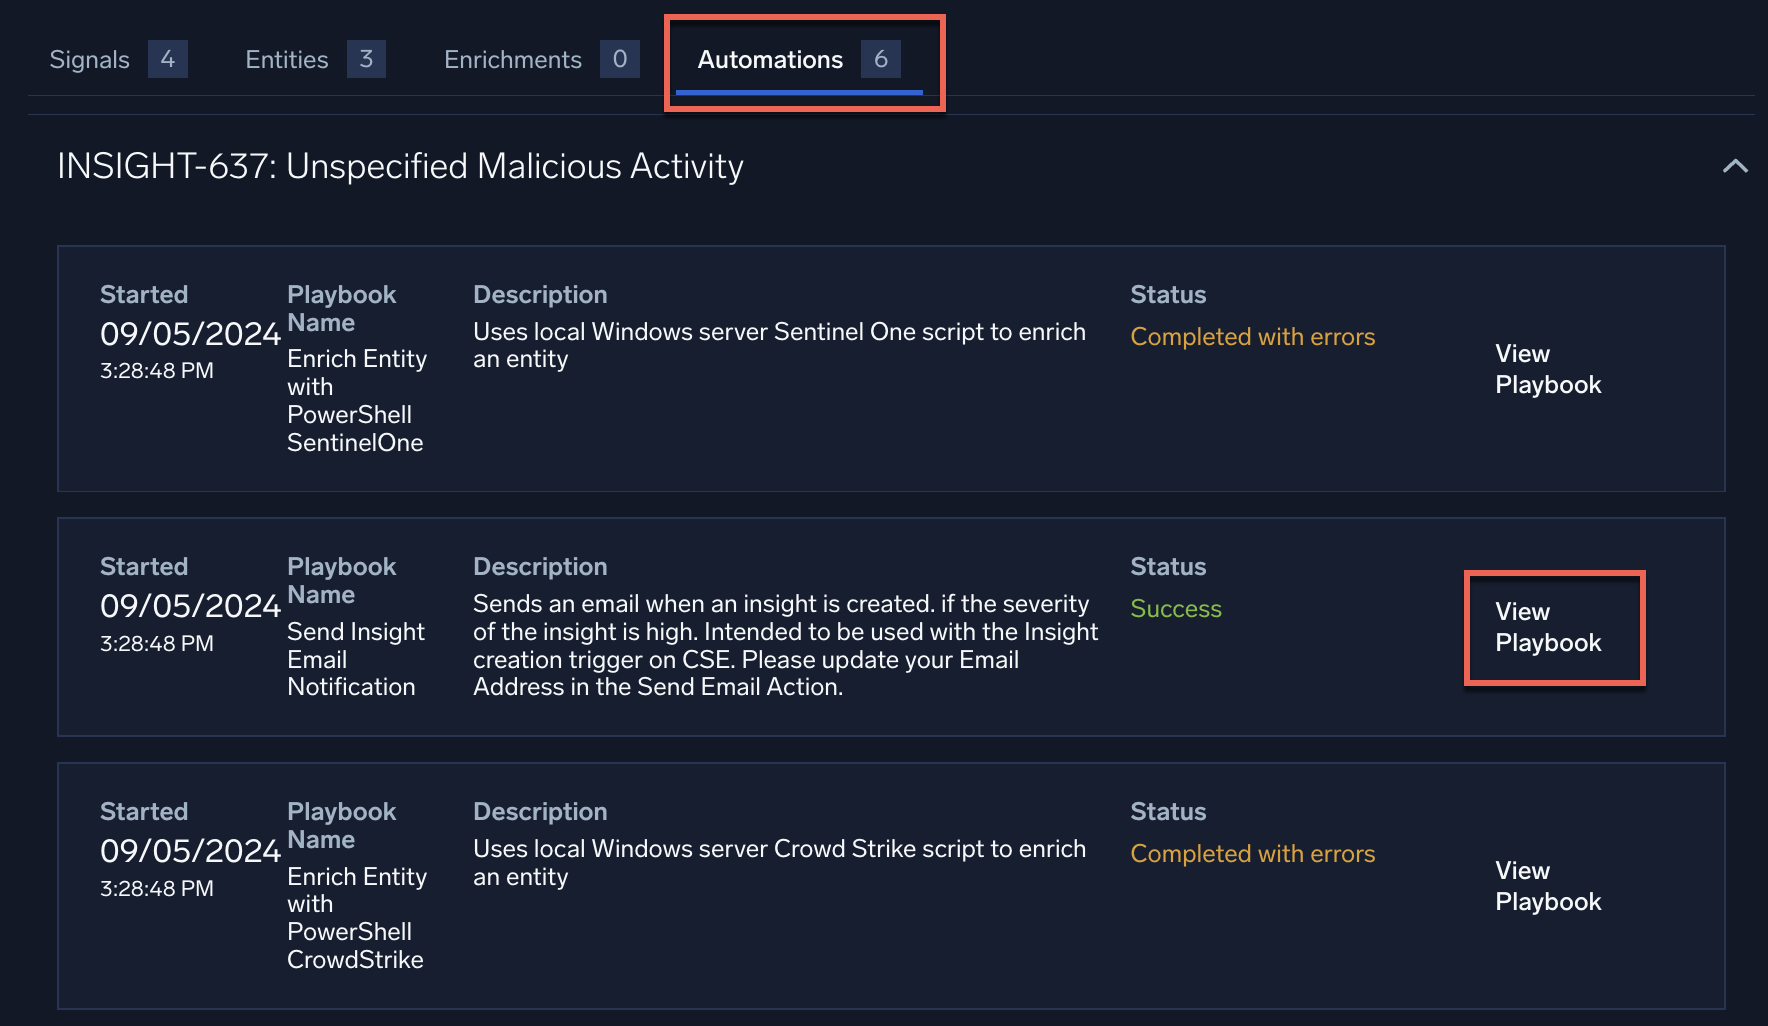
- Open an Insight or Entity that uses playbooks (that is, that has automations).
- Click the Automations button at the top of the page to view the automations on the Insight or Entity.
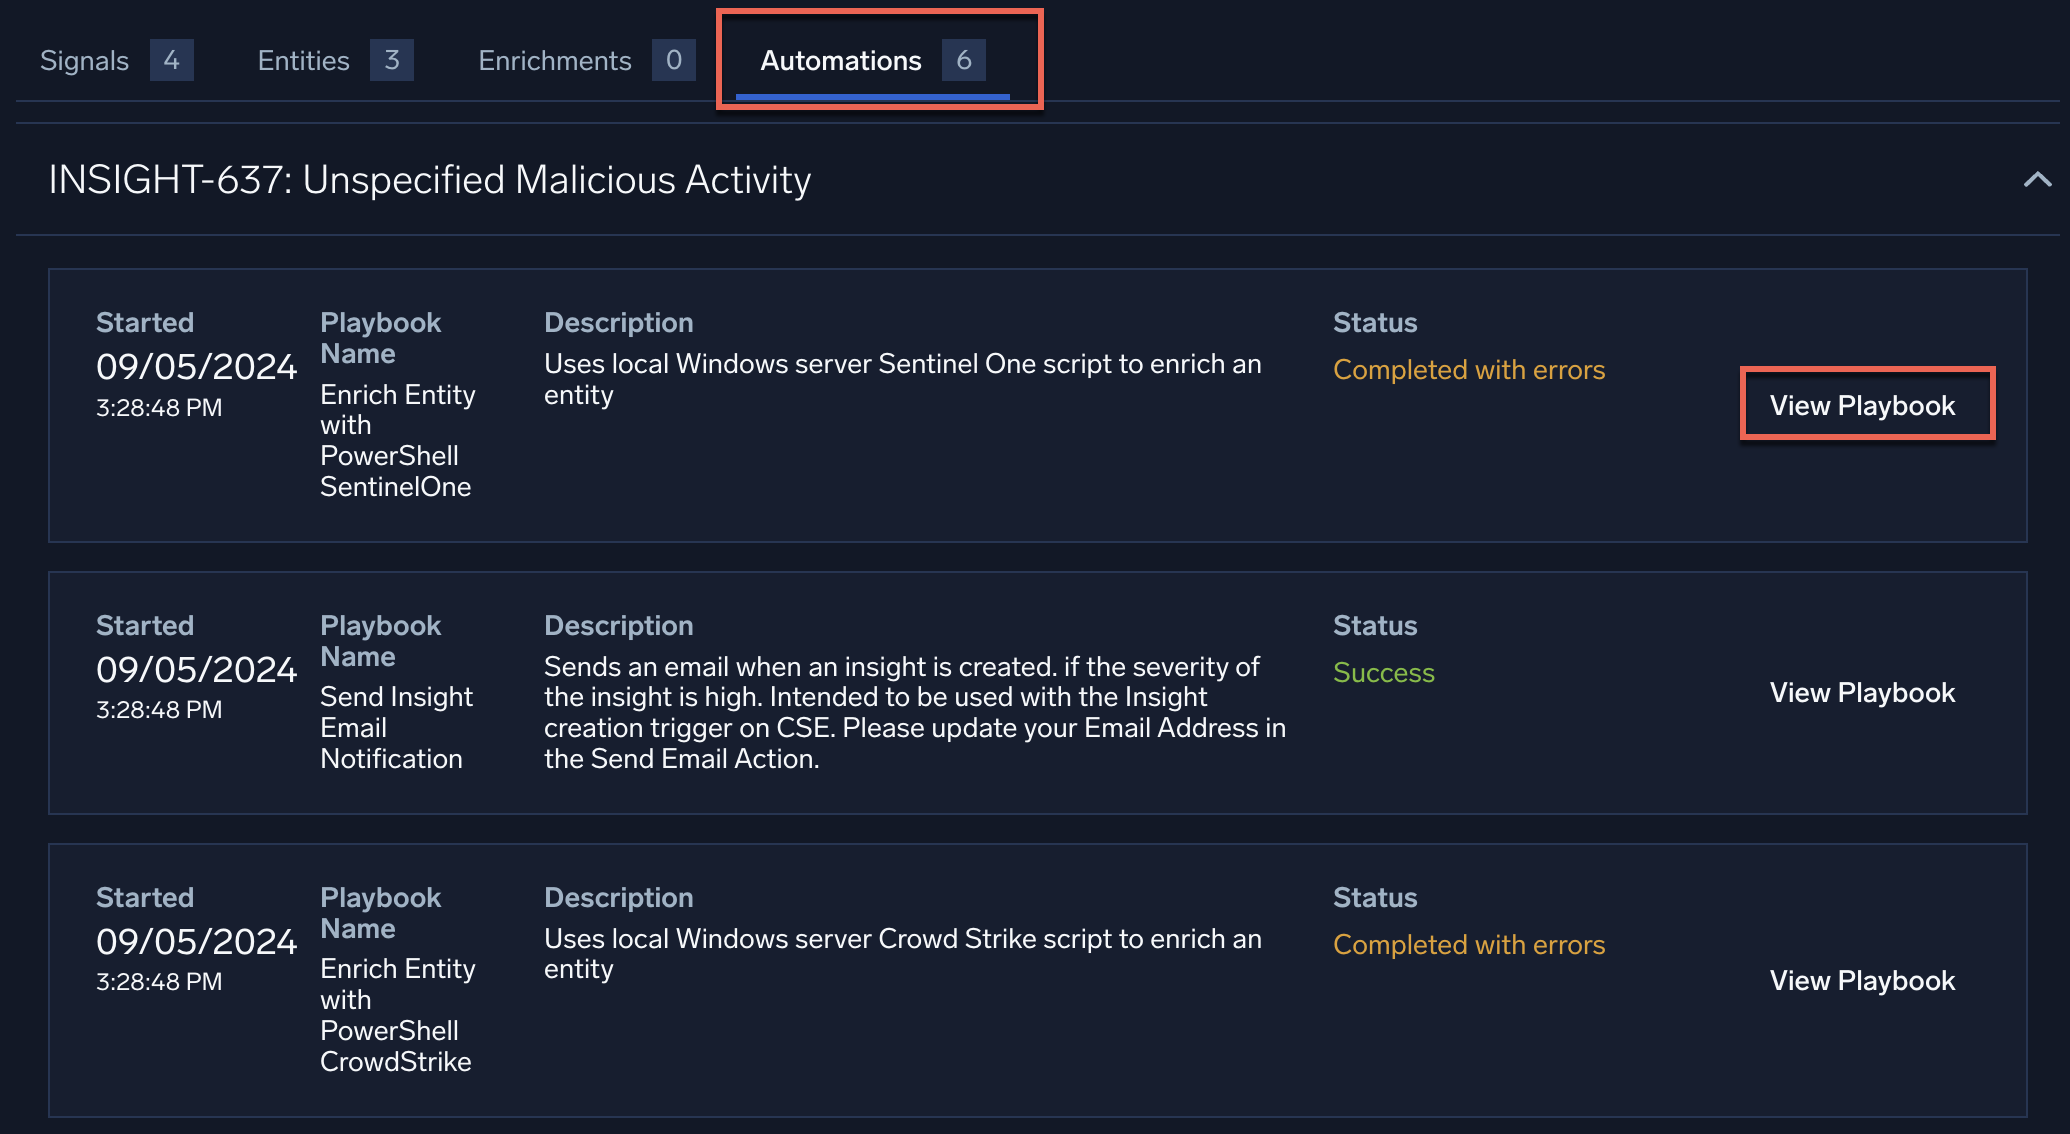
- Click View Playbook for a playbook you want to investigate. In the example above, the playbook we want to investigate completed with errors. The playbook opens in the Automation Service, and the issues display in the results section.

Proceed to Investigate playbook problems below to look into playbook problems.
Open a playbook from Cloud SOAR
- Open an Incident.
- On the incident details page, select Operations > Playbooks. Playbooks appear that have run for the incident.
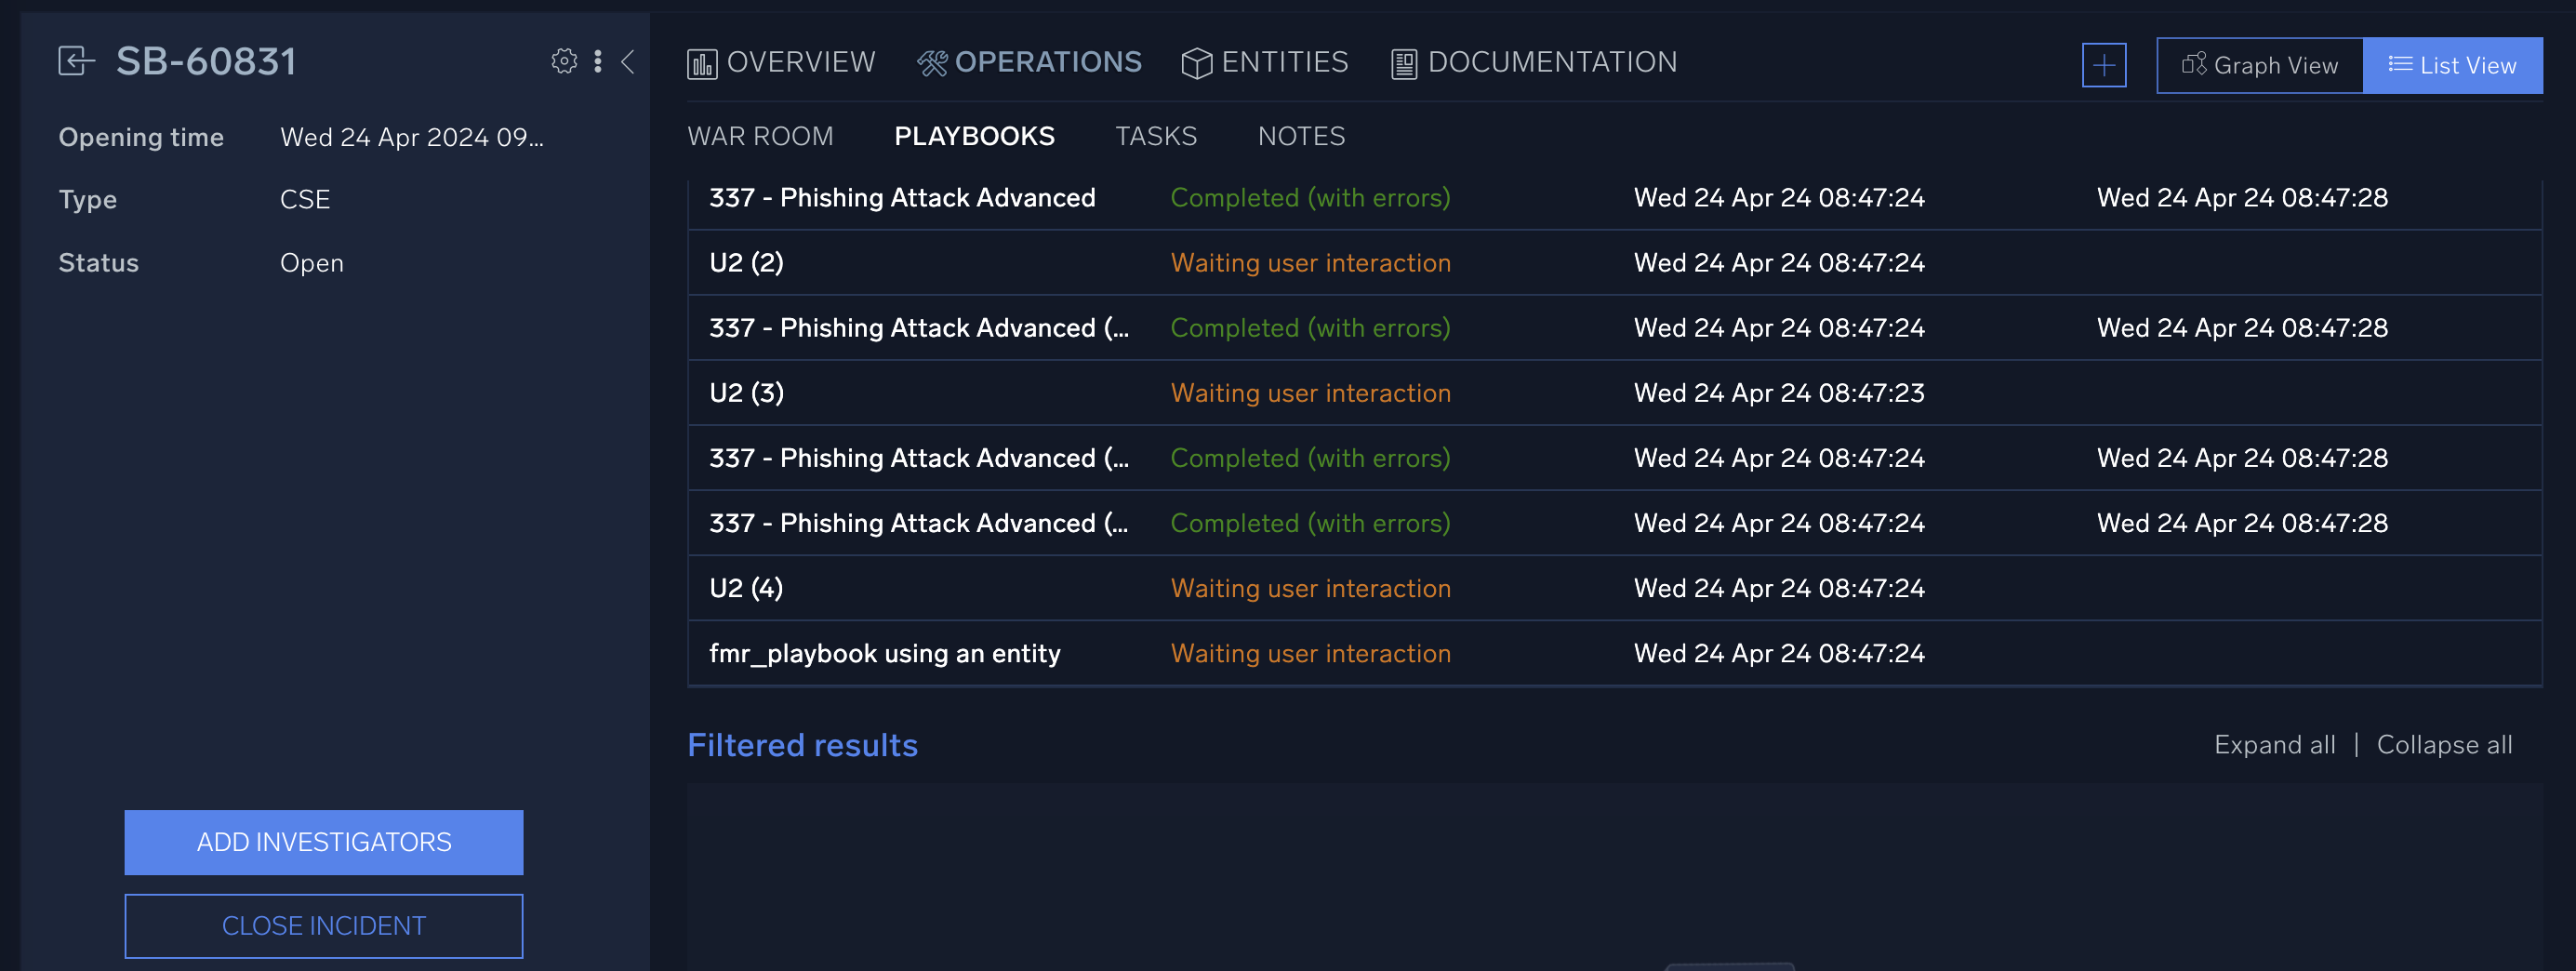
- Click Graph View in the upper-right and click > to page through the playbooks.
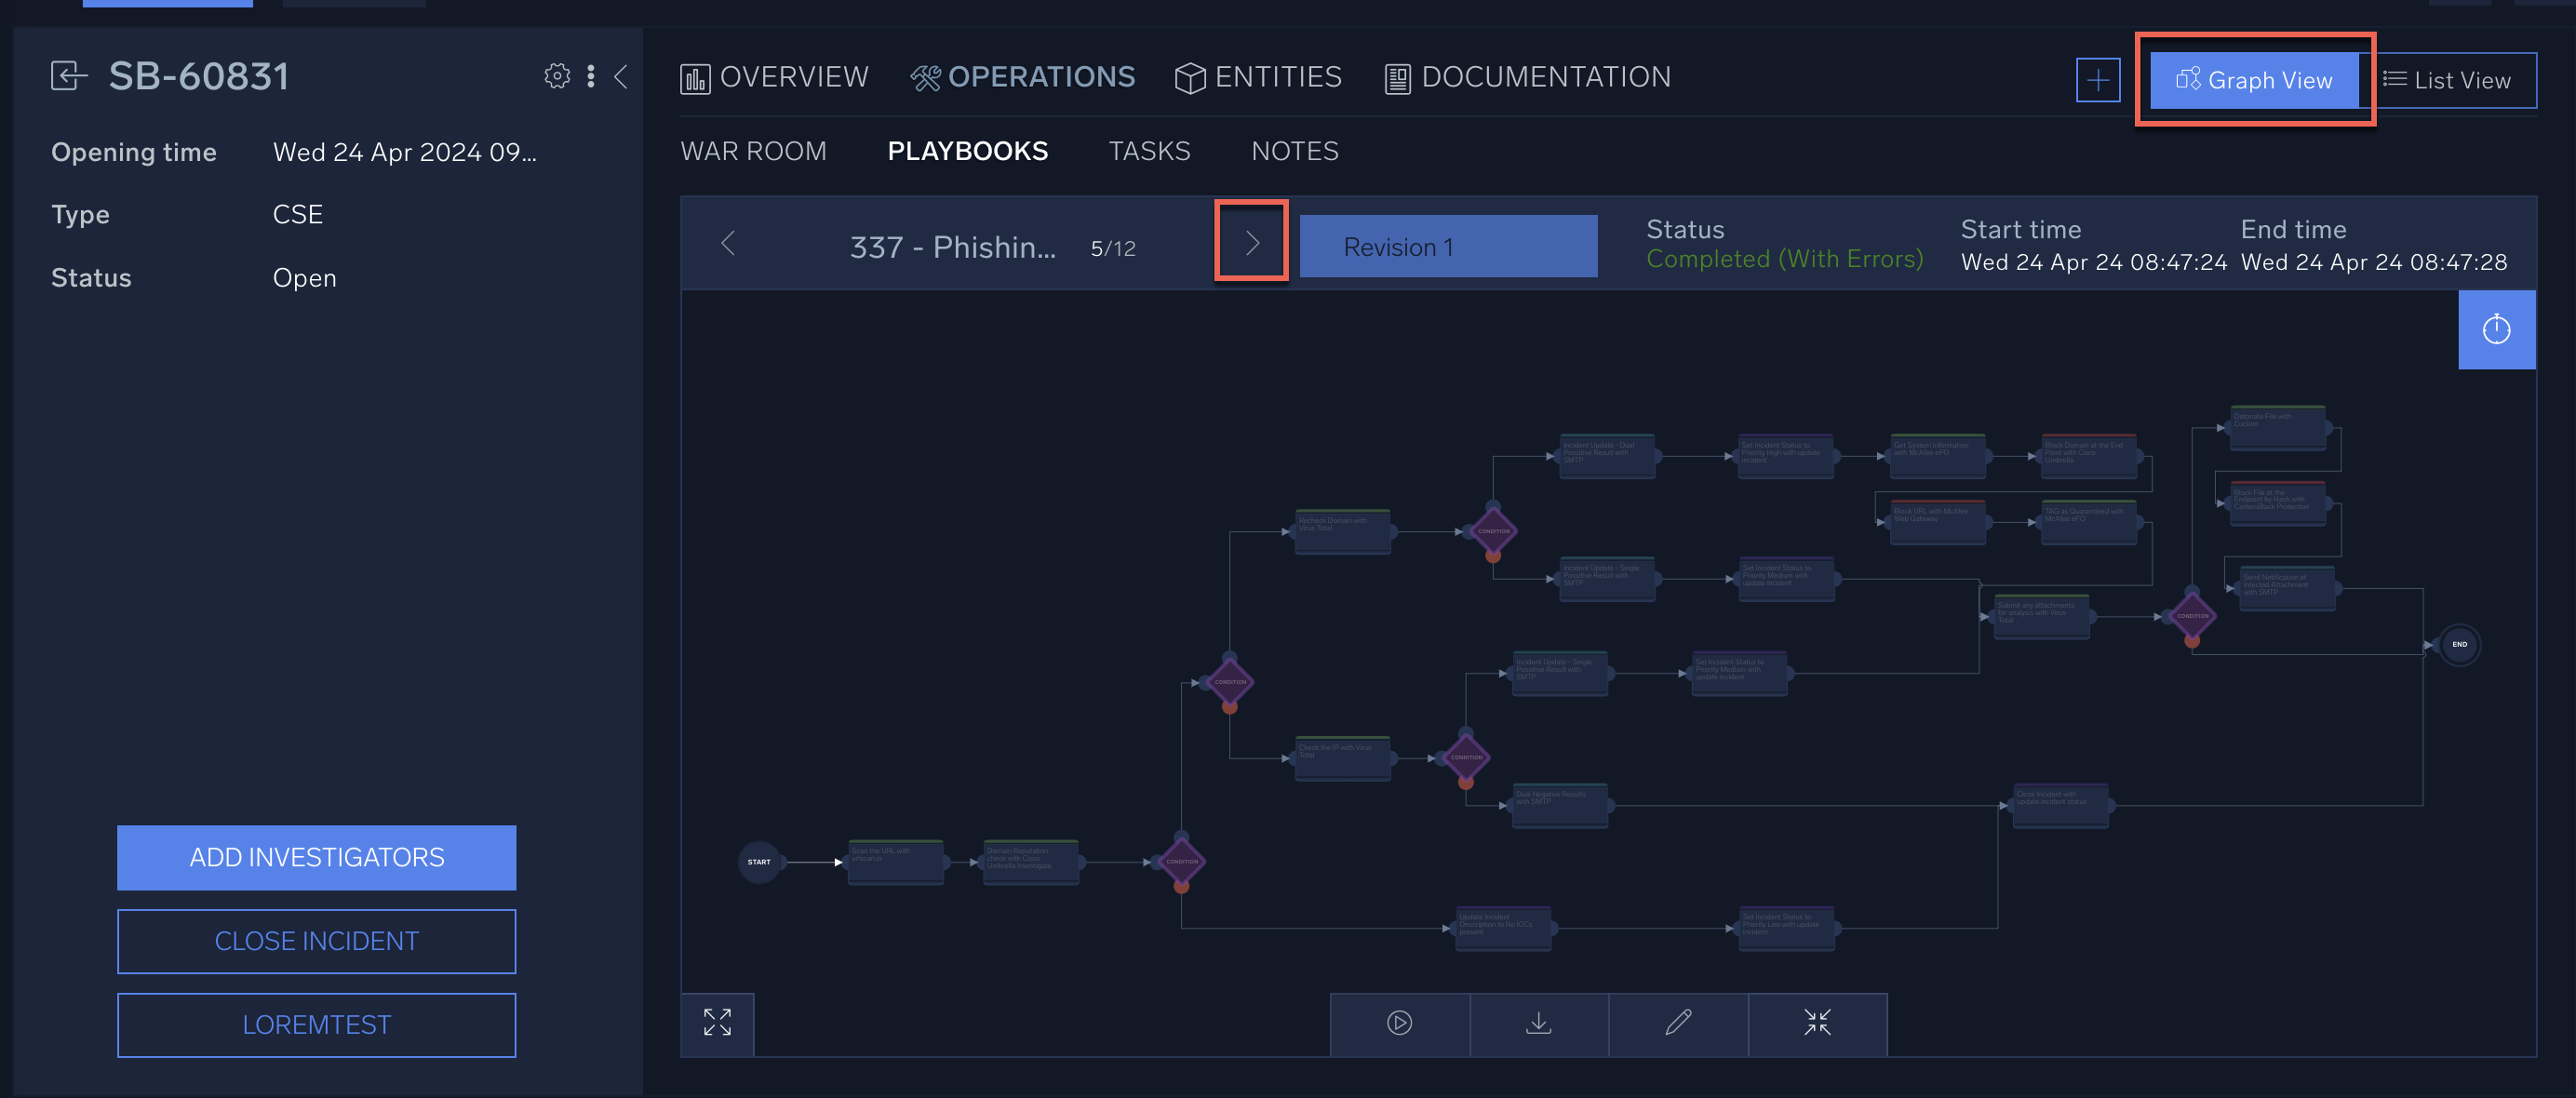
- Click a node on the playbook that displays an error.
Proceed to Investigate playbook problems below to look into playbook problems.
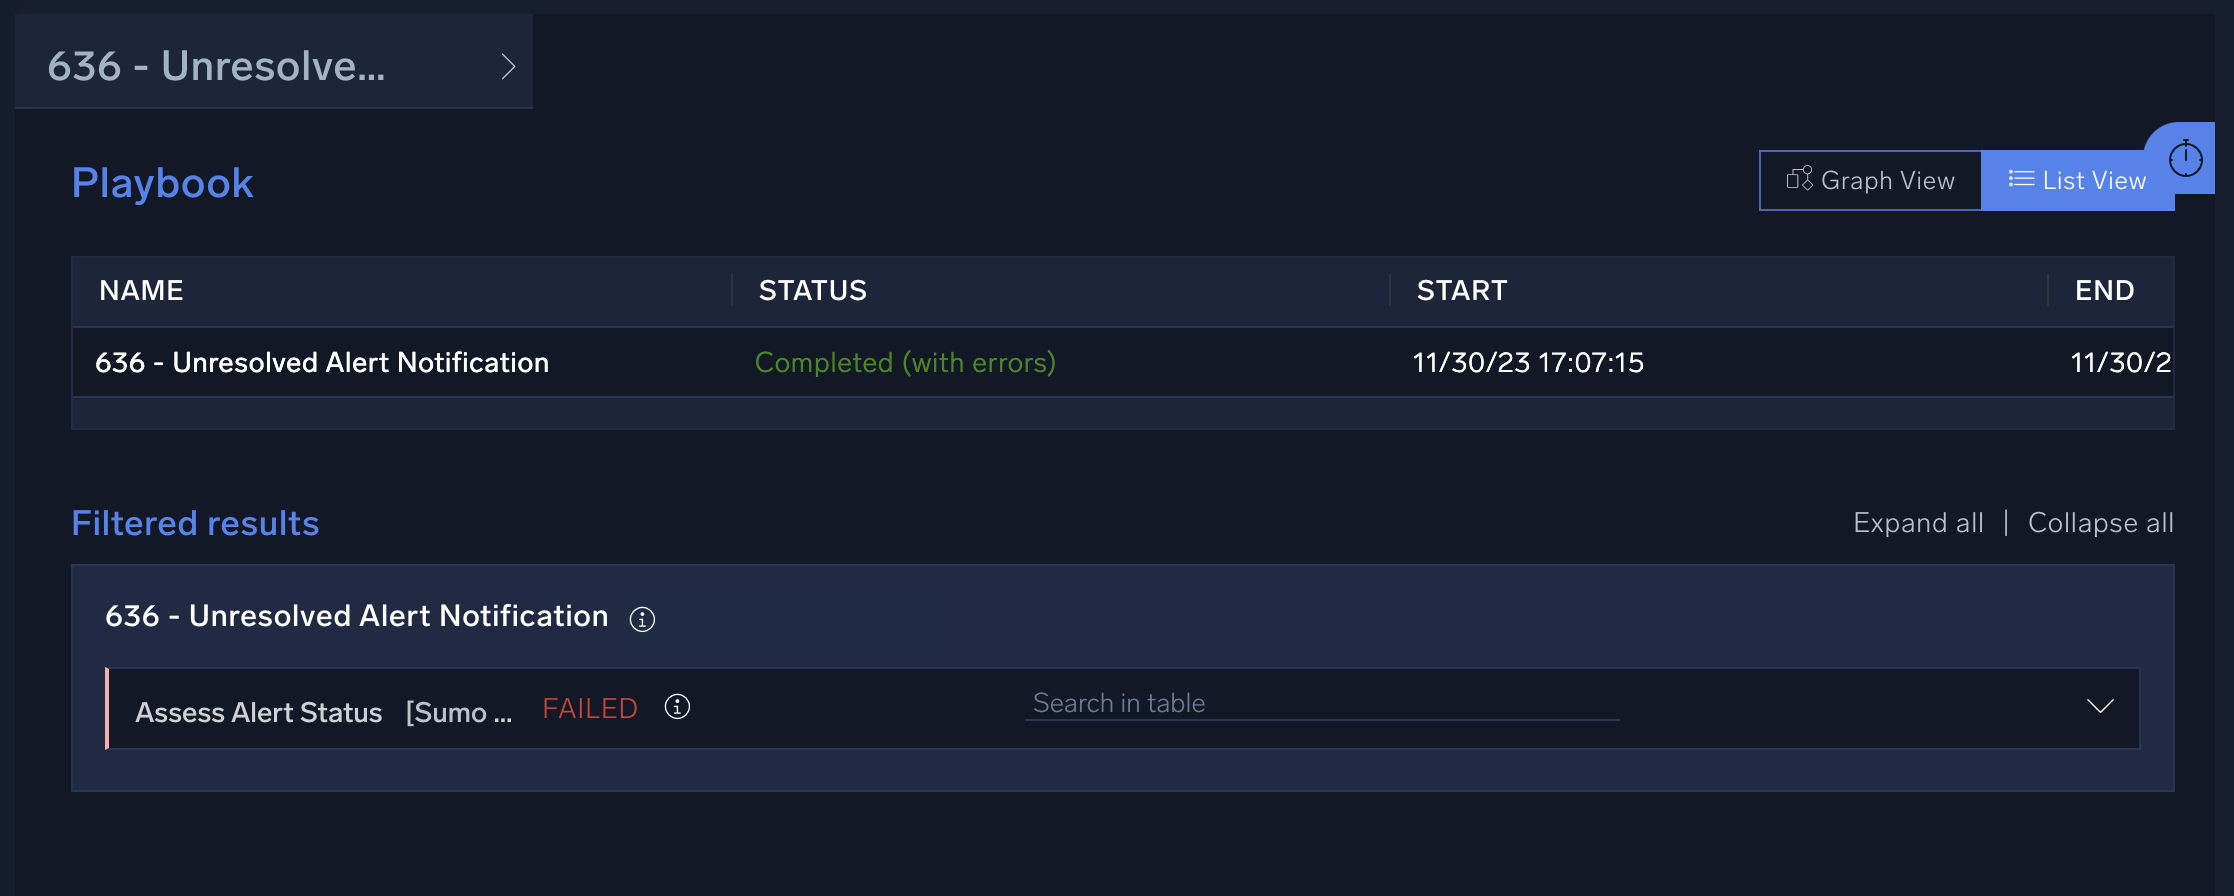
Investigate playbook problems
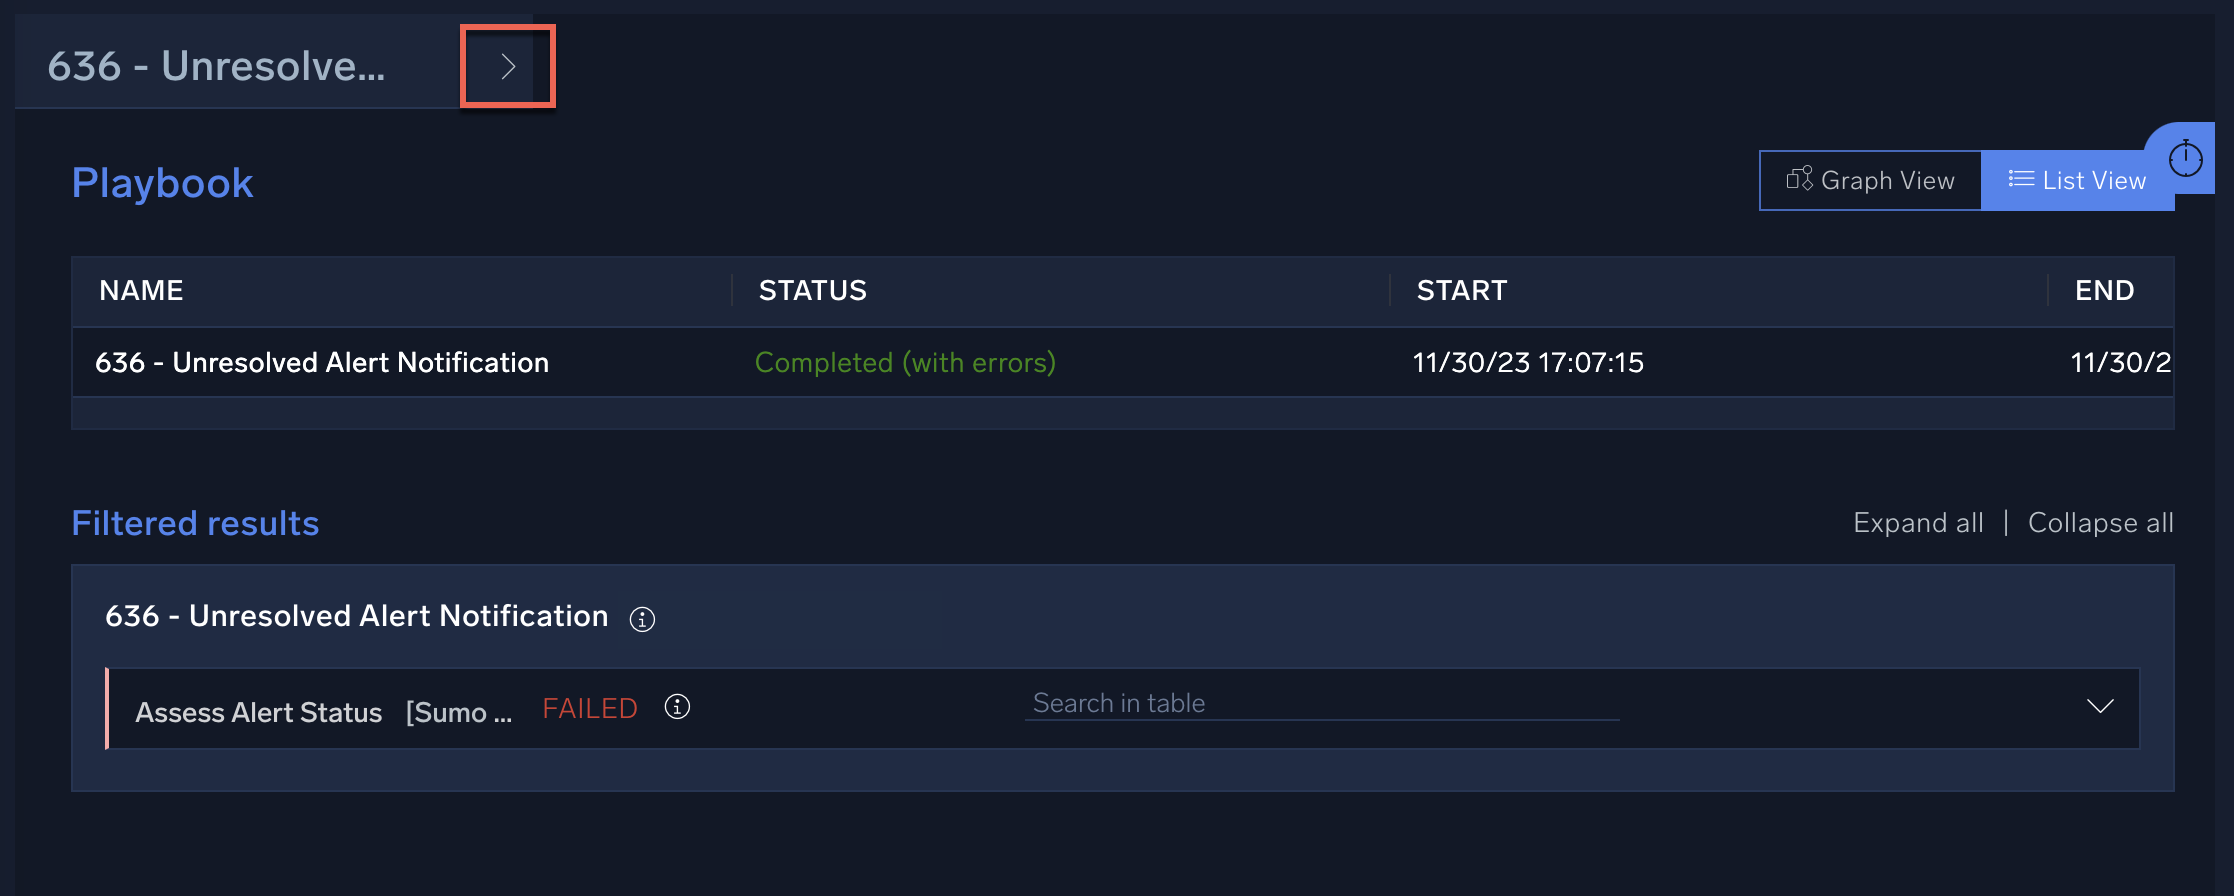
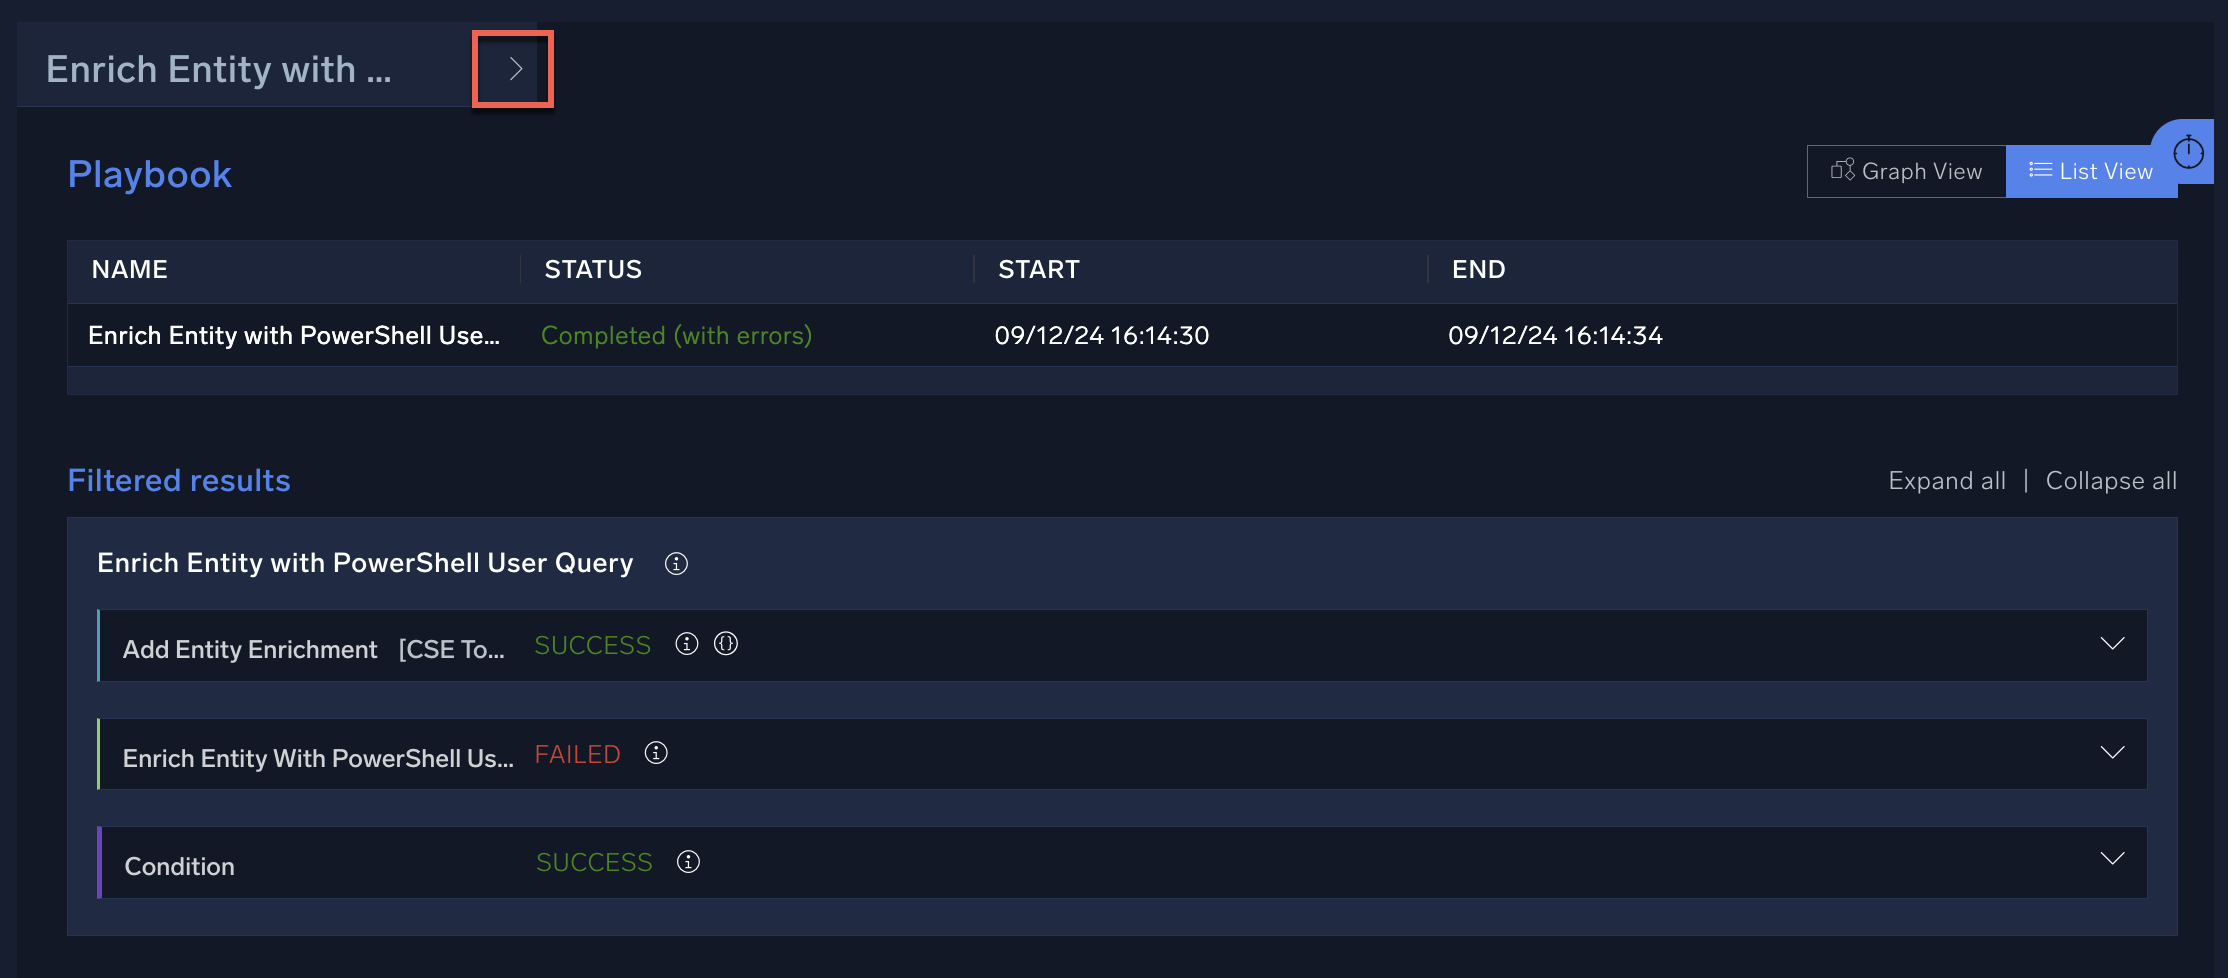
After you have opened a playbook that requires investigation, follow the steps below to investigate problems with the playbook.
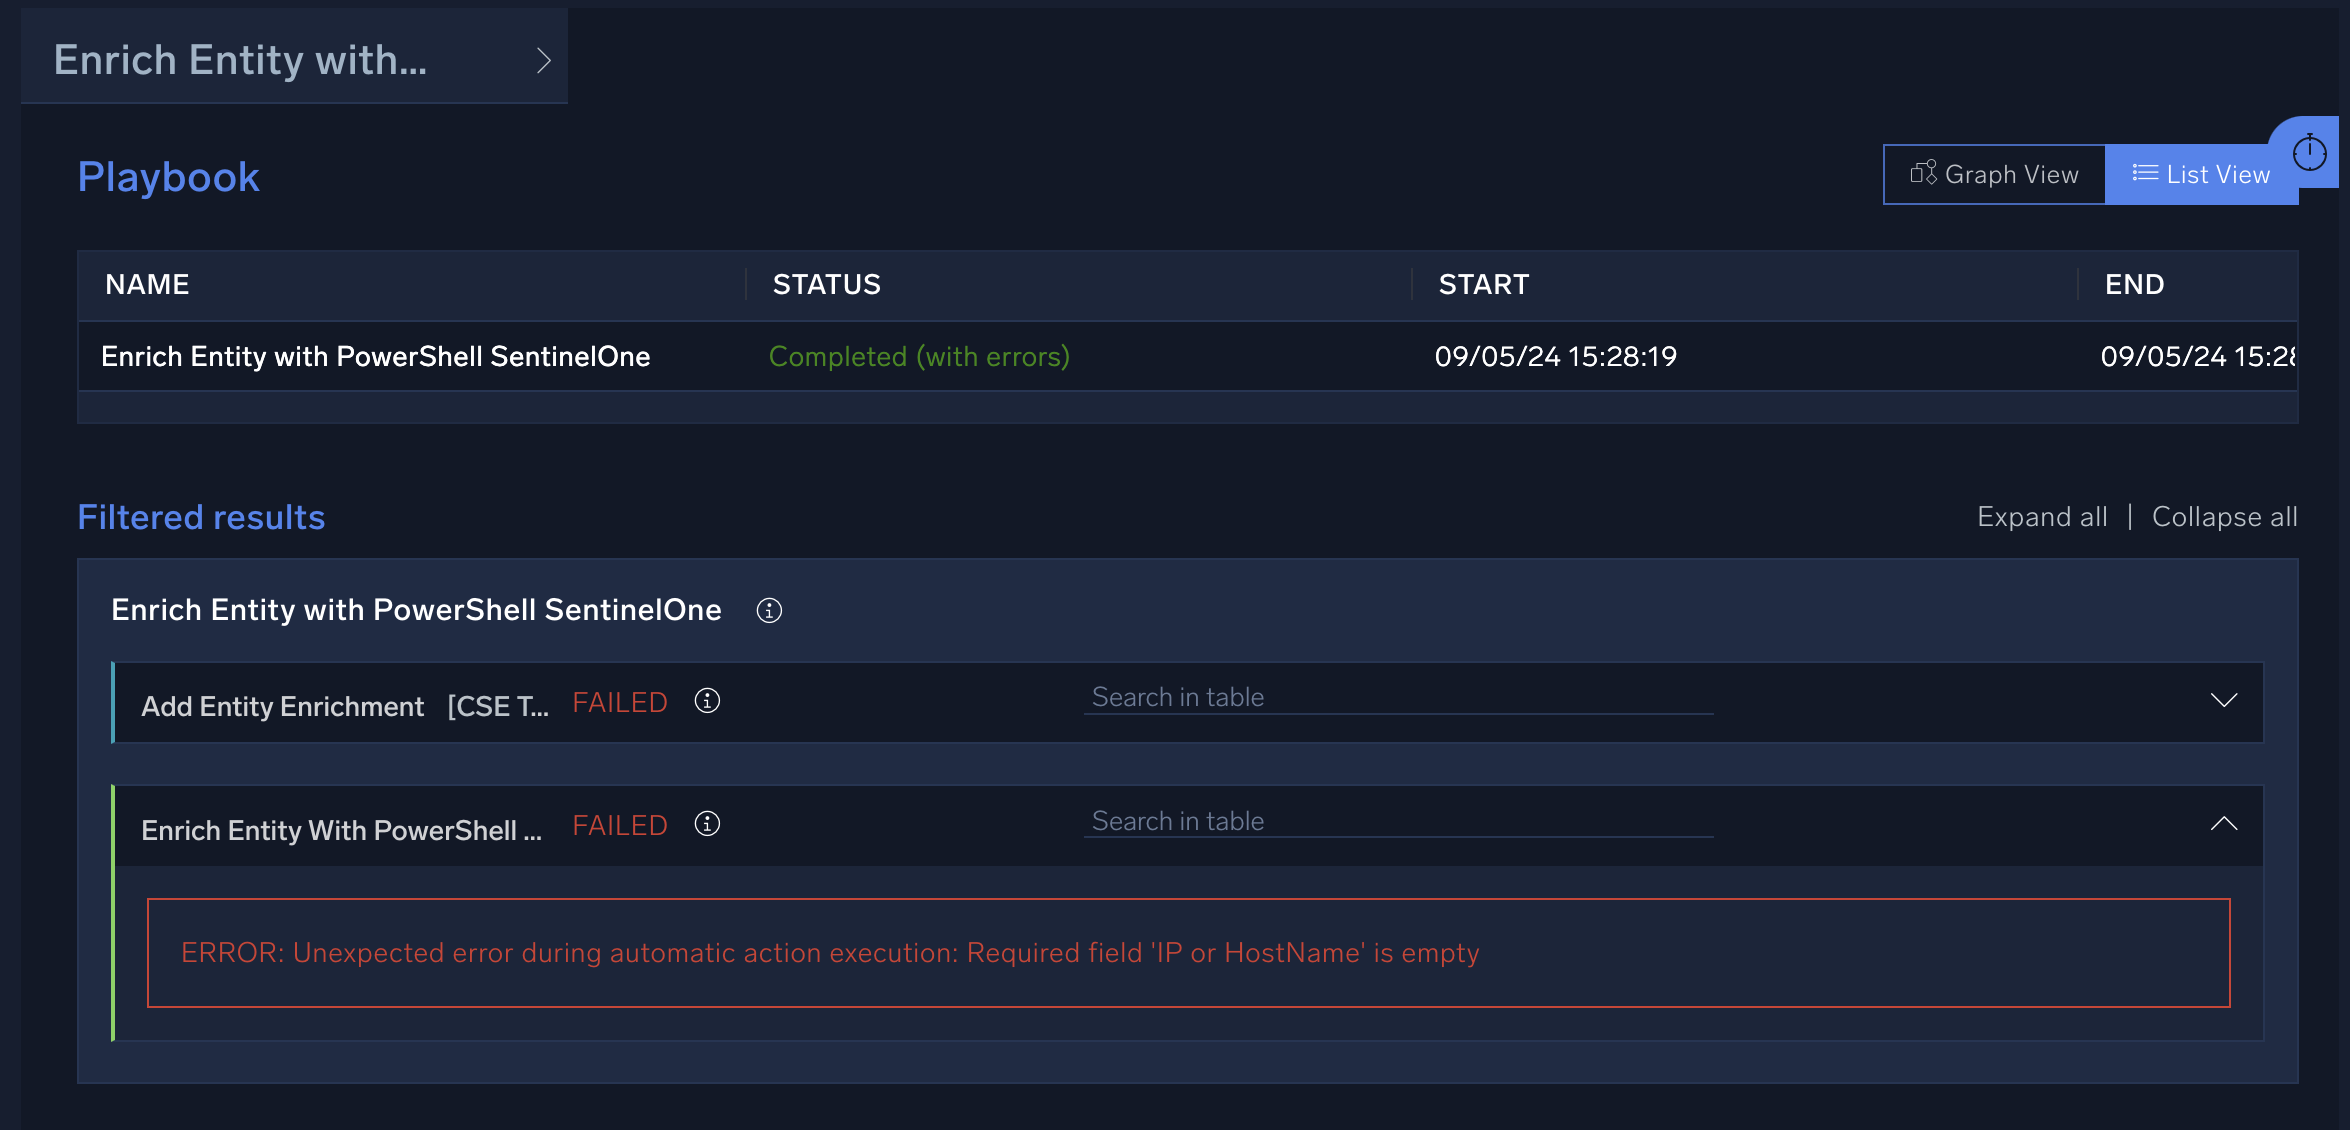
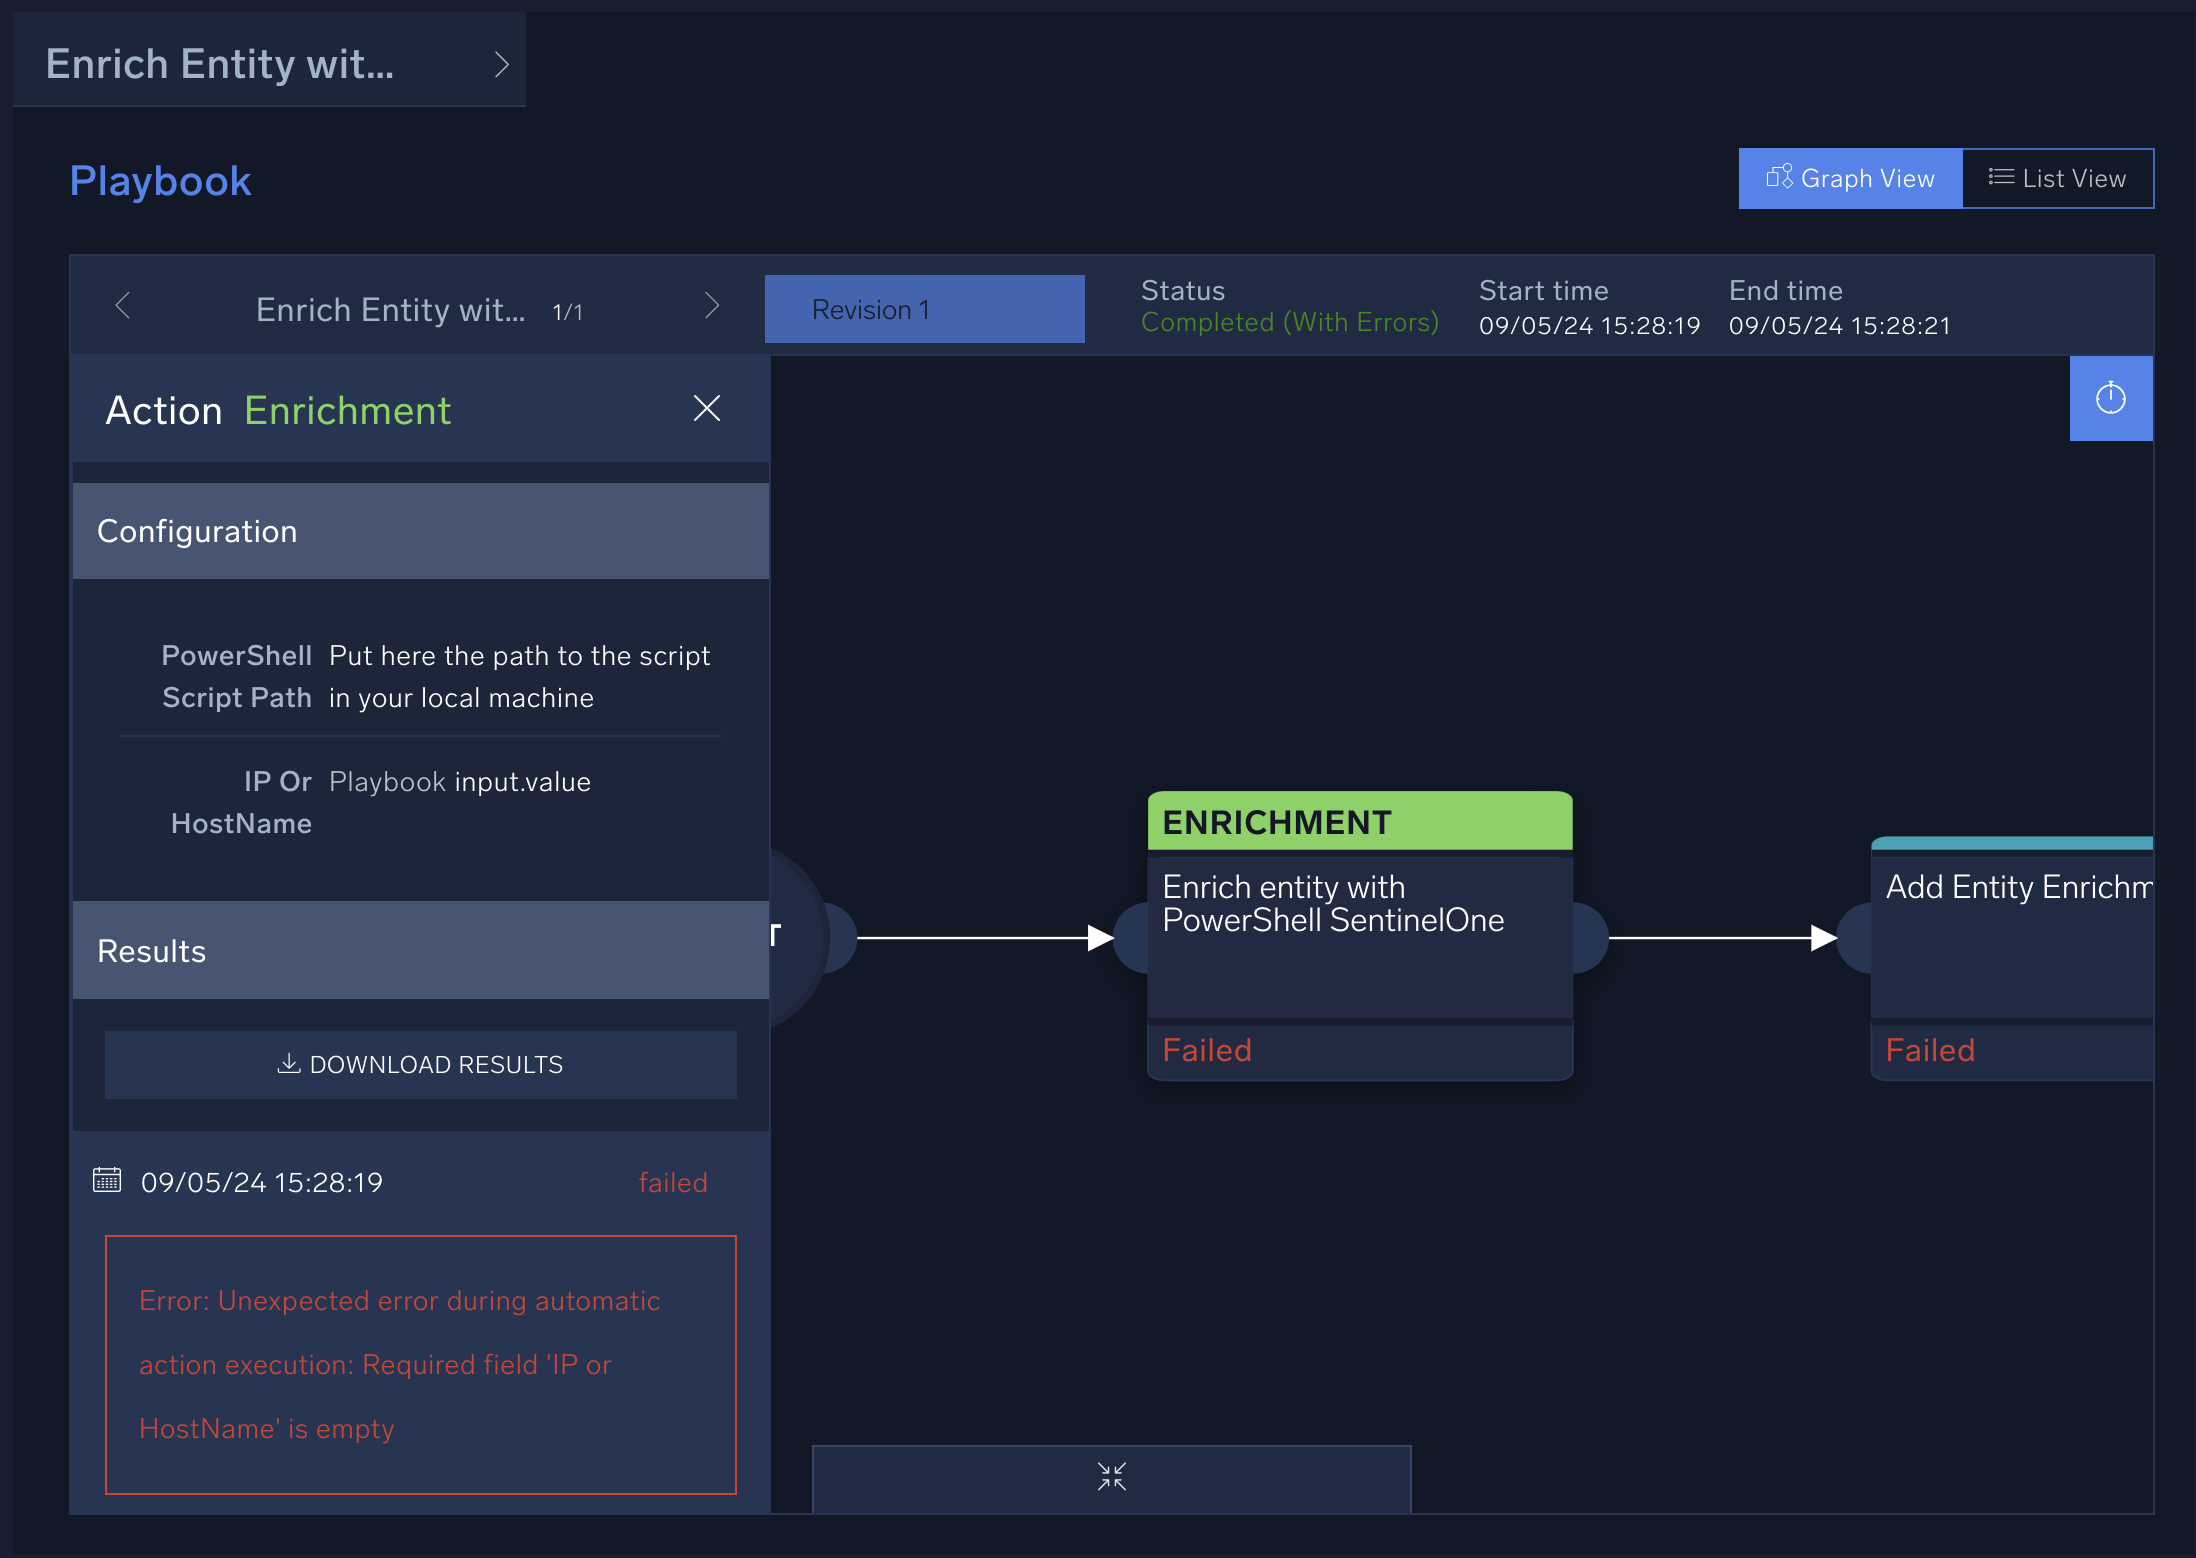
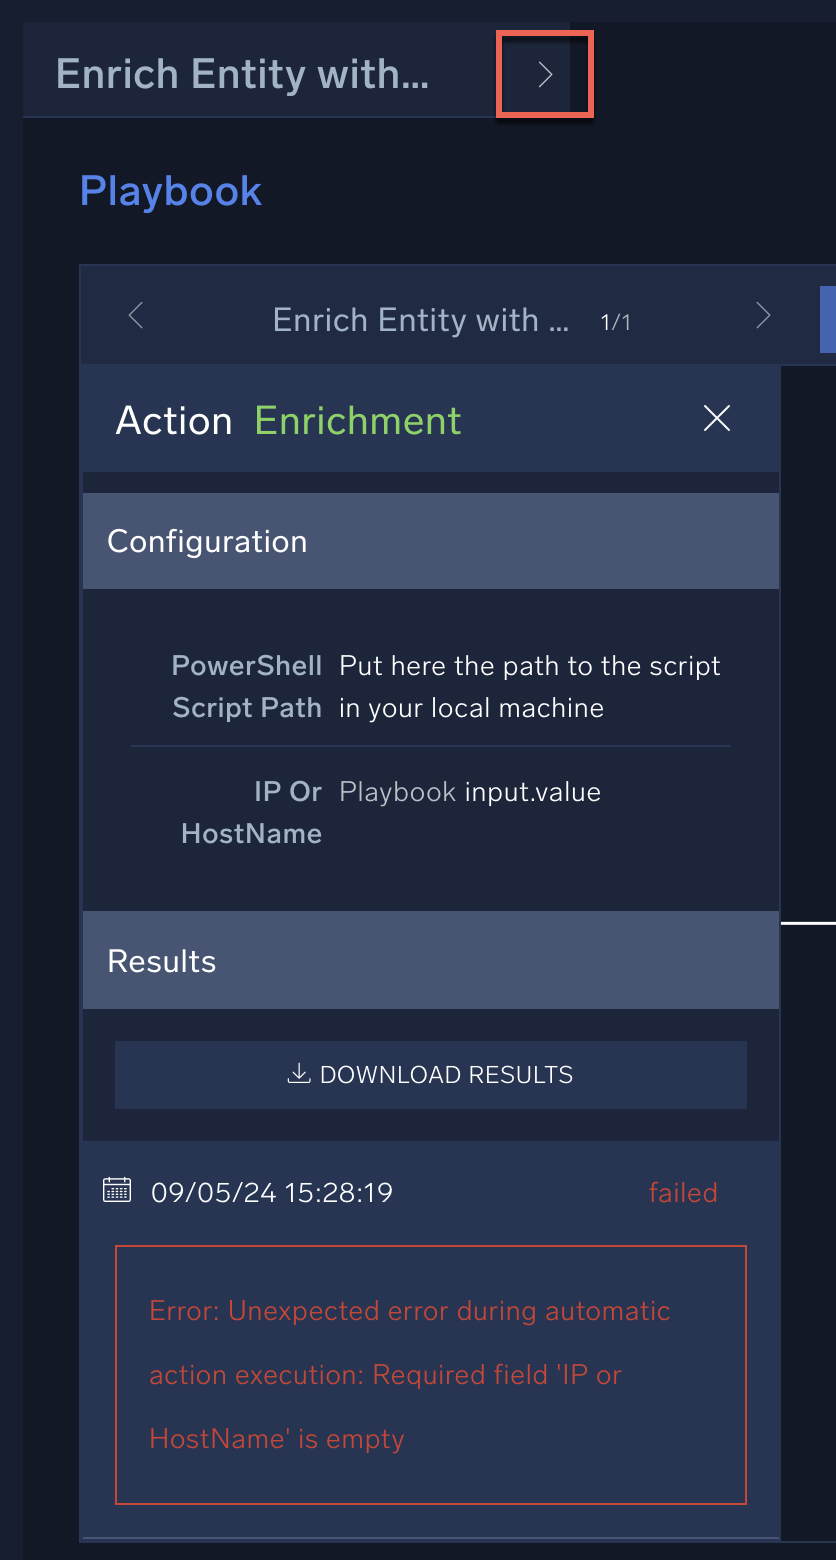
- The Filtered Results section shows the status of actions that ran on the playbook. The example below shows two failed actions that require investigation.
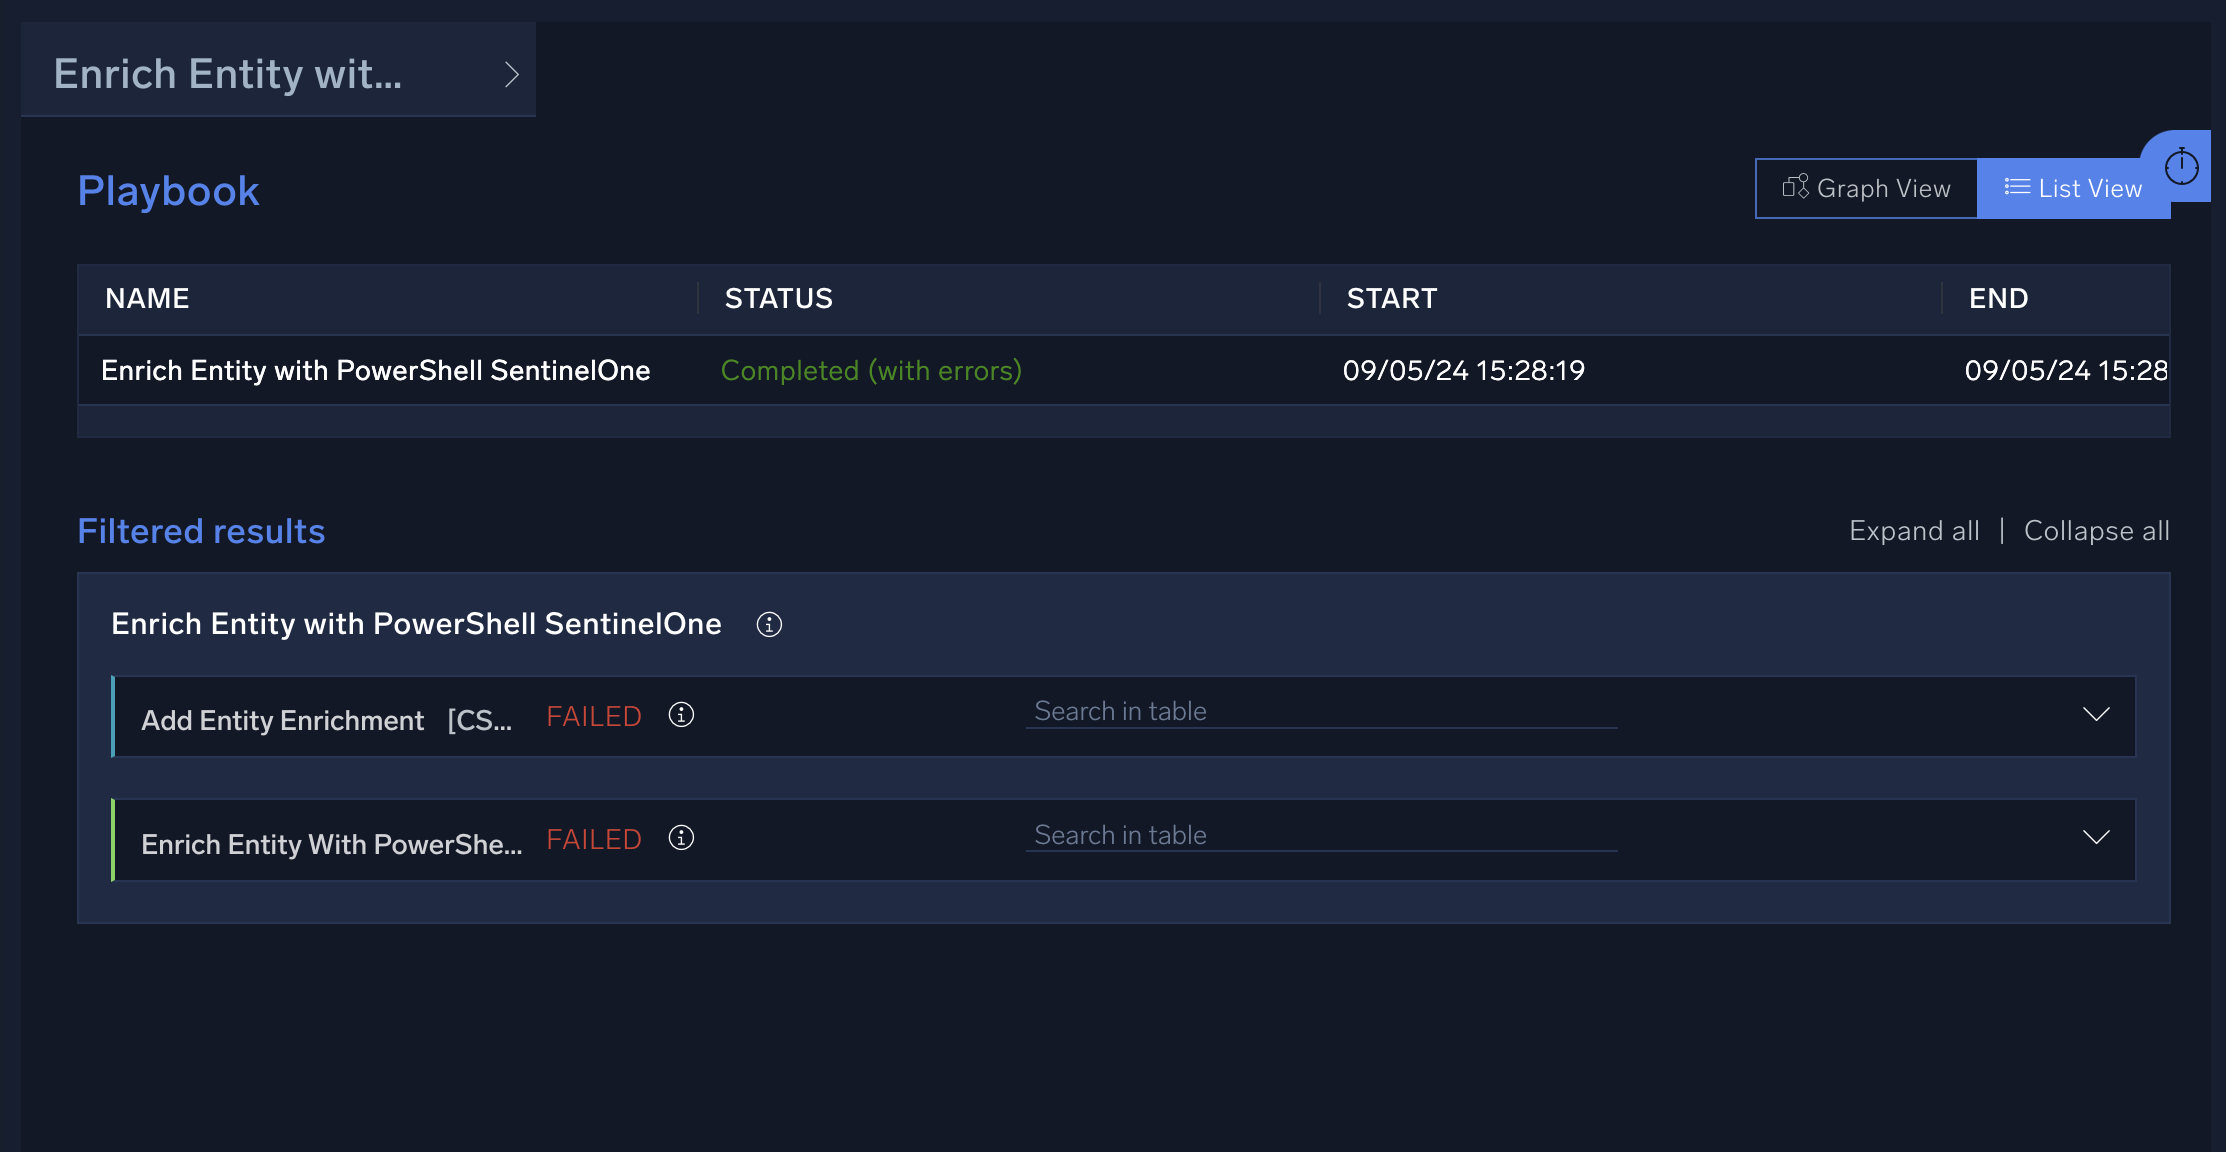
- Click an action for an explanation of the problem.
- For more detailed information about the action, click the Graph View in the upper right and then click on the action. A pane opens that displays more information about the action.
- Sometimes the playbook's payload will provide more information about why an action has a problem. To view the playbook's payload, click > to the right of the playbook name.
- Examine the playbook payload for information that might help you resolve the problem. For example, the payload may be able to tell you if a field has not been properly passed from a previous action, or a field was unintentionally left blank that the action requires.
- Based on what you uncover during investigation, you may need to make changes to the playbook and then test the playbook to ensure it works correctly.
Common playbook problems
Following are some common problems that can occur with playbooks:
- No response from the bridge
The automation bridge is offline, or the bridge does not have the egress firewall settings to handle the outbound request. - API rate limiting issues
The vendor has capped the number of requests that can be made to their API in a certain time frame. - HTTPS connection pool issues
There are no available connections at the vendor, usually indicative of a vendor API health issue. - A required field is empty that the action is looking for
A field has not been properly passed from a previous action, or a field was unintentionally left blank that the action requires. - Permission denied
The API key is incorrect on the integration resource, or the account running the playbook has invalid credentials or insufficient permissions. - You have exceeded the actions limit
The number of actions that your organization can run per hour is limited to a certain threshold. Any actions that are launched beyond this actions limit will not run. You might exceed the limit if:- There are alert surges.
- The playbook is not optimized properly and actions are stuck in a loop.
- There are Cartesian flag issues (too many nested elements to process as part of the returned API result).
- There are alert surges.