Grant Access to an AWS Product
Sumo Logic requires access to the services in your AWS account(s) in order to collect data. This section has instructions for granting a Sumo Logic source access to AWS services.
You can follow the instructions on this page to grant Sumo Logic access to the following AWS services:
- Amazon S3
- Amazon S3 Audit
- AWS CloudWatch Metrics
- AWS Kinesis Firehose for Metrics
- AWS Metadata (Tag)
- AWS Elastic Load Balancing
- Amazon CloudFront
- AWS CloudTrail
Methods for granting access
Access to AWS services is managed through AWS Identity and Access Management (IAM). You can grant access at either the IAM role level or the IAM user level. Role-based access is recommended, as described below.
Role-based access (recommended)
Both Sumo Logic and AWS recommend using IAM Role-based access for increased security. An IAM role is similar to a user, in that it is an AWS identity with permission policies that determine what the identity can and cannot do in AWS; however, instead of being uniquely associated with one person, a role is intended to be assumable by anyone who needs it. Also, a role does not have standard long-term credentials (that is, a password or access keys) associated with it. Instead, if a user assumes a role, temporary security credentials are created dynamically and provided to the user through an Amazon Resource Name (ARN).
IAM role-based access is not supported in GovCloud or China regions.
You can either create a new IAM role for the purpose of granting a Sumo Logic source access to AWS, or use an existing role. If you’re creating a new role, you can use one of the methods described below:
- Create a role automatically using a CloudFormation template
- Create a role manually using the AWS console
If you want to use an existing role, you can simply update the role with the appropriate policy from Policies below.
To grant an IAM role access to an AWS service, you’ll need to create the role in AWS and copy the ARN. You’ll need the ARN to complete the configuration of your Sumo Logic source.
The subsection below have instructions for creating a new IAM role automatically using a CloudFormation template or manually using the Amazon console. You can also create IAM roles using the AWS CLI or API. For more information, see Creating a role to delegate permissions to an IAM user in AWS help.
Create a role automatically using a CloudFormation template
This section has instructions for creating an S3 source and using the option Generate Role-Based Access Template to create a CloudFormation template that can be used to generate the IAM role. Sumo Logic can automatically generate this template when you create the following Sumo Logic source types:
- Amazon CloudFront
- AWS CloudTrail
- AWS CloudWatch Metrics
- AWS Elastic Load Balancing
- AWS Kinesis Firehose for Metrics
- AWS Metadata
- Amazon S3
- AWS S3 Archive
- Amazon S3 Audit
To create a role automatically using a CloudFormation template:
This procedure applies to the AWS Access method part of the source configuration process when adding a new S3 Source to an existing Hosted Collector.
Before generating the template, the source’s configuration must have the AWS-specific fields filled out (for example, Bucket Name, Path Expression, and so on).
- Leave the Access Method option set to the default option Role-based access (recommended).
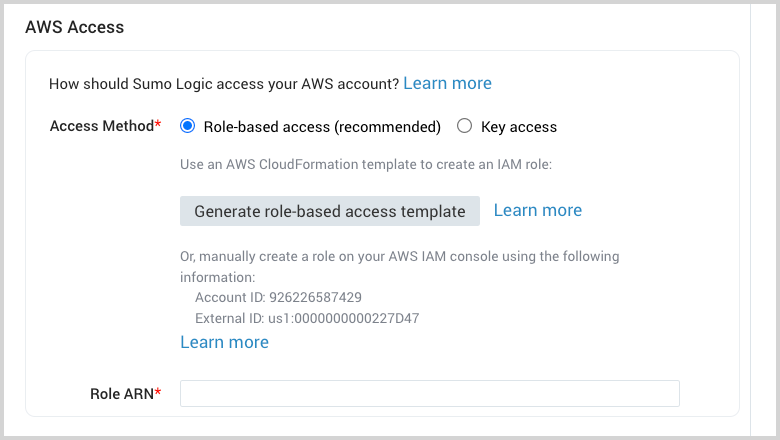
- Click Generate role-based access template.
- A CloudFormation template for the role is displayed in YAML format.
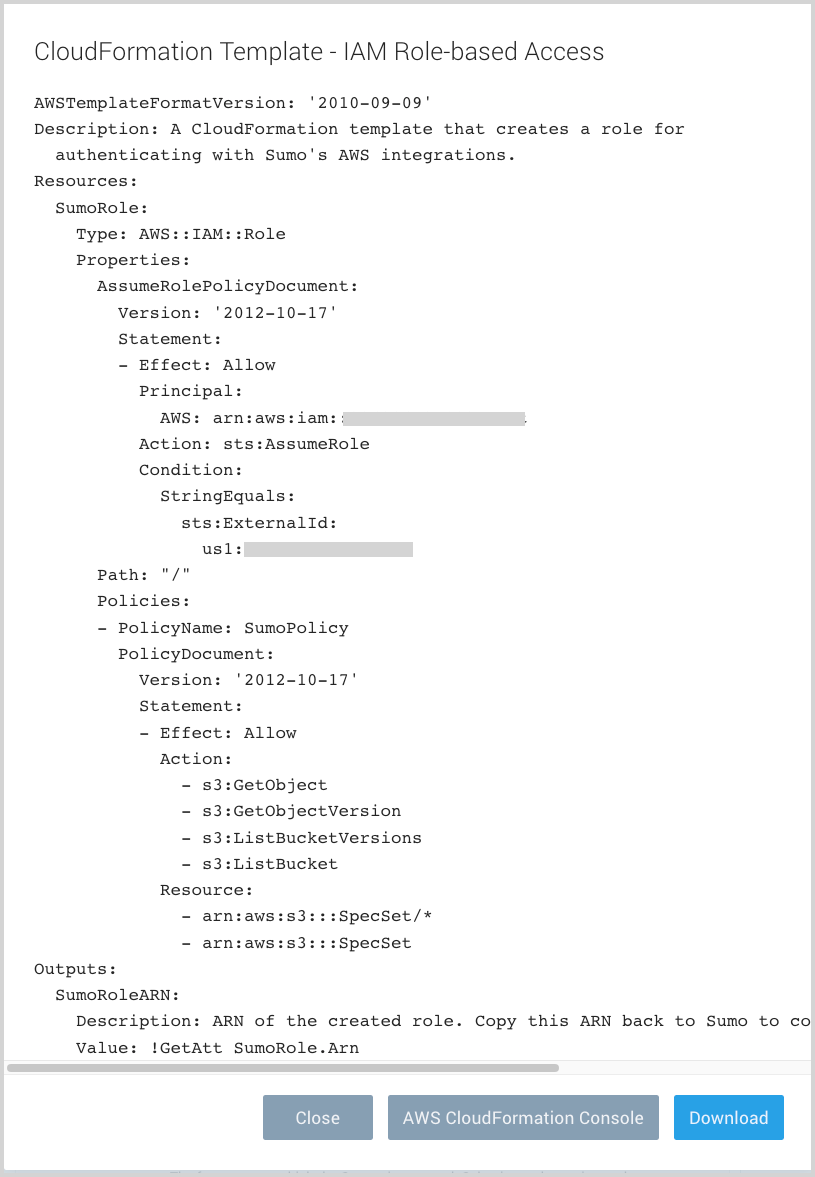
- Click Download to save the template.
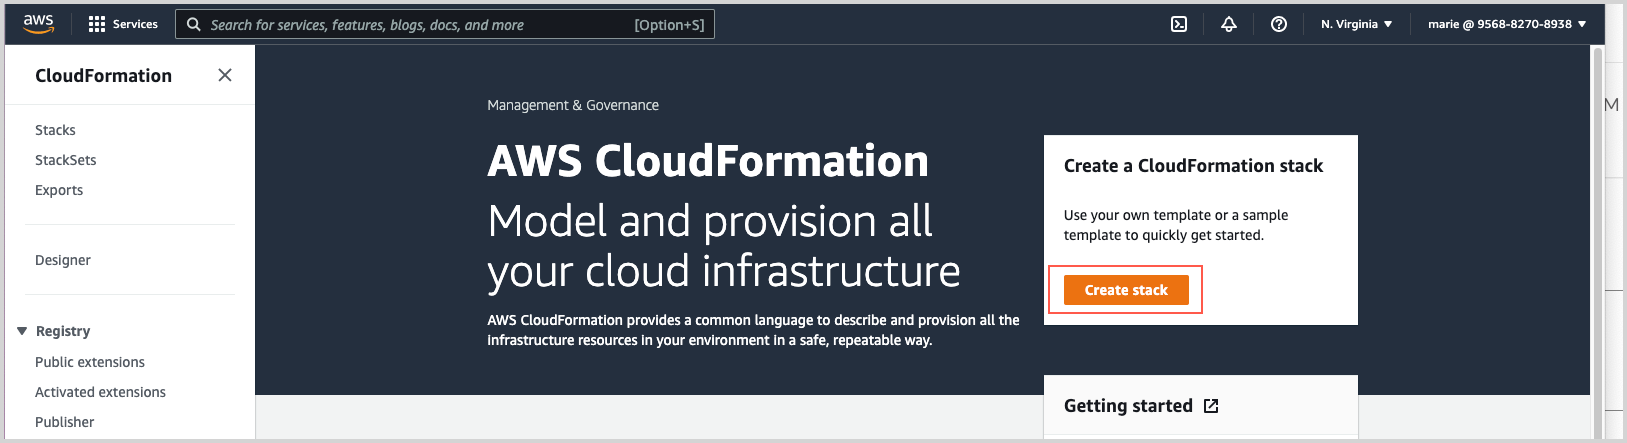
- Navigate to AWS CloudFormation, or click AWS CloudFormation Console. The button will take you to open https://console.aws.amazon.com/cloudformation, and will not run the template. You will still need to generate and download the template to proceed.
- Click Create Stack.
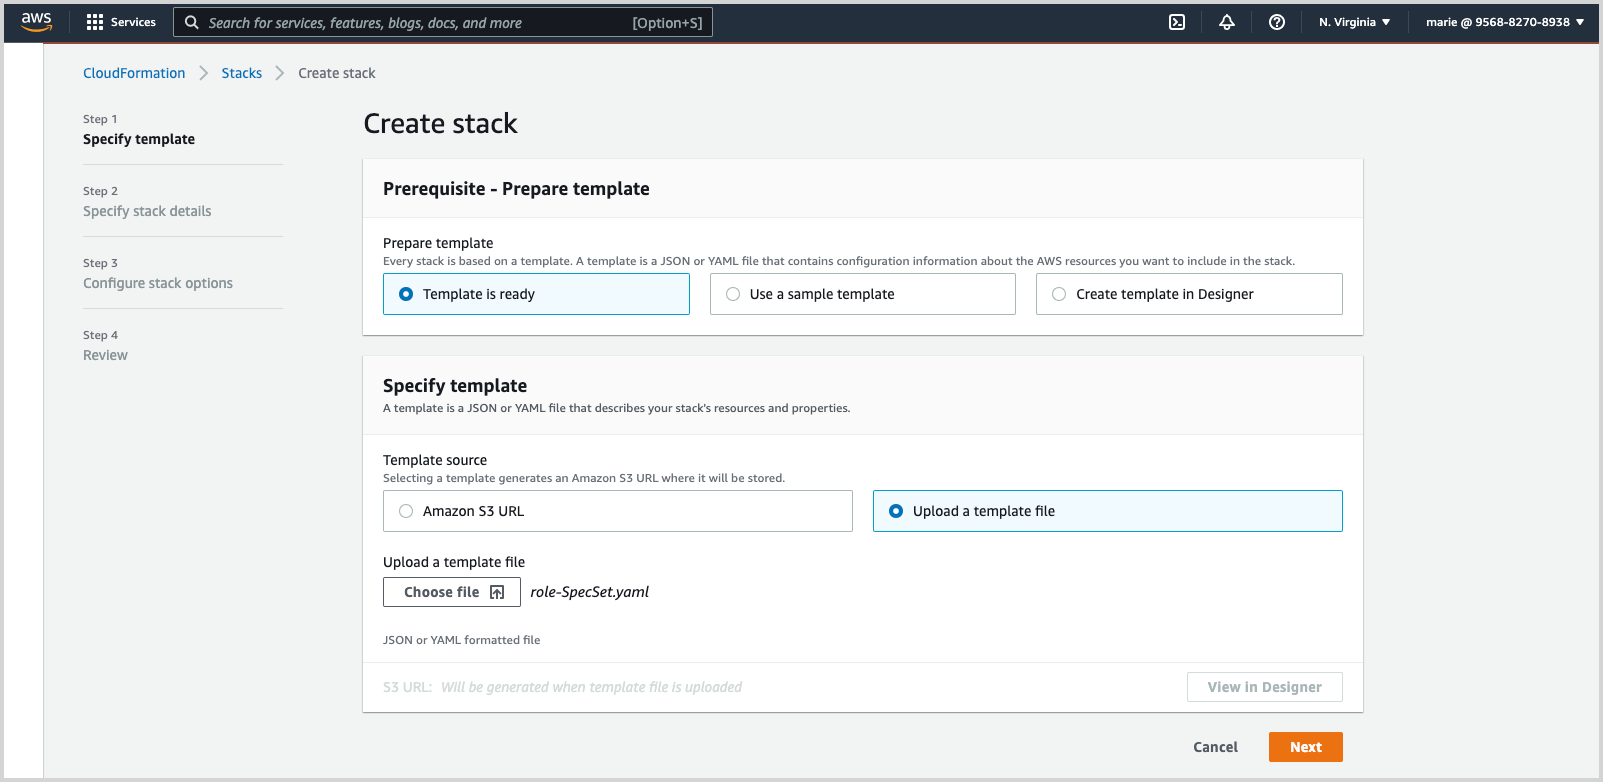
- On the Create Stack page:
- Choose Template is ready.
- Choose Upload a template file.
- Click Choose file and navigate to the .yaml file you downloaded from the Sumo Logic source configuration in the earlier step.
- Click Next.
- On the Specify details page, enter a name for the stack (for example, sumo-S3-role-access), and click Next.
- On the Configure stack options page, enter tags, if desired, and click Next.
- On the Review stack-title-name page, scroll to the bottom and read the acknowledgement from AWS that this CloudFormation template might create IAM resources. Then, check the acknowledgement box, and click Create stack.
- Once the stack is created, the ARN for the role is displayed in the Outputs section. Copy the value provided for the ARN Key. The ARN should look something like
arn:aws:iam::123456789:role/.... - Return to the source configuration page in the Sumo Logic UI and enter the ARN you copied into the Role ARN field.
Create a role manually using the AWS console
- Sign in to the AWS Management Console and open the IAM console.
- In the navigation pane of the console, choose Roles and then choose Create role.
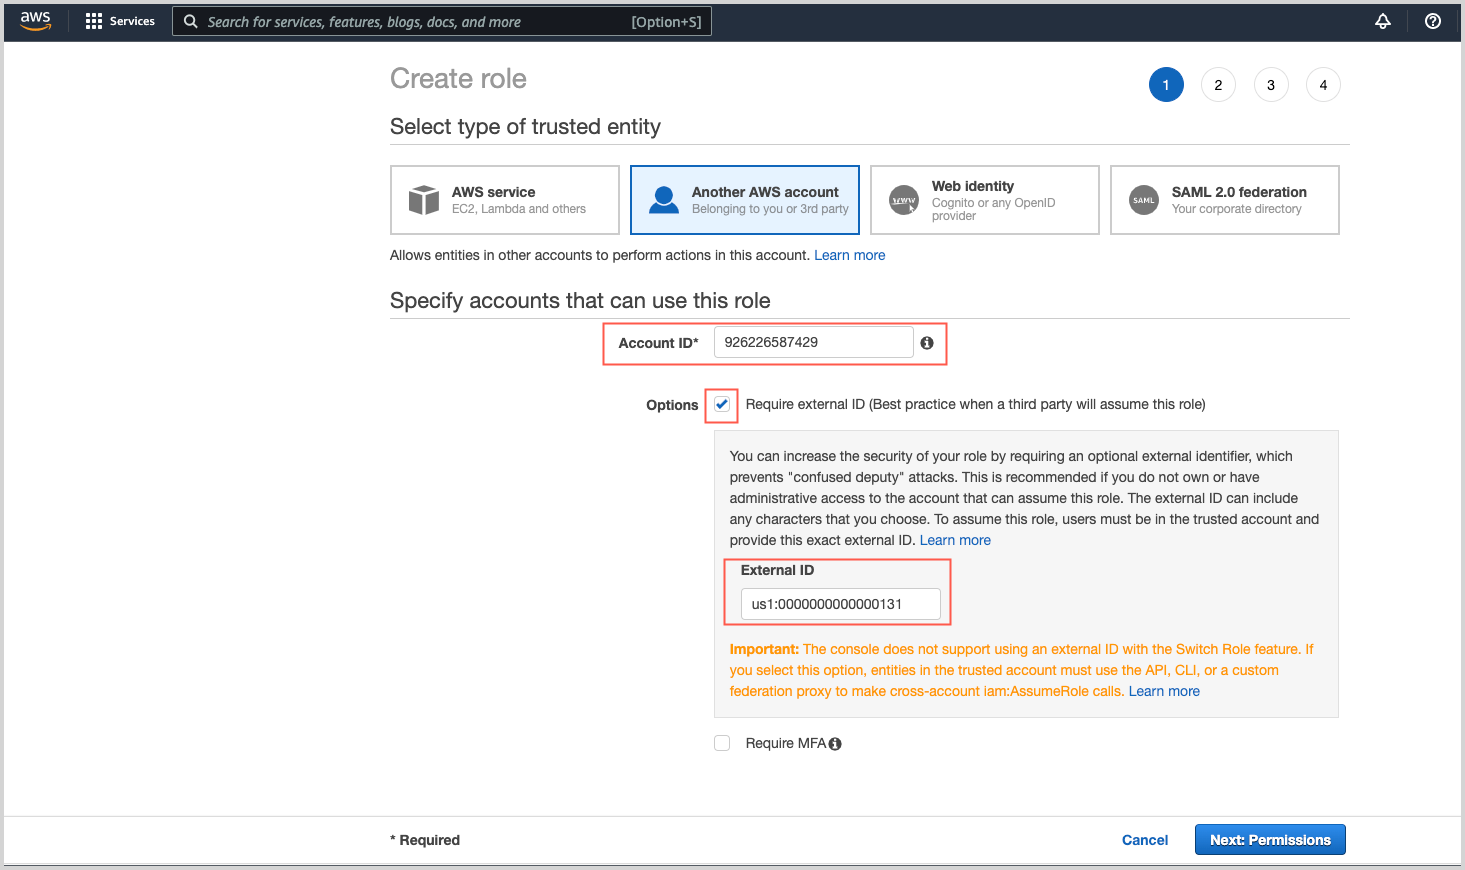
- On the Create role page:
- Click Another AWS account as the type of trusted entity.
- Account ID. Enter the following Sumo Logic ID:
926226587429. - In the Options section, checkmark the Require external ID for better security.
- External ID. The External ID is formed from your Sumo Logic region identifier and your Sumo Logic account identifier in this format: SumoDeployment:SumoAccountId where:
- SumoDeployment is your Sumo Logic deployment entered in lowercase such as au, ca, de, eu, fed, jp, kr, us1, or us2. To find your deployment, see Sumo Logic Endpoints by Deployment and Firewall Security.
- SumoAccountId is the Organization ID shown on your Account Overview in the Sumo Logic UI. You can access it by going to the Account Overview page.
- Require MFA. Don’t select this option; it is not supported.
- Click Next: Permissions.
- Click Create policy. The Create policy page opens in a separate window.
- On the Create policy page, choose the JSON tab.
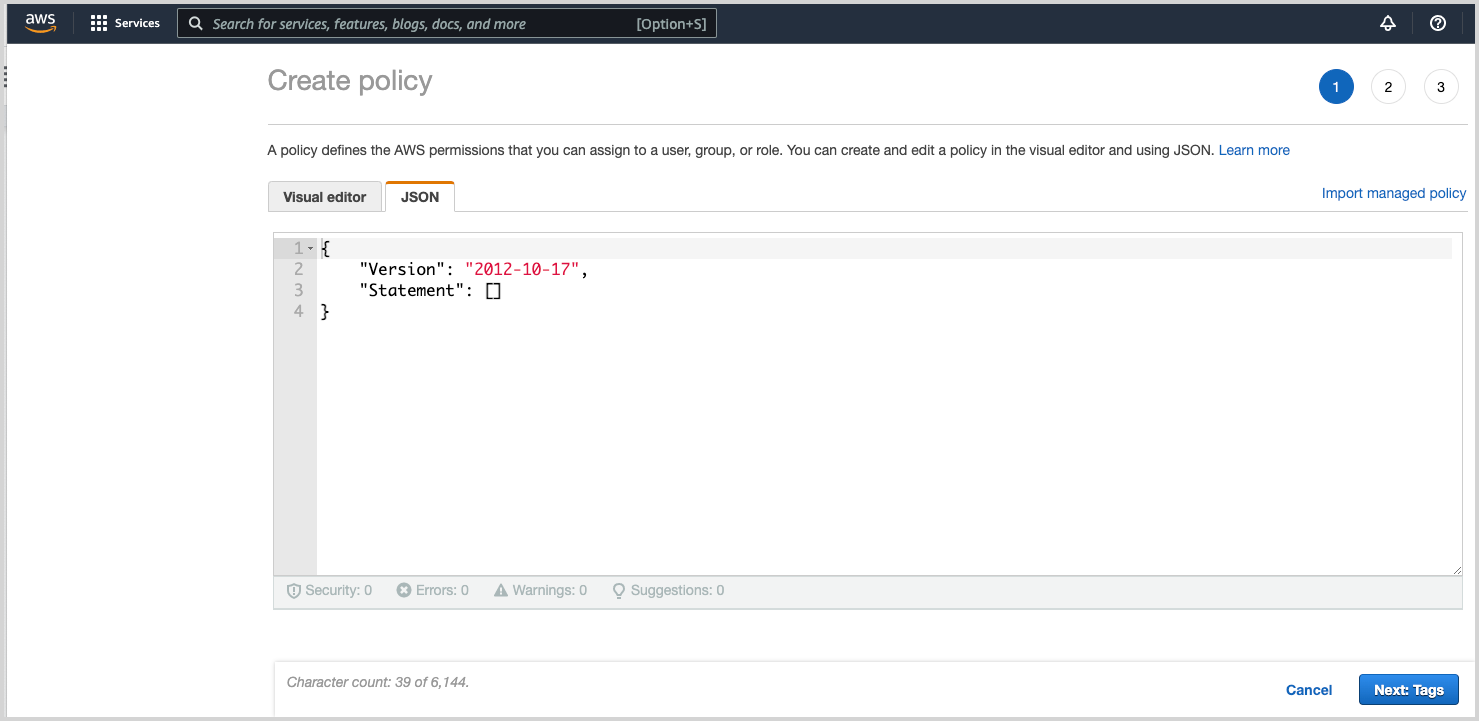
- Paste in the JSON policy for your source type.
- Click Next: Tags.
- Enter tags, as desired. Click Next: Review.
- Name. Enter a name for your policy. Policy names must be unique within your AWS account. Policy names are case-insensitive, and can’t be changed once created.
- Description. (Optional)
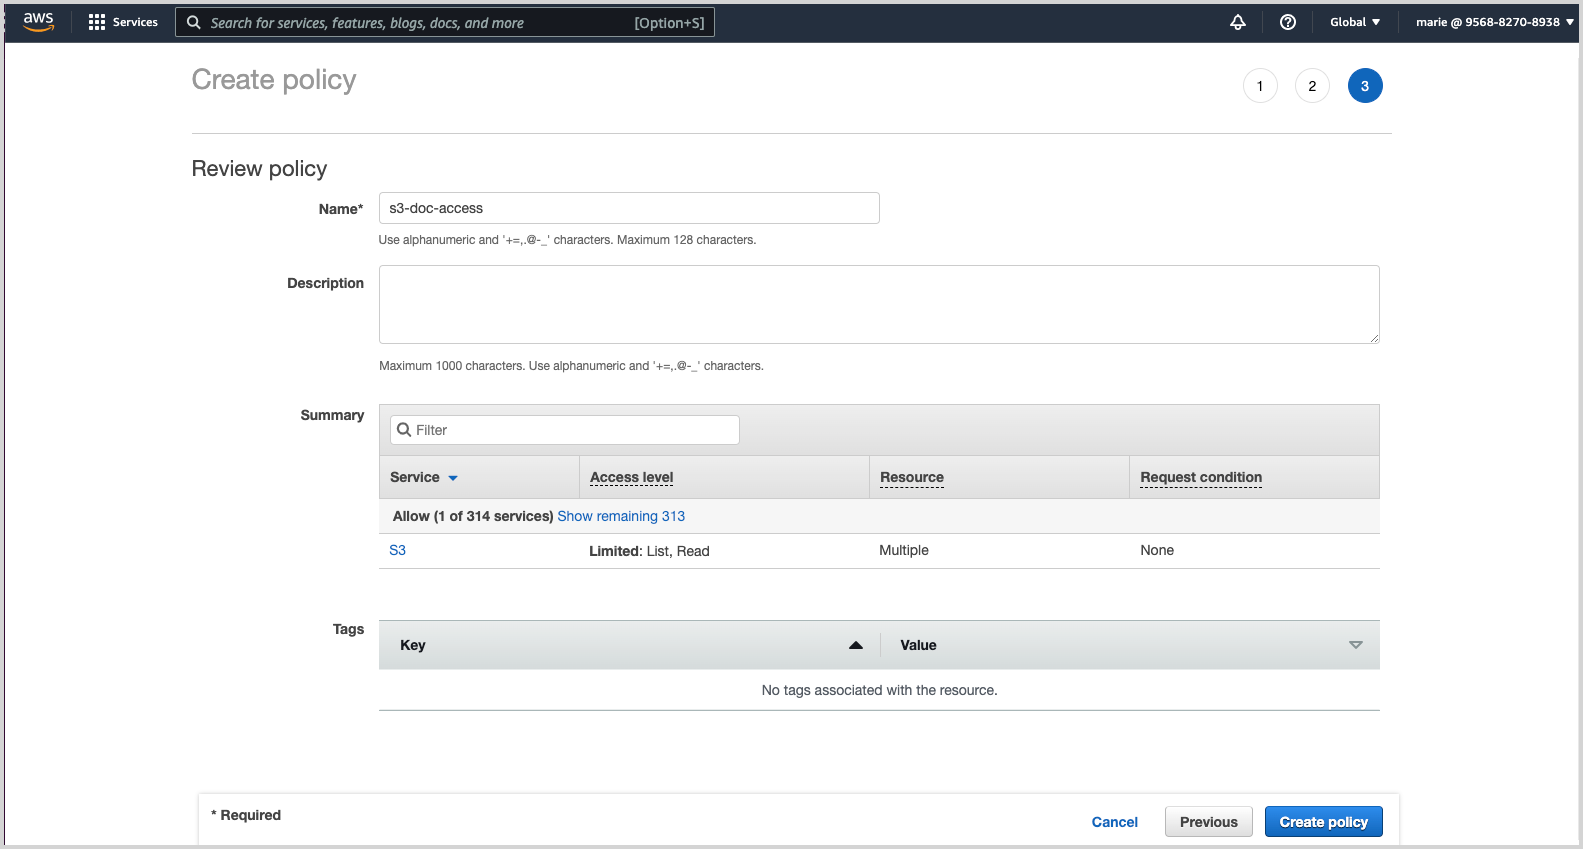
- Click Create policy.
- Return to the previous tab for the Create role page, and click the refresh button in the console.
- Filter by the name of the policy you created, and select the checkbox next to it.
- Click Next:Tags.
- Enter tags, as desired, and click Next: Review.
- On the Create role - Review page, enter a Role name.
- Review the configuration of the role, and click Create role.
- After creating the role, you will be returned to the IAM > Roles console.
- Enter the name of the newly created role, and then select the role.
- Copy the Role ARN. When you create your Sumo Logic source, enter it in the Role ARN field. The ARN will look something like
arn:aws:iam::123456789:role/...
It may take a few minutes after creating a role for it for authentication with AWS to work. This is due to AWS's eventual consistency.
User-level access
Although not recommended, you can configure your source to authenticate with AWS at the IAM user level.
Sumo Logic supports IAM user-level access to support GovCloud and China users who cannot provide Sumo Logic access using a cross-account role. For other environments Sumo Logic recommends role-level access.
If you're creating a new user for this purpose, see the instructions below. If you want to use an existing IAM user, you can simply update the role with the appropriate policy from Policies below.
To grant an IAM user access to an AWS service, you’ll need to create the user in AWS with programmatic access. The AWS Access Key ID and AWS Secret Access Key generated will be used to configure access to the S3 bucket by the Sumo Logic source.
The instructions in this section are for creating a user using the AWS console. For information about using the AWS CLI or AWS API to create a user, see Creating an IAM user in your AWS account in AWS help.
- Sign in to the AWS Management Console and open the IAM console.
- In the navigation pane of the console, choose Users and then choose Add users.
- On the Add user page:
- User name. Enter a username for the new user. Enter a username for the new user.
- Select AWS credentials type. Click the checkbox next to Access key - Programmatic access.
- Click Next: Permissions.
- Select Attach existing policies directly.
- Click Create policy. This should open the Create policy page in a separate window.
- Choose the JSON tab on the Create policy page.
- Paste in the JSON policy for your source type.
- Click Next: Tags.
- Enter tags as desired and click Next: Review.
- On the Create policy page.
- Name. Enter a name for your policy. Policy names must be unique within your AWS account. Policy names are case-insensitive and can’t be changed after creation.
- Description. (Optional)
- Click Create policy.
- Return to the previous tab for the Add user page, and click the refresh button in the policy list.
- Select the checkbox next to the policy, and click Next: Tags.
- Enter tags as desired. Click Next: Review.
- Review the user details and permissions, and click Create user.
- You will be provided with the User, Access key ID, and Secret access key. Securely store these credentials.
To use services in the China (Beijing) Region (cn-north-1), you must have an account and credentials that are specific to the China (Beijing) Region. Accounts and credentials for other AWS regions won't work for the China (Beijing) Region. Likewise, accounts and credentials for the China (Beijing) Region won't work for other AWS regions. For information about the region, see http://www.amazonaws.cn/en/.
Policies
This section contains several AWS policies—for the S3, CloudWatch Metrics, and AWS Metadata (Tag) sources that you can attach to an existing IAM role or user. You’ll want to do this if you have created a new role for granting access to AWS or you have an existing IAM role or user you want to use for AWS access.
This section also provides a policy that enables collection of data from encrypted sources, and one that enables data forwarding to S3.
You can add any of these policies to an existing IAM Role or User. For more information and instructions, see Creating IAM policies and Adding and removing IAM identity permissions in AWS help.
Amazon S3 Policy
This policy supports the following Sumo Logic source types: Amazon S3 Source, Amazon S3 Audit Source, AWS CloudFront Source, and AWS ELB Source.
Sumo Logic will verify the existence of the bucket using the GetBucketAcl API request, which will appear in CloudTrail with an AccessDenied response. Sumo Logic does not need the GetBucketAcl API request to collect data from S3 buckets.
Replace the your_bucketname placeholders in the Resource section of the JSON policy with your actual S3 bucket name.
{
   "Version":"2012-10-17",
   "Statement":[
      {
         "Action":[
            "s3:GetObject",
            "s3:GetObjectVersion",
            "s3:ListBucketVersions",
            "s3:ListBucket"
         ],
         "Effect":"Allow",
         "Resource":[
            "arn:aws:s3:::your_bucketname/*",
            "arn:aws:s3:::your_bucketname"
         ]
      }
   ]
}
- All of the Action parameters shown above are required. Make sure to include both of the Amazon Resource Name (ARN) statements in the Resource section of the policy. Both statements are required to allow full access to the bucket contents and the bucket itself.
- If your S3 bucket is versioned, configure the S3 source to use the versioned APIs as well, and make sure your policy has
GetObjectVersionandListBucketVersionspermissions. If the S3 bucket is not versioned, you do not need these permissions and you should configure the S3 source to not use versioned APIs.
AWS CloudWatch Source Policy
This policy is for an Amazon CloudWatch Source for Metrics.
The tag:GetResources parameter is needed only if you are creating a CloudWatch Source to collect tags from AWS namespaces that support tags.
{
    "Version": "2012-10-17",
    "Statement": [
        {
            "Action": [
                "cloudwatch:ListMetrics",
                "cloudwatch:GetMetricStatistics",
                "tag:GetResources"
            ],
            "Effect": "Allow",
            "Resource": "*"
        }
    ]
}
AWS Metadata (Tag) Source
This policy is for an AWS Metadata (Tag) Source.
{
   "Version": "2012-10-17",
   "Statement": [
       {
           "Action": [
               "tag:GetResources"
           ],
           "Effect": "Allow",
           "Resource": "*"
       }
   ]
}
AWS Kinesis Firehose for Metrics
This policy is for an AWS Kinesis Firehose for Metrics Source.
tag:GetResources
Data Forwarding Policy
This policy is for Forwarding Data from Sumo Logic to S3.
Replace the your_bucketname placeholder in the Resource section of the JSON policy with your actual S3 bucket name.
{
   "Version":"2012-10-17",
   "Statement":[
      {
         "Effect":"Allow",
         "Action":[
            "s3:PutObject"
         ],
         "Resource":[
            "arn:aws:s3:::your_bucketname/*"
         ]
      }
   ]
}
KMS Key Policy for server-side encrypted data
To collect data from encrypted sources, for example, encrypted CloudTrail logs, you'll also need to add access to the KMS resources in your KMS Key Policy. Add the IAM User or Role to the Principal section of your Key Policy and provide the kms:Decrypt action. See Amazon's documentation on Key Policies for more information, including how to view and change your policy.
The following is a basic example snippet of a policy with the kms:Decrypt action.
{
      "Sid": "Enable Sumo Logic S3 kms decrypt",
      "Effect": "Allow",
      "Principal": {"AWS": "<insert sumo s3 bucket read role>"},
      "Action": "kms:decrypt",
      "Resource": "*"
}