Create a Structured Log Mapping
This topic has instructions for creating a log mapping for structured messages using the Cloud SIEM UI. Log mapping is the process of telling Cloud SIEM how to build a Record from the key-value pairs extracted from messages.
For more information about log mapping, and how it fits into the Record creation process, see the Record Processing Pipeline topic. For a complete list of the standard log mappings, see Mappings the Cloud SIEM Content Catalog.
About the log mapping process
When you set up a log mapping, you supply the following information:
- What messages will the mapper process? To identify which incoming messages the mapper should process, you supply a vendor name, product name, message format, and an event ID expression.
- What Record type should be created for the messages the mapper processes? Cloud SIEM has multiple predefined Record types, each of which corresponds to a particular sort of event a log message might describe. When you configure a log mapping, you select the Record type that corresponds best to the log messages the mapper will process. For example, you would select “Authentication” as the Record type to create from messages that report successful or unsuccessful authentication events.
- What normalized classification should be added for the messages the mapper processes? Records can be classified at two levels of granularity. First, at a high level with Record Types which all mapped Records have, and more specifically using Normalized Classification Fields alongside the mapped attributes within a Record. For more information, see the Cloud SIEM Normalized Classification.
Step 1: Choose mapping type and name the mapping
- In the top menu select Configuration, and then under Incoming Data select Log Mappings.
- Click Create in the upper right side of the Log Mappings page.
- Click the Structured Mapping tile on the Create a Mapping page.
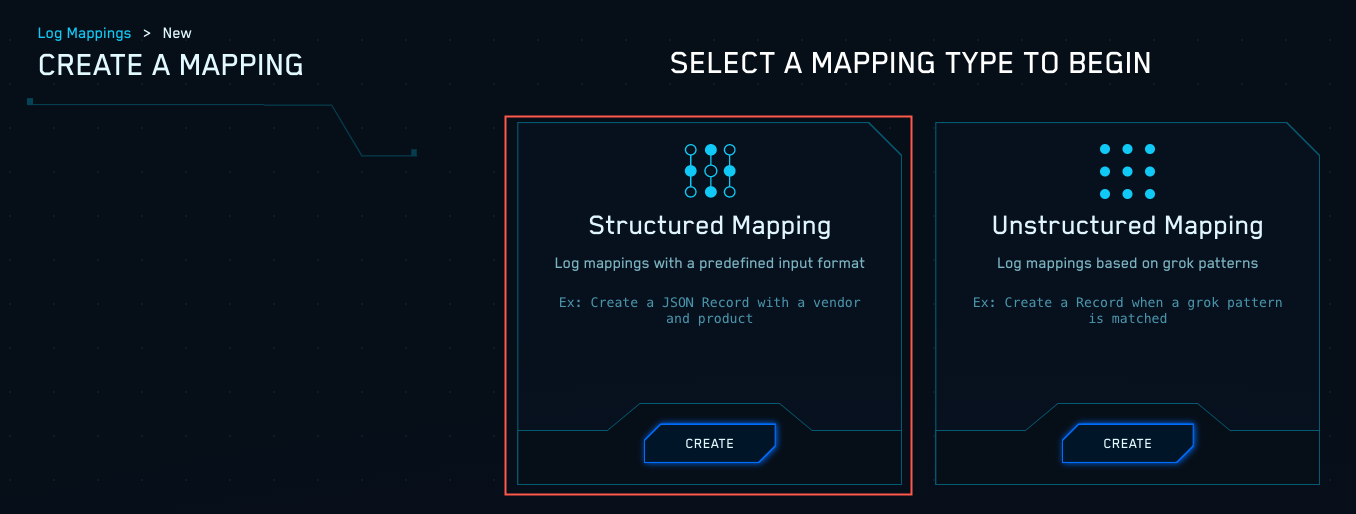
- On the New Mapping page, enter a name for the mapping.
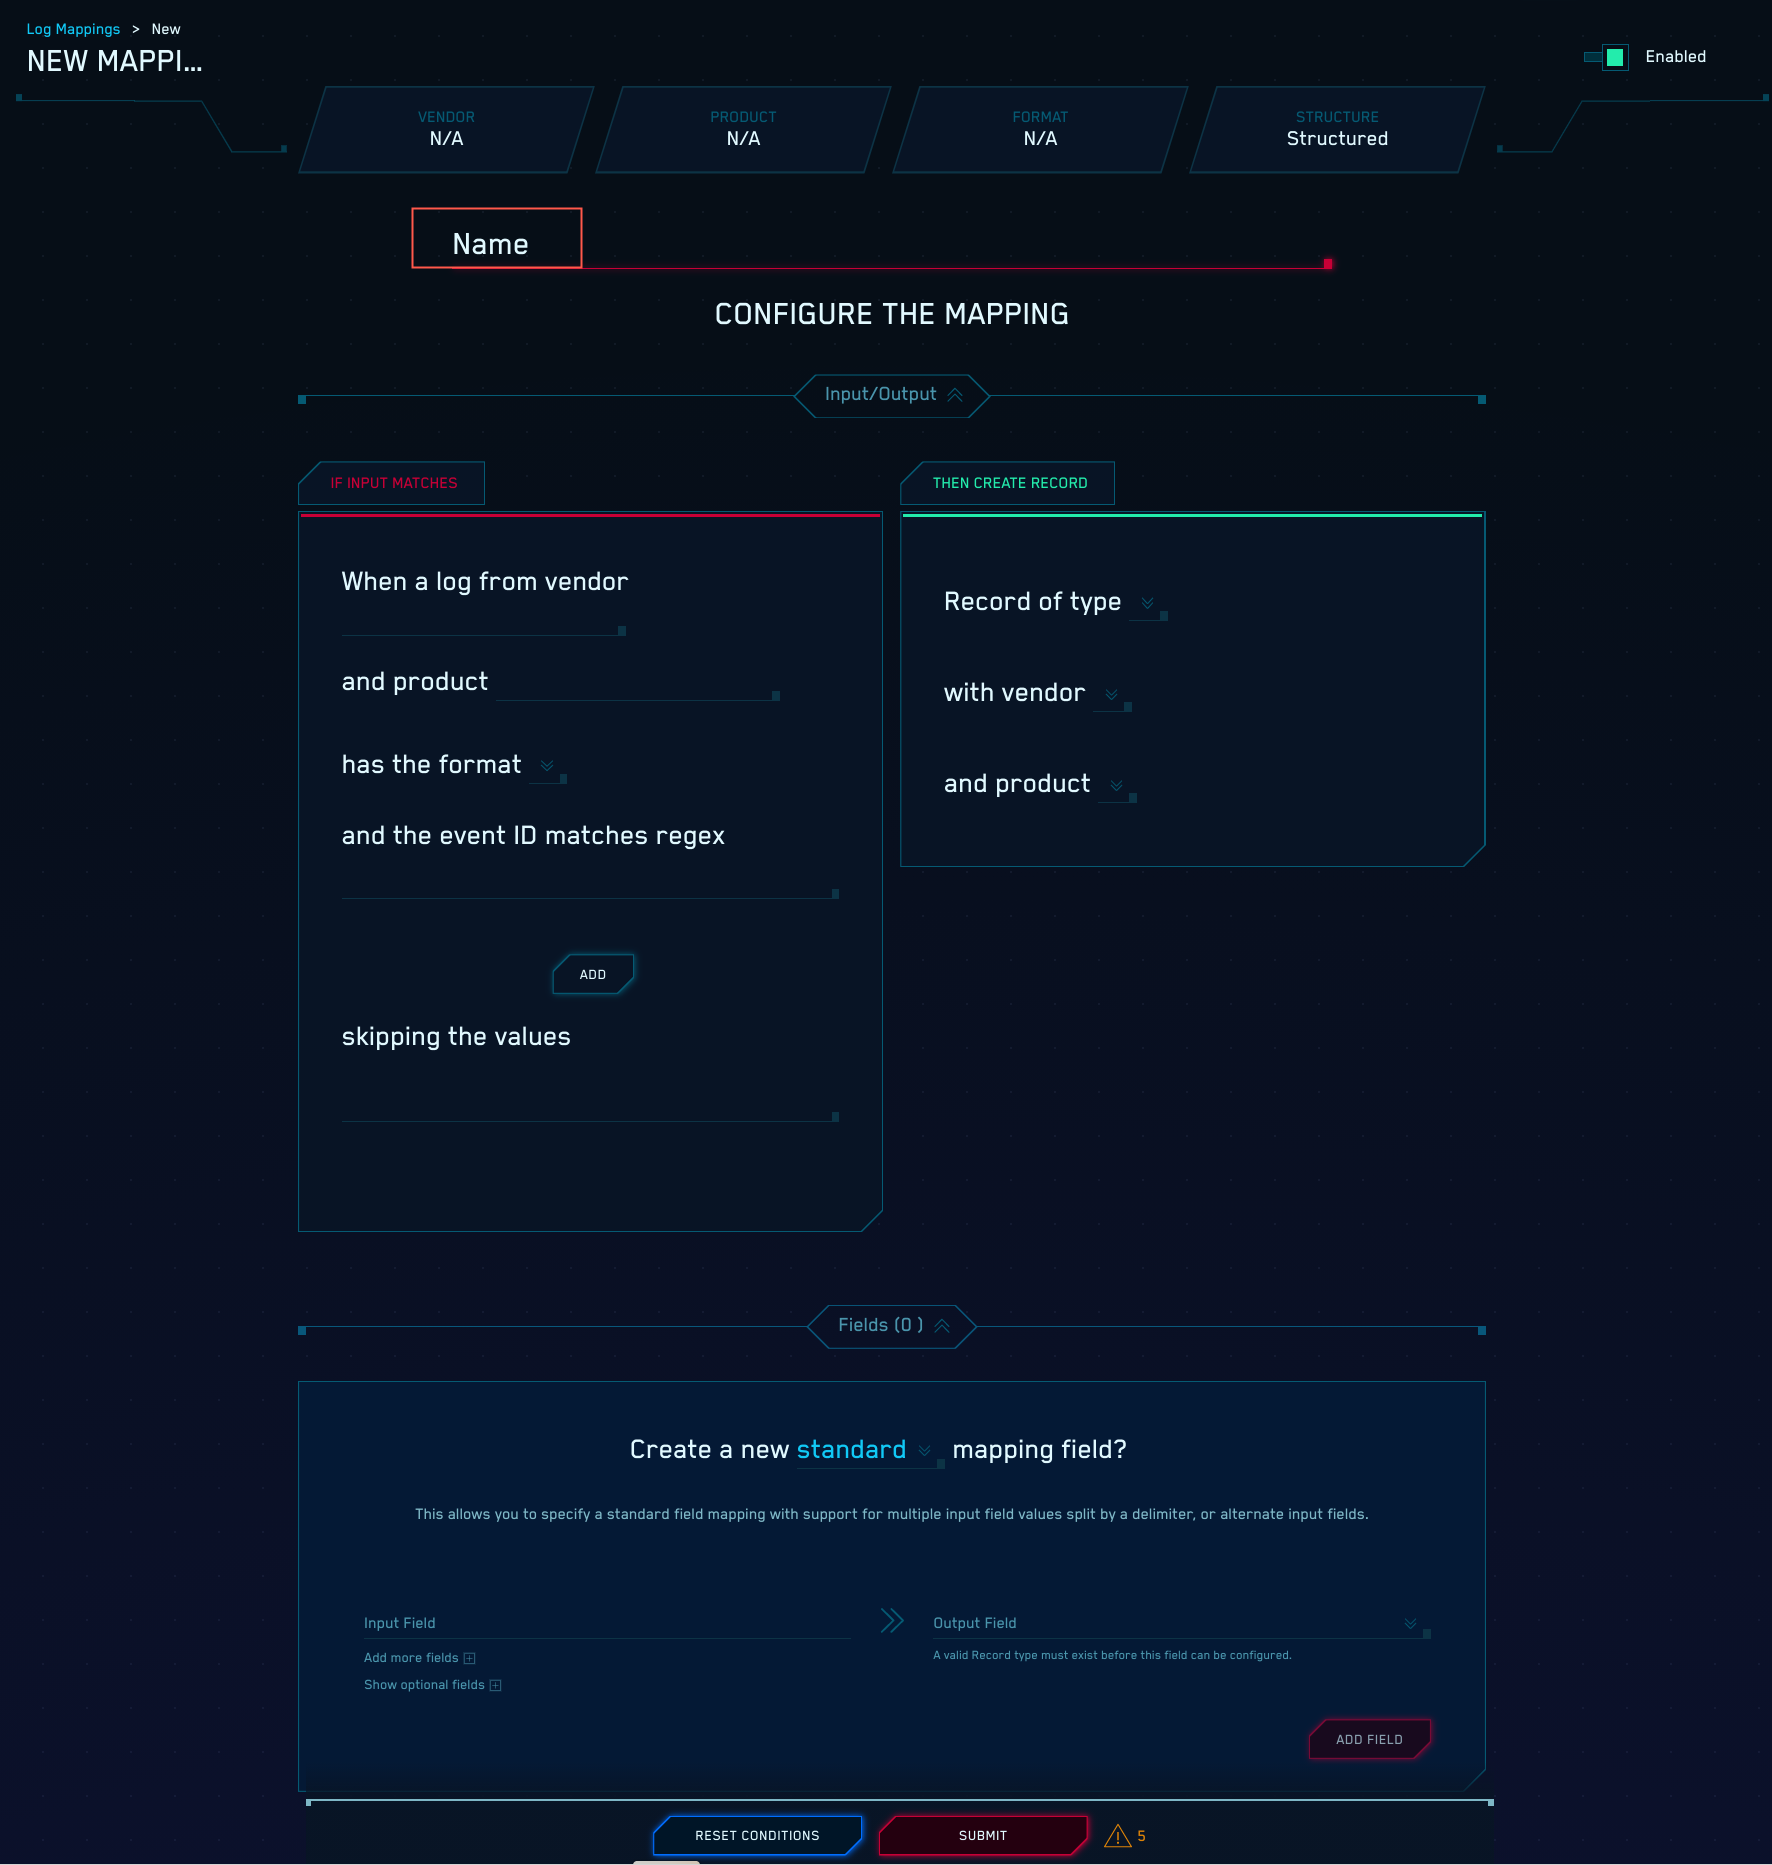
Step 2: Enter “If Input Matches” values
In this step you supply information about the messages that the mapper will process: the vendor, product name, message format, and an event ID regex.
The values you supply should correspond to the values that were supplied for vendor, product name, message format, and event ID regex in the Sumo Logic ingest mapping configured for the data source.
- When a log from vendor. The vendor of the product that issues the messages to be mapped. Select the vendor from the drop-down list. If the vendor does not appear in the drop-down list, you can create a new vendor entry by typing the vendor name as it appears in messages generated by the product, and clicking the Create "
<vendor name>" button that appears beneath the field. - and product. The name of the product that issues the messages to be mapped. Select the product from the drop-down list. If the product does not already exist in the drop-down list, you can create a new product entry by typing the product name as it appears in messages generated by the product, and clicking the Create "
<product name>" button that appears beneath the field. - has the format. The format of the messages: JSON, Windows XML, Syslog, or CEF/LEEF
- and the event ID matches regex. An event ID pattern, which is a constant value or a regex string that is checked against the
event_idfield (or constant, or group of fields) defined in the Sumo Logic ingest mapping for the data source. - Add. If you intend the mapper to also process messages with a different combination of Vendor, Product, Format, and Event ID pattern click Add, and repeat steps 1 through 4, as many times as you want.
- skipping the values. A list of skipped values (which is usually set to “,” and “-”) for which any value in the original log should be ignored.
Step 3: Enter “Then Create Record” values
- Record of type. Select the Record type that specifies the attributes that the Records created by the mapper should contain.
- with vendor. The vendor name that the mapper should write to Records. If you already selected a vendor in When a log from vendor in the If Input Matches area, that vendor appears here. In the Records the mapper creates, this value will be written to the
device_vendorfield. - and product. The product name that the mapper should write to Records. If you already selected a product from and product in the If Input Matches area, that product appears here. In the Records the mapper creates, this value will be written to the
device_productfield.
Step 4: Specify field mapping
In this step you specify field mapping. This is the process of assigning the value of message fields to Cloud SIEM attributes.
You might not map all message fields to schema attributes. Unmapped message fields will be retained in the fields attribute of the resulting Records.
The sections that follow have instructions for setting up each type of mapping:
- constant mapping
- extracted mapping
- format mapping
- joined mapping
- lookup mapping
- split mapping
- standard mapping
- time mapping
If you are creating a mapping for a source whose messages you want to be processed by Cloud SIEM's normalized threat rules, see Field Mapping for Security Event Sources.
constant mapping
You can use a constant mapping to map a constant encountered in a message to a Cloud SIEM attribute.
Example constant mapping
Given the example constant mapping below, if the key value “true” is encountered in an incoming message, that value is mapped to the success schema attribute.
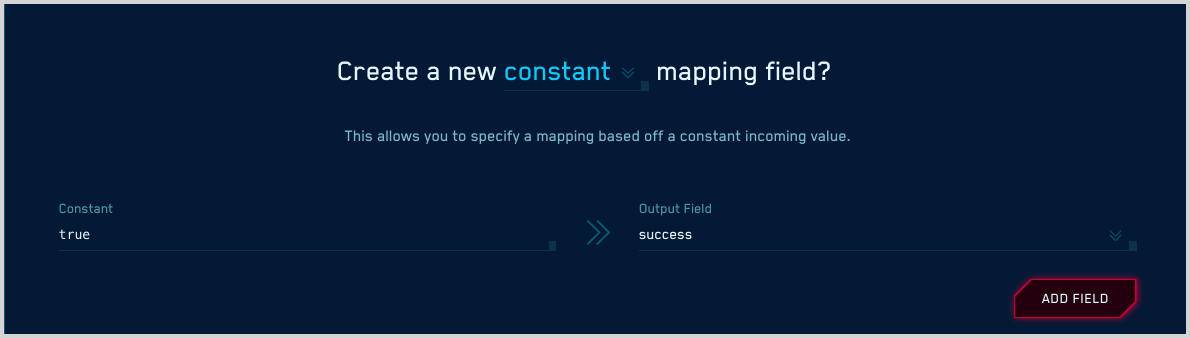
To configure a constant mapping:
- Select constant from the Create a new … mapping field? pull-down.
- Constant. Enter the name of an input field. This is the field from incoming messages whose value you want to translate.
- Output Field. Select an output field. This is the Record attribute whose value you wish to populate.
- Click Add Field to save the field mapping.
extracted mapping
You can use an extracted mapping to map a field that was extracted from a log message by a Sumo Logic Field Extraction Rule (FER) to a Cloud SIEM attribute.
Example extracted mapping
Given the following example mapping, if the extracted field serial is encountered in a message, its value is mapped to the resource schema attribute.
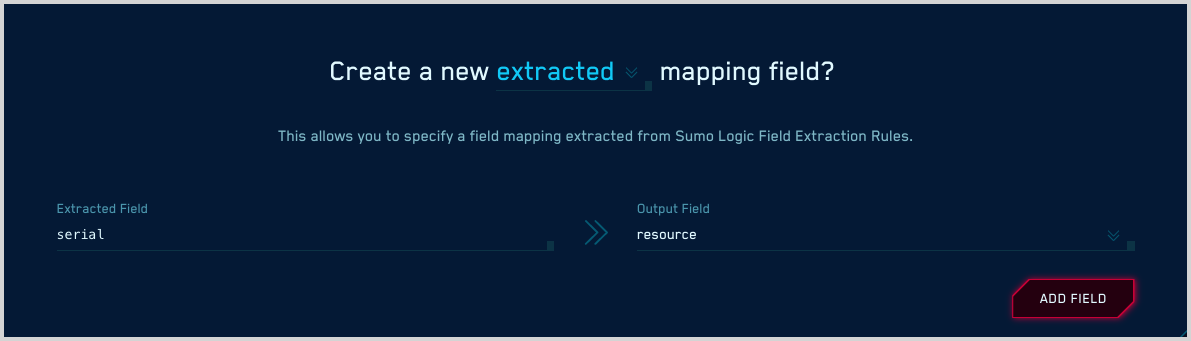
To configure a extracted mapping:
- Select extracted from the Create a new … mapping field? pull-down.
- Extracted Field. Enter the name of an extracted field.
- Output Field. Select an output field. This is the Record attribute whose value you wish to populate.
- Click Add Field to save the field mapping.
format mapping
You can use a format mapping to create a string from multiple message field values using format specifiers, like %s.
Example format mapping
The example mapping below creates a string by combining the values of the firstName and the lastName message fields, separated by a space. If a message contains the following fields:
{"firstName": "John", "lastName": "Doe"}
the mapping combines the values of the firstName and the lastName message fields, separated by a space. The resulting value, "John Doe", is mapped to the user_username attribute.
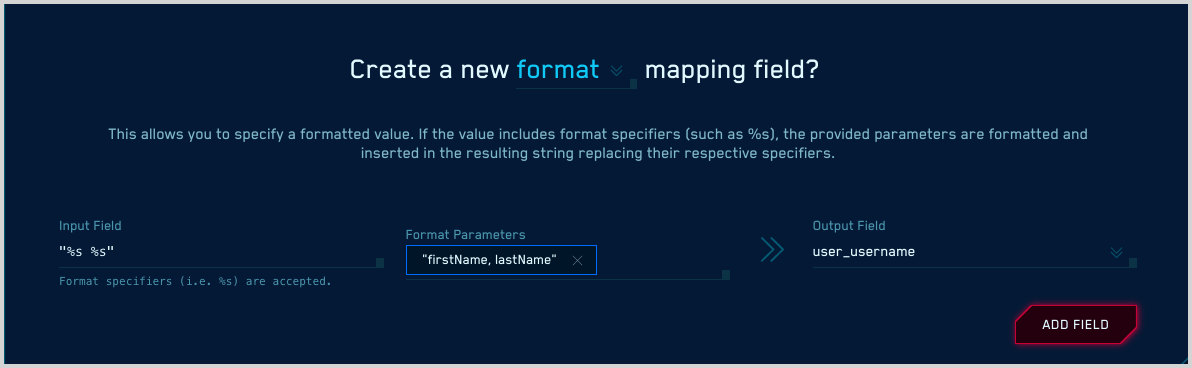
To define a format mapping:
- Select format from the Create a new … mapping field? pulldown.
- Input Field. Enter the format specifiers to be applied to the message fields you’ll specify in the next step.
- Format Parameters. Enter the message fields to which the formatting will be applied.
- Output Field. Select an output field. This is the Record attribute whose value you wish to populate.
- Click Add Field to save the field mapping.
joined mapping
You can use a joined mapping to join multiple values together and map them to a Cloud SIEM attribute.
Example joined mapping
In the screenshot below, we're configuring a mapping that joins the value of the actor.firstname and actor.lastname fields and maps the result to the user_username attribute. For example, if the value of actor.firstname is "zaya", and the value of actor.lastname is "hedad", this mapping would result in "zayahedad" being written to the user_username attribute.
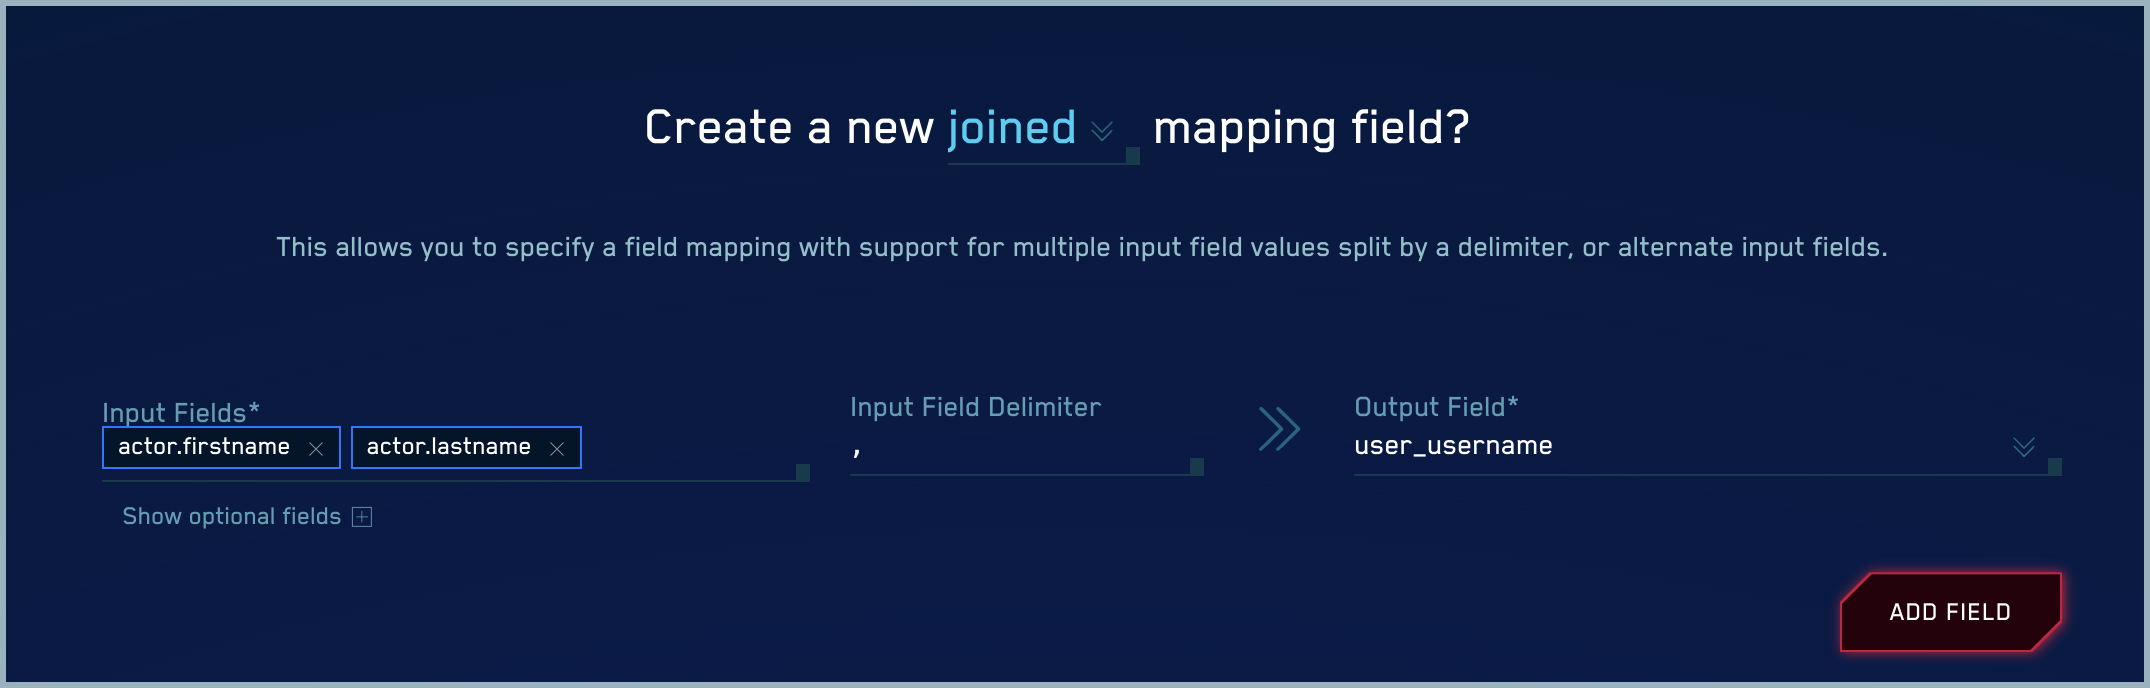
- Input Fields. Enter the names of input fields. These are the fields from incoming messages whose values you want to join.
- Delimiter. Enter the character that delimits the segments of the input fields.
- Show optional fields. Expand this section if you want to specify one or more alternative input fields, or set a default value to be mapped to the target in the event that the input field is null.
- Alternate input fields. Enter one or more fields, separated by spaces. If any of the input fields you entered above do not exist in a message, or is null, the value of the first alternative field that exists in the message and isn’t null will be mapped to the Cloud SIEM attribute you’ll specify later in this procedure.
- Default value. Enter the value you want to write to the Cloud SIEM attribute in the event that neither the input field or any alternative fields with non-null values exist in the message.
- Output Field. Select an output field. This is the Record attribute whose value you wish to populate.
lookup mapping
You use a lookup mapping to specify a set of input-output value pairs that are used to translate the value of an input field to the output value that should be mapped to a selected Cloud SIEM attribute. You can define a default value that will be applied if the input field value from an incoming message doesn’t match any of the input values you define.
Example lookup mapping
In the screenshot below, we’ve defined a set of lookup key-value pairs that specify how to translate the value of the EventData.LogonType field and write it to the logonType attribute in resulting Records.
The configuration shown below defines what value to write to the logonType attribute of a Record when the EventData.LogonType message field value is “1”, “2”, “3”, or “4”, which will be “Interactive”, “”Network”, “Batch”, and “Service”, respectively.

To define a lookup mapping
- Select lookup from the Create a new … mapping field? pulldown.
- Input Field. Enter the name of an input field. This is the field from incoming messages whose value you want to translate.
- Default Value. (Optional) Enter a default value to map to the target output field if none of the input values match the input field value.
- Input Value. Enter an input value.
- Output Value. Enter the value you want to translate the input value to.
- Add Mapping Pair. Click this option and repeat the two previous steps 3 through 5 to an additional value mapping.
- Input Case Sensitive. Check the box if the value of the input field is case sensitive.
- Output Field. Select an output field. This is the Record attribute whose value you wish to populate.
- Click Add Field to save the field mapping.
split mapping
You can use a split mapping to split the character-delimited value of an input field into multiple segments, and map one segment to the selected Cloud SIEM attribute.
Example split mapping
In the screenshot below, we’re configuring a mapping that splits the value of the actor.email field when an ampersand (@) is encountered, and maps the first segment to the user_username attribute. For example, if the value of actor.email is “ddonovan@acme.com”, this mapping would result in “ddonavan” being written to the user_username attribute.
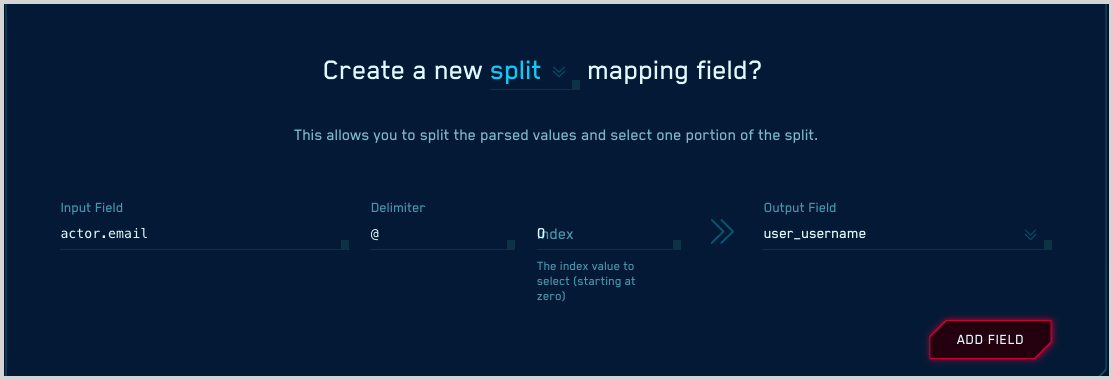
To define a split mapping:
- Select split from the Create a new … mapping field? pull-down.
- Input Field. Enter the name of an input field. This is the field from incoming messages whose value you want to split.
- Delimiter. Enter the character that delimits the segments of the field.
- Index. Enter the integer value that corresponds, order-wise, to the segment of the field that you want to write to the output field you’ll specify in the next step. An index value of “0” indicates the first segment, “1” indicates the second segment, and so on. Use a negative index value to index from the end (i.e., "-1" for the last segment, "-2" for the second to last segment).
- Output Field. Select an output field. This is the Record attribute whose value you wish to populate.
- Click Add Field to save the field mapping.
standard mapping
You can use a standard mapping to map a single input field to a Cloud SIEM attribute or to combine the values of multiple input fields into a character-delimited value and map it to a Cloud SIEM attribute.
Optionally, you can specify one or more alternative input fields that will be used in the case that the specified input field doesn’t exist in the message, or is null.
An alternate input field won’t be mapped to the selected attribute if the specified input field exists and has an empty string as its value.
Example standard mapping: single input field
In the screenshot below, we’re configuring a mapping that maps the value of the EventData.LogonProcessName message field to the application attribute. We defined one alternate input field, AppId, which will be mapped to the application attribute if the EventData.LogonProcessName field is not found in the message, or exists and is null.
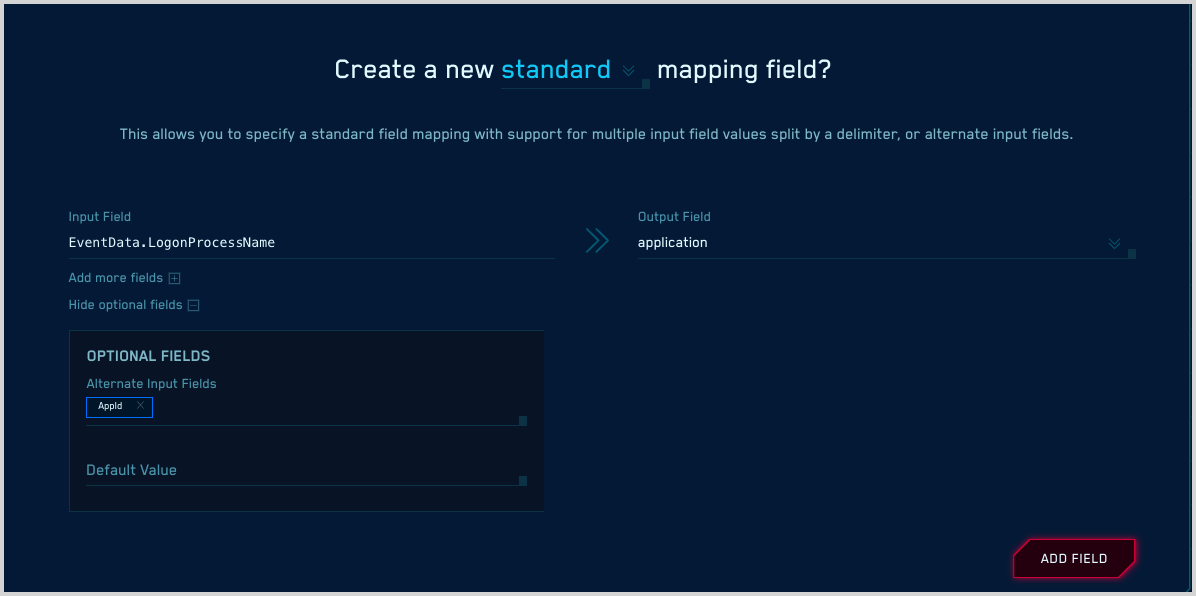
To map a single input field:
-
Select standard from the Create a new … mapping field? pull-down.
-
Input Field. Enter the name of an input field. This is the field from incoming messages whose value you want to write to the Cloud SIEM attribute you’ll specify later in this procedure.
-
Show optional fields. Expand this section if you want to specify one or more alternative input fields, or set a default value to be mapped to the target in the event that the input field is null.
- Alternate input fields. Enter one or more fields, separated by spaces. If the Input Field you entered above doesn’t exist in a message, or is null, the value of the first alternative field that exists in the message and isn’t null will be mapped to the Cloud SIEM attribute you’ll specify later in this procedure.
- Default value. Enter the value you want to write to the Cloud SIEM attribute in the event that neither the input field or any alternative fields with non-null values exist in the message.
-
Output Field. Select an output field. This is the Record attribute whose value you wish to populate.
-
Click Add Field to save the field mapping.
Example standard mapping: multiple input fields
This example mapping combines the values of fielda and fieldb, separated by a period delimiter, and maps the result to the user_username attribute.
We defined two alternative fields, fieldc and fieldd. If fieldaand fieldb are not found in a message or are null, the values of fieldc and fieldd are used instead to form the value to be mapped to the user_username attribute.
We also defined a default value: if fieldc and fieldd are not found in a message or are null, the default value “john.doe” is mapped to the user_username attribute.
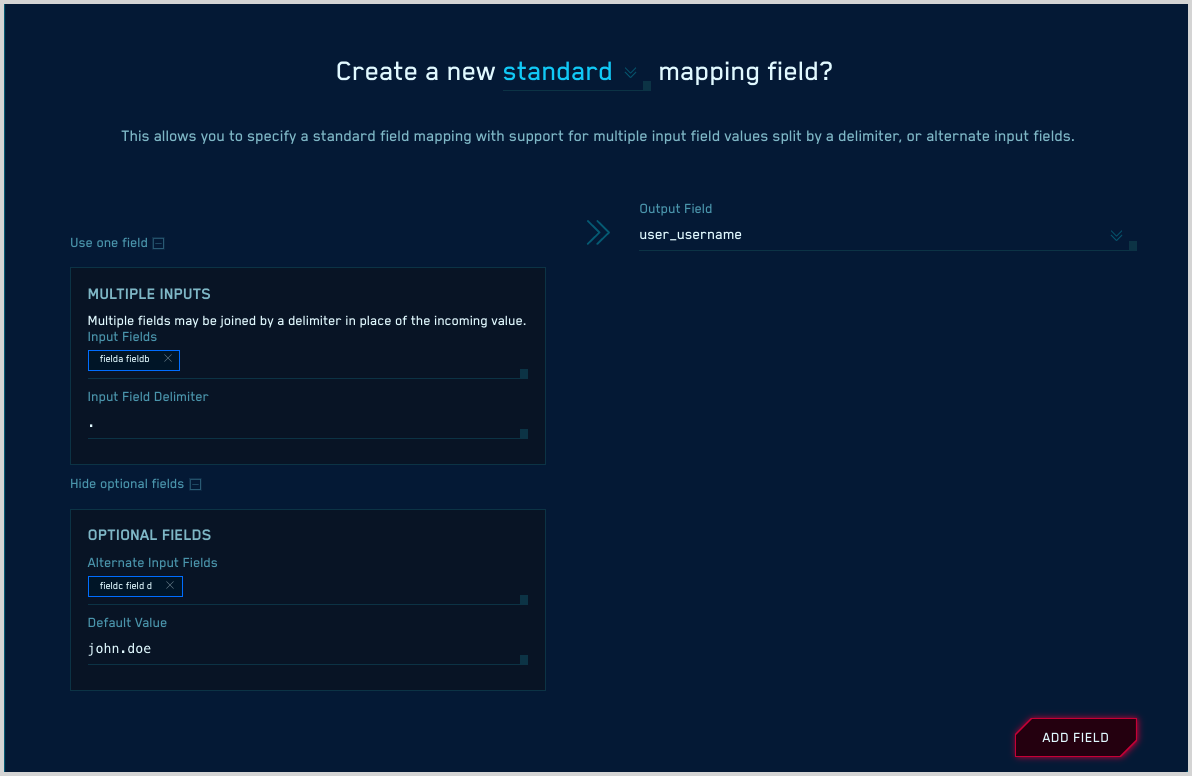
To map multiple input fields:
- Select standard from the Create a new … mapping field? pull-down.
- Add more fields. Expand this section.
- Input Fields. Enter the names of the input fields to be combined, separated by spaces.
- Input Field Delimiter. Enter the character to use as the delimiter between the input field values.
- Show optional fields. Click this if you want to specify one or more alternative input fields, or set a default value to be mapped to the target in the event that the input field is null.
- Alternate input fields. Enter one or more fields, separated by spaces. If any of the Input Fields you entered above don’t exist in a message, or are null, the values of the alternative fields you enter will be combined and mapped to the Cloud SIEM attribute you’ll specify later in this procedure.
- Default value. Enter the value you want to write to the Cloud SIEM attribute in the event that neither the input fields or any alternative fields exist with non-null values in the message.
- Output Field. Select an output field. This is the Record attribute whose value you wish to populate.
- Click Add Field to save the field mapping.
time mapping
You can use a time mapping to map a formatted time value to the timestamp schema attribute.
Example time mapping
This example mapping maps the TimeCreated.SystemTime input field to the timestamp attribute.
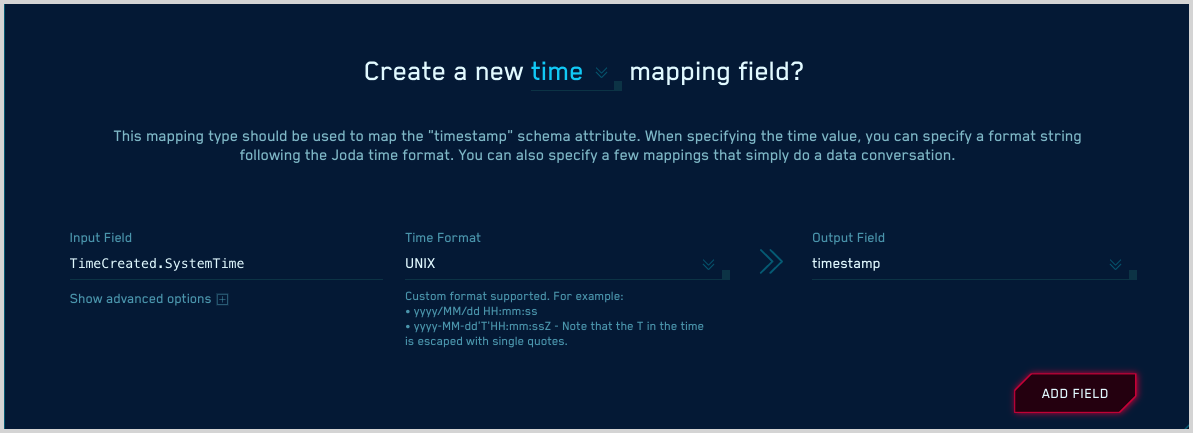
To create a time mapping:
- Select time from the Create a new … mapping field? pull-down.
- Input Field. Enter the name of the message field you want to map.
- Time Format. Select the following format that matches the format of your message field, or enter a custom Joda time format. * Unix * Unix (milliseconds) * Unix (float)
- Output Field. Select timestamp.
Example Joda time formats
Here are examples of custom Joda time formats.
yyyy/MM/dd HH:mm:ss yyyy-MM-dd'T'HH:mm:ssZ yyyy-MM-dd'T'HH:mm:ssZ
In the second and third examples above, T is a text indicator—it is escaped with single quotes so that it won’t be interpreted as part of the time pattern string.