Script Action
You'll need the View Collectors role capability to set a Script Action alert.
A Script Action passes the results of a scheduled search to a script or program that runs on a machine with an Installed Collector. The results are temporarily saved to the filesystem in JSON format at:
<sumologic_collector_installation_path>/<collector_id>-
<MM>-<dd>-<HH>-<mm>-<ss>-<sequence_id>
This fully-qualified path is passed as the first parameter to the script or program you configure in the Script Action. Anything printed to STDOUT will be collected and searchable.
The Collector executes the script as the user running the Collector process.

Step 1. Enable Script Actions on the Collector
Collectors using version 19.245-4 and later do not allow Script Actions to run by default. To allow Script Actions you need to set the Collector parameter enableActionSource in user.properties to true and restart the Collector.
Step 2. Create script
Create the script and save it to a folder on the host with the Installed Collector where you will set up the Script Action. Then set the shell script as an executable file:
chmod +x <nameOfFile>.sh
Step 3. Set up Script Action
You can set up a Script Action using the Sumo web app, described in Option A below, or by specifying it in a JSON file, described in Option B.
Option A. Set up Script Action using UI
-
In the main Sumo Logic menu, select Manage Data > Collection > Collection.
-
Find the name of the Installed Collector to which want to add the script action and select Add > Add Script Action.
-
Name. Enter a name to display for the Script Action.
-
Description. Optional.
-
Specify a timeout for your command. You can optionally set a timeout for script execution. Setting a timeout ensures that a script is killed, making sure that resources aren't fully consumed. If you set a timeout, make sure to select a generous amount of time to make sure that the script has enough time to finish running.
-
Command. Choose the type of command you're going to use.

-
Script. Enter the path to the script. Do not enter the contents of the script. (When the Collector executes the script, it will pass the full path to a file containing the search results that triggered the Script Action as the first and only parameter.)
-
Working Directory. Specify a directory if you need your Script Action to execute in a different directory than the Collector installation directory.
-
Click Save.
Option B. Set up Script Action in JSON file
To define a Script Action in a JSON file, define the following options:
name.Name of the action.automaticDateParsing. Set tofalse.commands.Type of command. See the previous section for examples.file.Path to the script.workingDir.Directory in which you want to run the script.timeout.Timeout for script execution, in milliseconds.sourceType.Set to "alert"
Example JSON:
{
"api.version":"v1",
"source":{
   "name":"testIngScriptAction",
   "automaticDateParsing":false,
   "commands":["/bin/bash"],
   "file":"/var/tmp/testIngScriptAction.sh",
   "workingDir":"/var/tmp",
   "timeout":180000,
   "sourceType":"Alert"
}}
For more information about configuring Sources in JSON files, see Use JSON to Configure Sources.
Step 4. Set up a Scheduled Search
After the Script Action has been added to your Collector, you can create a scheduled search. The search name will appear in the output file, along with the query.
The first time the Scheduled Search executes, output files will begin to be generated.
-
Save a search.
-
Click Schedule this search.
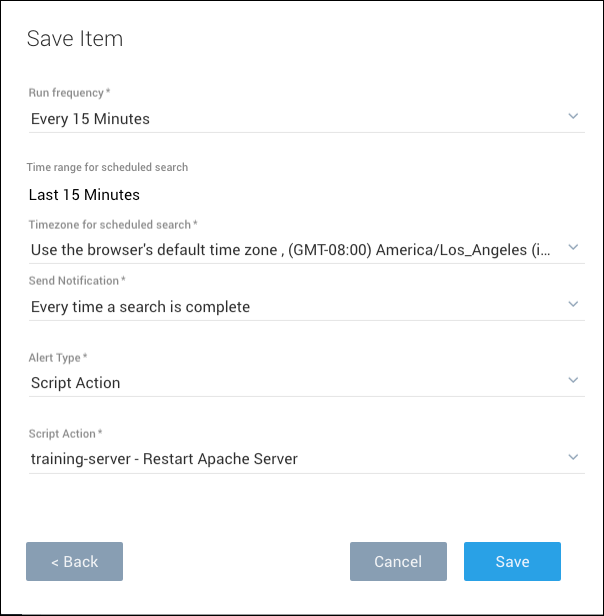
-
For all configuration options, see Schedule a Search.
-
Alert Type. Select Script Action.
-
Script Action. Select the name of the Script Action (displayed with its Collector's name) from the menu.
-
Click Save.
Example
This example shows how to set up a script and configure a Script Action.
-
Create a shell script
countNumberOfWarnings.sh, with the following contents:#!/bin/bash
num=`grep -oi "WARN" "$1" | wc -l`
echo "The number of \"WARN\" in the scheduled search result is $num"This script reads the output file of the scheduled search, counts the number of the appearances of keyword “WARN”, and then prints out the resulting number. For example, if the keyword “WARN” appears 10 times in the scheduled search results, the script prints the following:
The number of "WARN" in the scheduled search result is 10. -
Set the shell script as an executable file:
chmod +x countNumberOfWarnings.sh -
Select Manage Data > Collection > Collection.
-
Find the name of the Installed Collector to which you want to add the script action and select Add > Add Script Action.
-
Configure the Script Action as described in Step 3 above.
-
Define a search and click Save As.
-
Click Schedule this search, and complete the search configuration. Select "Script Action" as the Alert Type and select the script that you created. Click Save.
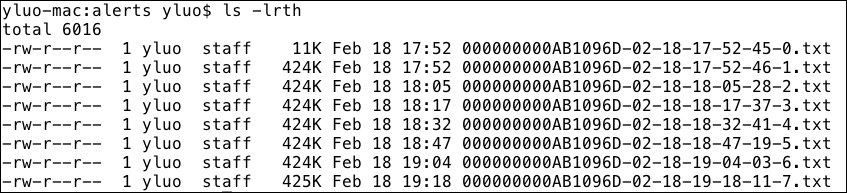
The Collector creates an alerts directory in its installation directory to store the results of the search, as in this example:
When the Collector gets the result of the Scheduled Search, it runs the script. The output of the script is collected by the Script Action, and you can run a query to get the results.
For this example, the Collector runs the following system command:
/bin/sh /Users/yluo/Development/sumo/collector/countNumberOfWarnings.sh /Users/yluo/Development/sumo/collector/alerts/000000000ABA1879-02-19-12-08-19-5.txt
where
/Users/yluo/Development/sumo/collector/countNumberOfWarnings.sh
is the shell script defined earlier for processing the data, and
/Users/yluo/Development/sumo/collector/alerts/000000000ABA1879-02-19-12-08-19-5.txt
is the output file of the Scheduled Search.
If you run the following query:
_source=ScriptAction_Shell_Script
where
ScriptAction_Shell_Script
is the name of the script action, the output of the script is displayed.
About the search results file
The Sumo Logic file is the result of a scheduled search written in JSON format. It includes the results of the scheduled search, as well as information about the time range of the search. The files are stored in the Collector installation directory. Every three hours the files are purged.
A maximum of 5MB or 1,000 messages are included in the file, except for real time non-aggregate queries which return up to 100 messages. Each message in the search results is marked with the Collector's metadata and a time stamp. At the end of each file you'll find information about the scheduled search:
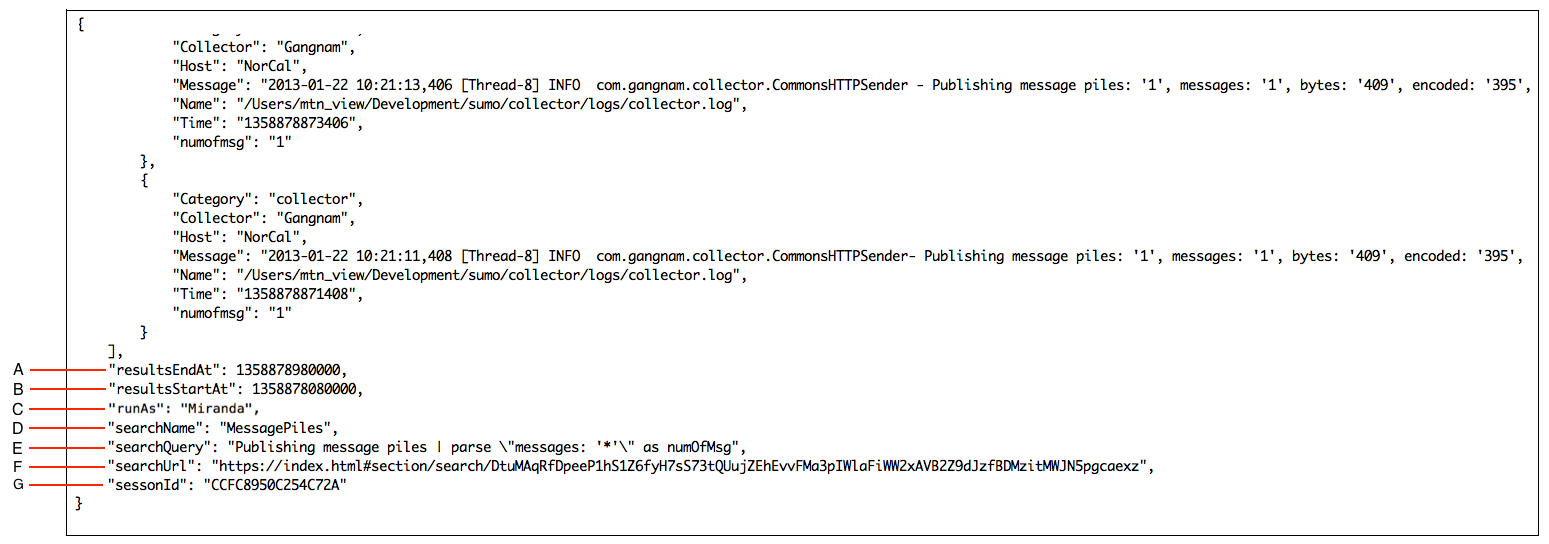
- A - End time of scheduled search (Unix timestamp)
- B - Beginning time of the scheduled search.
- C - User account that ran the search.
- D - Name of the scheduled search (reflects the name saved with the search; can be modified).
- E - Query of the scheduled search.
- F - URL of the search.
- G - Search session's unique identifier.